Polaroid 15” / 19” 4:3 LCD TV User manual
- Category
- LCD TVs
- Type
- User manual
This manual is also suitable for
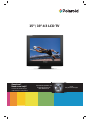
Polaroid 15” / 19” 4:3 LCD TV is a high-quality device that offers a wide range of features and capabilities. With its 4:3 aspect ratio and 8 pages Teletext, it's perfect for watching your favorite shows and movies. The Fasttext and Toptext features make it easy to stay up-to-date on the latest news and information, while the DNR Noise reduction ensures a clear and sharp picture. You can also connect your PC to the TV for a more immersive gaming or movie-watching experience.
Polaroid 15” / 19” 4:3 LCD TV is a high-quality device that offers a wide range of features and capabilities. With its 4:3 aspect ratio and 8 pages Teletext, it's perfect for watching your favorite shows and movies. The Fasttext and Toptext features make it easy to stay up-to-date on the latest news and information, while the DNR Noise reduction ensures a clear and sharp picture. You can also connect your PC to the TV for a more immersive gaming or movie-watching experience.


-
 1
1
-
 2
2
-
 3
3
-
 4
4
-
 5
5
-
 6
6
-
 7
7
-
 8
8
-
 9
9
-
 10
10
-
 11
11
-
 12
12
-
 13
13
-
 14
14
-
 15
15
-
 16
16
-
 17
17
-
 18
18
-
 19
19


Polaroid 15” / 19” 4:3 LCD TV User manual
- Category
- LCD TVs
- Type
- User manual
- This manual is also suitable for
Polaroid 15” / 19” 4:3 LCD TV is a high-quality device that offers a wide range of features and capabilities. With its 4:3 aspect ratio and 8 pages Teletext, it's perfect for watching your favorite shows and movies. The Fasttext and Toptext features make it easy to stay up-to-date on the latest news and information, while the DNR Noise reduction ensures a clear and sharp picture. You can also connect your PC to the TV for a more immersive gaming or movie-watching experience.
Ask a question and I''ll find the answer in the document
Finding information in a document is now easier with AI
Related papers
-
Polaroid TLU-41913B Owner's manual
-
Polaroid HD-READY 16:9 LCD TV User manual
-
-
Polaroid 37" User manual
-
-
-
-
-
Polaroid I0316 User manual
-
Other documents
-
Samsung 730MP User manual
-
Pyle PLVWR84IR User manual
-
-
Radio Shack PLVWR84IR User manual
-
-
Haier HT-2180 User manual
-
 PYLE Audio PYLE View Series PLH9SP User manual
-
Toshiba 15VL63c User manual
-
Haier 29T9B Operating Instructions Manual
-
Beko 40WLU550FHID User manual
