One-year limited warranty
Visit www.dynexproducts.com for details.
Need additional help?
See your User Guide! This comprehensive guide
includes everything from basic how-to steps to
more advanced features. Go to
www.dynexproducts.com, then click Support &
Service. Enter your model number in the Search
eld, then press Enter. Click Support/Downloads.
We’re here for you
www.dynexproducts.com
For customer service, call:
800-305-2204 (U.S./Canada markets)
Distributed by Best Buy Purchasing, LLC
7601 Penn Avenue South, Richeld, MN USA 55423-3645
© 2011 BBY Solutions, Inc., All Rights Reserved.
DYNEX is a trademark of BBY Solutions, Inc. Registered in some
countries. All other products and brand names are trademarks of
their respective owners.
ENGLISH 11-0938
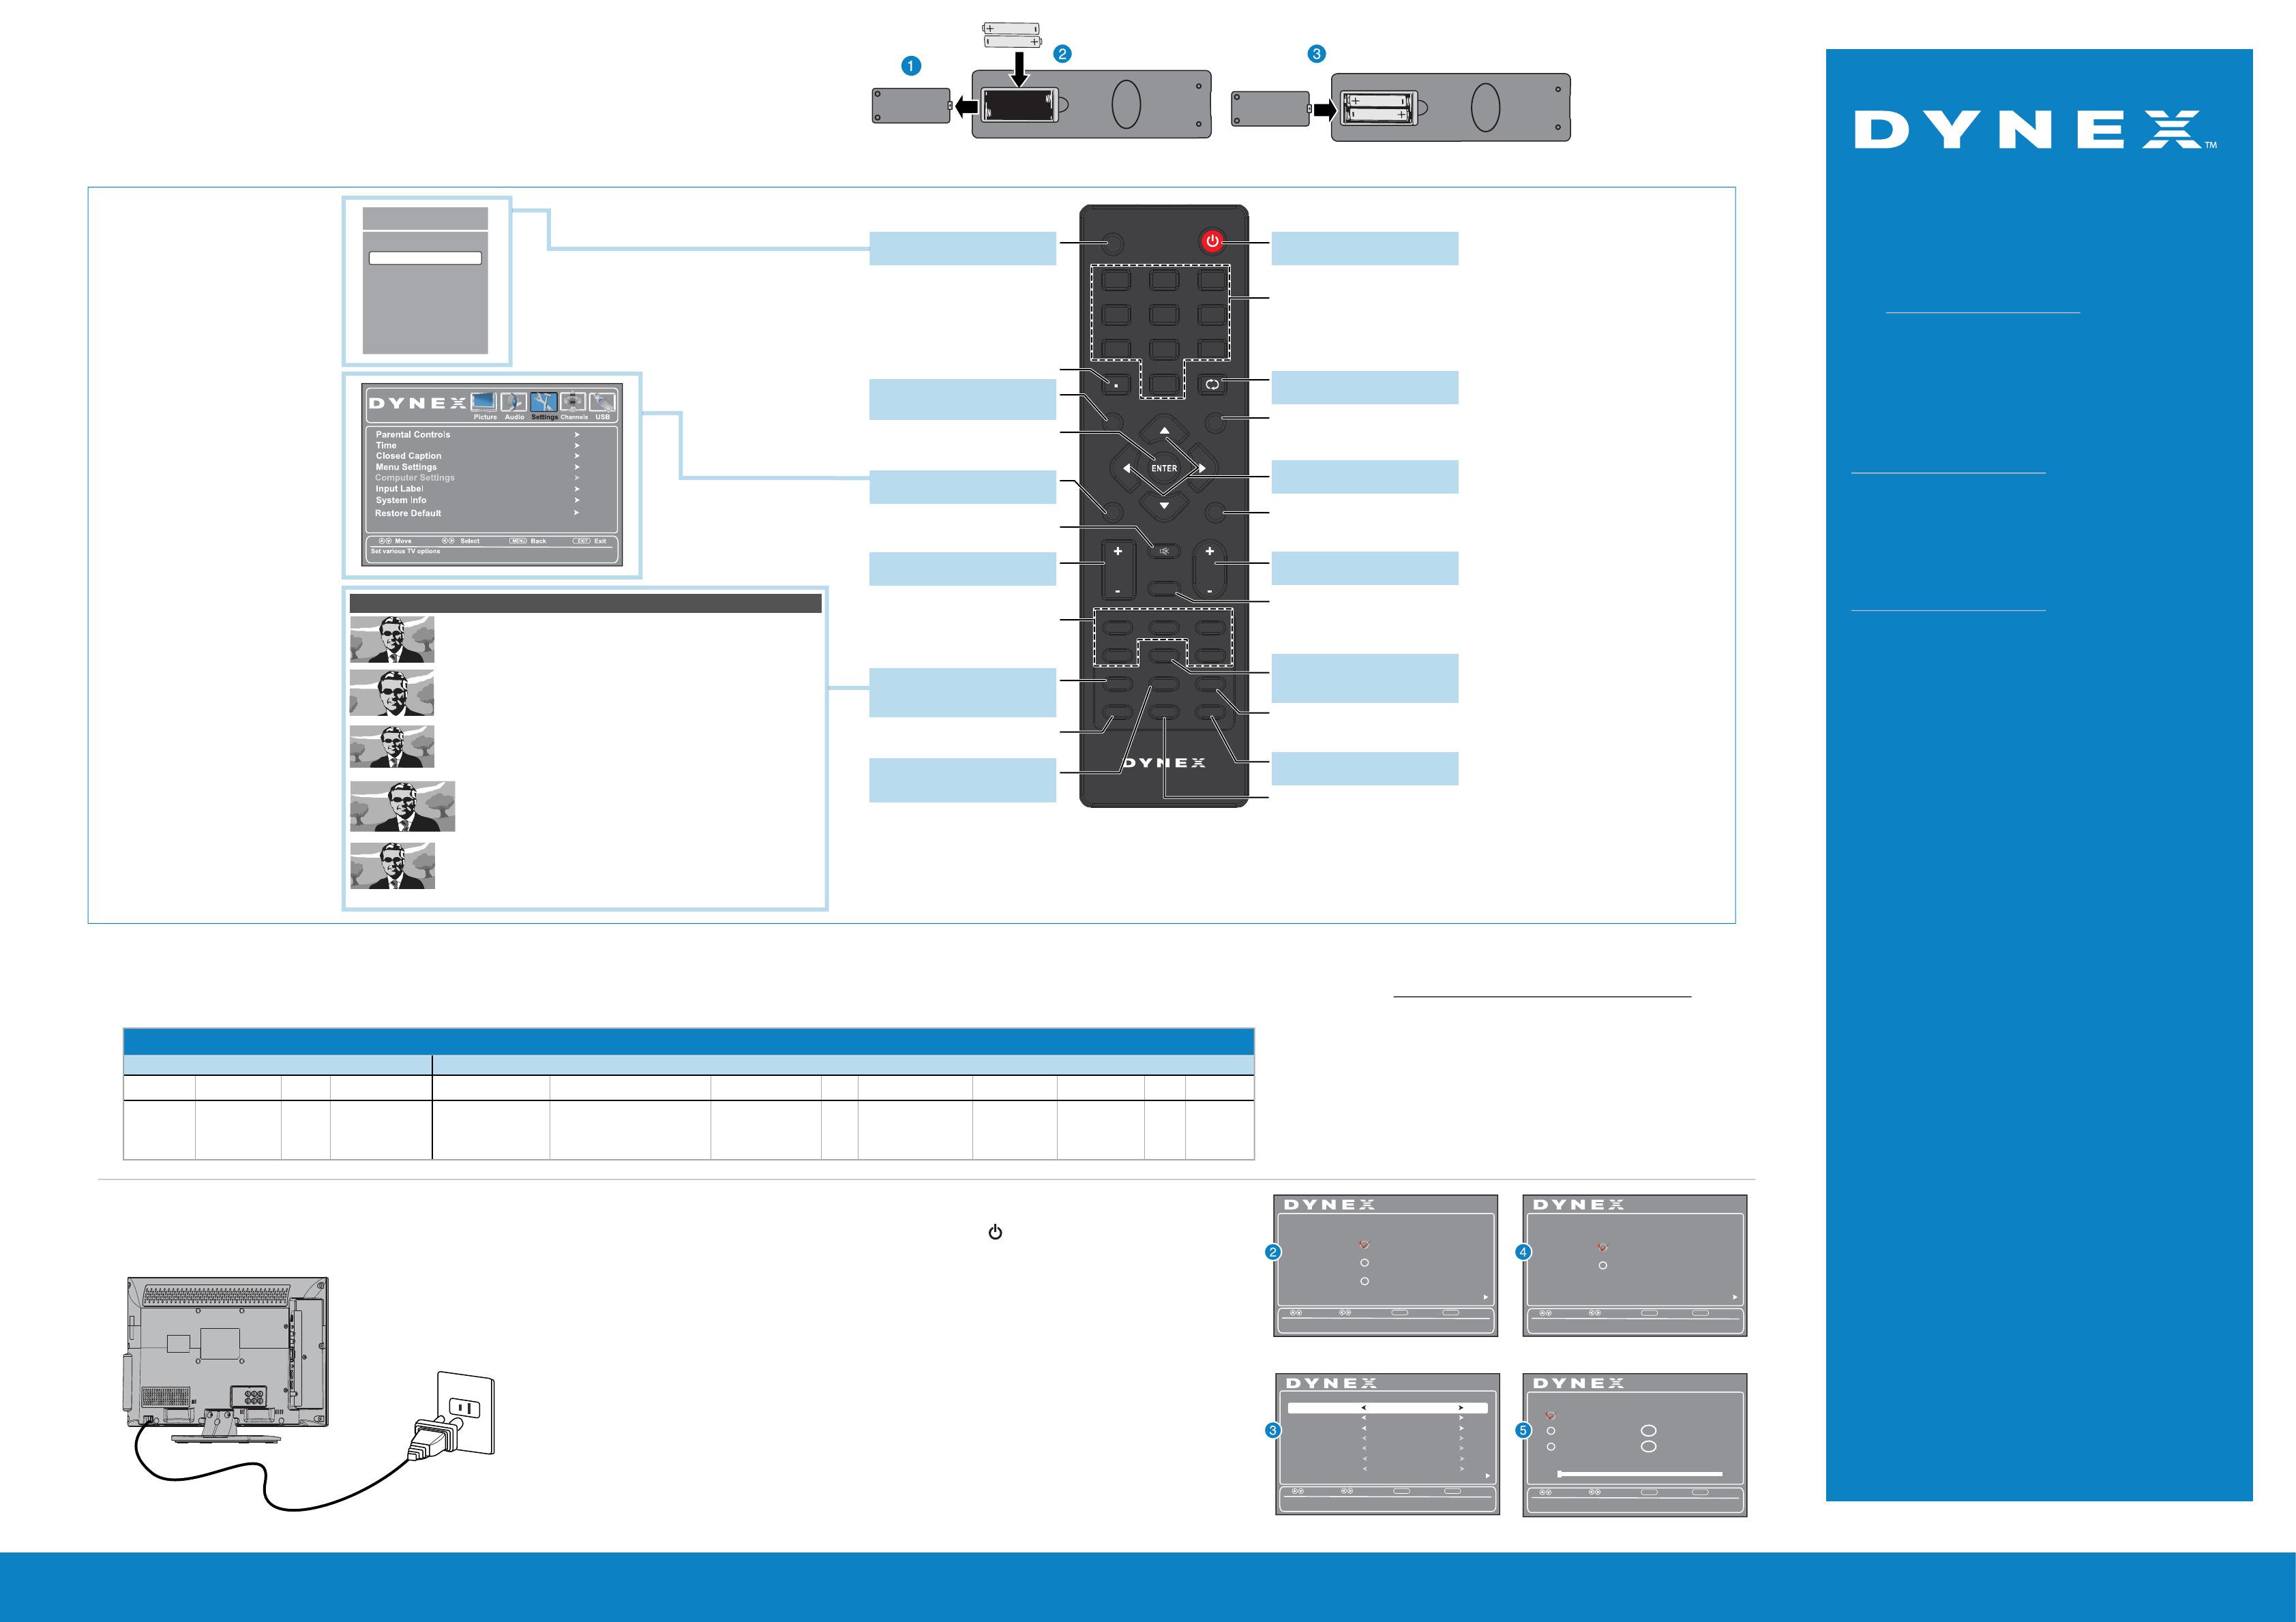
INFO
MENU
MUTE
GUIDE
RECALL
EXIT
INPUT
POWER
VOL CH
ZOOM
COMP
HDMI
SLEEP
MTS/SAP
AUDIO
TV
CH-LIST
VGA
FAVORITE
1
7
4
2
8
5
0
3
9
6
VIDEO
PICTURE
CCD
Turning on your TV for the rst time
1 Connect the power cord to a power outlet, then press (power). The Choose Your Menu
Language screen opens.
2 Press ▲ or ▼ to highlight a language, then press ENTER. The Choose Your Time Setting screen
opens with Mode highlighted.
3 Press ◄ or ► to select Auto or Manual. If you select Auto, the date and time are set
automatically from a digital TV signal. If you select Manual, you can manually set the date and
time. Press ENTER. The Choose Your Picture Mode screen opens.
4 Press ▲ or ▼ to highlight Home Mode or Retail Mode, then press ENTER. If you select Retail
Mode, a message asks you to conrm your selection. Select Yes or No. Retail Mode is not an
energy-saving mode. The Choose Your TV Source screen opens.
5 Press ▲ or ▼ to highlight Antenna, Cable, or Cable/Satellite box. If you select Antenna or
Cable, your TV scans for available channels. The scan may take several minutes. If you select
Cable/Satellite box, your TV does not scan for channels.
6 To watch TV, press INPUT, then press ▲ or ▼ to select the video input source for your TV signal.
For example, select HDMI if your TV is connected to a cable/satellite box using an HDMI cable or
select TV if your TV is connected to an antenna or cable/satellite using a coaxial cable.
Setting up and using your remote control
1 Press the release button on the back of the remote to remove the battery compartment cover.
2 Insert two AAA batteries into the battery compartment. Make sure that the + and – symbols on
the batteries match the + and – symbols in the battery compartment.
3 Replace the cover.
Connecting power
Plug the AC power cord into a power outlet.
Programming your remote control
To program your universal remote control to work with your new Dynex TV, see the table for common codes. If you have problems programming your remote or need a dierent remote control code, visit http://www.dynexproducts.com/remotecodes
for the latest remote control code information.
19" LEDLCD TV I QUICK SETUP GUIDE I DX19E220A12
Normal:
Displays the original 4:3 aspect ratio with black bars vertical on the left and
right hand side of the screen. If the original aspect ratio is 16:9, then the
image displays in 16:9.
Zoom:
Expands the image to ll the screen. The top and bottom of the image may
be cropped.
Wide:
Use this option to view content recorded in a 16:9 (wide-screen) aspect
ratio.
Cinema:
Stretches the image at the edges, but keeps a clear image in the center.
Auto:
Automatically adjusts the image based on the screen size and the TV
program. Note: Auto is only available when Auto Zoom in the Channels
menu is set to On.
Aspect ratio options
CCD
Turns closed captioning on or o.
MTS/SAP
Cycles through mono, stereo, and
secondary audio for analog programs.
SLEEP
Sets the sleep timer.
ZOOM
Changes how the picture displays
on the screen.
Channel
Changes the TV channels.
EXIT
Closes the on-screen menu.
INFO
Opens a TV status banner.
RECALL
Returns to the previous channel.
Input
Opens the Input Source list.
GUIDE
Displays the program guide.
MUTE
Mutes the sound.
PICTURE
Selects the picture modes.
Quick Launch Inputs
Selects another source
connected to your TV.
CH-LIST
Opens the channel list.
Power
Turns your TV on or o.
ENTER
Conrms selections or changes.
MENU
Opens the on-screen menu.
Volume
Changes the volume.
Arrows
Navigates in on-screen menus.
.
Enter a digital sub-channel number.
(Example: 4.1)
Numbers
Enter channel numbers.
FAVORITE
Opens the Favorite Channel List.
AUDIO
Selects the audio modes.
Setup Wizard
Select
Move
EXIT
Exit
Next
English
Fran aisç
Español
Choose Your Menu Language
MENU
Back
Set menu language to English, Fran ais, or Español. ç
Setup Wizard
Next
Choose Your Time Setting
DST
Off
Auto
Time Zone
Pacific
Year
Month
2011
July
Day
Time
15
09 : 05 AM
Select
Move
EXIT
Exit
MENU
Back
If Automatic, options are automatically set by TV source.
Mode
Setup Wizard
Next
Home Mode
Retail Mode
Choose Your Picture Mode
Select
Move
EXIT
Exit
MENU
Back
Reduces total power consumption.
Setup Wizard
Choose Your TV Source
Analog Channels
Digital Channels
0
0
Antenna
Cable
Cable/Satellite Box
RF CH : 0
Scan for channels
Select
Move
EXIT
Exit
MENU
Back
Select Antenna if using an antenna for standard or HD TV.
Verizon
0198, 0490
Universal remote controls Cable/Satellite/Set-top box
Universal remote TV codes
TiVo
0091
Time WarnerDish Network
720
Cox
1326,
1463
DirectTV
10171, 11204, 11326,
11517, 11564, 11641,
11963, 12002
ComcastCharterCablevision
068, 069, 078, 096,
100, 164, 168, 229, 026
Sony
068, 069, 078, 096,
100, 164, 168, 229,
026
One for All
0054
RCA
135
Philips
0198, 0490
400, 450, 461,
456, 10463,
1463, 0463
10171, 11204, 11326,
11463, 11517, 11641,
11780, 11785, 11892,
11963, 12002
2002, 1204, 1423, 1517, 0171,
1963, 0463, 1463, 0842, 1326,
167, 415, 424, 450, 456, 461,
507, 523, 567, 577, 586
Power outlet
Back of TV
Power cord
TV
Component
VGA
USB
INPUT SOURCE
AV
HDMI

