
Dishwasher
user manual
imagine the possibilities
Thank you for purchasing this Samsung product.
To receive more complete service, please
register your product at
www.samsung.com/global/register
DMS300TR
DMS301TR
DMS400TR
DMS500TR
D146
AAA Class
UserManual-DMS400TR_EN.indd 1 5/11/2010 2:40:06 PM

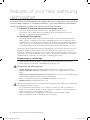
2_ features of your new samsung dishwasher
features of your new samsung
dishwasher
Your new Samsung Dishwasher will change the way you feel about doing dishes.
From its large capacity to its energy efficiency, your new Samsung dishwasher
has all the features to make your chores much less mundane.
1. Powerful 3 washing spray arms spraying 6 ways
Your Samsung dishwasher has 3 spray arms - top, upper, and lower arms.
All 3 of the 2-way washing spray arms powerfully spray cleaning water in a total of 6
directions to improve the washing performance.
2. Quadruple filter system
The quadruple filter system and the food filtration device crushes food remains from the
dishes, glasses, cooking pots and cutlery inside the dishwasher into small particles. Since
food remains are crushed by stainless blades, then filtrated, collected and picked out by the
draining cycle, you do not need to worry about any food remains inside bowls and dishes.
Your Samsung dishwasher has the best filtration performance of dishwashers in its class.
This manual contains important information regarding the use and care of your new Samsung
dishwasher. Refer to it for descriptions of the control panel, instructions on how to use the
dishwasher, and tips for making the most of its state-of-the-art features and technologies. The
cycle chart in the “Program overview” section offers an overview of the different cycles and the
“Troubleshooting” section tells you what to do if something goes wrong.
Condensing dry technology
• Saves energy by drying the dishes using the remaining heat after the last rinse cycle.
• Clean and safe. No hot steam is emitted during the drying cycle.
Do not wash the following items
• Acrylic, Aluminum: Dishes with printed gold rim decoration may become discolored.
• Dishes treated with adhesive: Treated plastics, wood, ivory, copper and tin may come
loose.
• Plastics with a temperature tolerance less than 90 °C : Thin plastics wash and dry poorly,
and may be damaged due to elevated wash temperatures.
• Tin: Tin should be washed by hand and dried immediately as it may rust.
• Wooden utensils: Wooden items may crack.
When using the dishwasher, try to arrange the dishes properly as described in the “Loading the
top and bottom baskets” section.
• You should remove food remains such as bones, fruit seeds, etc. and any other kind of
waste such as toothpicks, paper, etc. from the dishes as these may cause damage to the
dishes, create noise, or even a product malfunction.
• Select the appropriate cycle depending on the level of soil and the type of dishes.
• Use only the proper amount of detergent and rinsing agent.
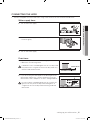
WARNING
WARNING
UserManual-DMS400TR_EN.indd 2 5/11/2010 2:40:06 PM

safety information _3
safety information
Throughout this manual, you’ll see Warning and Caution notes. These
important safety instructions do not cover all possible situations that might
occur. It is your responsibility to use and caution when installing, maintaining,
and operating your dishwasher. Samsung will not be liable for damages resulting
from improper use.
IMPORTANT SAFETY INSTRUCTIONS
What the icons and signs in this user manual mean :
WARNING
Hazards or unsafe practices that may result in severe personal injury or
death.
CAUTION
Hazards or unsafe practices that may result in personal injury or property
damage.
CAUTION
To reduce the risk of fire, explosion, electric shock, or personal injury when
using your dishwasher, follow these basic safety precautions:
Do NOT attempt.
Do NOT disassemble.
Do NOT touch.
Follow directions explicity.
Unplug the power plug from the wall socket.
Make sure the machine is grounded to prevent electric shock.
Call the service center for help.
WARNING - When using the dishwasher, follow basic precautions, including the
following:
Read all instructions before using the dishwasher.
As with any equipment using electricity, water and moving parts, potential hazards exist.
To safely operate this appliance, familiarize yourself with its operations and exercise care
when using it.
Install and level your dishwasher on an uncarpeted floor that can support its weight.
Your dishwasher must be properly grounded. Never connect it to an ungrounded outlet.
See the “Meeting installation requirements” section for more information on grounding your
dishwasher.
Use the dishwasher only for its intended function.
SAVE THESE INSTRUCTIONS
UserManual-DMS400TR_EN.indd 3 5/11/2010 2:40:06 PM

4_ safety information
Use only detergents or rinse agents recommended for use in a dishwasher, and keep them
out of the reach of children.
After unpacking the dishwasher, keep the packaging out of the reach of children.
Locate sharp items so that they do not damage the door seal.
Knives and other utensils with sharp points must be loaded in the basket with their points
facing downwards or placed in a horizontal position.
Do not wash plastic items unless they are marked “dishwasher safe” or the equivalent
thereof.
For plastic items that are not marked in this way, check the manufacturer’s
recommendations.
Do not operate the dishwasher unless all enclosure panels are properly in place.
Do not tamper with the controls.
Do not abuse, sit, or stand on the door, lid, or dish baskets of the dishwasher.
Do not put pressure on the door when it is open as this may damage the dishwasher or
result in injury.
Take care when opening the door, as hot water may splash onto your hand.
Do not install this dishwasher under the power outlet or place the extension cord on the
dishwasher.
Do not expose the unit to rain or moisture.
Do not expose the dishwasher to direct sunlight.
To reduce the risk of injury, do not allow children to play in or on the dishwasher.
To reduce the risk of fire or explosion:
- Under certain conditions, hydrogen gas may be produced in a hot water system that
has not been used for two weeks or more. HYDROGEN GAS IS EXPLOSIVE. If the hot
water system has not been used for such a period, before using the dishwasher turn
on all hot water faucets and let the water flow from each for several minutes. This will
release any accumulated hydrogen gas. As the gas is flammable, do not smoke or use
an open flame during this time.
Disconnect the power cord (or disconnect the circuit breaker) before servicing your
dishwasher.
Do not allow children to play in or on the dishwasher. They may harm themselves or
damage the dishwasher.
Do not repair, replace, or service any part of your dishwasher yourself. Disassembly, repairs
and modifications are permitted by authorized service technicians only. Work done by an
unauthorized person may void your warranty.
Before disposing of your dishwasher, remove the door of the washing compartment or the
door latch so that children or small animals do not get trapped inside.
Do not add any solvents into the dishwasher as this may result in an explosion.
Do not use industrial detergent.
Do not add dishwashing detergent into the rinse compartment.
safety information
SAVE THESE INSTRUCTIONS
UserManual-DMS400TR_EN.indd 4 5/11/2010 2:40:06 PM

safety information _5
In particular, keep the detergent dispenser dry when using the delay start function as it may
become clogged up.
The dishwasher is extremely heavy. Do not attempt to move or carry the dishwasher by
yourself. Two or more people are needed to move a dishwasher and avoid potential injuries.
If the power cord or plug is damaged, do not repair it yourself. Call a qualified person from
the manufacturer or service company.
This appliance is not intended for use by young children or infirm persons unless they
have been adequately supervised by a responsible person to ensure that they can use the
appliance safely. Young children should be supervised to ensure that they do not play with
the appliance.
Check the power supply, the water supply connection, and operate the product to check
for malfunctions and water leaks when operating the installed product.
The appliance door should always be closed as this could allow people to walk into it.
This appliance is intended for domestic use, but can be used in similar locations such as:
- staff kitchen areas in shops, offices and other working environments;
- farm houses;
- by clients in hotels, motels and other residential type environments;
- bed and breakfast type environments.
The power plug must be accessible after the installation.
After the dishwasher is installed, check that the drain hose is properly connected and
that there is no leakage from the hose connectors. If the drain hose is loose, it may cause
property damage.
The water supply hose is susceptible to breakage. As time goes by, it becomes less
flexible. Check the line periodically. If it is swollen, torn, cut or there is a water leak, replace
it immediately.
Do not put gasoline, solvents, or other flammable materials inside the dishwasher. Do not
wash dishes exposed to these materials.
Keep your dishwasher detergent out of the reach of children. Detergent has an adverse
effect on human organs. It contains elements for polishing and is corrosive. Avoid letting the
detergent come into contact with your skin and eyes.
Do not install the dishwasher near electrical components. Keep the dishwasher away from
open flames.
If the dishwasher is left unused for an extended period of time, turn off the water supply.
This dishwasher is intended for residential use only.
SAVE THESE INSTRUCTIONS
UserManual-DMS400TR_EN.indd 5 5/11/2010 2:40:06 PM

6_ safety information
SAVE THESE INSTRUCTIONS
Child care
- To ensure your children’s safety, use the Child Lock function while using this appliance.
For detailed information about the Child Lock function, refer to the description about the
Child Lock button in the “Control panel” section.
- Do not allow children to play with or operate the appliance.
- Keep children away from detergents and rinse aid. These may result in asphyxiation or
chemical burns to the mouth, throat or eyes.
- Keep children away from the open dishwasher. The water in the rinsing compartment is
not drinking water and could contain detergent residue.
- If the appliance is installed at eye-level, ensure that children are not caught or crushed
between the appliance door and the cupboard door when opening and closing the
door.
MEETING INSTALLATION REQUIREMENTS
Electrical supply and grounding
To prevent unnecessary risk of fire, electrical shock, or personal injury, all wiring must be
grounded. It is the personal responsibility of the appliance owner to provide adequate electrical
service for this appliance.
Never use an extension cord.
When preparing for installation, ensure that your power supply offers:
• An individual circuit serving only your dishwasher
Your dishwasher must be grounded. If your dishwasher malfunctions or breaks down, grounding
will reduce the risk of electric shock by providing a path of least resistance for the electric
current.
Never connect the ground wire to plastic plumbing lines, gas lines, or hot water pipes.
Water supply
Your dishwasher will fill properly when your water pressure is 0.05 ~ 0.8 MPa. Water pressure
less than 0.05 MPa may result in a water supply valve failure, which does not allow the water
supply valve to shut off completely. Alternatively, it may take the dishwasher longer to fill than
allowed by the controls, resulting in the dishwasher turning off. (A filling time limit, designed to
prevent overflowing/flooding if an internal line becomes loose, has been built into the controls.)
• Ensuring that water faucets are easily accessible.
• Turning off faucets when the dishwasher is not in use.
• Periodically checking for leaks on the water supply hose fittings.
Before using your dishwasher for the first time, check all connections on the water supply valves
and faucets for leaks.
safety information
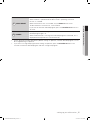
CAUTION
WARNING
WARNING
UserManual-DMS400TR_EN.indd 6 5/11/2010 2:40:06 PM

safety information _7
SAVE THESE INSTRUCTIONS
Flooring
For best performance, your dishwasher must be installed on a solidly constructed floor.
Never install your dishwasher on a platform or poorly supported structure.
Your dishwasher must be properly installed in accordance with the Installation Guide before it is used. If you
did not receive an Installation Guide with your dishwasher, you can receive one by visiting our website at
www.samsung.com.
BEFORE USING YOUR DISHWASHER
WARNING
Tipping-Over Hazard
- Do not use the dishwasher until it is correctly installed.
- Do not push down on an open door.
- Do not place excessive weight on the open door.
- Do not connect the power cord before it is fully installed.
Electric Shock Hazard
Failure to follow these instructions can result in death, fire or electric shock:
- Electrically ground the dishwasher
- Do not use an extension cord.
- Do not install the dishwasher in front of the power outlet.
When the power cord needs to be replaced, please call a Samsung Service technician.
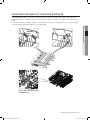
CONNECTING THE AQUA STOP (MODELS: DMS400TR/DMS500TR/D146)
WARNING
The aqua stop must not be bent, crushed or entangled when being connected.
Connect the threaded hose fitting on the aqua stop to a tap with an external thread (3/4
inches).
The aqua stop is fitted with either a plastic or a metal nut:
- Tighten the nut by hand only.
Then perform a visual check for any water leaks (Make sure that the tap is not dripping).
NORMAL USE
WARNING
The aqua stop is an electrical part.
Therefore, do not damage the aqua stop or cut off the hose of the aqua stop.
If the aqua stop is damaged, immediately pull out the power plug to turn off the power.
WARNING
WARNING
WARNING
Aqua stop
3/4˝
UserManual-DMS400TR_EN.indd 7 5/11/2010 2:40:07 PM

8_ contents
contents
SETTING UP YOUR DISHWASHER
9
9 Unpacking your dishwasher
9 Checking parts
10 Adjusting the level
10 Freestanding type installation
12 Freestanding built-in type installation
14 Power source
15 Connecting the hose
16 Control panel
18 Program selector
18 Display
USING YOUR DISHWASHER
19
19 Salt container setting
21 Adjusting the angle of the plate supports
22 Adjusting the height of the top basket
23 Handling the top and bottom basket
23 Loading the top and bottom baskets
24 Using the cutlery basket
25 Using the detergent & rinse aid dispenser
PROGRAMS
27
27 Program overview
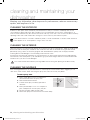
CLEANING AND MAINTAINING YOUR
DISHWASHER
28
28 Cleaning the exterior
28 Cleaning the interior
28 Cleaning the nozzles
29 Cleaning the filter
29 Storing your dishwasher
TROUBLESHOOTING
30
30 Check these points if your dishwasher…
32 Information codes
APPENDIX
33
33 Detailed part names and images
34 Helping the environment
34 Specifications
35 Notice about recycling
35 Declaration of conformity
UserManual-DMS400TR_EN.indd 8 5/11/2010 2:40:07 PM

setting up your dishwasher _9
setting up your dishwasher
Be sure to have your installer follow these instructions closely so that your new
dishwasher works properly and that you’re not at risk of injury when washing
dishes.
UNPACKING YOUR DISHWASHER
• Once your new dishwasher has been delivered to you, carefully unpack it and check for any damage.
If the dishwasher has been damaged, make note of it on the waybill and keep a copy. Do not install the
dishwasher, and call your Samsung Service Centre referring to the back of the cover.
• If there is no damage to the product, you can proceed with the installation. If you are going to install it
yourself, make sure to read through the installation guide and follow the directions inside.
• After unpacking your dishwasher, keep the packaging out of the reach of children to ensure their safety.
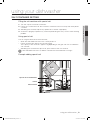
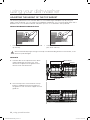
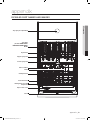
CHECKING PARTS (Refer to the “Detailed part names and images” section)
When your dishwasher has been unpacked, make sure you’ve received all the parts shown below.
If your dishwasher was damaged during shipping, or if you do not have all the parts, contact Samsung
Service Centre referring to the back of the cover.
01 setting up your dishwasher
Door handle
Display
Control panel
Drain hose
Aqua stop
(models: DMS400TR/
DMS500TR/D146)
Power cord
Water supply
hose
Top basket
Upper spray arm
Top spray arm (Invisible)
Lower spray arm
Cutlery basket
Salt container
Bottom basket
Filter
Detergent & rinse aid dispensers
Vapor vent cover
Latch
Top Shelf
(models: DMS301TR/
DMS400TR/DMS500TR/
D146)
UserManual-DMS400TR_EN.indd 9 5/11/2010 2:40:12 PM

10_ setting up your dishwasher
setting up your dishwasher
ADJUSTING THE LEVEL
Unfasten the adjusting nuts of the legs.
Rotate the legs to adjust the height.
If the ground surface is too uneven, please contact a qualified
service technician.
FREESTANDING TYPE INSTALLATION
1. Connect the power cord after the dishwasher is installed.
2. Do not repair, replace, or fix the part yourself. Disassembling, repairing or modifying the product is
only permitted by an authorized service technician.
3. This dishwasher is intended for domestic use only.
4. Turn off the water supply before installing the dishwasher.
5. Please to read the reference section before installing the dishwasher.
Tools
Electric Screwdriver Adjustable wrench
Accessories
a. Pinthfacia Lower Rubber (Protective panel)
1 pcs (598 x 30)
(Model: DMS500TR)
b. PU Foam Tape 1 pcs (600 x 10 x 5)
(Model: DMS500TR)
c. Screws – TRS (4 x 12) 3 pcs d. Cable Clamp 3 pcs e. Cable Tie 2 pcs
Higher
Leveler
Lower
WARNING
UserManual-DMS400TR_EN.indd 10 5/11/2010 2:40:14 PM

setting up your dishwasher _11
01 setting up your dishwasher
0~35mm
87
35
605
598
845
Level
Make sure that the dishwasher is
level using a leveling tool.
Remove the four protective pieces
of rubber.
CAUTION
1
C
B
A
Aqua stop
(models: DMS400TR/
DMS500TR/D146)
A
B
C
2
Make sure that the hoses are not bent when
you insert the dishwasher into its location in
your kitchen unit
.
CAUTION
A: MAXIMUM DRAIN CONNECTION LENGTH 2.9 M
B: MAXIMUM SUPPLY CONNECTION LENGTH 1.5 M
C: MAXIMUM POWER CONNECTION LENGTH 1.6 M
UserManual-DMS400TR_EN.indd 11 5/11/2010 2:40:15 PM

12_ setting up your dishwasher
setting up your dishwasher
FREESTANDING BUILT-IN TYPE INSTALLATION
1
589 mm
Remove the four
protective pieces of
rubber.
Cut the plinthfacia lower rubber (protective panel)
to a width of 589 mm.
Insert part “a”.
a
Cut the rubber (part “a”) to the same height of as the
level of your dishwasher.
UserManual-DMS400TR_EN.indd 12 5/11/2010 2:40:16 PM

setting up your dishwasher _13
01 setting up your dishwasher
2
2
1
Remove the two screws at the
top left and right at the front of the
dishwasher and separate the Top
Bracket.
Reassemble the two screws.
Remove the two screws at the top
left and right at the back of the
dishwasher and separate the Top
Table.
3
815
605
605
600
598
A: MAXIMUM DRAIN CONNECTION LENGTH 2.9 M
B: MAXIMUM SUPPLY CONNECTION LENGTH 1.5 M
C: MAXIMUM POWER CONNECTION LENGTH 1.6 M
Attach the foam tape (part “b”) to the
top of the dishwasher following the
measurements.
Make sure that the hoses are not
bent when you insert the dishwasher
into its location in your kitchen unit
.
CAUTION
b
A
B
C
UserManual-DMS400TR_EN.indd 13 5/11/2010 2:40:16 PM

14_ setting up your dishwasher
setting up your dishwasher
Using the cable clamp
Hoses can be fixed using the Cable Clamp.
Using the cable tie
The power cord can be tied using the Cable Ties.
POWER SOURCE
This product operates on a AC 220 ~ 230 V / 50 Hz power source.
c
d
e
0~35mm
Gap:5mm
Level
•
Make sure that the dishwasher is level using a leveling tool.
• Please make sure to follow the recommended measurements for the
installation.
CAUTION
4
UserManual-DMS400TR_EN.indd 14 5/11/2010 2:40:17 PM

setting up your dishwasher _15
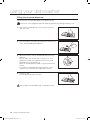
CONNECTING THE HOSE
• Connect the appliance to the water mains using a new set of hoses. Do not reuse the old hoses.
Water supply hose
1. Turn off the water supply.
2. Fasten the water supply hose (or aqua stop) to the inlet
connector tightly.
3. Turn on the water supply.
Drain hose
1. If you use only the drain hose for drainage, place and install
it below 80 cm from the ground.
If the drain hose is installed higher than 80 cm, dirty water
may flow back or a significant amount of dirty water may
remain inside the dishwasher.
2. If you are sharing one drain pipe for the draining both the
dishwasher and the sink, connect the drain hose of the
dishwasher to the Y-adapter as shown in the figure below.
Do not install the Y-adapter higher than 80 cm from the
ground. This may result in dirty water flowing back or
a significant amount of dirty water remaining inside the
dishwasher.
01 setting up your dishwasher
Below 80 cm
WARNING
Y-adapter
Below 80
cm
clamp
saddle
WARNING
UserManual-DMS400TR_EN.indd 15 5/11/2010 2:40:17 PM

16_ setting up your dishwasher
setting up your dishwasher
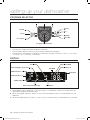
CONTROL PANEL
PROGRAM
SELECTOR
You can select the appropriate wash program depending on the soil level of
your dishes. When a program is selected, the indicator for that program is lit.
DISPLAY
Displays the remaining wash time, the wash information (Delay start, Salt refill,
Rinse refill, Child lock), and error messages.
If an error occurs during an operation, an error message is displayed with a
warning sound. Refer to the information in the “Troubleshooting” section.
Plus+
Use the Plus+ button to add the drying and rinse cycles to the original
course. If the program has already started, this button is deactivated.
1/2
For small loads, only use the top or bottom basket to save energy. Press the
button repeatedly to select the top or bottom basket where you load your
dishware.
STERILIZATION
Press this button to use the sterilization function by increasing the heat by 80
degrees during the final rinse cycle.
This function is only available when selecting the Normal, Pots&Pans, Eco, or
Rinse Dry courses or the 4 in 1 function.
CHILD LOCK
The Child Lock function allows you to lock the buttons so that the wash cycle
you’ve chosen can’t be changed.
If you want to activate or deactivate the Child Lock function, press the
Sterilization button for 3 seconds. All buttons will be locked and “L” will be
displayed when this feature is activated.
4 in 1
If you want to use multi-functional detergent such as “2 in 1”, “3 in 1”, and
“4 in 1” detergent, select a program and then press this button. (The 4 in 1
function is only available when selecting the Normal, Eco, Pots&Pans, Crystal
and Quick programs.)
Though the “Rinse Refill” indicator is lit while the 4 in 1 function is activated,
you do not have to add rinse detergent to the rinse aid dispenser.
DELAY START
Use the Delay Start button to preset the start time. The indicator changes
each time the button is pressed. The delay start time can be adjusted from 1
hour to 24hours.
3
2
1
8
4
5
6
7
1 2 3 4 5 6 7 8 9
10
UserManual-DMS400TR_EN.indd 16 5/11/2010 2:40:18 PM

setting up your dishwasher _17
START/RESET
Press this button to start the selected program.
When the door is opened while the dishwasher is operating, the Pause
function is activated.
When the Pause function is activated, only the Power button works.
To deactivate the Pause function, close the door.
If you want to reset the selected program, press the Start/Reset button for 3
seconds.
POWER
When pressed, all indicator lights turn on and off and the most recently
finished program light is lit.
When the dishwasher is running and a selected program has finished, ‘En’ is
displayed and the power turns off automatically.
• A wash program must be selected only before starting an operation, and the selected program can not
be changed during an operation.
• If you want to change the program after starting an operation, press the Start/Reset button for 3
seconds to reset the selected program and then change the program.
01 setting up your dishwasher
9
10
UserManual-DMS400TR_EN.indd 17 5/11/2010 2:40:18 PM

18_ setting up your dishwasher
PROGRAM SELECTOR
• The indicator changes each time the button is pressed.
• Press the select button to select one of the seven available wash programs.
• By pressing the select button, the program is selected in the order of “Normal → Quick → Pots & Pans
→ Crystal → Eco → Prewash → Rinse Dry”.
DISPLAY
1. When additional rinse and drying cycles, Half Load, 4 in 1, Sterilization, Child Lock or Delay Start are
selected, the respective indicators are lit.
2. When “Rinse Refill” remains lit, there is no rinse aid in the dispenser and you should refill the rinse aid
dispenser.
3. When “Salt Refill” remains lit, there is no salt in the salt container and you should refill the salt container.
setting up your dishwasher
Half load (Upper spray arm)
4 in 1
Additional Rinse +2
Additional Rinse +1
Additional Dry
Half load (Lower spray arm)
Salt Refill
Delay Start
Rinse Refill
Sterilization
Child Lock
Normal
Quick
Program selection button
Pots & Pans
Prewash
Crystal
Rinse Dry
Eco.
DryingWashing Rinsing
UserManual-DMS400TR_EN.indd 18 5/11/2010 2:40:18 PM

using your dishwasher _19
using your dishwasher
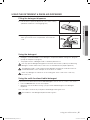
SALT CONTAINER SETTING
Filling the salt container with special salt
1. Turn the cap anti-clockwise to remove it.
2. Fill the salt container with salt. Use a funnel or similar mechanism to easily and cleanly fill the
container.
3. After filling the container, wipe off any spilled salt to seal the cap properly.
4. Screw the cap tightly to prevent any suds from penetrating that may cause a water softening
problem.
Using special salt
Prior to using the dishwasher for the first time;
- When the “Salt Refill” indicator on the control panel is lit
- Fill the container with special salt using the funnel:
The capacity of the container is approx. 1kg depending on the grain size. Do not overfill the
salt container.
- After filling the container with special salt, pour water into the salt container.
If the “Salt Refill” indicator is lit, refill the salt within the next three times of using it.
Example adding special salt
02 using your dishwasher
Salt Container
Special salt for dishwashers
Funnel
Salt
UserManual-DMS400TR_EN.indd 19 5/11/2010 2:40:19 PM

20_ using your dishwasher
Using the salt container
• Yourdishwasherisequippedwithanadjustablewatersofteningsystem.
To avoid scale deposits on the dishes and in the dishwasher, the dishes should be washed
with soft water, i.e. water with a low lime content.
The salt container should be adjusted according to the hardness of the water in your area.
Your local Water Authority can advise you on the hardness of the water in your area.
• Ifyouwanttochangethewatersofteninglevel,youshouldsetitmanuallyasfollows:
1. Press the Power button. (The dishwasher should turn off.)
2. Press the buttons sequentially. (At this time a button sound is heard.)
1) Press the 1/2 button for three seconds.
2) Press the Sterilization button.
3. To change the salt container level, press the 1/2 button.
(To select the new level, refer to the chart.)
We recommend that customers set the salt container when the dishwasher is initially
installed by a technician.
Filling the salt container with special salt
• Use only special salt for dishwashers. Do not fill the salt container with any another type of
salt or dishwasher detergent as this would irreparably damage the salt container.
• If you are not going to wash your dishes immediately, you should run the Prewash program.
This will clean any salt that has run out of the container and any salt that has been spilt.
• Depending on the size of the salt grains, it can take several hours for the salt to dissolve in
the water and the special salt indicator to turn off.
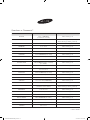
Adjusting the salt container system
• Adjust the salt container according to the water hardness level of your area. The salt
container has 6 settings (refer to the table below).
No. indicated on the
multi-display
Water hardness
Water soft cycle /
Dishwashing cycle
Uses Salt
ºdH ºTH mmol/l Range
1 29-70 51-125 5.1-12.5 VI 1/1 Yes
2 19-28 33-50 3.3-5.0 III / VI 1/2 Yes
3 15-18 26-32 2.6-3.2 III 1/3 Yes
4 11-14 19-25 1.9-2.5 II 1/4 Yes
5 4-10 7-18 0.7-1.8 I/II 1/5 Yes
0 < 4 < 7 < 0.7 I No salt No
1) The salt container is pre-set to “3” in the factory.
2) The water hardness is measured using international units, German degrees (°dH), French
degrees (°TH) and mmol/l(International unit for the hardness of water)
using your dishwasher
UserManual-DMS400TR_EN.indd 20 5/11/2010 2:40:19 PM
Page is loading ...
Page is loading ...
Page is loading ...
Page is loading ...
Page is loading ...
Page is loading ...
Page is loading ...
Page is loading ...
Page is loading ...
Page is loading ...
Page is loading ...
Page is loading ...
Page is loading ...
Page is loading ...
Page is loading ...
Page is loading ...
-
 1
1
-
 2
2
-
 3
3
-
 4
4
-
 5
5
-
 6
6
-
 7
7
-
 8
8
-
 9
9
-
 10
10
-
 11
11
-
 12
12
-
 13
13
-
 14
14
-
 15
15
-
 16
16
-
 17
17
-
 18
18
-
 19
19
-
 20
20
-
 21
21
-
 22
22
-
 23
23
-
 24
24
-
 25
25
-
 26
26
-
 27
27
-
 28
28
-
 29
29
-
 30
30
-
 31
31
-
 32
32
-
 33
33
-
 34
34
-
 35
35
-
 36
36


Samsung DMS301TRS User manual
- Category
- Dishwashers
- Type
- User manual
Ask a question and I''ll find the answer in the document
Finding information in a document is now easier with AI
Related papers
Other documents
-
 Lumina MDW0380 User manual
-
 QUANTUM STORAGE SYSTEMS QP245450VS-5 User guide
-
Easylife Foldable Sterilization Wand Operating instructions
-
Siemens SF25T554EU Owner's manual
-
Siemens SE24N860EU/36 User manual
-
Siemens Dishwasher User manual
-
-
-
Bosch SGS46A92EU/45 User manual
-

