Clarion VDH9300 User manual

Category
Audio equalizers
Type
User manual

This manual is also suitable for

EQS744
2
INTRODUCTION
INTRODUCTION
The Clarion EQS744 is a full-featured seven-band stereo equalizer specifically
designed for the mobile environment. Although it is housed in a one-half DIN
enclosure, the EQS744 provides a number of exceptional features in its compact
size, such as:
Seven equalization bands (at 50Hz, 125Hz, 315Hz, 750Hz, 2.2kHz,
6kHz, 16kHz), adjustable from -12dB to +12dB.
Low-pass crossover filter with selectable frequency control 60Hz or 90Hz.
Three stereo RCA outputs to drive front, rear and subwoofer audio
systems.
Auxiliary stereo RCA inputs with adjustable gain control.
Separate controls for master system volume, subwoofer volume, front/rear
fader and selection of main or auxiliary inputs.
For optimum performance, the EQS744 should be installed by an authorized
Clarion dealer.
ABOUT THE MANUAL
AND WARRANTY
To start enjoying your new Clarion EQS744, please read the instructions listed in
this manual. Please read your warranty card and save your sale receipt.
Because these items are essential for warranty service.
T
ABLE OF CONTENTS
Description . . . . . . . . . . . . . . . . . . . . . . . . . .2
Control Glossary . . . . . . . . . . . . . . . . . . . . .3
Applications . . . . . . . . . . . . . . . . . . . . . . . . .4
Mounting Precautions . . . . . . . . . . . . . . . . .4
Wiring Precautions . . . . . . . . . . . . . . . . . . .5
System Set-up . . . . . . . . . . . . . . . . . . . . . . .6
Auxiliary Input . . . . . . . . . . . . . . . . . . . . . . .6
Troubleshooting . . . . . . . . . . . . . . . . . . . . . .7
Product Specs . . . . . . . . . . . . . . . . . . . . . . . .7
DESCRIPTION
The Clarion EQS744 is a seven-band stereo equalizer. Each frequency band is indi-
vidually adjustable to meet individual listening preferences.
The EQS744 also features a subwoofer crossover, subwoofer level control and a
master system volume control. The subwoofer output makes use of a built-in 18dB
per octave electronic crossover that is fixed at 60Hz or 90Hz.
The EQS744 has the built-in an auxiliary input that allows use with portable
devices (such as MP3 player) or a video system.
Owner’s Manual
3
CONTROL GLOSSARY
1. Sub level
2. Volume control
3. AUX switch
4. Fader control
5. 50Hz adjustment
6. 125Hz adjustment
7. 315Hz adjustment
8. 750Hz adjustment
9. 2.2kHz adjustment
10. 6 kHz adjustment
11. 16kHz adjustment
12. Power plug
13. Front output
14. Rear output
15. Main input
16. AUX input
17. Sub output
18. AUX gain control
19. Low-pass frequency 60/90Hz
CONTROL GLOSSARY
Volume control - This is the master volume control for the system.
Fader control - This is used to balance the sound between the front and rear
speakers.
AUX switch - This allows you to select between the main input and an auxiliary
source.
Equalizer band frequency adjustment - This adjustment allows you to adjust
the frequency for each of the seven frequency band.
1
12
13
2 3 4 5 6 7 8 9 10
19
18
11
14 15 16 17
EQS744
4
APPLICATIONS
Low-pass frequency switch - This allows the subwoofer crossover to be set at
60Hz or 90Hz.
Subwoofer level control - This is the volume control for the subwoofer. The sub
woofer level control allows you to adjust the subwoofer volume at any time to
match any listening preference.
AUX gain controls - These controls allow individual left and right input gain
adjustment for the auxiliary input.
APPLICA
TIONS
The system diagram below will help you plan your own installation.
Source Unit
Aux. Source
BATTERY
+
-
Remote Turn-on
Front Amp/Rear Amp Sub Amp
Chasis Groung
(Bare Metal)
C
A
SS
E
TT
E
IN
P
O
W
E
R
S
T
E
R
E
O
H
i
-
F
i
R
E
P
E
A
T
A
U
T
O
R
E
WIND
E
NH
A
N
C
E
L
R
E
J
E
CT
R
E
W
FF
P
L
A
Y
S
T
O
P
VDH9300
VID
E
O
P
L
A
Y
E
R
D
G
T
A
L
A
U
T
O
T
R
A
C
G
F
U
S
E
HIGH LEVEL INPUTS
RIGHT
LEFT
.25v 2.5v
18
0
550
330
x1
x10
LP HP OFF
STEREO
RIGHT(BRIDGED)
L+R(SUM MONO)
POWER
110
55
240
RCA INPUTS GAIN
BASS
BOOST
dB
FREQ
Hz
X-OVER
MODE
INPUT
SELECT
X-OVER
FREQ
MULT
APX201.2
MOUNTING PRECAUTIONS
The EQS744 graphic equalizer can be mounted next to the source unit or under the
dash with the supplied mounting brackets. For easy system set-up, mount the equaliz-
er so the front panel controls will be easily accessible from the driver's seat after
installation. In addition, observe the following precautions:
1. Check clearances on both sides of a planned installation before drilling any holes
or installing any screws.
2. When routing RCA cables, keep them away from power cables and output speaker
wires.
Owner’s Manual
5
WIRING
3. Do not allow liquids or foreign objects to enter the unit.
4. If the unit should become wet, turn off all power and ask your authorized
Clarion dealer to clean or service the unit.
WIRING
PRECAUTIONS
Read all wiring precautions. If you are not sure of the connections, contact your
authorized Clarion dealer.
1. This unit operates on automotive 12V negative ground power source and
requires additional mobile audio components for proper operation.
2. Disconnect the negative (-) lead of the battery before making any power
connections.
3. A good chassis ground connection is critical to the performance of your Clarion
equalizer. Use the shortest ground wire possible and securely connect to the car
chassis along with the source unit ground to minimize resistance and avoid noise
problems.
4. Extra cable can cause signal loss and act as an "antenna" for noise. Use only
high quality RCA cables that are no longer than necessary to make a direct connec-
tion with the source unit and amplifiers.
5. If you are using a source unit, without a remote turn-on lead, the EQS744 can be
turned on with a switched accessory lead. You can find this accessory power source
in the factory harness at the back of the radio. It is the lead that turns on and off
with the key.
EQS744
6
SYSTEM SET-UP
SYSTEM SET-UP
Setting System Volume
After completing the system wiring, follow the steps below to properly adjust the
EQS744.
1. Turn the master control volume on the EQS744 and the amplifier gain controls
to their minimum setting.
2. Turn the source unit on and increase the volume until distortion is heard, then
reduce volume just below this point. * Once the source unit volume has been
set, it will no longer be used. Always use the volume control on the EQS744 as
the master (main) volume control. It has better electronics, higher S/N ratio
and is more linear than any source unit volume available.
* This is the maximum usable musical signal for the source unit. Turning the volume beyond this point will
increase noise and distortion without an increase in musical signal
.
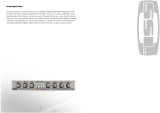
Setting Equalizer Controls
The EQS744 provides a graphic adjustment band for each of seven frequency
ranges: sub, low, mid, mid-high and high frequency. The center frequency of each
band is adjustable to allow fine tuning of the acoustical response of the vehicle.
1. Begin by setting the SUB/LO/MID/MID-HIGH/HIGH frequencies at the
center position.
2. Play a favorite music track and adjust individual EQ controls to a desired taste.
Avoid extreme settings which can distort musical peaks.
3. Increase or decrease the Equalizer Gain Controls as necessary.
4. If your system includes a subwoofer, slowly increase the Subwoofer control
until you hear solid bass.
5. If your system includes rear speakers, adjust the Fader control to add rear
sound. Set it to so most of the music comes from the front and only fills the rear.
Setting the Low Pass Frequency
The EQS744 provides a built-in Low Pass Crossover, located on the top panel of the
unit. Set at 60Hz or 90Hz depending upon type and size of your subwoofer system.
AUXILIAR
Y INPUT
The EQS744 has a built-in auxiliary input that allows use with portable devices
(such as MP3 player) or a video system.
1. Plug the auxiliary source into the auxiliary RCA input.
2. With the auxiliary switch in the main position, turn the equalizer volume
control to a normal listening level.
3. With the auxiliary source in the play mode, switch to the auxiliary source..
4. Adjust the auxiliary input gain controls, located on the top panel of the
EQS744, so that the volume of the auxiliary source matches the volume of the
main source.
Owner’s Manual
7
TROUBLESHOOTING
TROUBLESHOOTING
Problem
Unit does not work; no lights.
Solution
Power wires are not connected. Check battery and ground wiring at unit; check
battery connections
Problem
Sound is distorted.
Solution
Source unit volume is set too high. Reduce source unit volume.
EQ controls are set too high. Turn EQ controls to the center position and listen for
distortion again. If problem still occurs, see your authorized Clarion dealer.
Speakers may be damaged. Consult your authorized Clarion dealer.
Problem
No sound from unit.
Solution
Wrong input is selected. Press AUX switch so that main inputs are on.
No Remote-On. Using a voltmeter, check for +12V from Remote-On source.
PRODUCT SPECS
Graphic Center Frequencies 50Hz, 125Hz, 315Hz, 750Hz, 2.2kHz,
6kHz, 16kHz
Boost/Cut 12dB
S/N Ratio 100dB
Frequency Response 10Hz - 50kHz +/-1dB
Maximum Output Voltage 7V RMS
THD 0.005
Input Sensitivity 50mV - 3V RMS
Head Room 20dB
Input Impedance 20kOhms
Output Impedance 2kOhms
Stereo Separation 82dB/1kHz
Operating Voltage 11V - 15V Negative Ground
Size 1-1/8"H x 7"W x 4"H
  • Page 1 1
  • Page 2 2
  • Page 3 3
  • Page 4 4
  • Page 5 5
  • Page 6 6

Clarion VDH9300 User manual

Category
Audio equalizers
Type
User manual
This manual is also suitable for

Ask a question and I''ll find the answer in the document

Finding information in a document is now easier with AI