Page is loading ...

Contents
OPERATING INSTRUCTIONS
Personal Computer
Model No.
CF-C2
series
Introduction ...............................................................
11
Description of Parts ..................................................
13
First-time Operation ..................................................
17
Turning On / Turning Off ...........................................
21
Useful Information
Handling and Maintenance .......................................
22
Installing Software ....................................................
27
Troubleshooting
Troubleshooting (Basic) ............................................
31
Appendix
LIMITED USE LICENSE AGREEMENT ...................
36
Specifi cations ...........................................................
37
Standard Limited Warranty .......................................
41
Please read these instructions carefully before using this product, and save this manual for future use.
Getting Started
Useful Information
Troubleshooting
Appendix Read Me First
Getting Started
Safety Precautions .....................................................
2
Regulatory Information ...............................................
6
Read Me First

2
Read Me First
Safety Precautions
To reduce the risk of injury, loss of life, electric shock, fi re,
malfunction, and damage to equipment or property, al-
ways observe the following safety precautions.
Explanation of symbol word panels
The following symbol word panels are used to classify
and describe the level of hazard, injury, and property
damage caused when the denotation is disregarded and
improper use is performed.
DANGER
Denotes a potential hazard that will result in serious
injury or death.
WARNING
Denotes a potential hazard that could result in serious
injury or death.
CAUTION
Denotes a hazard that could result in minor injury.
NOTICE
Denotes a hazard that could result in property damage.
The following symbols are used to classify and describe
the type of instructions to be observed.
These symbols are used to alert users to a spe-
cifi c operating procedure that must not be per-
formed.
This symbol is used to alert users to a specifi c
operating procedure that must be followed in
order to operate the unit safety.
DANGER
Precautions on the Battery Pack
Do Not Throw the Battery Pack into a Fire or
Expose It to Excessive Heat
Generation of heat, ignition or rupture may result.
Do Not Insert Sharp Objects Into the Battery
Pack, Disassemble, or Modify It
Electrolyte leakage, generation of heat, ignition
or rupture may result.
Do Not Short the Positive (+) and Negative (-)
Contacts
Generation of heat, ignition or rupture may result.
•
Do not place the battery pack together with
articles such as necklaces or hairpins when
carrying or storing.
Avoid Extreme Heat (Near the Fire, in Direct
Sunlight, for Example)
Electrolyte leakage, generation of heat, ignition
or rupture may result.
Do Not Apply Shocks to the Product by Drop-
ping It, Applying Strong Pressure to It, etc.
Electrolyte leakage, generation of heat, ignition
or rupture of the battery may result.
•
If this product is subjected to a strong impact,
stop using it immediately.
Do Not Charge the Battery Using Methods
Other Than Those Specifi ed
If the battery is not charged using one of the
specifi ed methods, electrolyte leakage, genera-
tion of heat, ignition or rupture may result.
When the Battery Pack Has Deteriorated, Re-
place It With a New One
Continued use of a damaged battery pack may
result in heat generation, ignition or battery rup-
ture.
Do Not Use with Any Other Product
The battery pack is rechargeable and was in-
tended for the specifi ed product. If it is used with
a product other than the one for which it was
designed, electrolyte leakage, generation of heat,
ignition or rupture may result.
Do Not Use This Product with a Battery Pack
Other Than the One Specifi ed
Use only the specifi ed battery pack (
page 17)
with your product. Use of battery packs other
than those manufactured and supplied by Pana-
sonic may present a safety hazard (generation of
heat, ignition or rupture).

3
Read Me First
DANGER
Precautions on the Built-in Bridge Battery
(for disposal)
Handling This Computer
Do Not Disassemble the Computer Except
When Disposing of It
Generation of heat, ignition or rupture of the built-
in bridge battery may result.
Handling the Built-in Bridge Battery
Do Not Charge
Generation of heat, ignition or rupture may result.
Do Not Use With Any Other Product
Generation of heat, ignition or rupture may result.
Do Not Throw the Battery Into a Fire or Ex-
pose It to Excessive Heat
Generation of heat, ignition or rupture may result.
Avoid Extreme Heat (Near the Fire, In Direct
Sunlight, for Example)
Generation of heat, ignition or rupture may result.
Do Not Short the Positive (+) and Negative (-)
Contacts
Generation of heat, ignition or rupture may result.
Do Not Insert Sharp Objects Into the Battery,
Disassemble, or Modify It
Generation of heat, ignition or rupture may result.
Do Not Apply Shocks to the Computer by
Dropping It, Applying Strong Pressure to It,
etc.
Generation of heat, ignition or rupture may result.
WARNING
Precautions on the Built-in Bridge Battery
Do Not Charge the Battery Using Methods
Other Than Those Specifi ed
If the battery is not charged using one of the
specifi ed methods, electrolyte leakage, genera-
tion of heat, ignition or rupture of the battery may
result.
Do Not Throw the Product Into a Fire or Ex-
pose It to Excessive Heat
Generation of heat, ignition or rupture of the bat-
tery may result.
Avoid Extreme Heat (Near the Fire, In Direct
Sunlight, for Example)
Electrolyte leakage, generation of heat, ignition
or rupture of the battery may result.
Do Not Insert Sharp Objects Into the Battery
or Shocks, Disassemble, or Modify It
Electrolyte leakage, generation of heat, ignition
or rupture of the battery may result.
Do Not Apply Shocks to the Product by Drop-
ping It, Applying Strong Pressure to It, etc
Electrolyte leakage, generation of heat, ignition
or rupture of the battery may result.
•
If this product is subjected to a strong impact,
stop using it immediately.
When the Battery Has Deteriorated, Contact
Your Technical Support Offi ce to Replace the
Battery
Continued use of a damaged battery may result
in heat generation, ignition or battery rupture.
WARNING
If a Malfunction or Trouble Occurs, Immedi-
ately Stop Use
If a Malfunction Occurs, Immediately Unplug
the AC Plug and the Battery Pack
•
This product is damaged
•
Foreign object inside this product
•
Smoke emitted
•
Unusual smell emitted
•
Unusually hot
Continuing to use this product while any of the
above conditions are present may result in fi re or
electric shock
•
If a malfunction or trouble occurs, immediately
turn the power off and unplug the AC plug,
and then remove the battery pack. Then con-
tact your technical support offi ce for repair.
Do Not Touch This Product in a Thunderstorm
If Connected with the AC Cable or Any Other
Cables
Electric shock may result.
Do Not Connect the AC Adaptor to a Power
Source Other Than a Standard Household AC
Outlet
Otherwise, a fi re due to overheating may result.
Connecting to a DC/AC converter (inverter) may
damage the AC adaptor. On an airplane, only
connect the AC adaptor/charger to an AC outlet
specifi cally approved for such use.
Do Not Pull or Insert the AC Plug If Your
Hands Are Wet
Electric shock may result.
Clean Dust and Other Debris of the AC Plug
Regularly
If dust or other debris accumulates on the plug,
humidity, etc. may cause a defect in the insula-
tion, which may result in a fi re.
•
Pull the plug, and wipe it with a dry cloth.
Pull the plug if the computer is not being used
for a long period of time.

4
Read Me First
Safety Precautions
WARNING
Insert the AC Plug Completely
If the plug is not inserted completely, fi re due to
overheating or electric shock may result.
•
Do not use a damaged plug or loose AC out-
let.
Do Not Place Containers of Liquid or Metal
Objects on Top of This Product
If water or other liquid spills, or if paper clips,
coins, or foreign matter get inside this product,
fi re or electric shock may result.
•
If foreign matter has found its way inside, im-
mediately turn the power off and unplug the
AC plug and remove the battery pack. Then
contact your technical support offi ce.
Do Not Disassemble This Product
You may receive an electric shock, or foreign
matter may enter and result in a fi re.
Do Not Turn the Volume Up to Loud When Us-
ing Headphones
Listening at high volumes that overstimulate the
ear for long periods of time may result in loss of
hearing.
Do Not Use with Exposing the Skin to This
Product for a Long Period of Time
Using this product with exposing the skin to the
heat source of this product or AC adaptor for a
long period of time can cause a low-temperature
burn.
Do Not Do Anything That May Damage the AC
Cord, the AC Plug, or the AC Adaptor
Do not damage or modify the cord, place it near
hot tools, bend, twist, or pull it forcefully, place
heavy objects on it, or bundle it tightly. Continu-
ing to use a damaged cord may result in fi re,
short circuit, or electric shock.
CAUTION
Do Not Place This Product on Unstable Sur-
face
If balance is lost, this product may fall over or
drop, resulting in an injury.
Avoid Stacking
If balance is lost, this product may fall over or
drop, resulting in an injury.
Do Not Leave This Product in High Tempera-
ture Environment for a Long Period of Time
Leaving this product where it will be exposed to
extremely high temperatures such as near fi re or
in direct sunlight may deform the cabinet and/or
cause trouble in the internal parts. Continued use
in such a resulting condition may lead to short-
circuiting or insulation defects, etc. which may in
turn lead to a fi re or electric shocks.
Hold the Plug When Unplugging the AC Plug
Pulling on the cord may damage the cord, result-
ing in a fi re or electric shock.
Do Not Move This Product While the AC Plug
Is Connected
The AC cord may be damaged, resulting in fi re or
electric shock.
•
If the AC cord is damaged, unplug the AC
plug immediately.
Use Only the Specifi ed AC Adaptor With This
Product
Using an AC adaptor other than the one supplied
(supplied with the unit or one sold separately as
an accessory) may result in a fi re.
Do Not Subject the AC Adaptor to Any Strong
Impact
Using the AC adaptor after a strong impact such
as being dropped may result in electric shock,
short circuit, or fi re.
Take a Break of 10-15 Minutes Every Hour
Using this product for long periods of time may
have detrimental health effects on the eyes or
hands.
<Only for model with modem>
Use the Modem with a Regular Telephone
Line
Connection to an internal phone line (on-premise
switches) of a company or business offi ce, etc.
or to a digital public phone or use in a country or
area not supported by the computer may result in
a fi re or electric shocks.
Do Not Connect a Telephone Line, or a Net-
work Cable Other Than the One Specifi ed,
into the LAN Port
If the LAN port is connected to a network such as
the ones listed below, a fi re or electric shock may
result.
•
Networks other than 1000BASE-T, 100BASE-
TX or 10BASE-T
•
Phone lines (IP phone (Internet Protocol Tele-
phone), Telephone lines, internal phone lines
(on-premise switches), digital public phones,
etc.)
Do Not Expose the Skin to This Product When
Using the Product In a Hot or Cold Environ-
ment
Burns, low-temperature burns or frostbite may
result.
•
When it is necessary to expose the skin to this
product such as to scan a fi ngerprint, perform
the operation in the shortest time possible.

5
Read Me First
NOTICE
Do not place the computer near a television or radio
receiver.
Keep the computer away from magnets. Data stored
on the hard disk may be lost.
This computer is not intended for the display of im-
ages for use in medical diagnosis.
This computer is not intended for a use with connec-
tion of medical equipment for the purpose of medical
diagnosis.
Panasonic shall not be liable for loss of data or other
incidental or consequential damages resulting from
the use of this product.
Do not touch the terminals on the battery pack. The
battery pack may no longer function properly if the
contacts are dirty or damaged.
Do not expose the battery pack to water, or allow it to
become wet.
If the battery pack will not be used for a long period of
time (a month or more), charge or discharge (use) the
battery pack until the remaining battery level becomes
30% to 40% and store it in a cool, dry place.
This computer prevents overcharging of the battery by
recharging only when the remaining power is less than
approx. 95% of capacity.
The battery pack is not charged when the computer
is fi rst purchased. Be sure to charge it before using it
for the fi rst time. When the AC adaptor is connected to
the computer, charging begins automatically.
Should the battery leak and the fl uid get into your
eyes, do not rub your eyes. Immediately fl ush your
eyes with clear water and see a doctor for medical
treatment as soon as possible.
NOTE
The battery pack may become warm during recharg-
ing or normal use. This is completely normal.
Recharging will not commence if internal temperature
of the battery pack is outside of the allowable temper-
ature range (0
°C
to 50
°C
). (
Reference Manual
“Battery Power”) Once the allowable range require-
ment is satisfi ed, charging begins automatically. Note
that the recharging time varies based on the usage
conditions. (Recharging takes longer than usual when
the temperature is 10
°C
or below.)
If the temperature is low, the operating time is short-
ened. Only use the computer within the allowable
temperature range.
This computer has a high temperature mode function
that prevents the degradation of the battery in high
temperature environments. (
Reference Manual
“Battery Power”) A level corresponding to a 100%
charge for high temperature mode is approximately
equivalent to an 80% charge level for normal tempera-
ture mode.
The battery pack is a consumable item. If the amount
of time the computer can be run by using a particular
battery pack becomes dramatically shorter and re-
peated recharging does not restore its performance,
the battery pack should be replaced with a new one.
When transporting a spare battery inside a package,
briefcase, etc., it is recommended that it be placed in
a plastic bag so that its contacts are protected.
Always power off the computer when it is not in use.
Leaving the computer on when the AC adaptor is not
connected will exhaust the remaining battery capacity.
To minimize deterioration of the built-in bridge battery,
connect the computer to the AC adaptor and recharge
it for approximately 2 hours about once every year.
THIS PRODUCT IS NOT INTENDED FOR USE AS, OR
AS PART OF, NUCLEAR EQUIPMENT/SYSTEMS, AIR
TRAFFIC CONTROL EQUIPMENT/SYSTEMS, AIR-
CRAFT COCKPIT EQUIPMENT/SYSTEMS
*1
, MEDICAL
DEVICES OR ACCESSORIES
*2
, LIFE SUPPORT SYS-
TEMS OR OTHER EQUIPMENTS/DEVICES/SYSTEMS
THAT ARE INVOLVED WITH ENSURING HUMAN LIFE
OR SAFETY. PANASONIC WILL NOT BE RESPONSI-
BLE FOR ANY LIABILITY RESULTING FROM THE USE
OF THIS PRODUCT ARISING OUT OF THE FOREGO-
ING USES.
*1
AIRCRAFT COCKPIT EQUIPMENT/SYSTEMS include
Class2 Electronic Flight Bag (EFB) Systems and Class1 EFB
Systems when used during critical phases of fl ight (e.g., dur-
ing take-off and landing) and/or mounted on to the aircraft.
Class1 EFB Systems and 2 EFB Systems are defi ned by
FAA: AC (Advisory Circular) 120-76A or JAA: JAA TGL (Tem-
porary Guidance Leafl ets) No.36.
*2
As defi ned by the European Medical Device Directive (MDD)
93/42/EEC.
Panasonic cannot guarantee any specifi cations, technol-
ogies, reliability, safety (e.g. Flammability/Smoke/Toxic-
ity/Radio Frequency Emission, etc) requirements related
to aviation standards that exceed the specifi cations of
our COTS (Commercial-Off-The-Shelf) products.

6
Read Me First
<Only for model with modem>
When using your telephone equipment, basic safety pre-
cautions should always be followed to reduce the risk of
fi re, electric shock and injury to persons, including the fol-
lowing:
1. Do not use this product near water, for example, near
a bath tub, wash bowl, kitchen sink or laundry tub, in a
wet basement or near a swimming pool.
2. Avoid using a telephone (other than a cordless type)
during an electrical storm. There may be a remote risk
of electric shock from lightning.
3. Do not use the telephone to report a gas leak in the
vicinity of the leak.
4. Use only the power cord and batteries indicated in this
manual. Do not dispose of batteries in a fi re. They may
explode. Check with local codes for possible special
disposal instructions.
SAVE THESE INSTRUCTIONS
19-E-1
Important Safety Instructions
When using your telephone equipment, basic safety precautions should
Information to the User
Regulations for Wireless LAN / Bluetooth
<Only for model with wireless LAN/Bluetooth>
This product and your Health
This product, like other radio devices, emits radio fre-
quency electromagnetic energy. The level of energy
emitted by this product however is far much less than the
electromagnetic energy emitted by wireless devices like
for example mobile phones.
Because this product operates within the guidelines found
in radio frequency safety standards and recommenda-
tions, we believe this product is safe for use by consum-
ers. These standards and recommendations refl ect the
consensus of the scientifi c community and result from
deliberations of panels and committees of scientists who
continually review and interpret the extensive research
literature.
In some situations or environments, the use of this prod-
uct may be restricted by the proprietor of the building or
responsible representatives of the organization. These
situations may for example include:
Using this product on board of airplanes, or
In any other environment where the risk of interference
to other devices or services is perceived or identifi ed
as harmful.
If you are uncertain of the policy that applies on the use
of wireless devices in a specifi c organization or environ-
ment (e.g. airports), you are encouraged to ask for autho-
rization to use this product prior to turning on the product.
Regulatory Information
We are not responsible for any radio or television interfer-
ence caused by unauthorized modifi cation of this product.
The correction of interference caused by such unauthor-
ized modifi cation will be the responsibility of the user. We
and its authorized resellers or distributors are not liable
for damage or violation of government regulations that
may arise from failing to comply with these guidelines.
26-M-1
<Only for model with wireless LAN/Bluetooth>
Country / Region 802.11a
802.11b/g
Bluetooth
Austria, Belgium, Croatia, Cyprus,
Czech Republic, Denmark, Estonia,
Finland, France, Germany, Greece,
Hungary, Iceland, Ireland, Latvia,
Lithuania, Luxembourg, Macedonia,
Malta, Netherlands, Poland, Portu-
gal, Slovakia, Slovenia, Spain, Swe-
den, Switzerland, United Kingdom
Restricted to indoor use.
Italy Restricted to indoor use.
General authorization required if
used outside.
General authorization required if
used outside of own premises.
Turkey Restricted to indoor use.
Prohibited within an 1 km radius
from the centre of the runway of the
airports.
Norway Restricted to indoor use. Prohibited within a 20 km radius
from the centre of Ny-Ålesund.
Regulatory Information

7
Read Me First
Lithium Battery!
This computer contains a lithium battery to enable the date, time, and other data to be stored. The battery should only
be exchanged by authorized service personnel.
Warning!
A risk of explosion from incorrect installation or misapplication may possibly occur.
15-E-1
Lithium Battery
Information for Users on Collection and Disposal of Old Equipment and used Batteries
These symbols on the products, packaging, and/or accompanying documents mean that used electrical
and electronic products and batteries should not be mixed with general household waste. For proper treat-
ment, recovery and recycling of old products and used batteries, please take them to applicable collection
points, in accordance with your national legislation and the Directives 2002/96/EC and 2006/66/EC.By
disposing of these products and batteries correctly, you will help to save valuable resources and prevent
any potential negative effects on human health and the environment which could otherwise arise from
inappropriate waste handling. For more information about collection and recycling of old products and bat-
teries, please contact your local municipality, your waste disposal service or the point of sale where you
purchased the items. Penalties may be applicable for incorrect disposal of this waste, in accordance with
national legislation.
For business users in the European Union
If you wish to discard electrical and electronic equipment, please contact your dealer or supplier for further
information.
[Information on Disposal in other Countries outside the European Union]
These symbols are only valid in the European Union. If you wish to discard this product, please contact
your local authorities or dealer and ask for the correct method of disposal.
Note for the battery symbol (bottom two symbol examples):
This symbol might be used in combination with a chemical symbol. In this case it complies with the re-
quirement set by the Directive for the chemical involved.
53-E-1
The latest version of “ERC RECOMMENDATION 70-03” by European Radiocommunications Committee and the
regulation in Turkey.
Use only the antenna specifi ed by Panasonic.
Confi rm the latest information to the radio regulation authorities.
40-E-1
CAUTION
Risk of Explosion if Battery is replaced by an Incorrect
Type.
Dispose of Used Batteries According to the Instructions.
58-E-1
Interface Cable
Use of an interface cable longer than 3 m (9.84 feet) is not
recommended.
11-E-1

8
Read Me First
Regulatory Information
When in a hospital or other health care facility, observe the restrictions on the use of mobiles. Switch Personal
Computer or Handheld Computer incorporating wireless WAN modem off, if instructed to do so by the guide-
lines posted in sensitive areas. Medical equipment may be sensitive to RF energy.
The operation of cardiac pacemakers, other implanted medical equipment and hearing aids can be affected
by interference from Personal Computer or Handheld Computer incorporating wireless WAN modem placed
close to the device. If in doubt about potential danger, contact the physician or the manufacturer of the device
to verify that the equipment is properly shielded. Pacemaker patients are advised to keep their Personal Com-
puter or Handheld Computer incorporating wireless WAN modem away from the pacemaker, while it is on.
Switch off Personal Computer or Handheld Computer incorporating wireless WAN modem before boarding an
aircraft. Make sure it cannot be switched on inadvertently. The operation of wireless appliances in an aircraft
is forbidden to prevent interference with communications systems. Failure to observe these instructions may
lead to the suspension or denial of cellular services to the offender, legal action, or both.
For details on usage of this unit in aircrafts please consult and follow instruction provided by the airline.
Do not operate Personal Computer or Handheld Computer incorporating wireless WAN modem in the pres-
ence of fl ammable gases or fumes. Switch off the cellular terminal when you are near petrol stations, fuel
depots, chemical plants or where blasting operations are in progress. Operation of any electrical equipment in
potentially explosive atmospheres can constitute a safety hazard.
Your Personal Computer or Handheld Computer incorporating wireless WAN modem receives and transmits
radio frequency energy while switched on. Remember that interference can occur if it is used close to TV sets,
radios, computers or inadequately shielded equipment. Follow any special regulations and always switch off
Personal Computer or Handheld Computer incorporating wireless WAN modem wherever forbidden, or when
you suspect that it may cause interference or danger.
Road safety comes fi rst! Do not use a Personal Computer or Handheld Computer incorporating wireless
WAN modem while driving a vehicle. Do not place the computer with wireless WAN modem in an area where
it could cause personal injury to the driver or passengers. It is recommended to stow the unit in the boot or
secure stowage area while driving.
Do not place the computer with wireless WAN modem in an area over an air bag or in the vicinity where an air
bag may deploy.
Air bags infl ate with great force and if the computer with wireless WAN modem is placed in the air bag deploy-
ment area may be propelled with great force and cause serious injury to occupants of the vehicle.
IMPORTANT!
Personal Computer or Handheld Computer incorporating wireless WAN modem operate using radio signals
and cellular networks cannot be guaranteed to connect in all conditions. Therefore, you should never rely
solely upon any wireless device for essential communications, for example emergency calls.
Remember, in order to make or receive calls, Personal Computer or Handheld Computer incorporating wire-
less WAN modem must be switched on and in a service area with adequate cellular signal strength.
Some networks do not allow for emergency calls if certain network services or phone features are in use (e.g.
lock functions, fi xed dialing etc.). You may need to deactivate those features before you can make an emer-
gency call.
Some networks require that a valid SIM card be properly inserted in Personal Computer or Handheld Com-
puter incorporating wireless WAN modem.
Safety Precautions
<Only for model with wireless WAN>
The following safety precautions must be observed during all phases of the operation, usage, service or repair of any
Personal Computer or Handheld Computer incorporating wireless WAN modem. Manufacturers of the cellular termi-
nal are advised to convey the following safety information to users and operating personnel and to incorporate these
guidelines into all manuals supplied with the product. Failure to comply with these precautions violates safety stan-
dards of design, manufacture and intended use of the product. Panasonic assumes no liability for customer failure to
comply with these precautions.

9
Read Me First
For Europe
<Only for model with a “CE ” mark on the bottom of the computer>
Declaration of Conformity (DoC)
“Hereby, Panasonic declares that this Personal Computer is in compliance with the essential require-
ments and other relevant provisions of the Directive 1999/5/EC.”
Hint:
If you want to get a copy of the original DoC of our above mentioned products, please contact our web address: http://
www.doc.panasonic.de
Authorised Representative:
Panasonic Testing Centre
Panasonic Marketing Europe GmbH
Winsbergring 15, 22525 Hamburg, Germany
Network connection of Wired Modem.
The terminal equipment is intended for connection to the following public network;
In all the countries of European Economical Area and Turkey;
- Public Switched Telephony Networks
Technical Features of Wired Modem.
The terminal equipment includes the following features;
- DTMF dialing
- Maximum bitrate receiving mode: 56 kbit/s
- Maximum bitrate sending mode: 33.6 kbit/s
Indication of the countries where WLAN is intended to be used:
AT BE BG CH CY CZ DE DK EE ES
FI FR GB GR HU IE IS IT LT LU
LV MT NL NO PL PT RO SE SI SK TR
18-25-E-1
This equipment requires minimum 20 cm spacing from all person’s body (excluding extremities of hands, wrist and
feet) in directions of the back and both sides of the LCD display during wireless modes of operation.
If you use this equipment in tablet mode when utilizing the wireless functionality, it requires a minimum 5 mm spacing
from the body (excluding extremities such as hands, wrist and feet) around the left and right hand sides of the LCD
display.
60-E-1
<Only for model with a “CE” mark on the bottom of the computer>
Declaration of Conformity (DoC)
“Hereby, Panasonic Corporation declares that this Personal Computer is in compliance with the essen-
tial requirements and other relevant provisions of the Directive 1999/5/EC.”
Hint:
If you want to get a copy of the original DoC of our above mentioned products, please contact our web
address: http://www.doc.panasonic.de
Authorised Representative:
Panasonic Testing Centre
Panasonic Marketing Europe GmbH
Winsbergring 15, 22525 Hamburg, Germany
Network connection of Wired Modem.
The terminal equipment is intended for connection to the following public network;
In all the countries of European Economical Area and Turkey;
- Public Switched Telephony Networks
Technical Features of Wired Modem.
The terminal equipment includes the following features;
- DTMF dialing
- Maximum bitrate receiving mode: 56 kbit/s
- Maximum bitrate sending mode: 33.6 kbit/s
18-E-1

10
Read Me First
Regulatory Information
For India
For the purpose of recycling to facilitate effective utilization of resources, please return this product to a
nearby authorized collection center, registered dismantler or recycler, or Panasonic service center when dis-
posing of this product.
Please see the Panasonic website for further information on collection centers, etc.
http://www.panasonic.co.in/wps/portal/home
68-M-1
For UK
For your safety, please read the following text carefully.
This appliance is supplied with a molded three pin mains plug for your safety and convenience.
A 3 ampere fuse is fi tted in this plug.
Should the fuse need to be replaced please ensure that the replacement fuse has a rating of 3 ampere and that it is
approved by ASTA or BSI to BS1362.
Check for the ASTA mark
A S A
or the BSI mark on the body of the fuse.
If the plug contains a removable fuse cover you must ensure that it is refi tted when the fuse is replaced.
If you lose the fuse cover the plug must not be used until a replacement cover is obtained. A replacement fuse cover
can be purchased from your local dealer.
If the fi tted molded plug is unsuitable for the socket outlet in your home then the fuse should be removed and the plug
cut off and disposed of safely.
There is a danger of severe electrical shock if the cut off plug is inserted into any 13-ampere socket.
How to replace the fuse
The location of the fuse differs according to the type of AC mains plug (fi gures A and B).
Confi rm the AC mains plug fi tted and follow the instructions below. Illustrations may differ from actual AC mains plug.
Open the fuse cover with a screwdriver and replace the fuse and close or attach the fuse cover.
Figure A Figure B
Fuse cover
8-E-1

11
Getting Started
Introduction
Thank you for purchasing this Panasonic product. For optimum performance and safety, please read these instructions
carefully.
In these instructions, the names are referred as follows.
indicates Windows
®
8 Operating System.
indicates Windows
®
7 Operating System.
Terms and illustrations in these instructions
CAUTION
: Conditions that may result in minor or moderate injury.
NOTE
: Useful and helpful information.
Enter
: Press [Enter] key.
Fn
+
F5
: Press and hold [Fn] key, and then press [F5] key.
[Charm] - : This illustration means to click (Settings) in the Charm menu that appears when
you align the pointer to the top right (or bottom right) corner of the screen.
(Start) - [All Programs] : Click (Start), and then click [All Programs].
: Page in these Operating Instructions or in the Reference Manual.
: Reference to the on-screen manuals.
Some illustrations are simplifi ed to help your understanding and may look different from the actual unit.
If you do not log on as an administrator, you cannot use some functions or cannot display some screens.
Refer for the latest information about optional products to the catalogs, etc.
In these instructions, the names and terms are referred as follows.
“Windows
®
8 Pro 64-bit” as “Windows” or “Windows 8”
“Windows
®
7 Professional 32-bit Service Pack 1” and “Windows
®
7 Professional 64-bit Service Pack 1” as “Win-
dows” or “Windows 7”
DVD MULTI drive as “DVD drive”
Disclaimer
Computer specifi cations and manuals are subject to change without notice. Panasonic Corporation assumes no li-
ability for damage incurred directly or indirectly from errors, omissions or discrepancies between the computer and the
manuals.
Trademarks
Microsoft
®
, Windows
®
, and the Windows logo are registered trademarks of Microsoft Corporation of the United States
and/or other countries.
Intel, Core, Centrino and PROSet are either registered trademarks or trademarks of Intel Corporation.
SDXC Logo is a trademark of SD-3C, LLC.
Adobe, the Adobe logo and Adobe Reader are either registered trademarks or trademarks of Adobe Systems Incorpo-
rated in the United States and/or other countries.
Bluetooth
®
is a registered trademark owned by Bluetooth SIG, Inc., U.S.A. and licensed to Panasonic Corporation.
HDMI, the HDMI Logo and High-Defi nition Multimedia Interface are trademarks or registered trademarks of HDMI Li-
censing LLC in the United States and other countries.
Names of products, brands, etc., appearing in this manual are trademarks or registered trademarks of their respective
own companies.

12
Getting Started
Introduction
On-screen Manual
For further information about the computer, you can refer to the on-screen manual.
Reference Manual
The Reference Manual contains the practical information to help you fully enjoy the computer’s performance.
Important Tips
The Important Tips will provide you with the battery information so that you can use the battery pack in the optimum
condition to obtain longer operation time.
To access the on-screen manuals, follow the steps below.
On the Start screen, click the [Manual Selector] tile, and select the on-screen manual.
Double-click [Manual Selector] on the desktop screen, and select the on-screen manual.

13
Getting Started
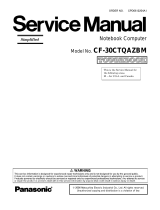
Description of Parts
A: Microphone
Reference Manual “Camera”
B: Camera Lens
Reference Manual “Camera”
C: Camera Indicator
Reference Manual “Camera”
D: Wireless LAN Antenna
<Only for model with wireless LAN>
Reference Manual “Wireless LAN”
The wireless LAN switch may turn off depending on
the reception.
E: LCD
Reference Manual “Screen Input Operation”
F: Wireless WAN Antenna
<Only for model with Wireless WAN>
Reference Manual “Wireless WAN”
G: Keyboard
H: Touch Pad
I: Power Switch
Power Indicator
Off: Power off/Hibernation, Green: Power on, Blinking
green: Sleep, Blinking green rapidly: Cannot power
on
*1
or resume due to low temperature.
*1
Model without HDD heater
J: Headphone Jack
You can connect headphones or amplifi ed speakers.
When they are connected, audio from the internal
speakers is not heard.
K: Microphone Jack
A condenser microphone can be used. If other types
of microphones are used, audio input may not be pos-
sible, or malfunctions may occur as a result.
L: Wireless Switch
Reference Manual “Disabling/Enabling Wireless
Communication”
M: SD Memory Card Slot
Keep SD Memory Cards away from infants and small
children.
Reference Manual “SD Memory Card”
N: LED Indicator
: SD Memory Card Indicator
(Blinking: During access)
Reference Manual “SD Memory Card”
: Wireless ready
This indicator lights when Wireless LAN, Blue-
tooth, and/or Wireless WAN are connected and
ready. It does not necessarily indicate the On/Off
condition of the wireless connection.
Reference Manual “Disabling/Enabling
Wireless Communication” “Wireless LAN”
“Bluetooth” “Wireless WAN”
: Caps lock
: Numeric key (NumLk)
: Scroll lock (ScrLk)
: Drive status
: Battery status
page 22 “When the battery indicator does not
light on”
Reference Manual “Battery Power”
O: Ambient Light Sensor
The ambient light sensor is equipped with an auto-
matic brightness adjustment function that adjusts the
display screen. (
page 23)
P: Display Rotation Lock
page 15 “Changing the Display Mode”
Q: Wireless LAN Antenna / Bluetooth Antenna
<Only for model with wireless LAN>
<Only for model with wireless Bluetooth>
Reference Manual “Wireless LAN” “Bluetooth”
R: Tablet Buttons
Reference Manual “Tablet Buttons”
The Windows button does not function when pressed
together with a specifi c key on the keyboard.
S: Function Key
Reference Manual “Key Combinations”
R
Q
S
O
D
E
F
A
B
C
I
J
K
L
M
N
G
H
P
This computer contains a
magnet and magnetic prod-
ucts at the locations circled
in the illustration at right.
Avoid leaving metallic object
or magnetic media in contact
with these areas.

14
Getting Started
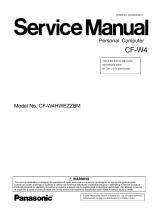
Description of Parts
Bottom
A: Hand Strap
B: NFC Sensor
*2
/Rear Camera
*3
/Half Size Smart Card
Slot
*4
*2
<Only for model with NFC Sensor>
Reference Manual “NFC Devices”
*3
<Only for model with Rear Camera>
Reference Manual “Camera”
*4
<Only for model with Half Size Smart Card Slot>
Reference Manual “Smart Card”
C: Pen Holder
D: Battery Pack
E: Hard Disk Drive
Reference Manual “Hard Disk Drive”
F: Battery Indicator
Reference Manual “Battery Power”
G: Battery Latch
Reference Manual “Battery Power”
H: RAM Module Slot
Reference Manual “RAM Module”
I: Expansion Bus Connector
Reference Manual “Port Replicator”
J: Hard Disk Drive Latch
Reference Manual “Hard Disk Drive”
K: LAN Port
Reference Manual “LAN”
L: USB2.0 Port
Reference Manual “USB Devices”
M: Security Lock
A Kensington cable can be connected.
For further information, read the manual that comes
with the cable.
N: SIM Card Slot
<Only for model with wireless WAN>
Reference Manual “Wireless WAN”
O: Serial Port
*5
/ VGA Port
*6
/ Modem Port
*7
*5
<Only for model with Serial Port>
Reference Manual “Serial Port”
*6
<Only for model with VGA port>
Reference Manual “External Display”
*7
<Only for model with Modem>
Reference Manual “Modem”
P: Speaker
Reference Manual “Key Combinations”
Q: DC-IN Jack
R: USB3.0 Ports
Reference Manual “USB Devices”
S: HDMI Port
Reference Manual “External Display”
T: ExpressCard Slot
*8
/ Smart Card Slot
*9
*8
<Only for model with ExpressCard Slot>
Reference Manual “ExpressCard”
*9
<Only for model with Smart Card Slot>
Reference Manual “Smart Card”
R SQP
*
9
T
*
8
T
Rear side
O
*
5
*
6
K L NM
O
*
7
O
Left side
F
G
H
I
J
E
D
C
A
B

15
Getting Started
Changing the Display Mode
NOTE
Do not press the tablet buttons, and do not change the display mode by holding the upper part of the display.
Do not allow your fi ngers to get caught between the display and the base when changing the display mode.
Do not allow the tether for the pen (included) or other cables to get caught between the display and the base when
changing the display mode.
If peripheral devices connected to the computer make it hard to change the display mode, disconnect the devices
and then change the display mode.
Switching to the Tablet Mode
A
Lift up the display so it stands perpendicular to the body.
B
Slide the Display Rotation Lock (A) to the unlocked position.
C
Hold the bottom left and bottom right of the display, and rotate the
display in the direction of the arrow until it clicks.
NOTE
The display cannot be rotated more than 180 degrees in the direc-
tion of the arrow, or in the opposite direction of the arrow. Do not
attempt to rotate the display more than 180 degrees or in the oppo-
site direction using force.
D
Close as the display faces up.
NOTE
Close the display completely and make sure there is no space
between the keyboard and the display; otherwise the computer will
remain in Laptop Mode.
A
Switching to the Laptop Mode
A
Lift up the display so it stands perpendicular to the body.
B
Hold the bottom left and bottom right of the display, and rotate the
display in the direction of the arrow until it clicks.
NOTE
The display cannot be rotated more than 180 degrees in the direc-
tion of the arrow, or in the opposite direction of the arrow. Do not
attempt to rotate the display more than 180 degrees or in the oppo-
site direction using force.
C
Slide the Display Rotation Lock (A) to the locked position.

16
Getting Started
Description of Parts
Before Using the Pen (Included)
The tether prevents the pen (included) from falling accidentally.
Attaching the pen (included) to the computer using the tether
In this section, illustrations of the digitizer pen are used as examples.
A
Pass one of the loops
through the hole.
B
C
Thread the second loop on the tether through the hole
as illustrated.
D
second loop
Using the Hand Strap
The hand strap is convenient for computing while standing.
To carry the computer, put your hand between the computer and the hand strap
to prevent if from falling, and fi rmly hold the computer when using it.
NOTE
Be careful of computer drop resulting from the hand strap damage.

17
Getting Started
Preparation
A
Check and identify the supplied accessories.
If you do not fi nd the described accessories, contact Panasonic Technical Support.
• AC Adaptor . . . . . 1
Model No: CF-AA6413C
• AC Cord . . . . . . . 1 • Battery Pack . . . 1
Model No: CF-VZSU80U or
CF-VZSU82U or
CF-VZSU83U
• Digitizer pen . . . . . . . . . . . . . . 1
Reference Manual “Screen
Input Operation”
• Tether . . . . . . . . . 1 • Soft Cloth . . . . . . 1
Reference Manual “Screen Input Operation”
• OPERATING INSTRUCTIONS (This book) . . . . . . . . . . . . . . . . . . . 1
B
Read the LIMITED USE LICENSE AGREEMENT before breaking the seal on the computer’s packaging
(
page 36).
1 Inserting the Battery Pack.
Turn over the computer.
Make sure no foreign objects are under the computer.
A
Slide the battery pack in parallel with the arrow direction until it clicks to the
secured position.
CAUTION
Make sure the latch is securely locked. Otherwise the battery pack may fall
when you carry the computer.
Do not touch the terminals of the battery pack and the computer. Doing so can
make the terminals dirty or damaged, and may cause malfunction of the battery
pack and the computer.
NOTE
Note that the computer consumes electricity even when the computer power is
off. If the battery pack is fully charged, the battery will fully discharge in the fol-
lowing period of time:
Status CF-VZSU80U CF-VZSU82U CF-VZSU83U
When power is off
*1
Approx. 6 weeks Approx. 3 weeks Approx. 9 weeks
In sleep Approx. 4 days Approx. 2 days Approx. 6 days
In hibernation Approx. 8 days Approx. 4 days Approx. 12 days
*1
The period of time is the value when the built-in bridge battery is fully charged.
2 Attaching the pen (included) to the computer.
Attach the pen (included) to the computer. To attach the pen, refer to ”Before
Using the Pen (Included)” (
page 16).
3 Opening the Display.
Hold the side of the computer with either of your hands and then hold and lift the
(A) part to open the display.
CAUTION
Do not open the display wider than necessary (180° or more), and do not apply
excessive pressure to the LCD. Do not open or close the computer holding the
edge of the LCD segment.
1
3
A
First-time Operation

18
Getting Started
First-time Operation
4 Connect your computer to a power outlet.
The battery charging starts automatically.
CAUTION
Do not disconnect the AC adaptor and do not switch the wireless switch to on
until the fi rst-time operation procedure is completed.
When using the computer for the fi rst time, do not connect any peripheral device
(including wired LAN cable) except the battery pack and AC adaptor.
Handling the AC adaptor
Problems such as sudden voltage drops may arise during periods of thunder and
lightning. Since this could adversely affect your computer, an uninterruptible power
source (UPS) is highly recommended unless running from the battery pack alone.
5 Turn on the computer.
Slide and hold the power switch (
page 13) until the power indicator
(
page 13) lights.
CAUTION
Do not slide the power switch repeatedly or do not hold the power switch for four
seconds or longer.
6 <For MUI OS model>
Select language.
Select language and OS (32-bit or 64-bit).
CAUTION
Carefully choose your language because you cannot change it later. If you set a
wrong language, you need to reinstall Windows.
A
Select language on “Your display language” and click [Next].
Follow the on-screen instructions.
A
Select language and OS (32bit or 64bit) on “Select OS” screen and click [OK].
The language setting will start by clicking [OK] on the confi rmation screen.
You can return to the “Select OS” screen by clicking [Cancel].
The language and OS setting will be completed in about 15 minutes.
B
When termination screen is displayed, click [OK] to turn off the computer.
C
Turn on the computer.
7 Setup Windows.
Follow the on-screen instructions.
The computer restarts several times. Do not touch the keyboard or touch
pad, and wait until the drive indicator has turned off.
After the computer is turned on, the screen remains black or unchanged for
a while, but this is not a malfunction. Wait for a moment until the Windows
setup screen appears.
During setup of Windows, use the touch pad and clicking to move the pointer
and to click an item.
Setup of Windows will take approximately 5 minutes /
20 minutes.
Go to the next step, confi rming each message on the display.
Follow the steps below.
A
When “Enable sensors” is displayed, click [Enable this sensor].
B
When the [User Account Control] screen is displayed, click [Yes].
C
At the [Display Rotation Tool] confi rmation screen, click [Yes].
The computer restarts automatically, and the setting is enabled.
“Join a wireless network” screen may not appear.
You can set the Wireless Network after the setup of Windows is complete.

19
Getting Started
CAUTION
You can change the user name, password, image and security setting after
setup of Windows.
Remember your password. If you forget the password, you cannot use Win-
dows. Creating a password reset disk beforehand is recommended.
Do not use the following words for user name: CON, PRN, AUX, CLOCK$, NUL,
COM1 to COM9, LPT1 to LPT9, @, &, space. In particular, if you create a user
name (account name) that includes the “@” mark, a password will be requested
at the log-on screen, even if no password has been set. If you try to log on
without entering a password, “The user name or password is incorrect.” may be
displayed and you will not be able to sign in / log on
to Windows (
page 33).
Use standard characters as a computer name: numbers 0 through 9, uppercase
and lowercase letters from A to Z, and the hyphen (-) character.
If the error message “The computer name is not valid” appears, check if charac-
ters other than the above are not entered. If the error message still remains on
the display, set the key entry mode to English (“EN”) and enter characters.
8
Set the time zone, and then set the date and time.
A
Open the Control Panel.
1. Right-click any empty location on the Start screen.
2. Click [All apps] on the toolbar.
3. Click [Control Panel] under “Windows System”.
B
Click [Clock, Language, and Region] - [Date and Time].
C
Click [Change time zone…].
D
Select the time zone, then click [OK].
E
Click [Change date and time…], then set the date and time.
9 Create the recovery disc.
A recovery disc allows you to install OS and restore its factory default condi-
tion, in case, for example, the recovery partition of the HDD is damaged. We
recommend creating a recovery disc before you begin using the computer.
Refer to
Reference Manual “Recovery Disc Creation Utility” about creat-
ing the disc.
NOTE
PC Information Viewer
This computer periodically records the management information of the hard disk, etc. The maximum data volume
for each record is 1024 bytes.
This information is only used for estimating the cause when the hard disk goes down by any possibility. They are
never sent to outside via network nor used for any other purpose except for the purpose described the above.
To disable the function, add the check mark for [Disable the automatic save function for management information
history] in [Hard Disk Status] of PC Information Viewer, and click [OK].
(
Reference Manual “Checking the Computer’s Usage Status”)
<For MUI OS model>
In the default settings, a shortcut icon for Korean language is on the Desktop screen. You may delete the icon if not
necessary.
Before using wireless function
A
Slide the wireless switch to ON.
B
Click [Charm] - - [Change PC Settings] - [Wireless].
Set [Airplane mode] to [Off], and then;
set [Wi-Fi] in “Wireless device” to [On] (for wireless LAN).
set [Mobile broadband] in “Wireless device” to [On] (for wireless WAN).
set [Bluetooth] in “Wireless device” to [On] (for Bluetooth).

20
Getting Started
First-time Operation
To change the partition structure
You can shrink a part of an existing partition to create unallocated disk space, from which you can create a new parti-
tion. In the default setting, you can use a single partition.
A
Open “Computer”. Right-click [Computer], then click [Manage].
To open “Computer”, proceed as follows on the Start screen.
1. Right-click any empty location on the Start screen.
2. Click [All apps] on the toolbar.
3. Click [Computer] under “Windows System”.
Click
(Start) and right-click [Computer], then click [Manage].
A standard user needs to enter an administrator password.
B
Click [Disk Management].
C
Right-click the partition for Windows (“c” drive in the default setting), and click [Shrink Volume].
The partition size depends on the computer specifi cations.
D
Input the size in [Enter the amount of space to shrink in MB] and click [Shrink].
You cannot input a larger number than the displayed size.
To select [Reinstall to the System and OS partitions.] in installing OS (
page 28), 70
GB
*1
/
60
GB
or more is necessary for [Total size after shrink in MB].
E
Right-click [Unallocated] (the shrunk space in the step
D
) and click [New Simple Volume].
F
Follow the on-screen instructions to make the settings, and click [Finish].
Wait until formatting is completed.
*1
For MUI OS model, 100
GB
or more is necessary.
NOTE
You can create an additional partition using remaining unallocated space or newly creating unallocated space.
To delete a partition, right-click the partition and click [Delete Volume] in the step
C
.
<For MUI OS model>To select language
To select a language other than the one you have selected during the fi rst-time operation, follow the steps below.
A
Open the Control Panel.
1. Right-click any empty location on the Start screen.
2. Click [All apps] on the toolbar.
3. Click [Control Panel] under “Windows System”.
B
Click [Clock, Language, and Region] - [Language] - [Add a language].
C
Select a language, and then click [Add].
Depending on the region, two or more languages are selectable. Click [Open] and select the desired language,
and then click [Add].
D
Click [Option] for the language you want to use.
E
Click [Make this the primary language].
F
Click [Log off now].
G
Sign in to the Windows.
/