Tefal Sensor Owner's manual

Category
Pressure cookers
Type
Owner's manual

Tefal Sensor is a versatile pressure cooker that offers safe and efficient cooking. With two cooking regulator valves (13 lb and 8 lb), it's ideal for a variety of foods, from fast cooking of meats to steaming delicate vegetables. The safety features include an automatic locking lid, two safety devices against excess pressure, and a red locking indicator that shows when pressure is released. It's suitable for all hob types, including induction, and is easy to clean with hand washing or in the dishwasher (except for the lid handle locking mechanism).

Tefal Sensor is a versatile pressure cooker that offers safe and efficient cooking. With two cooking regulator valves (13 lb and 8 lb), it's ideal for a variety of foods, from fast cooking of meats to steaming delicate vegetables. The safety features include an automatic locking lid, two safety devices against excess pressure, and a red locking indicator that shows when pressure is released. It's suitable for all hob types, including induction, and is easy to clean with hand washing or in the dishwasher (except for the lid handle locking mechanism).

RÉF 0048017 - ÉDITION MARS 1997
CONCEPTION : ADHOC STUDIO
SENSOR
PRESSURE COOKER
SENSOR UK 0048017 9/02/00 17:43 Page 1
1
INSTRUCTIONS FOR USEINSTRUCTIONS FOR USE
DESCRIPTION OF YOUR PRESSURE COOKER
1 Cooking regulator valve black with red stripe - 13 lb pressure.
black with green stripe - 8 lb pressure.
2 Centre pipe.
3 Lid release plate.
4 Lid handle.
5 Stainless steel lid.
6 Safety vent.
7 Gasket.
8 Safety valve (non-removable, fixed under lid).
9 Locking indicator (red).
10 Basket.
11 Trivet.
12 Short pan handle.
13 Long pan handle.
14 Pan.
HOB SUITABILITY
Your pressure cooker is suitable for use on all hobs types including induction.
BEFORE THE FIRST USE
Open the lid. Remove all the accessories, packaging and labels. Before use read all the
instructions especially the section "Golden Rules" and "Safety Warnings".
Before cooking food, operate as explained below for 20 minutes with water only to
remove any "new smells" and ensure correct fitting of the gasket.
(The numbers in brackets in the text below correspond to the diagram of the pressure
cooker).
3
5
2
1
6
7
12
4
8
9
10
11
13
14
SENSOR UK 0048017 9/02/00 17:43 Page 2
INSTRUCTIONS FOR USE
Raising to full pressure:
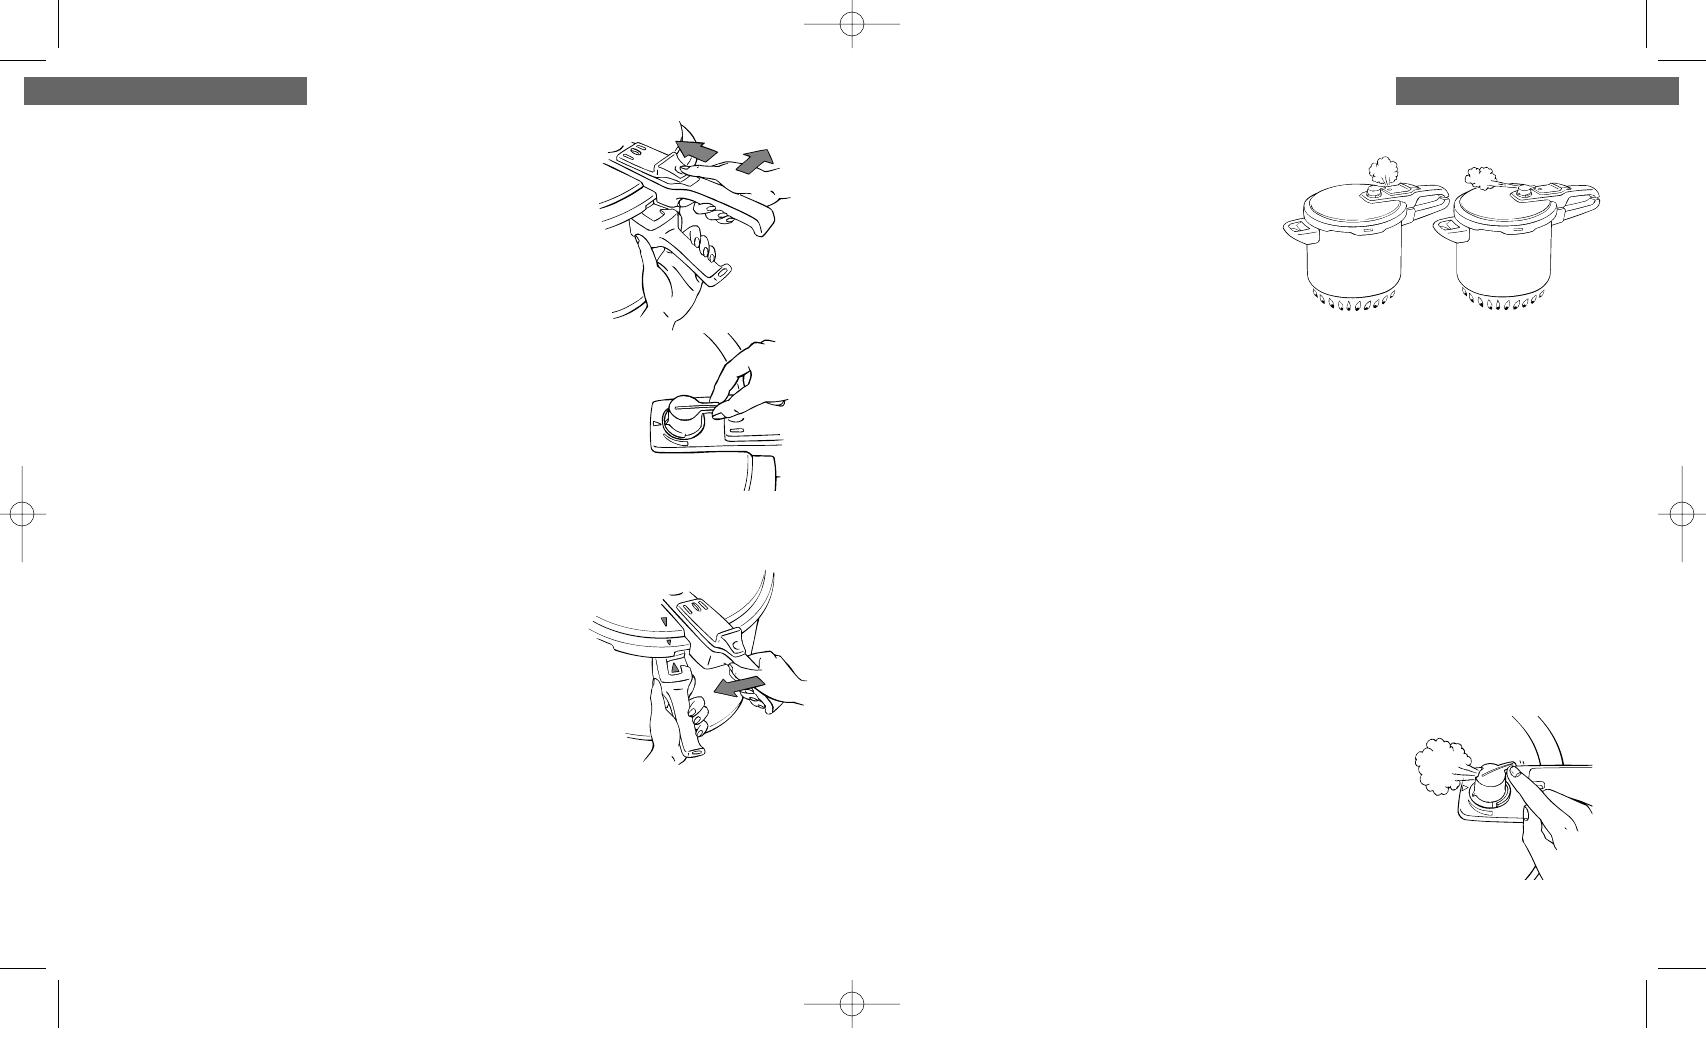
First steam escapes through the red locking indica-
tor (9), see Fig. a. As soon as pressure starts to
build up, however slight, the locking indicator
rises and locks the lid. (Opening the lid is now
impossible until the pressure has been safely
released).
Wait until a steady flow of steam escapes through the cooking regulator valve, accom-
panied by a loud hiss, see Fig. b. The cooker is now at full pressure. Lower the source of
heat to maintain a gentle, steady release of steam. Leave to operate for 20 minutes.
(Reduce the heat sufficiently to hear a steady muttering sound with a gentle flow of
steam. If the heat is too high, there is a constant loud hissing. If the heat is too low,
there is little or no noise).
Warning: It is not recommended that the cooker is left unattended during use.
Remember during cooking you may need to adjust the heat level.
Note: If the locking indicator drops down during cooking, increase the heat a little and
extend the cooking time.
If the cooking regulator turns to the "release position" during cooking, it could mean
either the heat is too high or the pressure cooker has boiled dry.
Never remove the cooking regulator until the pressure has been released.
Condensed water may collect around the centre pipe under the cooking regulator valve
which is normal.
Releasing the pressure and opening the lid:
Turn off the heat source and slowly turn the cooking regulator
valve anti-clockwise. The more the valve is turned the more
steam escapes. When all the steam is released and there is no more
pressure, the red locking indicator drops down and the lid can be opened.
Empty the pan. Rinse and dry the pan and lid. Your pressure cooker is
now ready for cooking.
INSTRUCTIONS FOR USE
Opening the lid:
Hold the lid handle (4) with one hand and hold the pan handle
(13) with the other hand. Push the lid release plate (3) for-
wards and at the same time, turn the lid to the right as far
as it will go. Lift off the lid.
Place the regulator valve on the lid:
Press it down firmly onto the centre pipe (2) in the position shown on the
diagram. The coloured stripe on the regulator must be in line with the
red arrow on the lid. This is the "cooking position".
Sensor is supplied with two cooking regulator valves:
red stripe (13 lb): fast cooking.
Ideal for most foods especially meat, and for defrosting.
green stripe (8 lb): steaming and low pressure cooking.
Ideal for delicate foods such as fish or when steaming.
Closing the lid:
Place the lid (5) onto the pan so that the arrow on the lid
is opposite the arrow on the pan handle. Hold the
handles as shown in the diagram. Turn the lid handle to the left.
A "click" indicates it is properly closed. If the pressure cooker is
not properly shut there will be no build up of pressure.
Warning: To ensure safe operation, it is important to follow
these instructions for closing the lid.
Place the pressure cooker on the most powerful heat setting:
Put on to a high heat. Do not allow heat, especially a gas flame, to come in contact
with the handles. Position the cooker so that the steam outlet on the cooking regulator
valve is away from you.
2 3
a b
SENSOR UK 0048017 9/02/00 17:43 Page 3
INSTRUCTIONS FOR USE
At the end of cooking:
Turn off the heat and release the steam either quickly or slowly
according to the recipe or type of food cooked.
Release quickly - for stews, vegetables, and fish dishes.
• Either:
1) Turn the cooking regulator valve anti-clockwise to the
"steam release position" by placing your finger on the tab. Steam
is released through the outlet on the side of the cooking regulator.
Always ensure the direction of the steam is released away from you. Keep your
fingers aways from the outlet. The more the valve is turned the more
the steam escapes.
• Or:
2) Lift the cooker away from the heat using both handles. Place
the pressure cooker under running cold water.
Make sure water never runs through the cooking regulator into
the pan.
Wait for the red locking indicator to drop before opening the lid.
Release slowly - for soups, stocks, milk puddings, egg custard, dried vegetables and
pulses, puddings or cake mixtures containing raising agents, and recipes containing rice
and pasta. Lift the cooker away from the heat and leave the cooking regulator in the
"cooking position". Allow to cool slowly at room temperature, for about 10-15 minutes,
until the red locking indicator drops down.
Note: The cooking regulator will remain hot after the steam is released. Either allow to
cool or remove using an oven glove.
Remove food as soon as possible after cooking. Do not leave food in the cooker for a
long time as this can mark the interior.
INSTRUCTIONS FOR USE
USING YOUR PRESSURE COOKER
Adding the food and liquid:
Place the ingredients and required quantity of liquid in the pan (see section Golden rules
for pressure cooking for detailed advice). Always use a liquid that will give off steam when
boiled e. g. water, stock, wine, beer, cider or milk. Never use oil or melted fat.
Minimum filling levels:
The minimum quantity of liquid required for normal cooking is
1/2 pint/300 ml.
Maximum filling levels:
To avoid any risk of overflowing never exceed the following levels:
Solid foods e. g. vegetables, meat joints:
- no more than 2/3 full.
Liquids and cereals e. g., soup, stews and rice:
- no more than 1/2 full.
Pulses e. g. lentils, kidney beans:
- no more than 1/3 full.
Steaming:
When using the basket, the water level must not exceed the level of the trivet otherwise
the food will be immersed instead of cooking in steam. Use at least 1 1/4 pints/750 ml
of water.
Cooking:
Put the lid on the cooker and close the lid. Place the cooking
regulator valve in the "cooking position". Set the heat source to
high, bring the cooker to full pressure as explained in Fig. a and
b and then lower the heat to maintain a gentle, steady release of
steam.
4 5
SENSOR UK 0048017 9/02/00 17:43 Page 4
INSTRUCTIONS FOR USE
If this happens follow directions I. to v. above and then send the cooker to the Tefal
Pressure Cooker Service Centre for inspection as the pan may be distorted (this is not
covered by the Tefal guarantee).
CLEANING AND MAINTENANCE
CLEANING
Hand washing: After each use wash the pan, and all the accessories in hot water and
washing-up liquid. Dry immediately to bring back the shine. The exterior of the cooker
can be cleaned with a proprietary stainless steel cleaner.
To clean the lid remove the gasket and cooking regulator. Wipe the lid with a damp
cloth. If particularly dirty, wash the lid and gasket in hot water and washing-up liquid
(avoid immersing the handle locking mechanism of the lid as it is difficult do dry).
Do not use abrasive powders, bicarbonate of soda or bleach on any part of the cooker.
To remove food stuck to the base pour in a solution of biological washing powder and
leave to soak for several hours. Never leave the exterior of the cooker to soak in water
as this will damage the metal finish.
In areas with hard or chalky water, any white specks over the base can be removed by
wiping fresh lemon juice.
Dishwasher cleaning: The pan only (not the lid) can be cleaned in a dishwasher but
must be removed immediately the cycle finishes otherwise the exterior may dull and
water stain. The lid must never be cleaned in a diswasher.
MAINTENANCE
Be sure all the steam has been released and that the locking indicator has fully dropped
before carrying out any maintenance. After each use check whether the following parts
need cleaning.
INSTRUCTIONS FOR USE
SAFE COOKING WITH YOUR PRESSURE COOKER
Your Tefal Pressure Cooker offers:
Safety in closing: if the lid is not correctly shut there can be no build-up of pressure.
Safety during use: as soon as there is any pressure, the lid automatically locks.
Safety when opening -: as long as any pressure remains in the cooker, opening the
lid is impossible.
Safety with excess pressure: the cooking regulator valve controls the normal level of
pressure required for pressure cooking. If this becomes blocked (due to inadequate
cleaning or a fragment of food), two safety devices against excess pressure will come
into operation as follows:
1. The red locking indicator will rise higher from its casing and allow excess pressure to
escape rapidly. Some steam and/or food may be ejected in a vertical direction. If this
happens:
ITurn off the heat source immediately taking special care to protect your hands.
II Leave the pan on the cooker. Wait until it has cooled and stopped spurting before
placing in a bowl of cold water.
III Allow the cooker to cool fully to ensure that the pressure is completely released.
IV Using an oven glove to protect your hands, gently push down the locking indicator
using a knitting needle or skewer. The locking indicator will fall into pan.
VClean the locking indicator under hot running water and check for any food par-
ticles around the safety valve (8) which may be blocking the locking indicator. Clean
the cooker as directed in section "Cleaning".
VI Make sure the centre pipe (4) and cooking regulator are clean and free from food
debris before re-using the cooker.
2. Should the first safety device fail (because the locking indicator is blocked), the
second device operates by allowing the gasket to expand so that steam and/or hot food
are ejected vertically downards through the cutout section on the left hand side of the
lid, the safety vent (7). This may be forceful and, if the pressure cooker is being used on
a gas burner, the gas may be extinguished.
6 7
SENSOR UK 0048017 9/02/00 17:43 Page 5
SAFETY WARNINGS
The safety of this appliance complies with the technical regulations and stan-
dards in force.
Only use the appliance in a stable position on the heat source.
Never let the cooker boil dry. This risks serious damage to the appliance.
When in use never leave the appliance unattended. Do not leave the appliance
within the reach of chidren.
Do not exceed the maximum quantities recommended.
Do not touch the metal parts of the appliance when it is in operation. Use the
insulated plastic handles.
Do not place your face or hands near the steam evacuation vents.
Avoid moving the appliance when it is under pressure.
Turn off the source of heat immediately if the appliance is not working properly.
Never use the appliance to fry under pressure.
Dismantling, cleaning and re-assembling of all the safety devices and their
replacement should be carried out according to the instructions for use.
No modification should be made to the safety devices and their replacement
should be undertaken by an approved Service Centre.
Any repairs should be made with genuine Tefal spare parts.
Do not use the appliance if it has been dropped and shows signs of damage or
functions abnormally. In these cases, your appliance should be checked by the
Tefal Pressure Cooker Service Centre (see section After Sales Service for details).
This appliance is intended for domestic use only and is not designed for com-
mercial use. The manufacturer accepts no liability if the appliance is used for
commercial purpose or in a manner which does not comply with the operating
instructions.
INSTRUCTIONS FOR USE
Cleaning the locking indicator:
Check that the indicator moves freely in its casing. If not, it should be cleaned.
Remove the red locking indicator by pushing down with knitting needle
or skewer from the top of the lid.
Clean the red locking indicator and housing under
hot running water. To replace, turn the lid upside
down and push firmly into the rubber safety
valve. Replace the lid release plate or timer.
Cleaning the centre pipe:
Check that there is no obstruction to the pipe by holding it up to the
light. Clean with hot running water and a skewer. Also, inspect the
cooking regulator valve and if blocked clean in hot water.
Removing and cleaning the gasket:
The gasket lifts out and is put back by easing in place. Clean
it with hot water and washing-up liquid. The gasket must be
replaced regularly every 9-12 months.
Note: If the cooker is not used for a long period of time the
gasket may need replacing as it can harden and then will
not form an air-tight seal.
Do not attempt to dismantle any other part of the cooker other than those men-
tioned above. If food is trapped around or under the lid release plate mechanism of
the lid handle return it for servicing, (see section "After Sales Service" for details).
Storage:
Ensure all parts are thoroughly dry before storage. Put the lid on but leave unlock (with
the handle apart) to allow air to circulate and prevent smells.
8
INSTRUCTIONS FOR USE
9
SENSOR UK 0048017 9/02/00 17:43 Page 6
COOKING GUIDE
COOKING GUIDE
- The cooking times in the tables are a guide only and may need slight adjustment to
suit personal taste. Follow the special instructions listed in the tables.
- The minimum quantity of liquid required for normal cooking is 1/2 pint (300 ml) for
the first 1/4 hour of cooking. For each additional 1/4 hour or part of 1/4 hour, add a
further 1/4 pint (150 ml) of liquid. Note: this is only a general guide. Check with the
table for any exceptions to this rule such as pulses and steamed puddings.
- Never exceed the maximum filling levels (see page 4).
- Always use a liquid which gives off steam when boiled eg water, stock, wine etc.
Never use oil or melted fat.
- If adapting a conventional recipe for pressure cooking, a general guide is to calculate
one third of the conventional cooking time. Calculate the amount of liquid required
according to the pressure cooking time and type of food.
- Cooking containers and coverings must be able to withstand temperatures of 130°C
(250°F). Do not use plastic lids as they prevent steam from being in contact with the
mixture. Any covering on containers eg foil, must be securely tied otherwise they
could block the safety devices.
- The Sensor pressure cooker operates at 13 lb pressure (black valve with red stripe)
and at 8 lb pressure (black valve with green stripe). Therefore cooking times in pressu-
re cooker recipe books devised using 15 lb pressure may be shorter. These recipes can
be adjusted for use in your pressure cooker by increasing the cooking time and alte-
ring the quantity of liquid used.
AFTER SALES SERVICE
AFTER SALES SERVICE AND SPARE PARTS
FOR U.K. ONLY
If your pressure cooker requires servicing please return the complete appliance, with its
pan and lid to:
TEFAL UK Ltd, PO Box 66, Nottingham, NG7 1SU - Tel 01159 414436 or
Gavin Electronics Ltd, 83 Lower Camden Street, Dublin 2, Eire, Southern Ireland - 014
757 109
If posting to the Service Centre, ensure all Post Office specifications are applied ie :
adequate outer protective carton, correctly addressed and sealed (refer to your local
Post Office for further information). Obtain a certificate of posting. Damages due to
bad packaging are the responsibility of the sender. Before posting:
1Enclose your name, address and details of the fault.
2If your are returning under the guarantee, it must be accompanied by a till receipt as
proof of date of purchase.
3If it is outside the guarantee period, please advise our Service Centre of the maximum
amount of money you wish to spend to make it operational again.
The above details are in addition to a consumer’s statutory rights and does not affect
those right in any way.
Pressure cookers cannot be repaired by TEFAL Electrical Service Centres. Repair is
free of charge under the conditions of the guarantee.
Spare Parts: The pressure regulator and gasket are available from Tefal Consumer
Bureau (Tel: 01702 290089) and the handles, baskets and trivet are available from
Ransoms (Tel: 01815 988921).
If you require further information contact Customer Services on 01604 762 726.
10 11
SENSOR UK 0048017 9/02/00 17:43 Page 7
Cereals, rice and pasta
Barley, Pearl
Macaroni
Noodles
Pasta shapes
(ordinary or wholewheat)
Rice
Easy cook
(par boiled)
Long grain
(patna, Basmati)
Brown rice
Spaghetti (ordinary or Wholewheat)
Fine
Regular
Desserts and puddings
Dried fruits
Apple rings
Apricots
Figs
Fruit salad
Peaches
Pears
Prunes
no
no
no
no
no
no
no
no
no
no
no
no
no
no
no
no
20 mins
3-4 mins
2-3 mins
2-3 mins
5 mins
5 mins
15 mins
2 mins
3 mins
8 mins
5 mins
15 mins
15 mins
7 mins
15 mins
5 mins
Note : Reduce cooking
times by 1 minute for
“no soak” dried fruits.
slowly
slowly
slowly
slowly
slowly
slowly
slowly
slowly
slowly
slowly
slowly
slowly
slowly
slowly
slowly
slowly
After each use check the centre
pipe and locking indicator are free
from food debris.
Never fill more than half full with
food and liquid.
Do not cook oatmeal in your pres-
sure cooker as it could block the
controls.
For each 4oz (100g) of cereal, rice
or pasta add 11/2 pts (900ml) of
boiling water.
Bring to full pressure using
medium heat (instead of high
heat) to avoid contents frothing
up and blocking vents.
Do not use “Quick cook” type
pasta and cereals in a pressure
cooker.
Never fill the pan more than half
full.
There is no need to soak fruit
overnight. Soak with 1 pt (600ml)
boiling water to 1 lb (500g) dried
fruit for 10 mins. (Except for “no
soak” dried fruit which does not
need soaking).
Food Basket
required
Cooking
time
Reg.
valve
Steam release
method
Special instructions and
maximum quantities
Fresh fruit
Apples, sliced
Apples, whole
Apricots, halved
Blackberries
Cherries
Currants (black,
red, etc…)
Damsons,
halved & stoned
Gooseberries
Greengages,
halved & stoned
Loganberries
Pears, sliced
Pears, whole
Plums, halved
& stoned
Peaches, halved
or sliced
Raspberries
Rhubarb (1in lengths)
Egg custards
Egg custard
Creme caramel
no
no
no
no
no
no
no
no
no
no
no
no
no
no
no
no
no
no
6 mins
7-8 mins
5 mins
5 mins
5 mins
5 mins
5 mins
6mins
5 mins
5 mins
4 mins
6 mins
5 mins
4-5 mins
5 mins
6 mins
7 mins
13 mins
slowly
slowly
slowly
slowly
slowly
slowly
slowly
slowly
slowly
slowly
slowly
slowly
slowly
slowly
slowly
slowly
slowly
slowly
Never fill the pan more than half
full.
Always use a minimum of 1/2 pint
(300 ml) of liquid.
To avoid overcooking soft fruit,
cook in their own juices in a basin
covered with a double layer of
greaseproof paper. Tie securely.
Stand on trivet and add 1/2 pint
(300ml) of water.
Stand a boilable dish on the trivet.
Cover the container with a double
layer of greased, greaseproof
paper and tie securely.
Use a minimum of 1/2 pint
(300ml) of water for steaming.
Food Steam release
method
Special instructions and
maximum quantities
COOKING GUIDECOOKING GUIDE
12 13
Red
Red
Red
Red
Red
Red
Red
Red
Red
Red
Red
Red
Red
Red
Red
Red
Basket
required
Cooking
time
Reg.
valve
Green
Green
Green
Green
Green
Green
Green
Green
Green
Green
Green
Green
Green
Green
Green
Green
Red
Red
SENSOR UK 0048017 9/02/00 17:43 Page 8
Milk puddings
Rice
Tapioca, sago
and semolina
Steamed puddings
Sponge pudding
(11/2 pint size basin)
Sponge puddings
(individual)
Steamed suet pudding
(11/2 pint
size basin)
Jam roly-poly
no
no
no
no
no
no
12 mins
8 mins
Pre-steaming: 15 mins
Cooking: 50 mins
Pre-steaming: 5 mins
Cooking: 10 mins
Pre-steaming: 15 mins
Cooking: 50 mins
Pre-steaming: 15 mins
Cooking: 50 mins
slowly
slowly
slowly
slowly
slowly
slowly
Never fill the pan more than half full.
Use a low to medium heat other-
wise the rice could burn.
Use 2oz (50g) rice to 1 pint
(550ml) milk.
Heat the contents in the pan until
boiling, lower the heat to obtain a
rolling boil (the contents should
not rise up the pan). Close the lid
and without alterning the heat
bring to full pressure.
Stand a boilable basin on the trivet.
Never fill more than two-thirds full
with sponge mixture.
Cover the basin with greased,
greaseproof paper and tie secure-
ly. If using foil add an extra 10-15
mins to the cooking time.
Use a minimum of 11/2 pint
(900ml) boiling water for combi-
ned pre-steaming and cooking
time of 1 hour. For each additio-
nal 1/4 hour, add an extra 1/4 pint
(150ml) boiling water.
Pre-steaming means closing the
lid without the pressure indicator
valve in position and heating the
cooker on a medium heat until a
steady flow of steam comes from
the centre vent and around the
locking indicator. Lower the heat so
that there is only a small amount of
Food Basket
required
Cooking
time
Reg.
valve
Steam release
method
Special instructions and
maximum quantities
Christmas pudding
(weight of mixture)
1 lb
11/2 lb
2 lb
Fish
Steamed white fish
eg. cod. coley, haddock,
huss, skate, turbot
Eg. plaice, sole,
whiting
Oily fish eg.
herrings, mackerel,
mullet (red or grey)
yes
Red
yes
Red
yes
Red
yes
yes
yes
Pre-steaming time:
20 mins
Cooking time: 13/4 hrs
Re-heating time: 20 mins
Pre-steaming time:
20 mins
Cooking time: 2 1/2hrs
Re-heating time: 25 mins
Pre-steaming time:
30 mins
Cooking time: 3hrs
Re-heating time: 30 mins
Fillets, steaks & cutlets
3-4 mins
Whole fish 5 mins per lb
Fillets 1-2 mins
Fillets 4-5 mins
Whole fish 5-7 mins per lb
slowly
slowly
slowly
slowly
slowly
slowly
quickly
quickly
quickly
quickly
quickly
steam coming out and pre-steam
for the required time.
To cook the pudding, place the pres-
sure indicator valve on the centre
vent using an oven glove or tea
towel.
Christmas puddings are cooked
according to the weight of mixture
and not the size of the bowl, so
remember to weigh the mixture.
Due to the long cooking times ensure
sufficient boiling water is used
(see below). 1 lb mixture: 21/2 pts
(see below). 11/2 lb mixture: 3 pts
(see below). 2 lb mixture: 31/2 pts
Cover the basin with a triple layer
of greased, greaseproof paper
and a layer of foil. Tie securely.
See special instructions section for
steamed pudding on how to pre-
steam pudding.
If preferred fish can be cooked direct-
ly in the pan, eg. for a fish stew.
Frozen fish can be used instead of
fresh. Cook from frozen - no need
to thaw.
To remove any fishy smells from
the cooker, boil some vinegar and
water in the pan.
Food Steam release
method
Special instructions and
maximum quantities
COOKING GUIDECOOKING GUIDE
14 15
Red
Red
Green
Green
Green
Green
Basket
required
Cooking
time
Reg.
valve
Green
Green
Green
SENSOR UK 0048017 9/02/00 17:43 Page 9
Game
Rabbit
Hare
Venison
Pheasant
Partridge
Meat pot roasting
Beef
Lamb
Pork
Veal
Chops, cutlet & fillets
lamb, pork & veal
Meat stewing & braising
Braised beef
Beef stew
Lamb stew
Steak & kidney
Minced beef
Chilli con carne
Beef curry
no
no
no
no
no
no
Red
no
Red
no
Red
no
Red
no
no
no
no
no
no
no
no
7 mins per lb
9 mins per lb
15 mins per lb
8 mins per lb
8 mins per lb
Brisket 20 mins per lb
Silverside, topside, rump
sirloin 20-25 mins per lb
Breast 15 mins per lb
(boned or rolled)
Shoulder (boned & rolled)
Leg, loin best end 17 mins per lb
Loin, shoulder (boned and
rolled) 15 mins per lb
Neck, loin, boned shoulder
12 mins per lb
10 mins
30 mins
40 mins
25 mins
25 mins
10 mins
15 mins
30 mins
quickly
quickly
quickly
quickly
quickly
slowly
slowly
slowly
slowly
slowly
slowly
slowly
quickly
quickly
quickly
quickly
quickly
quickly
quickly
Never fill more than more than
2/3 full when pot roasting.
Never fill more than 1/2 full when
stewing
Joints must not exceed 3 lb
(1,5kg) or fill the pan 2/3 full.
Weigh the joint and calculate the
cooking time per lb either stuffed
or unstuffed.
Never fill the pan more than half full.
Thicken food after pressure
cooking with eg. flour or corn-
flour, to avoid sticking on the base.
If cooking dumplings, cook the
stew and at the end of cooking
time, release the steam and add
the dumplings to the boiling meat.
Cook gently for about 20 mins
without the lid on. NEVER cook
dumplings with the lid tightly clo-
Food Basket
required
Cooking
time
Reg.
valve
Steam release
method
Special instructions and
maximum quantities
Boiling
Boiled beef
Boiled gammon or
ham joints
Poultry pot roasting
Whole chicken
Chicken portions
Duck portions
Turkey portions
Coq au vin
Preserves jam making
Apricots (fresh)
Blackberry & apple
Blackberry
Blackcurrants
Damson
Gooseberry
Plum, peach,
greengage
Jelly making
Apple
no
no
no
no
no
no
no
no
no
no
no
no
no
no
no
no
20 mins per lb
15 mins per lb
8 mins per lb
6 mins per lb
15-18 mins
12-15 mins
20 mins
4 mins
5 mins
5 mins
4 mins
5 mins
5 mins
4 mins
5 mins
slowly
slowly
slowly
slowly
slowly
slowly
slowly
slowly
slowly
slowly
slowly
slowly
slowly
slowly
slowly
sed as they could rise and block
the safety devices.
Never fill the pan more than half full.
Add 3/4 pint (450ml) liquid for joints
up to 2 lb (1kg) and an extra 1/4 pint
(150ml) for each additional 1 lb (450g).
For boil-in-the-bag joints cut the
top off the bag to prevent bursting.
Never cook poultry from frozen.
Always thaw first.
When cooking whole poultry the
pan must not be more than 2/3 full.
Never fill the pan more than half full.
Never cook a preserve under
pressure after adding the sugar,
always cook it in the open pan
without the lid.
Use the pressure cooker to pre-
cook and soften the fruit, then
add the sugar and boil in the
open pan without the lid on until
setting point is reached.
Always use sufficient water for the
type of fruit.
Follow the special instructions
above for jam making. Soften fruit
Food Steam release
method
Special instructions and
maximum quantities
COOKING GUIDECOOKING GUIDE
16 17
Red
Red
Red
Red
Red
Red
Red
Red
Red
Red
Red
Red
Red
Basket
required
Cooking
time
Reg.
valve
Red
Red
Red
Red
Red
Red
Red
Red
Red
Red
Red
Red
Red
Red
Red
Red
SENSOR UK 0048017 9/02/00 17:43 Page 10
Crab apple
Blackcurrant
Red currant
Marmalade making
Orange
Pulses
Butter beans
Bean mix
Chick peas
Haricot beans
Kidney beans
Red lentils
(to pressure only)
no
no
no
no
no
no
no
no
no
8 mins
5 mins
1 mins
18 mins
15 mins
Unsuitable for use in pres-
sure cookers as the ingre-
dients cook at different
times and could block the
safety devices
35 mins
15 mins
15 mins
To pressure only
slowly
slowly
slowly
slowly
slowly
slowly
slowly
slowly
slowly
in pressure cooker with sufficient
water and then strain through
jelly bag. Add sugar and bring to
setting point without the lid on.
Follow the special instructions
above for jam making. Soften fruit
in pressure cooker with sufficient
water and then bring to setting
point without the lid on.
The proportions for marmalade
are 1 lb of fruit, 1 pt water and 2
lb sugar.
Never fill the pan more than one-
third full with pulses and liquid.
Always soak pulses (except len-
tils) in boiling water for one
hour before cooking. Do not use
bicarbonate of soda or salt as it
could discolour the pan.
For every 8oz (250g) of dried pulses
add 2 pts (1,2litres) of cold water.
Always use a minimum of 1 pint.
Heat the contents of the pan until
boiling gently but not rising in the
pan.
Close the lid and without altering
the heat bring to full pressure.
Cook for required time. If necessary,
lower the heat so that only a small
amount of steam comes out of the
pressure indicator valve.
Food Basket
required
Cooking
time
Reg.
valve
Steam release
method
Special instructions and
maximum quantities
Peas (dried whole)
Split peas
Soya beans
Soups
Tomato soup
Mixed vegetable
soup
French onion
soup
Minestrone
Stocks
Beef stock
Poultry stock
Fish stock
Vegetables, fresh vegetables (steamed)
Asparagus
Beans
(broad, sliced)
Beans
(runner & french)
Broccoli
Brussel sprouts
(medium size)
Cabbage (finely
chopped)
Carrots (sliced)
no
no
no
no
no
no
no
no
no
no
yes
yes
yes
yes
yes
yes
yes
30 mins
8 mins
25 mins
10 mins
12 mins
5 mins
25 mins
45 mins
20 mins
15 mins
10 mins
10 mins
10 mins
2-3 mins
3-4 mins
3-4 mins
3-4 mins
slowly
slowly
slowly
quickly
quickly
slowly
slowly
slowly
slowly
slowly
quickly
quickly
quickly
quickly
quickly
quickly
quickly
Always release steam slowly
otherwise the centre pipe and
safety valve could become blocked.
After each use check the centre
pipe and locking indicator are free
from food debris.
Never fill the pan more than half
full.
Release steam slowly for thin
soups or soups with rice or pasta.
Release steam quickly for thick
soups.
If in doubt about method of steam
release, release pressure slowly.
Never fill the pan more than half
full.
Always release the steam slowly.
To steam vegetables place a mini-
mum of 1/2 pint of liquid in pan.
Place the trivet in the pan and rest
the basket on top.
Vegetables can be cut into smaller
pieces to shorten the cooking
time.
A second basket (obtainable from
your local service agent) is ideal
for cooking large quantities of
vegetables by standing it on top
of the basket already supplied.
Food Steam release
method
Special instructions and
maximum quantities
COOKING GUIDECOOKING GUIDE
18 19
Red
Red
Red
Red
Red
Red
Red
Red
Red
Basket
required
Cooking
time
Reg.
valve
Red
Red
Red
Red
Red
Red
Red
Red
Red
Red
Green
Green
Green
Green
Green
Green
Green
SENSOR UK 0048017 9/02/00 17:43 Page 11
Cauliflower
(florets)
Celery
Courgettes
(sliced)
Leeks (pieces)
Marrow (pieces)
Onion (slices)
Onion (whole)
Parsnips
(pieces)
Peas
Red or green
peppers (whole)
New potatoes
(small whole)
Old potatoes
- quarters
(1oz pieces)
- 1/2 inch thick
slices
- par boiled for
roasting
Spinach
Swede (1in cubes)
Turnip (1in cubes)
yes
yes
yes
yes
yes
yes
yes
yes
yes
yes
yes
yes
yes
yes
yes
yes
yes
3-4 mins
3-4 mins
3-4 mins
3-4 mins
3 mins
4-5 mins
6-8 mins
(depending on size)
3-4 mins
12-15 mins
14 mins
5-7 mins
7 mins
3 mins
3-4 mins
2 mins
5-6 mins
5-6 mins
quickly
quickly
quickly
quickly
quickly
quickly
quickly
quickly
quickly
quickly
quickly
quickly
quickly
quickly
quickly
quickly
quickly
Vegetables can be boiled directly
in the pan but increase the
cooking time and never fill more
than 2/3 full.
When steaming or boiling vege-
tables, use boiled water from a
kettle to reduce the time to reach
full pressure.
The divider is useful for cooking a
variety of vegetables separately.
Cook whole beetroot directly in
the pan according to the size.
Trim off stalk and root. Leave the
skin on.
Small + 1 pt water (cooking time
10-15 mins).
Medium + 11/2 pt water (cooking
time 15-20 mins).
Large + 2 pt water (cooking time
25-30 mins).
Food Basket
required
Cooking
time
Reg.
valve
Steam release
method
Special instructions and
maximum quantities
Frozen vegetables
Broad beans
Sliced greens
Whole green
beans
Broccoli spears
Brussel sprouts
Baby carrots
Sliced carrots
Cauliflower
florets
Mixed
vegetables
Peas
Spinach
Sweetcorn
kernels
yes
yes
yes
yes
yes
yes
yes
yes
yes
yes
yes
yes
10 mins
3 mins
3 mins
2 mins
6 mins
(depending on size)
7 mins
7 mins
7 mins
7 mins
3 mins
6 mins
2 mins
quickly
quickly
quickly
quickly
quickly
quickly
quickly
quickly
quickly
quickly
quickly
quickly
As frozen vegetables cook quickly,
it is often not worth using a pres-
sure cooker.
Generally the cooking times are
the same as that stated on the
packet for boiling.
Frozen vegetables can be cooked
together with fresh vegetables
providing the cooking times are
the same.
Food Steam release
method
Special instructions and
maximum quantities
COOKING GUIDE
20
Green
Green
Green
Green
Green
Green
Green
Green
Green
Green
Green
Green
Green
Green
Green
Green
Green
Basket
required
Cooking
time
Reg.
valve
Red
Red
Red
Red
Red
Red
Red
Red
Red
Red
Red
Red
SENSOR UK 0048017 9/02/00 17:43 Page 12
  • Page 1 1
  • Page 2 2
  • Page 3 3
  • Page 4 4
  • Page 5 5
  • Page 6 6
  • Page 7 7
  • Page 8 8
  • Page 9 9
  • Page 10 10
  • Page 11 11
  • Page 12 12

Tefal Sensor Owner's manual

Category
Pressure cookers
Type
Owner's manual

Tefal Sensor is a versatile pressure cooker that offers safe and efficient cooking. With two cooking regulator valves (13 lb and 8 lb), it's ideal for a variety of foods, from fast cooking of meats to steaming delicate vegetables. The safety features include an automatic locking lid, two safety devices against excess pressure, and a red locking indicator that shows when pressure is released. It's suitable for all hob types, including induction, and is easy to clean with hand washing or in the dishwasher (except for the lid handle locking mechanism).

Ask a question and I''ll find the answer in the document

Finding information in a document is now easier with AI