Sony NSC-GC3 User manual
- Category
- Document cameras
- Type
- User manual
This manual is also suitable for

© 2007 Sony Corporation 3-273-550-12(1)
Network Sharing
Camera
Instruction Manual
Before operating the unit, please read this manual thoroughly, and retain it for future reference.
NSC-GC1/GC3
For details on the advanced operations, please access
“Network Sharing Camera Handbook” contained on
the supplied CD-ROM via a computer.

2
Owner’s Record
The model and serial numbers are located
on the bottom. Record the serial number in
the space provided below. Refer to these
numbers whenever you call upon your Sony
dealer regarding this product.
Model No. NSC-GC
Serial No. ___________________________
To reduce fire or shock hazard, do
not expose the unit to rain or
moisture.
Read this first
Risk of explosion if battery is replaced by an
incorrect type.
Dispose of used batteries according to the
instruction.
“Do not incinerate, (or) disassemble; may explode
or release toxic materials. Do not short circuit;
may cause burns.”
[ RECYCLING LITHIUM-ION
BATTERIES
Lithium-Ion batteries are
recyclable.
You can help preserve our
environment by returning your
used rechargeable batteries to
the collection and recycling
location nearest you.
For more information regarding recycling of
rechargeable batteries, call toll free
1-800-822-8837, or visit http://www.rbrc.org/
Caution: Do not handle damaged or leaking
Lithium-Ion batteries.
This device complies with Part 15 of the FCC
Rules. Operation is subject to the following two
conditions: (1) This device may not cause harmful
interference, and (2) this device must accept any
interference received, including interference that
may cause undesired operation.
[ CAUTION
You are cautioned that any changes or
modifications not expressly approved in this
manual could void your authority to operate this
equipment.
[ Note:
This equipment has been tested and found to
comply with the limits for a Class B digital
device, pursuant to Part 15 of the FCC Rules.
These limits are designed to provide reasonable
protection against harmful interference in a
residential installation. This equipment generates,
uses, and can radiate radio frequency energy and,
if not installed and used in accordance with the
instructions, may cause harmful interference to
radio communications. However, there is no
guarantee that interference will not occur in a
particular installation. If this equipment does
cause harmful interference to radio or television
reception, which can be determined by turning the
equipment off and on, the user is encouraged to
try to correct the interference by one or more of
the following measures:
– Reorient or relocate the receiving antenna.
– Increase the separation between the
equipment and receiver.
– Connect the equipment into an outlet on a
circuit different from that to which the
receiver is connected.
– Consult the dealer or an experienced radio/TV
technician for help.
The supplied interface cable must be used with the
equipment in order to comply with the limits for a
digital device pursuant to Subpart B of Part 15 of
FCC Rules.
WARNING
CAUTION
For Customers in the U.S.A. and
Canada
For Customers in the U.S.A.

3
[ Notice for the customers in the
countries applying EU Directives
The manufacturer of this product is Sony
Corporation, 1-7-1 Konan Minato-ku Tokyo, 108-
0075 Japan. The Authorized Representative for
EMC and product safety is Sony Deutschland
GmbH, Hedelfinger Strasse 61, 70327 Stuttgart,
Germany. For any service or guarantee matters
please refer to the addresses given in separate
service or guarantee documents.
This product has been tested and found compliant
with the limits set out in the EMC Directive for
using connection cables shorter than 3 meters (9.8
feet).
[ Attention
The electromagnetic fields at the specific
frequencies may influence the picture and sound
of this unit.
[ Notice
If static electricity or electromagnetism causes
data transfer to discontinue midway (fail), restart
the application or disconnect and connect the
communication cable (USB, etc.) again.
[ Disposal of Old Electrical &
Electronic Equipment (Applicable
in the European Union and other
European countries with separate
collection systems)
This symbol on the product or on its packaging
indicates that this product shall not be treated as
household waste. Instead it shall be handed over
to the applicable collection point for the recycling
of electrical and electronic equipment. By
ensuring this product is disposed of correctly, you
will help prevent potential negative consequences
for the environment and human health, which
could otherwise be caused by inappropriate waste
handling of this product. The recycling of
materials will help to conserve natural resources.
For more detailed information about recycling of
this product, please contact your local Civic
Office, your household waste disposal service or
the shop where you purchased the product.
A moulded plug complying with BS 1363 is fitted
to this equipment for your safety and
convenience.
Should the fuse in the plug supplied need to be
replaced, a fuse of the same rating as the supplied
one and approved by ASTA or BSI to BS 1362,
(i.e., marked with an or mark) must be
used.
If the plug supplied with this equipment has a
detachable fuse cover, be sure to attach the fuse
cover after you change the fuse. Never use the
plug without the fuse cover. If you should lose the
fuse cover, please contact your nearest Sony
service station.
Notes on using your camera
[ Internal memory and “Memory
Stick Duo” back up
Do not turn off the camera or remove “Memory
Stick Duo” while the access lamp is lighted, as the
internal memory data or “Memory Stick Duo”
data may be destroyed. Always protect your data
by making a back up copy.
[ Notes on recording/playback
• Before you start recording, make a trial
recording to make sure that the camera is
working correctly.
• This camera is neither dust-proof, nor splash-
proof, nor water-proof. Read “Precautions”
(page 29) before operating the camera.
• Be careful not to get the camera wet. Water
entering the inside of the camera may cause
malfunctions which in some cases may not be
repairable.
For Customers in Europe
Notice for customers in the
United Kingdom

4
• Do not aim the camera at the sun or other bright
light. It may cause the malfunction of your
camera.
• Do not use the camera near a location that
generates strong radio waves or emits radiation.
The camera may not be able to record or play
back properly.
• Using the camera in sandy or dusty locations
may cause malfunctions.
• If moisture condensation occurs, remove it
before using the camera (page 29).
• Do not shake or strike the camera. In addition to
malfunctions and an inability to record images,
this may render the recording medium unusable,
or cause image data breakdown, damage or loss.
• Clean the flash surface before use. The heat of
flash emission may cause dirt on the flash
surface to become discolored or to stick to the
flash surface, resulting in insufficient light
emission.
• When connecting your camera to another device
with a cable, be sure to insert the connector plug
in the correct way. Pushing the plug forcibly
into the terminal will damage the terminal and
may result in a malfunction of your camera.
• Movies other than those shot, edited or
composed on this camera cannot be played
back.
[ Notes on the LCD screen and
lens
• The LCD screen is manufactured using
extremely high-precision technology so over
99.99% of the pixels are operational for
effective use. However, there may be some tiny
black points and/or bright points (white, red,
blue or green in color) that constantly appear on
the LCD screen. These points are normal in the
manufacturing process and do not affect the
recording in any way.
• Do not hold the camera by only holding the
LCD panel.
[ Note on disposal/transfer
When using software embedded in the camera,
personal information such as IDs and mail
addresses may be saved on the internal memory of
the camera. When transferring the camera to
others or on disposal, do so after deleting the
information input.
[ About changing the language
setting
The on-screen displays in each local language are
used for illustrating the operating procedures.
Change the screen language before using your
camera if necessary (page 9).
[ About this manual
• The photographs used as examples of pictures in
this Handbook are reproduced images, and are
not actual images shot using this camera.
• Design and specifications of recording media
and other accessories are subject to change
without notice.
• The screenshots are from Windows XP. The
scenes may vary depending on the operating
system of the computer.
[ On image data compatibility
• This camera conforms with DCF (Design rule
for Camera File system) universal standard
established by JEITA (Japan Electronics and
Information Technology Industries
Association).
• Playback of images recorded with your camera
on other equipment and playback of images
recorded or edited with other equipment on your
camera are not guaranteed.
[ Warning on copyright
Television programs, films, videotapes, and other
materials may be copyrighted. Unauthorized
recording of such materials may be contrary to the
provisions of the copyright laws.
[ No compensation for contents of
the recording
The contents of the recording cannot be
compensated for if recording or playback is not
possible due to a malfunction of your camera or
recording media, etc.

5
Table of contents
Read this first ............................................................................................ 2
Notes on using your camera .................................................................... 3
Getting started ................................................................................. 6
Checking the accessories supplied ......................................................... 6
1 Charging the built-in battery .................................................................. 7
2 Inserting a “Memory Stick Duo” (not supplied) ..................................... 8
3 Turning the camera on/setting the clock ............................................... 9
To change the language ....................................................................... 9
Shooting images easily ................................................................. 10
Useful functions for shooting .................................................................. 11
Viewing/Editing images ................................................................ 13
Changing the settings – Menu/Setup .......................................... 15
Menu items ............................................................................................. 15
Enjoying your computer ............................................................... 16
Viewing “Network Sharing Camera Handbook” (PDF) ........................... 16
What you can do with a Windows computer .......................................... 16
Using your Macintosh computer ............................................................ 20
Indicators on the screen ............................................................... 22
Battery life and memory capacity ................................................ 24
Battery life and the available recording and playback time ................... 24
Number of still images and recording time of movies ............................ 25
Troubleshooting ............................................................................ 26
Battery and power .................................................................................. 26
Shooting movies/still images .................................................................. 26
Viewing images ...................................................................................... 27
Computers .............................................................................................. 27
Precautions .................................................................................... 29
Specifications ................................................................................ 31

6
Getting started
Checking the accessories supplied
• AC Adaptor UPA-AC05 (1)/
Power cord (mains lead) (1)
• A/V connecting cable (1)
• USB cable (1)
• Hand strap (1)
• CD-ROM “Net-Sharing CAM Application
Software” (1) (page 16)
– Picture Motion Browser (software)
– Picture Motion Browser Guide
– Network Sharing Camera Handbook (PDF)
• Instruction Manual (this manual) (1)
Attach the strap and place your hand
through the loop to prevent the camera
from damage by being dropped, etc.
Hook

7
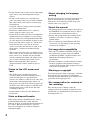
1 Charging the built-in battery
• The battery is built in within the camera.
1Remove the insulation sheet.
2Connect the AC Adaptor to the DC IN jack of the camera, making sure the
power is off.
3Plug the power cord (mains lead) to a wall outlet (wall socket).
The /CHG lamp lights on, and charging starts.
When the /CHG lamp turns off, charging is finished (Practical charge).
[ Charging time
• Time required to charge a fully depleted battery at a temperature of 25°C (77°F). Charging may take
longer under certain circumstances or conditions.
• See page 25 for the number of images that can be recorded.
• Connect the AC Adaptor to an easily accessible wall outlet (wall socket) close by.
• Even if the /CHG lamp is not lit, the AC Adaptor is not disconnected from the AC power source (mains)
as long as it is connected to the wall outlet (wall socket). If some trouble occurs while using the AC
Adaptor, immediately shut off the power by disconnecting the plug from the wall outlet (wall socket).
• If you do not operate the camera for a long time, disconnect the AC Adaptor from the DC IN jack of the
camera and from a wall outlet (wall socket).
Full charge time
Approx. 120 min.
/CHG lamp
DC IN jack
AC Adaptor
Insulation sheet
Power cord (mains lead)

8
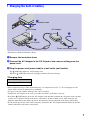
2 Inserting a “Memory Stick Duo” (not supplied)
1Open the “Memory Stick Duo” cover.
2Insert the “Memory Stick Duo” (not supplied) all the way in until it clicks.
3Close the “Memory Stick Duo” cover.
[ When there is no “Memory Stick Duo” inserted
The camera records/plays back images using the internal memory (approx. 8 MB).
[ To remove “Memory Stick Duo”
Open the “Memory Stick Duo” cover.
• Never remove “Memory Stick Duo” when the access lamp is lit. This may cause damage to data in the
“Memory Stick Duo”.
Insert the “Memory Stick Duo” all the
way in as shown in the illustration
until it clicks.
“Memory Stick Duo” cover
Make sure that the access lamp is not lit, then push the
“Memory Stick Duo” in once.

9
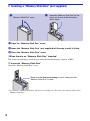
3 Turning the camera on/setting the clock
1Open the LCD panel to turn the power on.
Open and lift the LCD panel up to a 90 degrees angle from the camera (1), then rotate it to the desired
angle (2).
You can also turn the power on by pressing POWER button.
2Set the clock with the Multi-selector.
1 Select the date display format with v/V.
2 Select each item with b/B and set the numeric value with v/V.
3 Select [OK].
To turn the power off
Press POWER button.
[ To change the date and time
Press MENU, and select [Clock Set] in (Setup 2) (page 15).
[ To change the language
Press MENU, and select [ Language] in (Setup 1) (page 15).
• You can turn off the operation beeps by selecting [Beep] in (Setup 1) (page 15).
/:/
Tilt the Multi-selector side to side and up and down to
select, and press the center to set the setting.
LCD screen
POWER button
Multi-selector
MENU button
2 180 degrees (max.)
2 90 degrees (max.)
1 90 degrees (max.)
2
1
1

10
Shooting images easily
1Open the LCD panel to turn the power on.
You can also turn the power on by pressing POWER.
2Make sure the (Rec mode) lamp lights up.
3Confirm the composition.
4Start shooting.
• When shooting movies, the angle of view will change from when shooting still images.
• The shooting mode will automatically stop in either of the following situations.
– When the file size of the movie being recorded exceeds 2 GB.
– After the maximum shooting duration time* for each file has passed.
* NSC-GC1: 2 hours, NSC-GC3: 29 minutes
• When shooting movies, the anti-blur function will be set on.
(Screen display switch) button
MENU button
Zoom button
Multi-selector
Focus range
switch
Self-timer button
Flash button
(Rec mode)
lamp
POWER button
MODE button
MOVIE button
PHOTO button
(Image Size) button
/CHG lamp
Position the subject in the center of the screen.
When shooting movies:
Press MOVIE.
To stop recording, press MOVIE again.
When shooting still images:
Press PHOTO.
Movies Still images
+2.0EV
[
400
]
5M
101

11
Useful functions for shooting
[ W/T Using the zoom
Press T to zoom, press W to undo zoom.
[ Close-up mode
Slide the Focus range switch to (Close-
up) when shooting a subject close-up.
: Normal shooting (Approx. 1.0 m or farther
(3 feet 3 3/8 inches or farther))
: Close-up shooting (Approx. 60 cm to 1.0 m
(1 feet 11 5/8 inches to 3 feet 3 3/8 inches))
[ Flash (Selecting a flash mode
for still images)
Press button repeatedly until the desired
icon is displayed on the LCD screen.
(No indicator): Flash Auto
Strobes when there is insufficient light or
backlight (default setting)
: Flash forced on
: Slow synchro (Flash forced on)
The shutter speed is slow in a dark place to
clearly shoot the background that is out of
flash light.
: Flash forced off
• While charging the flash, /CHG lamp lights on
and is displayed.
[ Using the self-timer
Press (Self-timer) button.
(No indicator): Not using the self-timer
: Using the self-timer
If you press PHOTO, countdown timer is
displayed, and after rapid beep sounds are
heard, the camera will shoot.
[ Changing the screen display
Each time you press button, the display
changes as follows.
[ Selecting the image size
Press (Image size) button to select
(Photo Size) or (Movie Size) with
b/B on the Multi-selector, then select the
desired image size with v/V.
To turn off the Image Size menu, press the
button again.
(Movie Size):
640(30fps):
Shoot high quality movies in sizes suited for
display on TV
320(30fps):
Shoot high quality movies in sizes suited for
display on websites
320(15fps):
Shoot at a small size for e-mail attachment
(Photo Size):
5M:
For prints up to A4 (8×10")
3:2:
Shoot in 3:2 aspect ratio
3M:
For prints up to 10×15 cm (4×6") or
13×18 cm (5×7")
2M:
For prints up to 10×15 cm (4×6")
VGA:
Shoot at a small image size for e-mail
attachment
Histogram on
r
Indicators off
r
Indicators on

12
[ Selecting a camera mode
Press MENU, then select the desired item in
(Camera) mode (page 15).
Auto:
Allows easy shooting with the settings
adjusted automatically.
Program:
Allows you to shoot with the exposure
adjusted automatically (both the shutter speed
and the aperture value). Also you can select
various setting using the menu.
Scene Selection:
Allows you to shoot with the preset settings
according to the scene.
Scene Selection
Twilight
Shoots night scenes without losing the
nighttime atmosphere.
Twilight Portrait
Shoots sharp images of people in a dark place
without losing the nighttime atmosphere.
Soft Snap
Shoots images with a softer atmosphere for
portraits of people, flowers, etc.
Landscape
Shoots with the focus on a distant subject.
Hi-speed Shutter
Shoots moving subjects outdoors or in other
bright places.
Beach
Shoots seaside or lakeside scenes with the
blueness of the water captured more vividly.
Snow
Shoots snow scenes in white more clearly.
Fireworks
Shoots fireworks in all their splendor.
Candle
Shoots candlelit scenes, without spoiling the
atmosphere.

13
Viewing/Editing images
1Open the LCD panel to turn the power on.
You can also turn the power on by pressing POWER.
2Press MODE to set the camera to playback mode.
(Play mode) lamp lights up.
3Plays back movies or still images.
Movie:
Press the Multi-selector to playback a movie. (Press it again to stop playback.)
Press B to fast forward, b to rewind. (Press the Multi-selector to return to normal playback.)
Press V to display the volume control screen, then adjust the volume with v/V.
Still image:
Select an image with b/B on the Multi-selector.
[ To delete images
1 Press MODE to set the camera to playback mode.
2 Press (Delete) while display in single-image mode or in index mode.
3 Select [Delete] with v on the Multi-selector.
[ / To view an enlarged image (playback zoom)
Press while displaying a still image. To undo the zoom, press .
Adjust the position: v/V/b/B
Cancel playback zoom: Press the Multi-selector.
[ Viewing an index screen
Press (Index) button to display the index screen while a still image is displayed.
Select an image with v/V/b/B on the Multi-selector.
To return to the single image screen, press the Multi-selector.
To display the next (previous) index screen, move the yellow frame up/down/left/right with
v/V/b/B.
POWER button
(Playback
zoom)/ (Index)
button
MENU button
Multi-selector
(Play mode)
lamp
MODE button
(Delete) button
(Sharemark) button

14
[ To delete images in index mode
1 While an index screen is displayed, press (Delete) and select [Select] with v/V
on the Multi-selector.
2 Select the images you want to delete with v/V/b/B, then press the Multi-selector to
display the (Delete) indicator on the selected image.
3 Press (Delete).
4 Select [OK] with B.
• To delete all the images in the folder, select [All In This Folder] with v/V in step 1 instead of [Select].
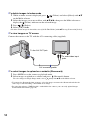
[ To view images on TV screen
Connect the camera to the TV with the A/V connecting cable (supplied).
[ To select images to upload on a website (Sharemark)
1 Press MODE to set the camera to playback mode.
2 Select images to upload on a website and press (Sharemark) button.
To select images in Single Image mode, select [ mark] with v/V on the Multi-selector.
• To remove the Sharemark from an image, select the image to remove the Sharemark and take the
same steps as when marking a Sharemark on an image.
• By using the software “PMB Portable” embedded in the camera, you can easily upload images
marked with Sharemarks (page 16).
To the A/V OUT jack
To audio/video input
jacks
A/V connecting cable

15
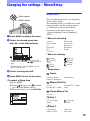
Changing the settings – Menu/Setup
1Press MENU to display the menu.
2 Select the desired menu item
with b/B on the Multi-selector.
• In REC mode, / is indicated. You
cannot set an item with / indicator in
gray.
• In PLAY mode, press the Multi-selector
after setting an item.
3 Select a setting with v/V.
4Press MENU to turn off the menu.
[ To select a Setup item
1 Press MENU.
2 Select (Setup) in step 2 and then
press B on the Multi-selector.
3 Select the item to set with v/V/b/B.
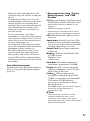
Menu items
The available menu items vary depending
on the camera mode.
The shooting menu is available only in the
shooting mode, and the viewing menu is
available only in the playback mode.
For details on the menu items, see
“Network Sharing Camera Handbook”
(PDF).
[ Menu for shooting
[ Menu for viewing
[ Setup items
Camera
Memory Stick Tool
Internal Memory Tool
Setup 1
Setup 2
MENU button
Multi-selector
Auto
Camera REC Mode
Color Mode Flash Level
EV Saturation
White Bal Sharpness
ISO Setup
P.Quality
(Folder) (Resize)
(Protect) (Rotate)
DPOF (Divide)
(Print) (Setup)
(Slide)
Function Guide Auto Review
Red Eye Reduction
Format Change REC. Folder
Create REC. Folder Copy
Format
LCD Backlight Language
Beep Initialize
File Number Video Out
USB Connect Clock Set

16
Enjoying your computer
Viewing “Network Sharing
Camera Handbook” (PDF)
For advanced use of your camera, see
“Network Sharing Camera Handbook”
(PDF).
To view “Network Sharing Camera
Handbook” (PDF), you need to install
Adobe Reader on your computer.
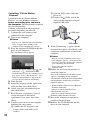
[ For Windows users
1 Turn on the computer.
2 Place the CD-ROM (supplied) in the
disc drive of your computer.
The select screen for installation appears.
3 Click [Handbook (PDF)].
The installation screen for “Network
Sharing Camera Handbook” (PDF)
appears.
4 Select the desired language and the
model name of your camera, then click
[Handbook (PDF)].
Installation starts. When the installation is
completed, the short-cut icon of “Network
Sharing Camera Handbook” appears on
the desktop of your computer.
• The model name of your camera is printed
on its bottom surface.
5 Click [Exit] t [Exit], then remove the
CD-ROM from the disc drive of your
computer.
[ For Macintosh users
1 Turn on the computer.
2 Place the CD-ROM (supplied) in the
disc drive of your computer.
3 Open the [Handbook] folder in the CD-
ROM, double-click the [GB] folder and
then drag-and-drop the “Handbook.pdf”
on the computer.
Double-click “Handbook.pdf” to view the
handbook.
What you can do with a Windows
computer
Take either of the following ways to
connect the camera with a Windows
computer and enjoy the functions.
[ When using various functions
By using the software “Picture Motion
Browser” in the supplied CD-ROM, you
can enjoy the following operations.
• Importing images taken with your camera
to a computer
• Viewing imported images on a computer
• Creating a disc with edited images
• Changing the language displayed in
“PMB Portable”
[ When using simply outside your
home, etc.
By using the software “PMB Portable”
embedded within the camera, you can load
images onto computers or upload images on
the Web. It is also useful when connecting
the camera to a computer that is not
installed with “Picture Motion Browser”.
• By pressing (Sharemark) button
(page 14), you can mark movies to upload
on the Web.
For details on the functions and operations
of the supplied software, see “Picture
Motion Browser Guide” or Help in the
“PMB Portable”.
“PMB Portable” is preset with URL of
several websites at factory setting. Give
your consent to the following on using the
image upload service, etc. (hereon after
referred to as service) provided by the
websites (including those preset) by using
“PMB Portable”.
• Depending on websites, registration
procedures or fees may be required on
using the service.

17
• Follow the terms and conditions of the
agreement set by the website on using the
service.
• Termination or changes in service may
occur depending on certain reasons of the
website operator, etc. Including these
situations, Sony is not held responsible for
any troubles between customers and a
third party or any loss to customers on
using the service.
• To view the website, you will be
redirected by a server run by Sony (hereon
after referred to as Sony server). You may
not be able to access the website because
of server maintenance, etc.
• On termination of the operation of Sony
server, the termination will be informed of
beforehand on Sony websites, etc.
• The URL redirected to by Sony server
may be recorded for improving future
Sony products and services. In this case,
only the URL will be recorded and other
information such as personal data will not
be recorded.
Using a Macintosh computer
For details on using a Macintosh computer,
refer to “Using your Macintosh computer”
(page 20).
[ Environment for using “Picture
Motion Browser” and “PMB
Portable”
OS: Microsoft Windows 2000 Professional
SP4/Windows XP SP2*/Windows Vista*
* 64-bit editions and Starter (Edition) are not
supported.
• Standard installation is required.
• Operation is not assured if the above OS has
been upgraded or in a multi-boot environment.
CPU: Intel Pentium III 1 GHz or faster is
necessary.
Application: DirectX 9.0c or later (This
product is based on DirectX technology.
It is necessary to have DirectX installed.)
Windows Media Player 9 or later
Sound Card: Direct Sound compatible
sound card
Memory: Windows 2000/Windows XP
512 MB or more
Windows Vista
1 GB or more
Hard disk: Disk volume required for
installation: Approximately 300 MB*
Display: DirectX 7 or later-compatible
video card, Minimum 1,024
× 768 dots,
High Color (16 bit color)
Others: USB port (this must be
provided as standard, Hi-Speed USB
(USB 2.0 compatible) is recommended),
DVD burner (CD-ROM drive is
necessary for installation of “Picture
Motion Browser”)
* For “PMB Portable”, the disk volume required
on using the program temporarily is
approximately 1 GB.
b Note
• Operations are not guaranteed, even on
computers fulfilling the above system
requirements. For example, other open or
background applications currently running may
limit product performance.

18
[ Installing “Picture Motion
Browser”
You need to install “Picture Motion
Browser” to your Windows computer
before connecting your camera to
the computer. The installation is required
only for the first time.
Contents to be installed and procedures
may differ depending on your OS.
1 Confirm that your camera is not
connected to the computer.
2 Turn on the computer.
b Notes
• Log on as an Administrator for installation.
• Close all applications running on the
computer before installing the software.
3 Place the supplied CD-ROM in the disc
drive of your computer.
The installation screen appears.
• If it does not appear, double-click (My
Computer)
t (SONYPICTUTIL).
• Under Windows Vista, the AutoPlay screen
may appear. Select “Run Install.exe.” and
follow the instructions that appear on the
screen to proceed with the installation.
4 Click [Install].
5 Select the language for the application
to be installed, then click [Next].
6 Check your area and country/region,
then click [Next].
7 Read [License Agreement], select [I
accept the terms of the license
agreement] if you agree, then click
[Next].
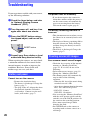
8 Connect your camera to the computer
following the steps below.
1 Connect the AC Adaptor to the
camera and a wall outlet (wall
socket).
2 Open the LCD panel to turn the
power on.
3 Connect the (USB) jack of the
camera to the computer using the
supplied USB cable.
9 When [Connecting...] appears on the
screen of the camera, click [Next] on the
connection confirmation screen of the
computer.
b Notes
• Even if a screen prompting you to restart
your computer appears, you do not need to
restart it at this time. Restart your computer
after completing the installation.
• It may take some time for the
authentication.
10 Follow the on-screen instructions to
install the software.
One of the following installation screens
appears, depending on the computer
environment. Check the screen and follow
the instructions displayed to install the
required software.
– Windows Media Format 9 Series Runtime
(Windows 2000 only)
Software required to handle movies
– Microsoft DirectX 9.0c*
Software required to handle movies
* Windows 2000, Windows XP only
11 Restart the computer if required to
complete the installation.
12 Remove the CD-ROM from the disc
drive of your computer.
USB cable
(USB) jack

19
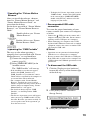
[ Operating the “Picture Motion
Browser”
After you install the software, shortcut
icons for “Picture Motion Browser” and
“Picture Motion Browser Guide” are
created on the desktop.
For the basic operation of “Picture Motion
Browser”, see “Picture Motion Browser
Guide”.
[ Operating the “PMB Portable”
The steps to take when operating a
computer that is not installed with “Picture
Motion Browser” are explained here.
1 Connect the computer with the
camera (page 18).
2 Select [PMBPORTABLE] in the
AutoRun screen.
The “PMB Portable” will start up.
• If the AutoRun screen does not appear,
double-click [PMB_Portable.exe].
[PMB_Portable.exe] is within the camera
which will be recognized by the computer as
an external drive when connected.
• For a computer with “Picture Motion
Browser” installed, the screen to select
whether to upload the image on the Web or
load the image to computer using “Picture
Motion Browser” will appear.
• For details on how to operate “PMB
Portable”, see the Help within “PMB
Portable”.
• The License Agreement screen will appear
when you start up “PMB Portable” for the
first time. Read the agreement carefully. If
you accept the terms of the agreement, go
on to the next screen.
• To display the License Agreement screen of
“PMB Portable”, double-click [APP] folder
in the external drive (PMBPORTABLE),
double-click [EULA], and then select the
language of your choice.
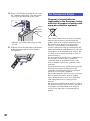
[ Recommended USB cable
connection
To assure the proper functioning of your
camera, connect your camera to a computer
as below.
• Connect the (USB) jack of the camera and a
computer using the USB cable. Do not connect
anything to other USB ports of a computer.
• When connecting to a computer with a USB
keyboard and USB mouse connected as standard
equipment, connect the camera to another USB
port using the USB cable.
b Notes
• Operations are not guaranteed when multiple
USB devices are connected to a computer.
• Be sure to connect the USB cable to a USB port.
If the USB cable is connected to a computer via
a USB keyboard or USB hub, operations are not
guaranteed.
[ To disconnect the USB cable
1 Click the [Unplug or eject hardware]
icon on the task tray on the bottom right
of the desk top.
2 Click [Safely remove USB Mass
Storage Device].
3 Click [OK] (Windows 2000 only).
Double-click to start “Picture
Motion Browser”.
Double-click to start “Picture
Motion Browser Guide”.

20
Disconnect the USB cable from the
camera and the computer.
b Notes
• Before turning off your camera, disconnect the
USB cable following the proper procedures
described above.
• Disconnect the USB cable using the proper
procedures described above. Otherwise, files
stored on the “Memory Stick PRO Duo” may
not be updated correctly. Also, disconnecting
the USB cable improperly may cause a
malfunction of the “Memory Stick PRO Duo”.
Using your Macintosh computer
You can copy images to your Macintosh
computer.
• “Picture Motion Browser” is not compatible
with Macintosh computers.
Recommended computer environment
The following environment is
recommended for a computer connected to
the camera.
OS (pre-installed): Mac OS 9.1/9.2/ Mac
OS X(v10.1 to v10.4)
USB jack: Provided as standard
CPU: iMac, eMac, iBook, PowerBook,
Power Mac G3/G4/G5 series, Mac mini
Memory: 64 MB or more (128 MB or
more is recommended)
b Note
• Operations are not guaranteed for all the
recommended computer environments
mentioned above.
• If you connect two or more USB devices to a
single computer at the same time, some devices,
including your camera, may not operate
depending on the types of USB devices you are
using.
• Operations are not guaranteed when using a
USB hub.
• Connecting your camera using a USB interface
that is compatible with Hi-Speed USB (USB 2.0
compliant) allows advanced transfer (high speed
transfer) as this camera is compatible with Hi-
Speed USB (USB 2.0 compliant).
• There are three modes for a USB connection
when connecting a computer, [PictBridge],
[Web Camera] and [Mass Storage] (default
setting) modes. This section describes the [Mass
Storage] as an example. For details on
[PictBridge], see “Network Sharing Camera
Handbook”.
• When your computer resumes from the suspend
or sleep mode, communication between your
camera and your computer may not recover at
the same time.
Page is loading ...
Page is loading ...
Page is loading ...
Page is loading ...
Page is loading ...
Page is loading ...
Page is loading ...
Page is loading ...
Page is loading ...
Page is loading ...
Page is loading ...
Page is loading ...
-
 1
1
-
 2
2
-
 3
3
-
 4
4
-
 5
5
-
 6
6
-
 7
7
-
 8
8
-
 9
9
-
 10
10
-
 11
11
-
 12
12
-
 13
13
-
 14
14
-
 15
15
-
 16
16
-
 17
17
-
 18
18
-
 19
19
-
 20
20
-
 21
21
-
 22
22
-
 23
23
-
 24
24
-
 25
25
-
 26
26
-
 27
27
-
 28
28
-
 29
29
-
 30
30
-
 31
31
-
 32
32


Sony NSC-GC3 User manual
- Category
- Document cameras
- Type
- User manual
- This manual is also suitable for
Ask a question and I''ll find the answer in the document
Finding information in a document is now easier with AI