Mazda MAZDA5 Quick Tips

Category
Cars
Type
Quick Tips

Mazda MAZDA5, your versatile and feature-packed vehicle, is ready to enhance your driving experience. With its impressive capabilities, it's the perfect companion for everyday adventures and long journeys alike.

Mazda MAZDA5, your versatile and feature-packed vehicle, is ready to enhance your driving experience. With its impressive capabilities, it's the perfect companion for everyday adventures and long journeys alike.

ROADSIDE ASSISTANCE/WARRANTY
This Quick Tips® guide is
provided by Mazda North
American Operations to
make your Mazda ownership
experience more convenient.
For complete details and
operating instructions, see
your Owner’s Manual.
Mazda Roadside Assistance
Exhilaration, liberation and inspiration,
are great reasons to drive a
Mazda car, truck or SUV. In addition
to all the other great standard
features, you also get peace of mind
with our basic warranty period
Emergency Roadside Assistance
Plan, it’s just a phone call away,
24 hours a day, 365 days a year,
call 1-800-866-1998.
Mazda ‘bumper-to-bumper”
Limited Warranty and
Powertrain Warranty
Engineers design and build every
Mazda to give you driving pleasure
now and far down the road. We’re
so confident in our quality that we
cover the entire vehicle against defects
in materials and workmanship for
36 months/36,000 miles, whichever
comes first, plus we provide a
powertrain warranty for 60 months/
60,000 miles, whichever comes first.
Unleaded
Gasoline
87-octane
minimum
16-gallon/
60-liter tank
2.3L engine
If you have any questions about
your vehicle, you are invited to
contact your local dealer.
Or if you need additional help,
feel free to call our
Customer Assistance Center
at 1-800-222-5500
Monday through Friday,
8 a.m.-4:45 p.m., Pacific
9 a.m.-5:45 p.m., Eastern/Central
www.mazdausa.com
©2007 Calcar, Quick Tips
®
is a trademark
of Calcar, made in USA 9/07 23.9M DOT
Mazda North American Operations reserves
the right to change product specifications
at any time without incurring obligations.
9999-95-005C-08QT
DRIVER’S VIEW
Always check the Owner’s Manual for more operating information and safety features
1. Power window switches,
see Switches/Clock
2. Door locks,
see Locks
3. Mirror controls,
see Switches/Clock
4. Air vents
5. HID headlight leveling
switch*, see Getting Started
6. Turn signal/lighting
control lever,
see Getting Started
7. Fog light switch*,
see Getting Started
8. Audio control switches,
see Audio Systems
9. Horn/Air bag
To beep: Press.
10. Cruise control,
see Getting Started
11. Wiper/washer control
lever, see Getting Started
12. NAVI display*,
see Owner’s Manual
Audio system,
see Audio Systems
13. Clock setting buttons,
see Switches/Clock
14. Hazard warning
switch/light
Push to activate/deactivate.
15. Information display,
see Audio Systems
16. Passenger air bag off
indicator, see Getting Started
17. Climate control panel,
see Climate Controls
18. Gearshift lever, see Transaxle
19. Accessory socket
12V power outlet.
20. Seat warmer*
Press on/off.
21. Cup holders
22. Center console storage
Driver’s
View
30
19
0
20
mph
40
60
1
0
2
3
4
5
67
8
80
100
120
140
TRIP
A
8
O.O
0
20
40
60
80
100 120
140
160
180
200
220
H
C
F
E
x1000r/min
P
R
N
2728
29
1 2 4 6 43 45
23
1
M-D
20
R
E
A
R
RES
SET
97 108 11
25
MAP
RETURN
DISP
LOAD/
MENU VOICE
VOL
SOURCE
SCAN
SEEK
TRACK
SEEK
TRACK
TUNE
AUDIO
24
12 13 14 15
22
21
26
18
17
16
*Denotes optional equipment
23. Parking-brake lever
To engage: Pull up.
To release: Pull up slightly,
while depressing button at front
of lever, lower parking brake lever.
24. Auxiliary jack
Connect portable music device
to vehicle audio system.
25. Tilt/telescopic steering
wheel lever, see Getting Started
26. Voice recognition/
Bluetooth hands-free
switch*, see Getting Started
27. Hood release handle
Pull release handle to unlock.
28. Storage
29. Bottle holder
CAUTION: Use plastic
bottles with caps, cups may
spill when door is closed.
30. Fuel-filler lid release
To open: Pull lever upward.
Getting Started
MAZDA5 Quick Tips
®
are
designed to quickly familiarize
you with some important
features of your MAZDA5.
This Driver’s View tab is your
index to the Quick Tips
®
, locate
the item you would like to
learn more about and then
turn to the listed tab.
Be sure to see the tab called
Getting Started, this section
contains important operating
tips about your MAZDA5.
Items identified in blue text
call out unique features.
GETTING STARTED
Always check the Owner’s Manual for more operating information and safety features
Bluetooth
Hands-Free
System*
System consists of
Voice recognition/
hands-free switch*
(1) located on
steering-wheel,
information
display, microphone and audio/
navigation system*; system only
functions with a Bluetooth type
mobile telephone, a mobile
telephone can be programmed
only when vehicle is parked.
Hands-Free Telephone setup
Pair a phone
1. Press switch (1); say “setup.”
2. System prompts you with available
options; say “pairing options.”
Passenger air bag
deactivation
indicator light
Front air bag
deactivation indicator
light (4) provides
current status of front passenger
air bag and pretensioner system.
If total seated weight on front
passenger seat is less than
approximately 66 lb., front
passenger air bag deactivation
indicator light illuminates,
front passenger and side air
bags/pretensioner will not
deploy/activate in an accident.
If the total seated weight
is greater than approximately
93 lb., light does not illuminate,
and the front passenger and side
air bags/pretensioner will deploy/
activate in an appropriate accident.
Getting
Started
Getting
Started
See Owner’s Manual for additional
information on this feature and
the air bag system.
Passenger sensing operation
Passenger air bag deactivation
indicator on dash will illuminate
when front passenger air bag is
deactivated, child-restraint seat
with child that weighs a combined
total of 66 lbs. or less will deactivate
front passenger air bag, see
Owner’s Manual.
WARNINGS: Even with a
deactivation system, never
place rear-facing infant-safety
seat in front of any air bag,
an infant is in serious danger
of being injured or killed.
If you must install a forward-
facing child-safety seat in
the front seating position,
move vehicle seat as far
back as possible.
Language
Press switch (1); say “setup”
after beep, say “language”
after beep, say “English,” “French”
or “Spanish,” you will be asked
“is this correct,” say “yes” after
the beep, then follow any
additional prompts.
Dialing a phone number
Press switch (1); say “dial” after beep,
slowly say phone number after the
prompt, system verifies number is
correct; then connects your call.
Redialing last-called number
Press switch (1); say “redial” after
beep, system will redial last dialed
phone number.
See Owner’s Manual
for complete operating
instructions and warnings.
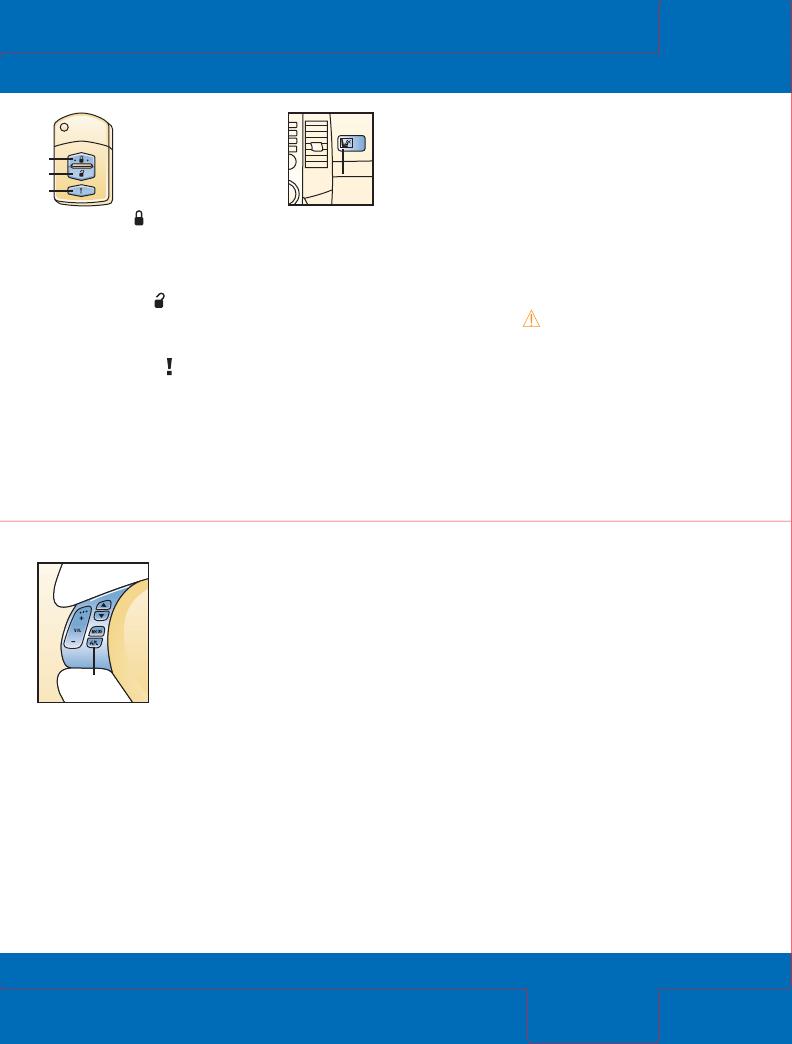
Remote
entry system
Functions only
with ignition key
not inserted.
To lock doors and
liftgate: Press (1); pressing again
within a few seconds causes doors/
liftgate to re-lock, horn to beep once
and hazard warning lights to flash
once if doors/liftgate properly closed.
To unlock: Press (2) for driver’s
door, hazard warning lights will
flash twice, press again within a few
seconds for all other doors/liftgate.
Panic alarm: Press (3) for a few
seconds; horn sounds, hazard
warning lights flash; press any
button on transmitter to stop.
After unlocking with the transmitter, all
doors or the liftgate will automatically
lock if a door or the liftgate is not
opened within about 30 seconds.
PAS S
AIRBAG
OFF
4
3. After prompts, say “pair a phone.”
4. System will request a 4-digit
PIN of your choice (record PIN
number for future phone pairing
procedure), slowly say your
4-digit PIN and confirm.
5. After prompt, follow phone
manufacturer’s instructions to
search for Bluetooth device.
6. Once device is found, select
“Mazda,” enter your selected
4-digit PIN on phone’s numeric
keypad when requested.
7. System prompts you to name
the phone.
8. System will ask for a phone
priority number between 1-7,
1 being highest.
9. When programming is complete,
system will indicate “pairing
complete.”
*Denotes optional equipment
1
1
2
3
GETTING STARTED
Always check the Owner’s Manual for more operating information and safety features
Turn signal/lighting
control lever
OFF = Lights off
= Tail, parking and
dashboard lights on: Rotate
knob (1) to first notch
= Tail, parking, dashboard
and headlights on: Rotate
knob (1) to second notch
Normal wiper speed: Two clicks down.
High-speed wiper: Three clicks down.
Rear window wiper/washer
To activate rear interval wiper:
Rotate knob (3) up to INT.
To activate rear normal speed
wiper: Rotate knob (3) up to ON.
To activate rear washer: Rotate
knob (3) to and release.
Liftgate
Liftgate opens in 2 positions,
first position is slightly lower
than fully open position, do not
use excessive force while pushing
liftgate to fully open position.
Getting
Started
Getting
Started
Cruise
control
Operates
above 19 mph.
Press Main switch
(4) to turn
system on/off.
To set speed: Accelerate to desired
speed and press SET
-
(6).
To accelerate: Press and hold RES+
(5); release button at desired speed.
To decelerate: Press and hold SET
-
(6); release button at desired speed.
Incremental acceleration: Press and
release (5); each tap = plus 1 mph.
Incremental deceleration: Press and
release (6); each tap = minus 1 mph.
To cancel: Press CANCEL (7) or
Main switch (4); tap brake pedal
or depress clutch pedal*.
Return to preset speed after
CANCEL button or braking: Press
and release RES+ button (5).
Tilt/telescopic
steering-
wheel lever
Pull lever (3)
up to unlock
column, position
tilt angle and
length of steering
column position.
WARNING: Do not adjust
steering-wheel while driving.
Tire Pressure Monitoring
System (TPMS)
Warning light illuminates for a
few seconds after ignition is on.
If tire pressure is too low in one
or more tires, warning light will
illuminate and beeper will sound;
flashing warning light indicates
possible malfunction; dealer
inspection required.
Wiper/washer lever
Single wipe: Push lever up.
Washer: Pull back, also operates wipers.
Intermittent wiper: One click down, to
change interval speed rotate ring (1).
Auto*: One click down, rain sensor
senses rain amount on windshield,
then controls wiper automatically.
Rain sensor sensitivity is adjusted
from high sensitivity (+) to less
sensitivity (-) by rotating ring (2).
AUTO* = With ignition switch
in ON position; headlights and
exterior lights automatically
turn ON/OFF depending on
surrounding darkness/lightness;
rotate knob (1) to third notch
High beams on/off: Push
forward/pull back to detent.
To flash high beams: Pull back
slightly and release.
= Fog lights* on: Rotate (2);
functions only with low beams on
Turn signals right/left: Move
lever up/down.
HID headlights
leveling switch*
Adjusts headlight angle
to compensate for weight
of passengers and cargo,
see Owner’s Manual.
*Denotes optional equipment
2 1
AUTO
3
1
0
1
3
REA
R
2
R
EA
R
AUTO
3
RES
SET
67
54
INSTRUMENT CLUSTER
Always check the Owner’s Manual for more operating information and safety features
WARNING LIGHTS
Cruise control on
Amber light: Cruise control system
activated; Green light: Cruising
speed set; see Getting Started
Tire Pressure Monitoring
System (TPMS),
see Getting Started
Turn signals/hazard
warning on
High beams on
• Engine oil-pressure
warning light
Stop car when safe and turn
off engine; check oil level
Always fasten seat belts
Security indicator light
(immobilizer system)/
Theft-deterrent system*
• Door ajar
GAUGES
1. Tachometer
2. Speedometer
3. Gear indicator (A/T only)*
Displays current gear
position.
• Charging system
warning light
Charging system malfunction;
dealer inspection required
Air bag/front seat belt
pretensioner system
If light flashes or stays on,
the air bags/front seat belt
pretensioners may not operate
in an accident; dealer inspection
required
• Power steering
malfunction
Dealer inspection required if
light remains on
• Check engine
Dealer inspection required if
light remains on, see Owner’s
Manual
O Low fuel
4. Engine coolant
temperature gauge
Stop car if above normal
range, turn off engine, let
vehicle cool; check coolant
level when safe.
5. Fuel gauge
16-gallon/60-liter tank
Instrument
Cluster
Instrument
Cluster
0
20
mph
40
60
1
0
2
3
4
5
6 7
8
80
100
120
140
TRIP
A
8
O.O
0
20
40
60
80
100 120
140
160
180
200
220
H
C
M-D
F
E
P
R
N
x1000r/min
7 5 8 6
1 2 3 4
5
M
AT Automatic transaxle
warning light*
Automatic transaxle malfunction;
dealer inspection required
• Brake system
Parking brake on/low brake fluid
• Anti-lock Brake
System (ABS)
ABS malfunction, normal brakes
only; dealer inspection required
Electronic brake force
distribution system
warning
Brake system warning light
and ABS warning light on
simultaneously may indicate a
problem with electronic brake
force distribution system;
dealer inspection required
6. Odometer/Trip meter
selector
Press to view odometer; press
again to reset trip odometer
A/B settings.
7. Odometer/Trip meter
8. Instrument cluster
dimmer select
button*
CRUISE
*Denotes optional equipment
LOCKS
Always check the Owner’s Manual for more operating information and safety features
Power windows
Ignition must be on.
All windows controlled from the
driver’s armrest; passenger doors
have separate switches.
Driver’s window: One-touch-
down; push (3) down firmly and
release, window goes down all
the way; pull switch back briefly
to stop; press lightly and hold
for normal operation.
Passenger window switches:
Push down (4) and hold to open,
pull back and hold to close.
Power window lockout switch:
Press down (5) until it clicks,
only driver’s window operates;
press again and passenger
window switches function again.
Clock
To set: With ignition in ACC or
ON position, press H (6) or M (7)
to advance hours/minutes.
To set 12/24-hour format: Press
H/M buttons simultaneously for
1.5 seconds or more; 12h/24h will
be displayed; selected format will
be displayed within 3 seconds.
Time resetting: Press :00 button
(8) for 1.5 seconds or more,
displayed time flashes; when
:00 button is released, time will
be reset to nearest hour.
Locks
Switches/
Clock
AUTO
LR
3
5
4
2
1
H :00M
6 7 8
Key
Operates ignition and all locks.
Tip: Use key number plate to
purchase a new key; store in
safe place separate from vehicle.
Retractable Key
To fold/unfold press release button (1).
WARNING: Never leave a child
in car with key in the vehicle.
Remote
entry
system
See Getting
Started
Illuminated entry system
Activates interior lights when dome
light switch set to DOOR position;
lights off after driver’s door is
locked or ignition in ON position.
Dual power mirrors
Ignition must be in ACC or ON.
To adjust left/right mirror:
Press control switch (1) left/right,
press switch (2) in direction of
desired mirror movement.
Tip: To lock mirrors in place,
move control switch to
center position.
Manual door
locks
To lock: Press
front of button (2)
toward door handle.
To unlock: Pull front
of button away
from door handle.
Power door locks
To lock/unlock all doors from
inside vehicle: Press bottom/top
of switch (3).
To lock doors without key:
With door open, press bottom
of door lock switch, exit car,
close doors.
To unlock: Use key to unlock driver’s
front door, rotate key to counter-
clockwise position for more than
one second to unlock other doors.
Child-safety
locks
Located at edge
of rear doors.
To activate: Pull
tab (4) down;
door opens from
outside only.
To cancel: Push tab (4) up.
WARNING: Since children
may access either rear door,
child-safety locks for both rear
doors should be activated.
Sliding doors
Lock/unlock from
interior: Slide
door-lock knob
(5) toward front/
toward back.
Locking from exterior: Slide
door-lock knob toward
front and close door.
1
5
Unlock
Lock
4
LOCK
UNLOCK
3
2
INTERIOR LIGHTS
Always check the Owner’s Manual for more operating information and safety features
Automatic
transaxle*
Gearshift
must be in
Park or
Neutral to
start engine;
it must
be in Park
to remove
ignition key.
P = Park
To move gearshift from Park:
Press firmly on brake pedal then
move the shift lever out of P.
R = Reverse
N = Neutral
No gear engaged.
D Drive (Overdrive)
For normal driving: Shifts through
all forward gears automatically.
Interior
Lights
Transaxle
1. Map/reading light switch
Press on/off.
2. Interior light switch
DOOR = light on when door open
ON = light always on
OFF = light always off
3. Front interior light
4. Rear interior light
5. Moonroof tilt switch*
Press rear of switch to tilt
rear of moonroof.
Press front of switch to close.
6. Moonroof slide switch*
Press rear of switch to
open moonroof.
Press front of switch to close.
7. Cargo light
ON = Light always on
OFF = Light always off
Driver/passenger
covered visor mirrors
To access mirror: Lower visor.
OFF
DO
OR
T
IL
T
S
L
ID
E
1 2 1
33 56
ON
OF
F
DO
OR
2
4
ON OFF
7
M (Sport A/T
manual shift mode)
Move shifter from
D to M to engage
manual shift mode,
M will be illuminated
for manual mode on
shift position indicator located
in the instrument panel.
Manual shifting of transmission
is achieved by moving shifter
back to upshift and forward to
downshift, move shifter from
M to D to engage automatic
shift mode.
Gear indicator
(A/T only)*
Illuminated gear
indicator located in
the instrument panel
displays current gear
in Manual mode or D
in Automatic mode.
Manual
transaxle
Depress clutch
pedal to start
engine and
change gears.
Ignition key
release button
(M/T only)
Press button (1)
to remove key
from ignition.
Tips: Do not shift into
1st above 20 mph or clutch
failure could occur.
Resting your foot on clutch
pedal while driving or using
the clutch to hold your vehicle
at a standstill while waiting
on a hill may reduce clutch life.
P
N
R
M-D
+
P
R
N
D
M
0
E
P
R
N
M-D
5
M
L
O
C
K
A
C
C
O
N
S
T
A
R
T
P
U
SH
1
*Denotes optional equipment
CLIMATE CONTROLS
Always check the Owner’s Manual for more operating information and safety features
1. Temperature control
Cooler/warmer = rotate knob
counterclockwise/clockwise
2. Windshield defroster
Press: Fresh air position is
automatically selected, A/C
automatically turns ON.
3. Air flow selections
= air to dash
= air to dash and floor
= air to floor
= air to floor and windshield
= air to windshield (defrost)
4. Fan control
Rotate knob clockwise/
counterclockwise to increase/
decrease fan speed.
8. Rear window defogger/
heated outside mirrors*
Press on/off; shuts off with
ignition or automatically after
15 minutes of operation.
Tip: Rear window
defogger also operates
heated outside mirrors*.
Automatic operation
Press AUTO (14) for automatic
operation; rotate outer dial
to set temperature, see
Owner’s Manual.
Tip: Automatic climate
control display viewed
via information display,
see Audio Systems.
5. A/C = air conditioner
Press to turn on/off.
A/C indicator light will illuminate
only when fan is operating.
6. AMB
Press to view ambient temperature.
Tip: Press AMB (6) for 2
seconds or more to switch
display from Fahrenheit to
Centigrade and vice versa.
7. Rear control switch
Press to turn rear (cool) air
ventilation system on.
9. Air intake control
Press switch to alternate
between recirculated (Indicator
light on) or outside (Indicator
light off) air mode.
= recirculate inside air;
use for maximum cooling
WARNING: Do not use
position in cold
weather, windows may
fog and hamper vision.
10. OFF
Press to turn system OFF.
Control positions for
maximum defrost
Fan to maximum, temperature
to maximum hot, selected.
Tips: To help prevent
windshield fogging in
humid weather, select
before starting engine.
To prevent moisture buildup,
never drive with system off.
Objects placed under the front
seats may interfere with air
flow to the rear.
Rear cool air ventilation
system
When front climate control panel
is on, the following settings can
be controlled from the rear area
controls located on rear of center
console, even if (7) is not turned on.
11. OFF = Fan off
12. LO = Low speed
13. HI = High speed
Tip: Rear ventilation system
will only control cool air flow.
Climate
Controls
Climate
Controls
OFF
PUSH
AUTO
PUSH
FRONT LO HI
MODE
A/C
PUSH
AMB
REAR
1 2 314 4
9 8 7 6 510
*Denotes optional equipment
OFF LO HI
11 12 13
Automatic A/C with Rear Cool Air
Ventilation System
SEATS
Always check the Owner’s Manual for more operating information and safety features
Shoulder belt
height
adjustment
To raise: Push
adjuster up.
To lower: Pull
button (1), slide
down; release button.
WARNING: Make sure
adjuster locks in one
of its positions.
Seat controls
1. Fore-aft adjustment
Lift lever and hold, slide seat,
release lever.
2. Raise/lower seat
(Driver’s seat only)
Pull/push lever and release.
3. Seat back angle
To adjust: Lift and hold lever,
lean forward or backward
to tilt seat, release lever.
4. Lumbar support
adjustment*
(Driver’s seat only)
Pull lever forward.
5. Head restraint
To raise/lower: Pull up/press
and hold release button (6)
and push down.
Tip: Side-impact air bags*
deploy from outboard
side of front seatbacks.
Seats
Seats
WARNINGS: Do not adjust
seats while driving.
Seat belts must always be
worn when vehicle is in motion.
Air bags are supplemental
and do not replace seat
belt usage.
Always wear your seat belt
and properly secure children
12 and under in the rear seat.
Even with a deactivation
system, never place rear-facing
infant-safety seat in front
of any air bag, an infant is
in serious danger of being
injured or killed.
If you must install a forward-
facing child-safety seat in
the front seating position,
move vehicle seat as far
back as possible.
Seat belt emergency
locking mode
Belts lock only on hard acceleration,
braking, cornering or impacts of
about 5 mph or more.
Automatic locking mode
(all seat belts except
driver’s seat belt)
Must be used when installing
child-safety seat.
To activate: Pull webbing fully
out of retractor, allow belt to
retract until click is heard;
belt will only tighten.
To disengage: Unbuckle belt and
allow webbing to retract fully.
Child-safety seat
To install in rear outboard seats:
Use dual locking mode retractor
seat belts; see Owner’s Manual
for proper installation and child
seat tether and LATCH system
instructions.
WARNING: Use age
appropriate child restraints,
see Owner’s Manual and
state or province laws.
4
6
2
1
3
5
*Denotes optional equipment
REAR SEATS/CARGO AREA
Always check the Owner’s Manual for more operating information and safety features
Rear Seats/
Cargo Area
Driving Tips
Third-row seat passenger
exiting
Pull (1) and fold seatback forward.
Folding second-row seats
Insert second-row outboard seat
belts in retainers; lower head
restraint; pull strap (2) and lift
seat-bottom forward; raise lever
(3) and fold seatback forward.
Tip: Second-row under seat
storage bin* (4).
Returning seatbacks to
original positions
Raise lever (3) and return seatback to
upward locked position; return seat-
bottom to original locked position.
Tire economy and tips
Check tire pressure monthly when
tires are cold, use a digital tire
pressure gauge for accurate tire
pressure measurement.
Tires should be of the same
type and size.
Maintain correct front-end alignment
and tire balance; rotate tires at
5,000 or 7,500 mile intervals; see
Owner’s Manual for rotation chart.
Tire pressure
Decal on Driver’s B-pillar provides
tire pressure information.
Tire chains*
Use only SAE Class “S” chains;
install on front tires as tightly
as possible and re-tighten
periodically; do not use chains
on dry roads, aluminum wheels,
or with tire pressure monitor
system, damage may occur,
use on steel wheels only.
Anti-lock Braking
System (ABS)
ABS automatically reduces
hydraulic pressure to any wheel
on the verge of locking up.
You may feel a slight pulsing of
the brake pedal and hear a
clicking noise; this tells you the
ABS is functioning properly;
increase pressure on pedal for
maximum braking.
Tips: Maintain constant
pressure on the brake pedal.
Do not pump the brakes.
ABS self test
A self-diagnostic test is performed
when starting; you may feel some
brake pedal pulsation and hear
some noise, this is normal.
Third-row seat (50/50 split)
To fold down: Pull (5), then fold
seatback down.
*Denotes optional equipment
See Owner’s Manual
Cargo area
1. Temporary spare tire
Stored under panel in trunk;
to change flat tire: Follow
instructions in Owner’s Manual.
WARNING: Do not exceed
50 mph with temporary spare.
Tip: For instructions and
restrictions on use of temporary
spare tire, see Owner’s Manual.
2. Lug wrench
3. Jack handle
4. Jack
5. Flat tire belt storage bag
6. Tie down eyelet
7. Cargo light
8. Accessory socket
48 1 75 3 2 6
Fuel filler
door
Located on
passenger
side.
Gas cap
After filling vehicle with
gasoline, fully reinstall gas
cap by turning clockwise until
a clicking sound is heard, if gas
cap is not fully installed, Check
Engine light may come on.
For more information on Check
Engine light, see Owner’s Manual.
Trailer towing
Never tow a trailer with
your MAZDA5.
5
3
1 2
1
2
4
4
AM/FM STEREO/CD/MP3
Always check the Owner’s Manual for more operating information and safety features
7. SAT*, Satellite ready capability.
8. CD, Press to play CD.
9. Media
Select external audio devices.
10. CD eject button
11. Reverse/Fast forward
Press to reverse/fast forward
through a track.
12. Tune/Text/Audio control
Radio: Rotate counter clock-
wise/clockwise for lower/
higher frequency.
Audio: Press to select
ALC/BASS/TREB/FADE/BAL/BEEP.
Rotate right/left to adjust
selected feature.
Text*(MP3*): Rotate right/left
to display titles.
Tip: Automatic Level Control
(ALC) automatically adjusts
audio volume depending
on vehicle speed.
1. Power/Volume
Press to turn on/off; rotate
to increase/decrease volume.
2. Disc / *
Press to skip to next/previous CD.
3. Memory preset buttons
To set: Tune to station, press and
hold until beep sound is heard.
4. LOAD*
To load multiple discs: Press
and hold LOAD (4) until beep
sound is heard; insert CD
when “In” is displayed.
To eject disc: Press Eject (10).
To eject specific disc: Press and
hold Eject (10) until beep sound is
heard; within five seconds press
the desired tray number 1-6 (3).
5. CD slot
6. FM/AM
Press to turn radio on and
select between FM1/FM2/AM.
14. DISP
CD/MP3*: Press repeatedly to
scroll through displays.
15. SEEK/CAT/TRACK
Radio: Press to automatically
seek higher/lower frequency.
CD/MP3*: Press to select
next track/beginning of
current track.
16. RPT
Press to replay current
CD/MP3* selection.
17. Random
Press to play CD/MP3*
selections in random order,
press again to cancel.
18. Scan
Radio: Press to sample strong
stations, press again to stop
at current station.
CD/MP3*: Press to play first few
seconds of each selection, press
again to stop at current selection.
/
/
13. Auto-Memory
Press and hold until a beep sound
is heard; system automatically
scans and temporarily stores six
strong stations in each band;
press to switch between these
stored preset stations.
19. Information display
Has following functions:
Clock, audio display, automatic
climate control display*
and ambient temperature
display (AMB).
Audio
Systems
Audio
Systems
FM/AM SAT CD MEDIA
LOAD
1 DISC 2 DISC 3 RPT 4 5 6
PWR
POWER
VOL
PUSH
AUDIO CONT
TUNE/TEXT
SCAN RDM
SEEK/CAT
TRACK
DISP
ESN
AUTO-M
88:8.8 FM1 88.9 88.8CH
RPT RDM AUTO-M
8
AMB F
O
AUTO
A/C ECO
1
4
2
5
6
789
10
11
12
19
131416 151718
3
CD 1 2 3 4 5 6 ST
20 23 22
21
Steering-wheel audio
controls
To increase/decrease volume:
Press (20).
Radio: Press (21) less than
one second to select next/previous
preset station, press (21) more
than one second until beep sound is
heard to seek next/previous station.
CD: Press (21) to select next track,
press (21) to repeat current track.
Press (22) to select AM, FM 1, FM 2,
CD and external audio devices.
Press (23) to mute Audio system,
activate Navigation Voice Command*
or for Bluetooth hands-free system*,
see Getting Started.
Navigation/Audio system*
Press TUNE/AUDIO dial to display
audio system screen on NAVI system,
see Navigation Owner’s Manual.
/
/
*Denotes optional equipment
UNDER HOOD
Always check the Owner’s Manual for more operating information and safety features
Under Hood
1. Engine coolant reservoir
Level should be between COLD
FILL RANGE indicator marks.
WARNING: Never remove
coolant reservoir cap while
engine is running or hot;
remove only when system
is cool.
2. Engine oil filler cap
Use 5W-20 engine oil.
Break-in period
First 600 miles: Avoid heavy
braking and acceleration; drive at
varying road and engine speeds.
Tip: Follow similar procedures
with newly overhauled engine
or when brakes are replaced.
Maintenance notes:
Rotate tires every 7,500
miles or sooner if needed.
Replace cabin air filter every
25,000 miles or 24 months.
Replace (FL22)* engine
coolant at 120,000 miles.
WARNING: Using coolant other
than FL22 requires more frequent
maintenance intervals.
Tip: For severe driving
conditions, Owner’s Manual
recommends changing oil
and filter at 5,000
miles.
Tip: For additional service
intervals and complete details,
see Owner’s Manual.
3. Automatic transaxle
fluid dipstick*
Check with transaxle in park,
engine on and at operating
temperature; fluid level must
be between the indicator
marks on the dipstick.
4. Battery
5. Brake/clutch fluid reservoir
Fill to MAX mark with DOT 3
fluid; check with cap on.
A. Replace: Engine oil
and filter
Lubricate: All locks and hinges
B. Inspect: Fuel lines and hoses,
brake lines, hoses and
connections, steering operation
and linkages, front and rear
suspension and ball joints,
drive-shaft dust boots
Tighten: Bolts/nuts on chassis/body
C. Inspect: Drive belts (tension)
Replace: Air filter
D. Inspect: Hoses and tubes for
emission system
Replace: Engine coolant
(Other than FL22)
E. Inspect: Engine valve clearance
Replace: Spark plugs
F. Inspect: Disc brakes
G. Inspect: Exhaust system and
heat shields
Tip: Clutch uses same
reservoir as brakes.
6. Fuse block
Push latch in; lift cover.
7. Air filter
8. Hood latch
Pull up to release hood.
9. Engine oil dipstick
Fluid should be between Full
and Low on dipstick; do not
fill above Full.
10. Power steering fluid
reservoir
Level should be between
MIN and MAX lines.
11. Windshield washer
reservoir
Fill with windshield washer fluid.
12. Cooling system cap
Tip: Check all fluids with
vehicle parked on a level
surface and engine off
unless otherwise stated.
8 11 1210 9 7 6
1 2 3 4 5
2.3-liter Engine
*Denotes optional equipment
See Owner’s Manual
NORMAL SERVICE INTERVALS
7,500 miles
15,000 miles
22,500 miles
30,000 miles
37,500 miles
45,000 miles
52,500 miles
60,000 miles
67,500 miles
75,000 miles
82,500 miles
90,000 miles
A B F G
A
A
C E F
A
A
B D F
A
A
F G
A C
A
B F
A
A F
A
ROADSIDE ASSISTANCE/WARRANTY
This Quick Tips® guide is
provided by Mazda North
American Operations to
make your Mazda ownership
experience more convenient.
For complete details and
operating instructions, see
your Owner’s Manual.
Mazda Roadside Assistance
Exhilaration, liberation and inspiration,
are great reasons to drive a
Mazda car, truck or SUV. In addition
to all the other great standard
features, you also get peace of mind
with our basic warranty period
Emergency Roadside Assistance
Plan, it’s just a phone call away,
24 hours a day, 365 days a year,
call 1-800-866-1998.
Mazda ‘bumper-to-bumper”
Limited Warranty and
Powertrain Warranty
Engineers design and build every
Mazda to give you driving pleasure
now and far down the road. We’re
so confident in our quality that we
cover the entire vehicle against defects
in materials and workmanship for
36 months/36,000 miles, whichever
comes first, plus we provide a
powertrain warranty for 60 months/
60,000 miles, whichever comes first.
Unleaded
Gasoline
87-octane
minimum
16-gallon/
60-liter tank
2.3L engine
If you have any questions about
your vehicle, you are invited to
contact your local dealer.
Or if you need additional help,
feel free to call our
Customer Assistance Center
at 1-800-222-5500
Monday through Friday,
8 a.m.-4:45 p.m., Pacific
9 a.m.-5:45 p.m., Eastern/Central
www.mazdausa.com
©2007 Calcar, Quick Tips
®
is a trademark
of Calcar, made in USA 9/07 23.9M DOT
Mazda North American Operations reserves
the right to change product specifications
at any time without incurring obligations.
9999-95-005C-08QT
  • Page 1 1
  • Page 2 2
  • Page 3 3
  • Page 4 4
  • Page 5 5
  • Page 6 6
  • Page 7 7
  • Page 8 8
  • Page 9 9
  • Page 10 10
  • Page 11 11
  • Page 12 12
  • Page 13 13

Mazda MAZDA5 Quick Tips

Category
Cars
Type
Quick Tips

Mazda MAZDA5, your versatile and feature-packed vehicle, is ready to enhance your driving experience. With its impressive capabilities, it's the perfect companion for everyday adventures and long journeys alike.

Ask a question and I''ll find the answer in the document

Finding information in a document is now easier with AI