
Confidential
Developer's Guide
SR-600
Issued date , ,
Issued by
EPSON
English
401333300

Confidential

Rev.A i
Developer's Guide SR-600
Confidential
Table of contents
Revision Information . . . . . . . . . . . . . . . . . . . . . . . . . . . . . . . . . . . . . . . . . . . . . . . . . . . . iv
Warnings, Cautions, and Notes . . . . . . . . . . . . . . . . . . . . . . . . . . . . . . . . . . . . . . . . . . . iv
Guide Configuration . . . . . . . . . . . . . . . . . . . . . . . . . . . . . . . . . . . . . . . . . . . . . . . . . . .viii
Chapter 1 General Features
Features of the product . . . . . . . . . . . . . . . . . . . . . . . . . . . . . . . . . . . . . . . . . . . . . . . . . 1-1
Part Names . . . . . . . . . . . . . . . . . . . . . . . . . . . . . . . . . . . . . . . . . . . . . . . . . . . . . . . . . . . 1-5
Required Clearance . . . . . . . . . . . . . . . . . . . . . . . . . . . . . . . . . . . . . . . . . . . . . . . . . . . 1-11
Chapter 2 OS and Driver Setup
Supporting OS . . . . . . . . . . . . . . . . . . . . . . . . . . . . . . . . . . . . . . . . . . . . . . . . . . . . . . . . . 2-1
MS-DOS . . . . . . . . . . . . . . . . . . . . . . . . . . . . . . . . . . . . . . . . . . . . . . . . . . . . . . . . . . . . . . 2-1
Windows 95 . . . . . . . . . . . . . . . . . . . . . . . . . . . . . . . . . . . . . . . . . . . . . . . . . . . . . . . . . . . 2-4
Windows 98 . . . . . . . . . . . . . . . . . . . . . . . . . . . . . . . . . . . . . . . . . . . . . . . . . . . . . . . . . . . 2-9
Windows NT 4.0 . . . . . . . . . . . . . . . . . . . . . . . . . . . . . . . . . . . . . . . . . . . . . . . . . . . . . . 2-13
Windows2000 . . . . . . . . . . . . . . . . . . . . . . . . . . . . . . . . . . . . . . . . . . . . . . . . . . . . . . . . 2-20
Chapter 3 BIOS Setup
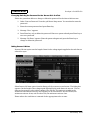
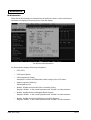
BIOS Setup Utility . . . . . . . . . . . . . . . . . . . . . . . . . . . . . . . . . . . . . . . . . . . . . . . . . . . . . 3-1
Power On Self Test (POST) . . . . . . . . . . . . . . . . . . . . . . . . . . . . . . . . . . . . . . . . . . . . . 3-11
Device Diagnostics Utility . . . . . . . . . . . . . . . . . . . . . . . . . . . . . . . . . . . . . . . . . . . . . . 3-15
Chapter 4 Driver / Utility Specifications
Network Driver . . . . . . . . . . . . . . . . . . . . . . . . . . . . . . . . . . . . . . . . . . . . . . . . . . . . . . . . 4-3
Video Driver . . . . . . . . . . . . . . . . . . . . . . . . . . . . . . . . . . . . . . . . . . . . . . . . . . . . . . . . . . 4-4
Log on (Software Keyboard) Utility . . . . . . . . . . . . . . . . . . . . . . . . . . . . . . . . . . . . . . 4-5
Screen Saver (For NT) . . . . . . . . . . . . . . . . . . . . . . . . . . . . . . . . . . . . . . . . . . . . . . . . . . 4-7
EPSON OPOS ADK . . . . . . . . . . . . . . . . . . . . . . . . . . . . . . . . . . . . . . . . . . . . . . . . . . . 4-11
Chapter 5 Hardware Specifications
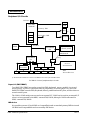
Circuit Board Functions . . . . . . . . . . . . . . . . . . . . . . . . . . . . . . . . . . . . . . . . . . . . . . . . . 5-1
System . . . . . . . . . . . . . . . . . . . . . . . . . . . . . . . . . . . . . . . . . . . . . . . . . . . . . . . . . . . . . . . 5-2
Mother Board . . . . . . . . . . . . . . . . . . . . . . . . . . . . . . . . . . . . . . . . . . . . . . . . . . . . . . . . . 5-7
Power Supply Unit . . . . . . . . . . . . . . . . . . . . . . . . . . . . . . . . . . . . . . . . . . . . . . . . . . . . 5-11
Multi Video Mode . . . . . . . . . . . . . . . . . . . . . . . . . . . . . . . . . . . . . . . . . . . . . . . . . . . . 5-14
PCI Board . . . . . . . . . . . . . . . . . . . . . . . . . . . . . . . . . . . . . . . . . . . . . . . . . . . . . . . . . . . . 5-15
Power Supply Unit . . . . . . . . . . . . . . . . . . . . . . . . . . . . . . . . . . . . . . . . . . . . . . . . . . . . 5-16
FDD . . . . . . . . . . . . . . . . . . . . . . . . . . . . . . . . . . . . . . . . . . . . . . . . . . . . . . . . . . . . . . . . . 5-18
HDD . . . . . . . . . . . . . . . . . . . . . . . . . . . . . . . . . . . . . . . . . . . . . . . . . . . . . . . . . . . . . . . . 5-18
CD-ROM Drive(Optional) . . . . . . . . . . . . . . . . . . . . . . . . . . . . . . . . . . . . . . . . . . . . . . 5-19
CompactFlash Card(Optional or Specified Product) . . . . . . . . . . . . . . . . . . . . . . . 5-19
LCD/Keyboard unit . . . . . . . . . . . . . . . . . . . . . . . . . . . . . . . . . . . . . . . . . . . . . . . . . . 5-20
Chapter 6 Peripherals/Option Installation
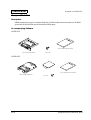
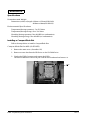
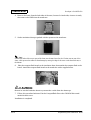
LCD Unit . . . . . . . . . . . . . . . . . . . . . . . . . . . . . . . . . . . . . . . . . . . . . . . . . . . . . . . . . . . . . 6-2
CD-ROM Drive . . . . . . . . . . . . . . . . . . . . . . . . . . . . . . . . . . . . . . . . . . . . . . . . . . . . . . . 6-14
Drawer /CRT Board . . . . . . . . . . . . . . . . . . . . . . . . . . . . . . . . . . . . . . . . . . . . . . . . . . 6-17
Compact Flash Slot . . . . . . . . . . . . . . . . . . . . . . . . . . . . . . . . . . . . . . . . . . . . . . . . . . . . 6-23
MSR Unit . . . . . . . . . . . . . . . . . . . . . . . . . . . . . . . . . . . . . . . . . . . . . . . . . . . . . . . . . . . . 6-27
DM-D Unit . . . . . . . . . . . . . . . . . . . . . . . . . . . . . . . . . . . . . . . . . . . . . . . . . . . . . . . . . . . 6-44
Floppy Disk Drive . . . . . . . . . . . . . . . . . . . . . . . . . . . . . . . . . . . . . . . . . . . . . . . . . . . . 6-45
DIMM . . . . . . . . . . . . . . . . . . . . . . . . . . . . . . . . . . . . . . . . . . . . . . . . . . . . . . . . . . . . . . . 6-46

ii Rev.A
Confidential
Appendix 1 Interfaces
Connector Location . . . . . . . . . . . . . . . . . . . . . . . . . . . . . . . . . . . . . . . . . . . Appendix 1-1
Serial Port . . . . . . . . . . . . . . . . . . . . . . . . . . . . . . . . . . . . . . . . . . . . . . . . . . . Appendix 1-2
Parallel Port (LPT Port) . . . . . . . . . . . . . . . . . . . . . . . . . . . . . . . . . . . . . . . Appendix 1-3
Keyboard/Mouse Port . . . . . . . . . . . . . . . . . . . . . . . . . . . . . . . . . . . . . . . . Appendix 1-4
USB Port . . . . . . . . . . . . . . . . . . . . . . . . . . . . . . . . . . . . . . . . . . . . . . . . . . . . Appendix 1-5
Ethernet Port . . . . . . . . . . . . . . . . . . . . . . . . . . . . . . . . . . . . . . . . . . . . . . . . Appendix 1-6
Customer Display Port . . . . . . . . . . . . . . . . . . . . . . . . . . . . . . . . . . . . . . . . Appendix 1-7
CRT Port . . . . . . . . . . . . . . . . . . . . . . . . . . . . . . . . . . . . . . . . . . . . . . . . . . . . Appendix 1-8
Drawer Port . . . . . . . . . . . . . . . . . . . . . . . . . . . . . . . . . . . . . . . . . . . . . . . . . Appendix 1-9
Floppy Disk Drive Connector . . . . . . . . . . . . . . . . . . . . . . . . . . . . . . . . . Appendix 1-10
PCI Slot . . . . . . . . . . . . . . . . . . . . . . . . . . . . . . . . . . . . . . . . . . . . . . . . . . . . Appendix 1-11
Appendix 2 Power Management
Description . . . . . . . . . . . . . . . . . . . . . . . . . . . . . . . . . . . . . . . . . . . . . . . . . . Appendix 2-1
Suspend . . . . . . . . . . . . . . . . . . . . . . . . . . . . . . . . . . . . . . . . . . . . . . . . . . . . Appendix 2-3
Video Off . . . . . . . . . . . . . . . . . . . . . . . . . . . . . . . . . . . . . . . . . . . . . . . . . . . Appendix 2-6
Front Power Switch Function . . . . . . . . . . . . . . . . . . . . . . . . . . . . . . . . . . Appendix 2-8
Recommended Setting according with Operation . . . . . . . . . . . . . . . . Appendix 2-12
Restrictions . . . . . . . . . . . . . . . . . . . . . . . . . . . . . . . . . . . . . . . . . . . . . . . . . Appendix 2-12
Appendix 3 Wake On LAN
Descriptions . . . . . . . . . . . . . . . . . . . . . . . . . . . . . . . . . . . . . . . . . . . . . . . . . Appendix 3-1
Software Setting . . . . . . . . . . . . . . . . . . . . . . . . . . . . . . . . . . . . . . . . . . . . . . Appendix 3-3
Function Details . . . . . . . . . . . . . . . . . . . . . . . . . . . . . . . . . . . . . . . . . . . . . . Appendix 3-5
Appendix 4 COM3 Mode
Description . . . . . . . . . . . . . . . . . . . . . . . . . . . . . . . . . . . . . . . . . . . . . . . . . . Appendix 4-1
COM3 Mode Seting Specification . . . . . . . . . . . . . . . . . . . . . . . . . . . . . . . Appendix 4-2
INDEX . . . . . . . . . . . . . . . . . . . . . . . . . . . . . . . . . . . . . . . . . . . . . . . . . . . . . . . . . . . .Index-1

Rev.A iii
Developer's Guide SR-600
Confidential
CONFIDENTIALITY AGREEMENT
BY USING THIS DOCUMENT, YOU AGREE TO ABIDE BY THE TERMS OF THIS AGREEMENT. PLEASE
RETURN THIS DOCUMENT IMMEDIATELY IF YOU DO NOT AGREE TO THESE TERMS.
❏ This document contains confidential, proprietary information of Seiko Epson Corporation or its affiliates. You
must keep such information confidential. If the user is a business entity or organization, you must limit disclosure
to your employees, agents, and contractors who have a need to know and who are also bound by obligations of
confidentiality.
❏ On the earlier of (a) termination of your relationship with Seiko Epson, or (b) Seiko Epson’s request, you must
stop using the confidential information. You must then return or destroy the information, as directed by Seiko
Epson.
❏ If a court, arbitrator, government agency, or the like orders you to disclose any confidential information, you
mustimmediately notify Seiko Epson. You agree to give Seiko Epson reasonable cooperation and assistance in
resisting disclosure.
❏ You may use confidential information only for the purpose of facilitating authorized sales and service of, or
developing software and similar products for authorized use with, the products to which the document relates,
unless you obtain the prior written consent of Seiko Epson for some other use.
❏ Seiko Epson warrants that it has the right to disclose the confidential information. SEIKO EPSON MAKES NO
OTHER WARRANTIES CONCERNING THE CONFIDENTIAL INFORMATION OR ANY OTHER
INFORMATION IN THE DOCUMENT, INCLUDING (WITHOUT LIMITATION) ANY WARRANTY OF TITLE
OR NON-INFRINGEMENT. Seiko Epson has no liability for loss or damage arising from or relating to your use of
or reliance on the information in the document.
❏ You may not reproduce, store, or transmit the confidential information in any form or by any means (electronic,
mechanical, photocopying, recording, or otherwise) without the prior written permission of Seiko Epson.
❏ Your obligations under this Agreement are in addition to any other legal obligations. Seiko Epson does not waive
any right under this Agreement by failing to exercise it. The laws of Japan apply to this Agreement.
CAUTIONS
❏ This document shall apply only to the product(s) identified herein.
❏ No part of this document may be reproduced, stored in a retrieval system, or transmitted in any form or by any
means, electronic, mechanical, photocopying, recording, or otherwise, without the prior written permission of
Seiko Epson Corporation.
❏ The contents of this document are subject to change without notice. Please contact us for the latest information.
❏ While every precaution has been taken in the preparation of this document, Seiko Epson Corporation assumes no
responsibility for errors or omissions.
❏ Neither is any liability assumed for damages resulting from the use of the information contained herein.
❏ Neither Seiko Epson Corporation nor its affiliates shall be liable to the purchaser of this product or third parties
for damages, losses, costs, or expenses incurred by the purchaser or third parties as a result of: accident, misuse, or
abuse of this product or unauthorized modifications, repairs, or alterations to this product, or (excluding the U.S.)
failure to strictly comply with Seiko Epson Corporation's operating and maintenance instructions.
❏ Seiko Epson Corporation shall not be liable against any damages or problems arising from the use of any options
or any consumable products other than those designated as Original EPSON Products or EPSON Approved
Products by Seiko Epson Corporation.
TRADEMARKS
EPSON
®
is a registered trademark of Seiko Epson Corporation.
General Notice: Other product and company names used herein are for identification purposes only and may be
trademarks of their respective companies.

iv Rev.A
Confidential
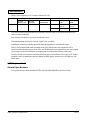
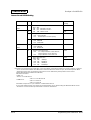
Revision Information
Warnings, Cautions, and Notes
Notes and precautions in this manual are identified as defined below.
WARNING:
Provides information that must be followed carefully to avoid bodily injury.
CAUTION:
Provides information that must be observed to prevent damage to the equipment or
loss of data.
❏
Possibility of sustaining physical injuries.
❏
Possibility of causing physical damages.
❏
Possibility of causing information loss.
Note:
Provides important information and useful tips on handling the equipment.
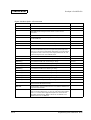
Revision Page Altered Item and Contents
Rev. A

Rev.A v
Developer's Guide SR-600
Confidential
Safety Precautions
This section presents important information intended to ensure safe and effective use of this
product. Please read this section carefully and store it in an accessible location.
WARNING:
❏
Turn off the main power switch immediately and unplug the power cord if the SR-600
produces smoke, a strange odor, or unusual
noise
. Continued use may lead to fire or
electric shock. Contact your dealer or an EPSON service center for advice.
❏
Never attempt to repair this product yourself. Improper repair work can be
dangerous.
❏
Never disassemble or modify this product. Tampering with this product may result in
injury, fire, or electric shock.
❏
Be sure to use the specified power supply. Using an unsuitable power supply may
cause fire or electric shock.
❏
Never insert or disconnect the power plug with wet hands. Doing so may result in
severe shock.
❏
Do not allow foreign objects to fall into this product. Penetration by foreign objects
may lead to fire or shock.
❏
Do not plug too many leads into a single socket. It may lead to fire.
❏
Handle the power cord with care. Improper handling may lead
to fire or shock.
❏
Do not modify or attempt to repair the cord.
• Do not process the power cord.
• Do not place any object on top of the cord.
• Avoid excessive bending, twisting, and pulling.
• Do not place the cord near heating equipment.
• Check that the plug is clean before plugging it in.
• Be sure to push the prongs all the way in.

vi Rev.A
Confidential
CAUTION:
❏
Be sure your power cable meets the relevant safety standards and includes a
power-system ground terminal (PE terminal). Improper interconnections may lead to
crash or fire.
❏
Be sure to set this product on a firm, stable and horizontal surface. The product may
break or cause injury if it falls
.
❏
Do not use in locations subject to high humidity or dust levels. Excessive humidity and
dust may cause equipment damage, fire, or shock.
❏
Do not place multiple loads on the power outlet (wall outlet). Overloading the outlet
may lead to fire.
❏
To ensure safety, unplug this product prior to leaving it unused for an extended
period.
Note:
❏
Be sure to use the EPSON supplied DIMM, HDD and CPU.
❏
To get the lastest information about which Compact Flash and PCI board can be used with
this product, contact your EPSON dealer.
Note for Maintenance, Repair, and Inspection
WARNING:
❏
Wear a ground wristlet to prevent the system failure from the static electricity during
the handling of the internal circuit board.
❏
If you remove the internal circuit board, place the circuit board on the antistatic
rubber surface or equivalent product to prevent the system failure from the static
electricity.
❏
Handle the power cord with care, improper handling may lead to fire.
❏
Do not modify or attempt to repair the cord.
❏
Do not operate the maintenance, repairing or inspection to avoid the electric shock
when it’s thunderstorming.
❏
It is possible that the temperature of the circuit board device is high. Besure to wait
for about 10 minutes after turned off the power to handle the circuit board device.
❏
Do not give the circuit board impacts or vibrations. It may result in the system failure.
❏
Do not touch the circuit board or cable terminals. It may cause the system failure
from the dirt.

Rev.A vii
Developer's Guide SR-600
Confidential
❏
Never clean the product with thinner, benzene, alcohol or other such
solvent.
It may
result in deformation or breakage of the plastic and rubber made supplies of this
product.
❏
Clean this product with dry or wettish fabric. Be sure to unplug the power cord
before clean this product.
Note for Deacquisition
Note:
Follow the country(or local) law and the regulation for the disposal of this product.
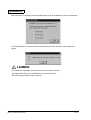
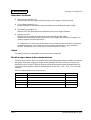
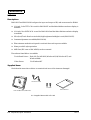
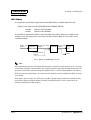
Modular Type Connector
Be careful not to cut your finger on any edge of he unit.The Caution label as shown below is
sticked around the three modular type connector on the rear and bottom sides of this product.
CAUTION:
The modular type connector is used as a dedicated connector for cash drawer or customer
display. Do not connect it with the public circuits, Network, or LAN. It does not operate as an
Ethernet Connector.

viii Rev.A
Confidential
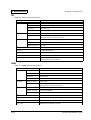
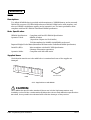
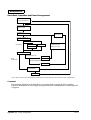
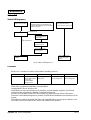
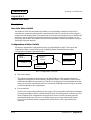
Guide Configuration
Aim of the Manual
This manual was created to provide information on the
SR-600
for anyone who is developing
programs, and setting upthe optional supplies and the printer.
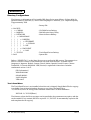
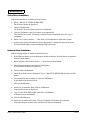
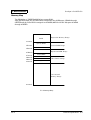
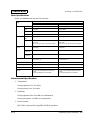
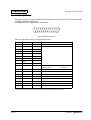
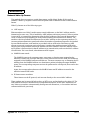
Contents of the Manual
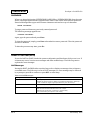
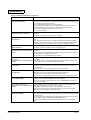
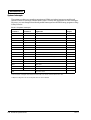
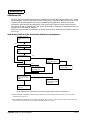
The configurations of this manual is summarized in the table below.
Related Manuals
Chapter 1 “General Features"
Gives descriptions of SR-600 and the parts
names.
Chapter 2 “OS and Driver Setup”
Gives descriptions of the OS and the Driver
compliant with each OS.
Chapter 3 “BIOS Setup”
Gives descriptions of the BIOS, POST, and the
Device Diagnostic Utility.
Chapter 4 “Driver / Utility
Specifications”
Gives specifications for the Drivers and
Utilities.
Chapter 5 “Hardware Specifications”
Gives specifications for the Hardware
configurations and the optional supplies.
Chapter 6 “Peripherals/Option
Installation”
Gives specifications for the optional peripherals
and setup.
Appendix 1 “Interfaces”
Gives specifications for all the interfaces.
Appendix 2 “Power Management”
Gives specifications for the Power Management
Function.
Appendix 3 “Wake On LAN”
Gives specifications for the Wake On LAN
function.
Appendix 4 “COM3 Mode”
Gives descriptions of the COM3 Mode.
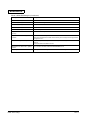
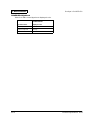
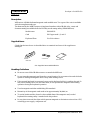
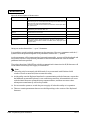
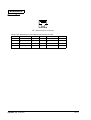
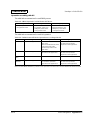
Related Manuals
Name Contents
SR-600 User’s Manual Gives basic handling guidelines of SR-600.
SR-600 Service Manual Gives guidelines for anyone who supports and repairs SR-600.

Rev.A General Features 1-1
Developer's Guide SR-600
Confidential
Chapter 1
General Features
Features of the product
Hardware Configurations
The SR-600 is an intelligent terminal developed for the POS environment.
The SR-600 has the following features:
❏
A high speed Intel Celeron processor provides the power and speed necessary for data
processing.
❏
Using it with a variety of options and
peripheral devices allows you to construct a system that
suits your needs best.
❏
Designed with a stylish color and shape, it is waterproof and easy to care for.
❏
The lock on the front cover allows only the key owner to take out a CD-ROM
.
❏
The power management function supplies only the amount of power
necessary for data
processing, assuring optimum power saving.
❏
Use of PC/AT compatible BIOS.
❏
Support of Plug & Play function. (Windows 98/2000 only)
❏
Wake up function can be available over a LAN.
❏
Use of design consistent with the EPSON POS system DM series Customer Display. A
customer display can be mounted on the SR-600, so it does not occupy much space.
❏
Two disk spaces are provided for HDD, CD-ROM, and/or CompactFlash.
❏
A 2.5-inch hard disk drive can be stored in hard disk drive.
❏
The PC-based open architecture with a PCI slot increases system
expandability.
❏
Three serial ports, one parallel port, and two USB port allow connection of
peripheral
devices, increasing system expandability.
❏
An Ethernet controller can be used to 100Base-TX or 10Base-T
.
❏
A CompactFlash board can be installed.
❏
The built-in IBM PS 2 keyboard port supports IBM PC/AT
compatible keyboards.
❏
A CD-ROM drive can be installed.
❏
LCD unit (option) is a 12.1-inch TFT with Touch Panel or can be selected from DSTN
, which
allows you to make a free layout for the application screen.
❏
A 2MB video memory is internally equipped using a PCI video controller.

1-2 General Features Rev.A
Confidential
Software Configurations
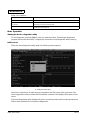
BIOS setup
BIOS setup defines your system configuration. When you set up the product for the first time,
run this program to set the system environment. When you want to change the operating
environment, run this program again. For details on BIOS setup, refer to “Chapter 3, BIOS
Setup.”
Device self-diagnosis utility
Device self-diagnosis utility performs a test on each devices and functions of the SR-600. For
details on device self-diagnosis utility, refer to “Chapter 3, BIOS Setup.”

Rev.A General Features 1-3
Developer's Guide SR-600
Confidential
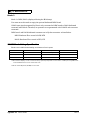
Operating System
The
SR-600
runs on the standard Microsoft
®
operating systems:
•Windows 95
•Windows 98
• Windows NT Workstation 4.0
•MS-DOS 6.2
• Windows 2000 Professional (It’ll be available in the near future.)

1-4 General Features Rev.A
Confidential
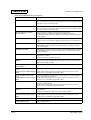
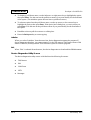
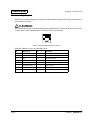
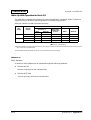
Peripheral Devices
The
SR-600
can be configured with the following optional units:
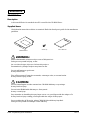
❏
LCD units
12.1” color DSTN Model Name DM-LS121S
12.1” color TFT Model Name DM-LS121T
❏
MSR units
ISO I track 1,2,3 Model NameDM-MS123
❏
Floppy disk drive
3.5” 720KB/1.44MB Model Name OI-S01
❏
CD-ROM drive Model Name OI-S02
❏
Drawer board
Cash drawer x 2 port Model Name OI-B08
CRT x 1 port
❏
CompactFlash board
For HDD attachment Model Name OI-S03-012
For CD-ROM attachment Model Name OI-S03-022

Rev.A General Features 1-5
Developer's Guide SR-600
Confidential
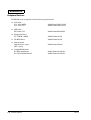
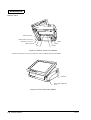
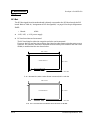
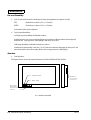
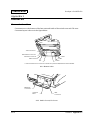
Part Names
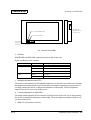
Front View
Figure 1-1 Front views of the SR-600
Key Lock
LCD Unit
CD Cover
Switch Cover
K/B Mouse Connector
Reset Switch
Front Power Switch
CD-ROM Drive
CD-ROM Access LED
FDD Connector
Speaker Volume
CD-ROM Eject Button

1-6 General Features Rev.A
Confidential
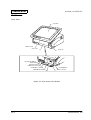
DM-LS121S
Figure 1-2 External views of the DM-LS121S
DM-LS121T
Figure 1-3 External views of the DM-LS121T
HDD LED
Power LED
Contrast Adjustment
Switch
HDD LED
Power LED
Backlight Brightness
Adjustment Switch

Rev.A General Features 1-7
Developer's Guide SR-600
Confidential
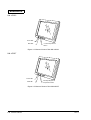
Rear View
Figure 1-4 Rear views of the SR-600
Rear Cover
MSR Unit
Connector
Customer Display
Connector
Main Power Connector
Main Power Switch
Main Cover

1-8 General Features Rev.A
Confidential
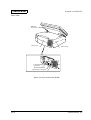
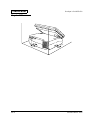
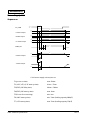
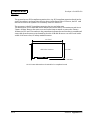
Bottom View
:
Figure 1-5 Bottom views of the SR-600
* CRT and drawer kick connector is used if the optional CRT/drawer board is installed.
Figure 1-6 Side views of the SR-600
COM1
COM2
COM3
LPT
USB Connector
Ethernet Connector
*Drawer Kick Connector
*CRT Connector
LCD Angle Adjusment
Lever
Ventilator

Rev.A General Features 1-9
Developer's Guide SR-600
Confidential
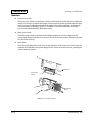
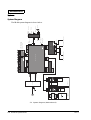
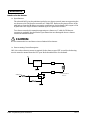
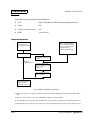
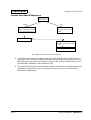
Switches
❏
Front power switch
The front power switch is a push type switch on the bottom of the left side corner under the
switch cover. It turns on and off the system. The front power switch is placed under the front
cover to prevent the operation mistake from being turning off accidentally. It changes the
front power status of SR-600 to power on, standby, or off. The functionality of the front
power switch is determined by BIOS Setup utiliy.
❏
Main power switch
The main power switch on the back of the SR-600 isolates the AC line voltage from the
power supply. Remove the rear cover to turn on and off the main power. During the normal
use, this switch is left on.
❏
Reset Switch
The reset switch under the switch cover by the right side of the front power switch resets the
hardware of the SR-600. If the system hangs for any reason and cannot recover, pressing this
switch restarts the system.
Figure 1-7
Switch locations
Reset Switch
Front Power
Switch
Main Power
Switch

1-10 General Features Rev.A
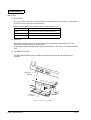
Confidential
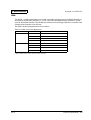
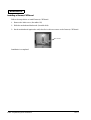
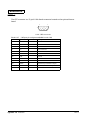
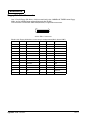
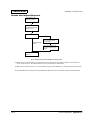
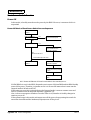
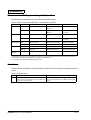
Indicators
❏
Power LED
The power LED on the LCD unit indicates the on/off status of the power supply.
The table below
shows the colors of the LED and its meaning.
❏
HDD LED
HDD LED (Green) on the LCD unit indicates the access status of the HDD or CF. The
meaning of the LED is same in all the units.
It also lights while accessing to other devices (CD-ROM or CF) which connected to Primary
IDE.
❏
CD-ROM Access LED
CD-ROM access LED on the CD-ROM unit lights green while the CD-ROM is being
accessed.
Figure 1-8 Location of LEDs
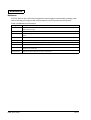
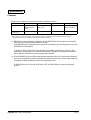
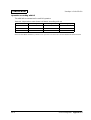
Table 1-1 Power LED colors and their meaning s
hows the colors
LED color Meaning when illuminated
Green Power supply is on (during normal operations)
Orange
Power is suspended
Off Power is off
HDD LED
Power LED
CD-ROM
Access LED
Page is loading ...
Page is loading ...
Page is loading ...
Page is loading ...
Page is loading ...
Page is loading ...
Page is loading ...
Page is loading ...
Page is loading ...
Page is loading ...
Page is loading ...
Page is loading ...
Page is loading ...
Page is loading ...
Page is loading ...
Page is loading ...
Page is loading ...
Page is loading ...
Page is loading ...
Page is loading ...
Page is loading ...
Page is loading ...
Page is loading ...
Page is loading ...
Page is loading ...
Page is loading ...
Page is loading ...
Page is loading ...
Page is loading ...
Page is loading ...
Page is loading ...
Page is loading ...
Page is loading ...
Page is loading ...
Page is loading ...
Page is loading ...
Page is loading ...
Page is loading ...
Page is loading ...
Page is loading ...
Page is loading ...
Page is loading ...
Page is loading ...
Page is loading ...
Page is loading ...
Page is loading ...
Page is loading ...
Page is loading ...
Page is loading ...
Page is loading ...
Page is loading ...
Page is loading ...
Page is loading ...
Page is loading ...
Page is loading ...
Page is loading ...
Page is loading ...
Page is loading ...
Page is loading ...
Page is loading ...
Page is loading ...
Page is loading ...
Page is loading ...
Page is loading ...
Page is loading ...
Page is loading ...
Page is loading ...
Page is loading ...
Page is loading ...
Page is loading ...
Page is loading ...
Page is loading ...
Page is loading ...
Page is loading ...
Page is loading ...
Page is loading ...
Page is loading ...
Page is loading ...
Page is loading ...
Page is loading ...
Page is loading ...
Page is loading ...
Page is loading ...
Page is loading ...
Page is loading ...
Page is loading ...
Page is loading ...
Page is loading ...
Page is loading ...
Page is loading ...
Page is loading ...
Page is loading ...
Page is loading ...
Page is loading ...
Page is loading ...
Page is loading ...
Page is loading ...
Page is loading ...
Page is loading ...
Page is loading ...
Page is loading ...
Page is loading ...
Page is loading ...
Page is loading ...
Page is loading ...
Page is loading ...
Page is loading ...
Page is loading ...
Page is loading ...
Page is loading ...
Page is loading ...
Page is loading ...
Page is loading ...
Page is loading ...
Page is loading ...
Page is loading ...
Page is loading ...
Page is loading ...
Page is loading ...
Page is loading ...
Page is loading ...
Page is loading ...
Page is loading ...
Page is loading ...
Page is loading ...
Page is loading ...
Page is loading ...
Page is loading ...
Page is loading ...
Page is loading ...
Page is loading ...
Page is loading ...
Page is loading ...
Page is loading ...
Page is loading ...
Page is loading ...
Page is loading ...
Page is loading ...
Page is loading ...
Page is loading ...
Page is loading ...
Page is loading ...
Page is loading ...
Page is loading ...
Page is loading ...
Page is loading ...
Page is loading ...
Page is loading ...
Page is loading ...
Page is loading ...
Page is loading ...
Page is loading ...
Page is loading ...
Page is loading ...
Page is loading ...
Page is loading ...
Page is loading ...
Page is loading ...
Page is loading ...
Page is loading ...
Page is loading ...
Page is loading ...
Page is loading ...
Page is loading ...
Page is loading ...
Page is loading ...
Page is loading ...
Page is loading ...
Page is loading ...
Page is loading ...
Page is loading ...
Page is loading ...
-
 1
1
-
 2
2
-
 3
3
-
 4
4
-
 5
5
-
 6
6
-
 7
7
-
 8
8
-
 9
9
-
 10
10
-
 11
11
-
 12
12
-
 13
13
-
 14
14
-
 15
15
-
 16
16
-
 17
17
-
 18
18
-
 19
19
-
 20
20
-
 21
21
-
 22
22
-
 23
23
-
 24
24
-
 25
25
-
 26
26
-
 27
27
-
 28
28
-
 29
29
-
 30
30
-
 31
31
-
 32
32
-
 33
33
-
 34
34
-
 35
35
-
 36
36
-
 37
37
-
 38
38
-
 39
39
-
 40
40
-
 41
41
-
 42
42
-
 43
43
-
 44
44
-
 45
45
-
 46
46
-
 47
47
-
 48
48
-
 49
49
-
 50
50
-
 51
51
-
 52
52
-
 53
53
-
 54
54
-
 55
55
-
 56
56
-
 57
57
-
 58
58
-
 59
59
-
 60
60
-
 61
61
-
 62
62
-
 63
63
-
 64
64
-
 65
65
-
 66
66
-
 67
67
-
 68
68
-
 69
69
-
 70
70
-
 71
71
-
 72
72
-
 73
73
-
 74
74
-
 75
75
-
 76
76
-
 77
77
-
 78
78
-
 79
79
-
 80
80
-
 81
81
-
 82
82
-
 83
83
-
 84
84
-
 85
85
-
 86
86
-
 87
87
-
 88
88
-
 89
89
-
 90
90
-
 91
91
-
 92
92
-
 93
93
-
 94
94
-
 95
95
-
 96
96
-
 97
97
-
 98
98
-
 99
99
-
 100
100
-
 101
101
-
 102
102
-
 103
103
-
 104
104
-
 105
105
-
 106
106
-
 107
107
-
 108
108
-
 109
109
-
 110
110
-
 111
111
-
 112
112
-
 113
113
-
 114
114
-
 115
115
-
 116
116
-
 117
117
-
 118
118
-
 119
119
-
 120
120
-
 121
121
-
 122
122
-
 123
123
-
 124
124
-
 125
125
-
 126
126
-
 127
127
-
 128
128
-
 129
129
-
 130
130
-
 131
131
-
 132
132
-
 133
133
-
 134
134
-
 135
135
-
 136
136
-
 137
137
-
 138
138
-
 139
139
-
 140
140
-
 141
141
-
 142
142
-
 143
143
-
 144
144
-
 145
145
-
 146
146
-
 147
147
-
 148
148
-
 149
149
-
 150
150
-
 151
151
-
 152
152
-
 153
153
-
 154
154
-
 155
155
-
 156
156
-
 157
157
-
 158
158
-
 159
159
-
 160
160
-
 161
161
-
 162
162
-
 163
163
-
 164
164
-
 165
165
-
 166
166
-
 167
167
-
 168
168
-
 169
169
-
 170
170
-
 171
171
-
 172
172
-
 173
173
-
 174
174
-
 175
175
-
 176
176
-
 177
177
-
 178
178
-
 179
179
-
 180
180
-
 181
181
-
 182
182
-
 183
183
-
 184
184
-
 185
185
-
 186
186
-
 187
187
-
 188
188
-
 189
189
-
 190
190
-
 191
191
-
 192
192


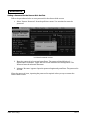
Ask a question and I''ll find the answer in the document
Finding information in a document is now easier with AI
Related papers
-
Epson Remote Configuration Manager User manual
-
Epson FX-880+ User manual
-
Epson SD-USBA User manual
-
-
Epson DM-210 Owner's manual
-
-
-
-
-
Other documents
-
HUANUO HNLM1 Installation guide
-
CyberData 010748 Owner's manual
-
EC Line EC-1530 User manual
-
 all4shop ProfitAge Installation guide
-
 Ultimate Technology 600 POS User manual
-
 Axon POS System POS 5000 User manual
-
 Fametech TP-8515 User manual
-
Logic Controls SB9015F/SB9015T - i3 User manual
-
Logic Controls SB9095 User manual
-
protech PS8852 User manual


