
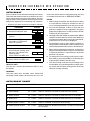
Read all instructions carefully before using the oven.
CONVECTION
MICROWAVE OVEN
OPERATION MANUAL
MODEL
R-830B
Followed by letter indicating color
K = black, W = white, S = stainless steel

2 32
IMPORTANT! Register within 10 days of purchase. Register ONLINE at www.sharpusa.com/productregistration.
To aid in reporting this microwave oven in case of loss or theft, please record below the model number and serial
number located on the unit. We also suggest you record all the information listed and retain for future reference.
MODEL NUMBER _______________________ SERIAL NUMBER _____________
DATE OF PURCHASE ______________________
DEALER ___________________________ TELEPHONE ________________
SERvICER ___________________________ TELEPHONE ________________
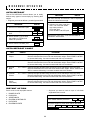
PRECAUTIONS TO AVOID POSSIBLE
EXPOSURE TO EXCESSIVE
MICROWAVE ENERGY
(a) Do not attempt to operate this oven with the door open since open-door operation can result
in harmful exposure to microwave energy. It is important not to defeat or tamper with the
safety interlocks.
(b) Do not place any object between the oven front face and the door or allow soil or cleaner
residue to accumulate on sealing surfaces.
(c) Do not operate the oven if it is damaged. It is particularly important that the oven door close
properly and that there is no damage to the: (1) door (bent), (2) hinges and latches (broken
or loosened), (3) door seals and sealing surfaces.
(d)Theovenshouldnotbeadjustedorrepairedbyanyoneexceptproperlyqualiedservice
personnel.
TO PHONE:
DIAL 1-800-BE-SHARP ( 237-4277 ) for :
SERVICE (for your nearest Sharp Authorized Servicer)
PARTS (for your authorized parts distributor)
ADDITIONAL CUSTOMER INFORMATION
ACCESSORIES and COOKBOOK
TO WRITE:
Sharp Electronics Corporation
Attn: Customer Assistance Center
Sharp Plaza Blvd.
Memphis, TN 38193
TO ACCESS INTERNET:
www.sharpusa.com
Please provide the following information when you write or call: model number, serial number, date of purchase,
your complete mailing address (including zip code), your daytime telephone number (including area code) and
description of the problem.
FOR CUSTOMER ASSISTANCE

2 32
CONTENTS
For Customer Assistance .............................. 2
Precautions to Avoid Possible Exposure to
Excessive Microwave Energy ...................... 2
Contents .......................................................... 3
Consumer Limited Warranty ......................... 4
Product Information Card .............................. 4
Important Safety Instructions ....................... 5
Installation Instructions ................................. 6
Grounding Instructions ................................. 6
Information You Need to Know ..................... 7-9
About Your Oven ........................................... 7
About Food .................................................... 7
About Microwave Cooking ............................ 8
About Safety ................................................. 8
About Children and the Microwave ................ 8
About Utensils and Coverings ....................... 9
Part Names ..................................................... 10
Touch-Control Panel ...................................... 11
Before Operating ........................................... 12
Getting Started .............................................. 12
To Set the Clock ............................................ 12
Stop/Clear .................................................... 12
Microwave Operation ..................................... 13-15
Microwave Time Cooking .............................. 13
To Set Power Lever ....................................... 13
Auto Defrost ................................................. 14
Auto Defrost Chart ....................................... 14
Instant Action................................................. 14
Instant Action Chart ...................................... 15
Convection/Automatic Mix Operation .......... 16-19
Convection Cooking ...................................... 16
Automatic Mix Cooking ................................. 17
Roasting ........................................................ 17
Auto Roast .................................................... 18
Auto Roast Chart........................................... 18
Auto Cook ..................................................... 19
Auto Cook Chart............................................ 19
Other Convenient Features .......................... 20-21
Multiple Sequence Cooking .......................... 20
Child Lock ..................................................... 20
Help (Information on pads) ........................... 20
Settings ......................................................... 20-21
1. Auto Start............................................... 20
2. Audible Signal Elimination ..................... 20
3. Demo Mode ........................................... 21
Help (On display) .......................................... 21
Kitchen Timer ................................................ 21
+30 SEC ....................................................... 21
Less and More .............................................. 21
Cleaning and Care .......................................... 22
Service Call Check ......................................... 23
Specications ................................................. 24
Cooking Guides .............................................. 25-38
Introduction ................................................... 25
Auto Roast .................................................... 26
Main Dish Recipes ........................................ 26-30
Roasting ........................................................ 31
Roasting Recipes .......................................... 31-32
Baking ........................................................... 33
Baking Recipes ............................................. 34-38
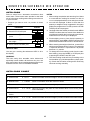
INFO DISPLAY COOKING SYSTEM
Thank you for buying a Sharp Microwave Oven. Your new oven has an “Information Display System”
which offers you step-by-step instructions to easily guide you through each feature. Your oven
also has a HELP pad for instructions on using Auto Start, Demo Mode, Child Lock, Info on pads,
Help and Automatic Operations. We strongly recommend however that you read this operation
manual thoroughly before operating your oven, paying particular attention to the safety warnings
and special notes.

4 5
CONSUMER LIMITED WARRANTY
SHARP ELECTRONICS CORPORATION warrants to the rst consumer purchaser that this Sharp brand
product (the “Product”), when shipped in its original container, will be free from defective workmanship
and materials, and agrees that it will, at its option, either repair the defect or replace the defective Product
or part thereof with a new or remanufactured equivalent at no charge to the purchaser for parts or labor
for the period(s) set forth below.
This warranty does not apply to any appearance items of the Product nor to the additional excluded item(s)
set forth below nor to any Product the exterior of which has been damaged or defaced, which has been
subjected to improper voltage or other misuse, abnormal service or handling, or which has been altered
or modied in design or construction.
In order to enforce the rights under this limited warranty, the purchaser should follow the steps set forth
below and provide proof of purchase to the servicer.
The limited warranty described herein is in addition to whatever implied warranties may be granted to
purchasers by law. ALL IMPLIED WARRANTIES INCLUDING THE WARRANTIES OF MERCHANTABILITY
AND FITNESS FOR USE ARE LIMITED TO THE PERIOD(S) FROM THE DATE OF PURCHASE SET FORTH
BELOW. Some states do not allow limitations on how long an implied warranty lasts, so the above limitation
may not apply to you.
Neither the sales personnel of the seller nor any other person is authorized to make any warranties other
than those described herein, or to extend the duration of any warranties beyond the time period described
herein on behalf of Sharp.
The warranties described herein shall be the sole and exclusive warranties granted by Sharp and shall be
the sole and exclusive remedy available to the purchaser. Correction of defects, in the manner and for the
period of time described herein, shall constitute complete fulllment of all liabilities and responsibilities
of Sharp to the purchaser with respect to the Product, and shall constitute full satisfaction of all claims,
whether based on contract, negligence, strict liability or otherwise. In no event shall Sharp be liable, or
in any way responsible, for any damages or defects in the Product which were caused by repairs or at-
tempted repairs performed by anyone other than an authorized servicer. Nor shall Sharp be liable or in any
way responsible for any incidental or consequential economic or property damage. Some states do not
allow the exclusion of incidental or consequential damages, so the above exclusion may not apply to you.
THIS WARRANTY GIVES YOU SPECIFIC LEGAL RIGHTS. YOU MAY ALSO HAVE OTHER RIGHTS
WHICH VARY FROM STATE TO STATE.
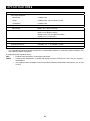
Your Product Model Number &
Description:
R-830B Home Use Carousel Microwave Oven. (Be sure to have this
information available when you need service for your Product.)
Warranty Period for this Product:
One (1) year parts and labor. The warranty period continues for an
additional four (4) years, for a total of ve (5) years, with respect to
the magnetron tube in the Product for parts only; labor and service
are not provided free of charge for this additional period.
Additional Item(s) Excluded from
Warranty Coverage (if any):
Non-functional accessories, turntable and light bulb.
Where to Obtain Service:
From a Sharp Authorized Servicer located In the United States. To
nd the location of the nearest Sharp Authorized Servicer, call Sharp
toll free at 1-800-BE-SHARP (1-800-237-4277).
What to do to Obtain Service:
Ship prepaid or carry in your Product to a Sharp Authorized Servicer.
Be sure to have Proof of Purchase available. If you ship the Product,
be sure it is insured and packaged securely.
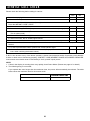
The Product information card should be completed within ten days of purchase and returned. We will keep it on
leandhelpyouaccesstheinformationincaseofloss,damageortheft.Thiswillalsoenableustocontactyou
intheunlikelyeventthatanyadjustmentsormodicationsareeverrequiredforyouroven.
PRODUCT INFORMATION CARD
TO OBTAIN SUPPLY, ACCESSORY OR PRODUCT INFORMATION, CALL 1-800-BE-SHARP OR VISIT www.sharpusa.com.
SAVE THE PROOF OF PURCHASE AS IT IS NEEDED SHOULD YOUR OVEN EVER REQUIRE WARRANTY SERVICE.

54 5
SAVE THESE INSTRUCTIONS
When using electrical appliances basic safety precautions should be followed, including the following:
WARNING -Toreducetheriskofburns,electricshock,re,injurytopersonsorexposuretoexcessive
microwave energy:
1. READ ALL INSTRUCTIONS BEFORE USING
THE APPLIANCE.
2.Readandfollowthespecic“PRECAUTIONS
TO AVOID POSSIBLE EXPOSURE TO
EXCESSIVE MICROWAVE ENERGY” on
page 2.
3. This appliance must be grounded.
Connect only to properly grounded
outlet. See “ELECTRICAL GROUNDING
INSTRUCTIONS” on page 6.
4. Install or locate this appliance only in
accordance with the provided installation
instructions.
5. Some products such as whole eggs and
sealed containers—for example, closed glass
jars—are able to explode and should not be
heated in this oven.
6. Use this appliance only for its intended use as
described in this manual. Do not use corrosive
chemicals or vapors in this appliance. This
type of oven is specifically designed to
heat, cook or dry food. It is not designed for
industrial or laboratory use.
7. As with any appliance, close supervision is
necessary when used by children.
8. Do not operate this appliance if it has a
damaged cord or plug, if it is not working
properly or if it has been damaged or dropped.
9. This appliance should be serviced only by
qualiedservicepersonnel.Contactnearest
Sharp Authorized Servicer for examination,
repair or adjustment.
10. Do not cover or block any openings on the
appliance.
11. Do not store or use this appliance outdoors. Do
not use this product near water—for example,
near a kitchen sink, in a wet basement or near
a swimming pool, or similar locations.
12. Do not immerse cord or plug in water.
13. Keep cord away from heated surfaces.
14. Do not let cord hang over edge of table or
counter.
15. See door surface cleaning instructions on
page 22.
16.Toreducetheriskofreintheovencavity:
a. Do not overcook food. Carefully attend
appliance when paper, plastic or other
combustible materials are placed inside
the oven to facilitate cooking.
b. Remove wire twist-ties from paper or
plastic bags before placing bag in oven.
c. If materials inside the oven ignite, keep
oven door closed, turn oven o and
disconnect the power cord or shut o
power at the fuse or circuit breaker
panel.
d. Do not use the cavity for storage purposes.
Do not leave paper products, cooking
utensils or food in the cavity when not in
use.
17. Liquids, such as water, coffee or tea are able to
be overheated beyond the boiling point without
appearing to be boiling. Visible bubbling or
boiling when the container is removed from the
microwave oven is not always present. THIS
COULD RESULT IN VERY HOT LIQUIDS
SUDDENLY BOILING OVER WHEN A
SPOON OR OTHER UTENSIL IS INSERTED
INTO THE LIQUID.
To reduce the risk of injury to persons:
a. Do not overheat the liquid.
b. Stir the liquid both before and halfway
through heating it.
c. Do not use straight-sided containers
with narrow necks. Use a wide-mouthed
container.
d. After heating, allow the container to stand
in the microwave oven at least for 20
seconds before removing the container.
e. Use extreme care when inserting a spoon
or other utensil into the container.
18. If the oven light fails, consult a SHARP
AUTHORIZED SERVICER.
IMPORTANT SAFETY INSTRUCTIONS

6
gROUNDINg INSTRUCTIONS
This appliance must be grounded. This oven is equipped with a cord having a grounding wire with a grounding plug.
It must be plugged into a wall receptacle that is properly installed and grounded in accordance with the National
Electrical Code and local codes and ordinances. In the event of an electrical short circuit, grounding reduces risk
of electric shock by providing an escape wire for the electric current.
WARNING – Improper use of the grounding plug can result in a risk of electric shock.
ELECTRICAL REQUIREMENTS
The electrical requirements are a 120 volt 60 Hz, AC only, 15 amp. or more protected electrical supply. It is rec-
ommended that a separate circuit serving only this appliance be provided.
The oven is equipped with a 3-prong grounding plug. It must be plugged into a wall
receptacle that is properly installed and grounded. Should you only have a 2-prong
outlet,haveaqualiedelectricianinstallacorrectwallreceptacle.
A 3-prong adapter may be purchased and used temporarily if local codes allow.
Follow package directions.
A short power-supply cord is provided to reduce risk of becoming entangled in or
tripping over a longer cord.
Extension Cord
If it is necessary to use an extension cord, use only a 3-wire extension cord that
has a 3-blade grounding plug and a 3-slot receptacle that will accept the plug on
the microwave oven. The marked rating of the extension cord should be AC 115-
120 volt, 15 amp. or more.
Be careful not to drape the cord over the countertop or table where it can be pulled
on by children or tripped over accidentally.
Notes: 1. If you have any questions about the grounding or electrical instructions,
consultaqualiedelectricianorserviceperson.
2. Neither Sharp nor the dealer can accept any liability for damage to the
oven or personal injury resulting from failure to observe the correct
electrical connection procedures.
Radio or TV Interference
Should there be any interference caused by the microwave oven to your radio or TV, check that the microwave
oven is on a different electrical circuit, relocate the radio or TV as far away from the oven as feasible or check
position and signal of receiving antenna.
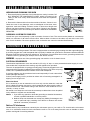
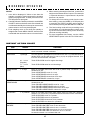
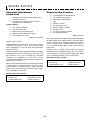
UNPACKING AND EXAMINING YOUR OVEN
1. Remove all packing materials from inside the oven cavity; however, DO
NOT REMOVE THE WAVEGUIDE COVER, which is located on the
ceiling in the oven cavity. Read enclosures and SAVE the Operation
Manual.
2. Remove the feature sticker from the outside of the door, if there is one.
Check the oven for any damage, such as misaligned or bent door, dam-
aged door seals and sealing surfaces, broken or loose door hinges and
latches and dents inside the cavity or on the door. If there is any damage,
do not operate the oven and contact your dealer or SHARP AUTHORIZED
SERVICER.
CHOOSING A LOCATION FOR YOUR OVEN
You will use your oven frequently so plan its location for ease of use. The oven must be placed on a countertop
whichisaminimumof36inchesfromtheoor.Allowatleast2inchesonthesides,topandattherearofthe
oven for air circulation. Be sure to position oven so that the rear cannot be touched inadvertently.
INSTALLATION INSTRUCTIONS
Waveguide cover

6 7
ABOUT YOUR OVEN
This Operation Manual is valuable: read it carefully and
always save it for reference.
A good microwave cookbook is a valuable asset. Check
it for microwave cooking principles, techniques, hints
and recipes.
NEVER use the oven without the turntable and support
nor turn the turntable over so that a large dish could
be placed in the oven. The turntable will turn both
clockwise and counterclockwise.
ALWAYS have food in the oven when it is on to absorb
the microwave energy.
When using the oven at power levels below 100%, you
may hear the magnetron cycling on and off.
The fan will automatically start when heat rises from
range surface units or burners and when convection,
high mix, low mix or the broil settings are used.
Condensation is a normal part of microwave cooking.
Roomhumidityandthemoistureinfoodwillinuence
the amount of moisture that condenses in the oven.
Generally, covered foods will not cause as much
condensation as uncovered ones. Ventilation openings
must not be blocked.
The oven is for food preparation only. It should not be
used to dry clothes or newspapers.
Your oven is rated 900 watts by using the IEC Test
Procedure. In using recipes or package directions,
check food a minute or two before the minimum time
and add time accordingly.
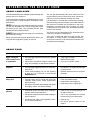
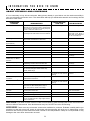
ABOUT FOOD
FOOD DO DON'T
Eggs, sausages,
nuts, seeds, fruits
& vegetables
• Puncture egg yolks before cooking to prevent
“explosion”.
• Pierce skins of potatoes, apples, squash, hot
dogs and sausages so that steam escapes.
• Cook eggs in shells.
• Reheat whole eggs.
• Dry nuts or seeds in shells.
Popcorn
• Use specially bagged popcorn for the micro-
wave oven.
• Listen while popping corn for the popping
to slow to 1 or 2 seconds or use special
POPCORN pad.
• Pop popcorn in regular brown bags
or glass bowls.
• Exceed maximum time on popcorn
package.
Baby food
• Transfer baby food to small dish and heat
carefully, stirring often. Check temperature
before serving.
• Put nipples on bottles after heating and shake
thoroughly. “Wrist” test before feeding.
• Heat disposable bottles.
• Heat bottles with nipples on.
• Heat baby food in original jars.
General
• Cutbakedgoodswithllingafterheatingto
release steam and avoid burns.
• Stir liquids briskly before and after heating to
avoid “eruption”.
• Use deep bowl, when cooking liquids or cere-
als, to prevent boilovers.
• Heat or cook in closed glass jars or
air tight containers.
• Can in the microwave as harmful
bacteria may not be destroyed.
• Deep fat fry.
• Dry wood, gourds, herbs or wet
papers.
INFORMATION YOU NEED TO KNOW

8
INFORMATION YOU NEED TO KNOW
ABOUT MICROWAVE COOKING
• Arrange food carefully. Place thickest areas towards
outside of dish.
• Watch cooking time. Cook for the shortest amount
of time indicated and add more as needed. Food
severely overcooked can smoke or ignite.
• Cover foods while cooking. Check recipe or cook-
book for suggestions: paper towels, wax paper,
microwave plastic wrap or a lid. Covers prevent
spattering and help foods to cook evenly.
• Shieldwithsmallatpieces ofaluminumfoilany
thin areas of meat or poultry to prevent overcooking
before dense, thick areas are cooked thoroughly.
• Stir foods from outside to center of dish once or
twice during cooking, if possible.
• Turn foods over once during microwaving to
speed cooking of such foods as chicken and ham-
burgers. Large items like roasts must be turned over
at least once.
• Rearrange foods such as meatballs halfway through
cooking both from top to bottom and from the center
of the dish to the outside.
• Add standing time. Remove food from oven and stir,
if possible. Cover for standing time which allows the
foodtonishcookingwithoutovercooking.
• Check for doneness. Look for signs indicating that
cooking temperatures have been reached.
Doneness signs include:
- Food steams throughout, not just at edge.
- Center bottom of dish is very hot to the touch.
- Poultry thigh joints move easily.
- Meat and poultry show no pinkness.
- Fishisopaqueandakeseasilywithafork.
ABOUT SAFETY
• Check foods to see that they are cooked to the
United States Department of Agriculture’s recom-
mended temperatures.
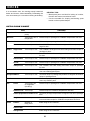
TEMP FOOD
160˚F For fresh pork, ground meat, boneless
whitepoultry,sh,seafood,eggdishes
and frozen prepared food.
165˚F For leftover, ready-to-reheat refrigerated,
and deli and carry-out “fresh” food.
170˚F White meat of poultry.
180˚F Dark meat of poultry.
To test for doneness, insert a meat thermometer in a
thick or dense area away from fat or bone. NEVER leave
the thermometer in the food during cooking, unless it
is approved for microwave oven use.
• ALWAYS use potholders to prevent burns when
handling utensils that are in contact with hot food.
Enough heat from the food can transfer through
utensils to cause skin burns.
• Avoid steam burns by directing steam away from
the face and hands. Slowly lift the farthest edge of
a dish’s covering and carefully open popcorn and
oven cooking bags away from the face.
• Stay near the oven while it’s in use and check cooking
progress frequently so that there is no chance of
overcooking food.
• NEVER use the cavity for storing cookbooks or
other items.
• Select, store and handle food carefully to preserve
its high quality and minimize the spread of foodborne
bacteria.
• Keep waveguide cover clean. Food residue can
causearcingand/orres.
• Use care when removing items from the oven so
that the utensil, your clothes or accessories do not
touch the safety door latches.
ABOUT CHILDREN AND THE
MICROWAVE
Children below the age of 7 should use the microwave
oven with a supervising person very near to them.
Between the ages of 7 and 12, the supervising person
should be in the same room.
The child must be able to reach the oven comfortably;
if not, he/she should stand on a sturdy stool.
At no time should anyone be allowed to lean or swing
on the oven door.
Children should be taught all safety precautions: use
potholders, remove coverings carefully, pay special
attention to packages that crisp food because they
may be extra hot.
Don’t assume that because a child has mastered one
cooking skill he/she can cook everything.
Children need to learn that the microwave oven is not
a toy. See pages 20 for Child Lock feature.

8 9
INFORMATION YOU NEED TO KNOW
ABOUT UTENSILS AND COVERINGS
It is not necessary to buy all new cookware. Many pieces already in your kitchen can be used successfully in
your new microwave convection oven. The chart below will help you decide what utensils and coverings should
be used in each mode.
UTENsils aND
COvEriNgs
MiCrOwavE ONly
CONvECTiON BrOil,
slOw COOk
HigH Mix/lOw Mix
Aluminum Foil YesSmallatpiecesofaluminumfoilplaced
smoothly on food can be used to shield areas
from cooking or defrosting too quickly. Keep foil
at least 1 inch from wall of oven.
Yes For shielding. Yes For shielding.
Aluminum containers
Yes Can be used if
3
/4lledwithfood.Keep1
inch away from walls and do not cover with lid.
Yes Broil - No cover.
Yes Can be used if
3
/4
filled with food. Keep 1
inch away from walls and
do not cover with foil.
Browning dish Yes Do not exceed recommended preheating
time. Follow manufacturer’s directions.
No No
Glass ceramic
(Pyroceram®)
Yes Excellent. Yes Excellent. Yes Excellent.
Glass, heat-resistant Yes Excellent. Yes Excellent. Yes Excellent.
Glass, non-heat-resistant No No No
Lids, glass Yes Yes Broil - No cover. Yes
Lids, metal No Yes Broil - No cover. No
Metal cookware No Yes Yes Do not use metal
coverings.
Metal, misc: dishes with
metalic trim, etc. Metal
twist-ties.
No No No
Oven cooking bags Yes Good for large meats or foods that need
tenderizing. DO NOT use metal twist ties
Yes Broil - No cover. Yes Do not use metal
coverings.
Paper plates Yes For reheating. No No
Paper towels Yes To cover for reheating and cooking. Do
not use recycled paper towels which may
containmetallings.
No No
Paper, ovenable Yes Yes For temperatures up
to 400˚F. Do not use for
broiling.
Yes For temperatures up
to400˚F.
Microwave-safe plastic
containers
Yes Use for reheating and defrosting. Follow
manufacturer’s directions.
No No
Plastic, Thermoset
®
Yes
Yes Are heat resistant up
to 425˚F. Do not use for
broiling.
Yes
Plastic wrap Yes Use brands specially marked for micro-
wave use. DO NOT allow plastic wrap to
touch food. Vent so steam can escape.
No No
Pottery, stoneware,
porcelain
Yes Check manufacturer’s recommendation
for being microwave-safe.
Yes Yes Must be microwave-
safe and ovenable.
Styrofoam Yes For reheating No No
Wax paper Yes Good covering for cooking and reheating. No No
Wicker, wood, straw Yes May be used for short periods of time.
Do not use with high fat or high sugar content
foods. Could char.
No No
DISH CHECK. If you wish to check if a dish is safe for microwaving, place the empty dish in the oven and micro-
wave on HIGH for 30 seconds. If the dish becomes very hot, DO NOT use it for microwaving.
ACCESSORIES There are many microwave accessories available for purchase. Evaluate carefully before you
purchase so that they meet your needs. A microwave-safe thermometer will assist you in determining correct
doneness and assure you that foods have been cooked to safe temperatures. Sharp is not responsible for any
damage to the oven when accessories are used.

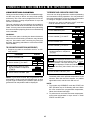
10
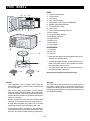
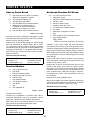
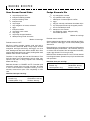
OVEN:
1. Liquid crystal display
2. Control panel
3. Oven lamp
4. Door opening button
5. Waveguide cover (DO NOT REMOVE)
6. Bottom grill heating element
7. Turntable motor shaft
8. Oven cavity
9. Door seals and sealing surfaces
10. Door latches
11. Top grill heating element
12. Ventilation openings
13. Outer cabinet
14. Power cord
15. Menu label
16. Door hinges
ACCESSORIES:
17. Turntable
18. High rack
19. Low rack
• Place the turntable on to the turntable motor shaft,
ensuringitislocatedrmly.
• To avoid turntable damage, ensure dishes or con-
tainers are lifted clear of the turntable rim when
removing them from the oven.
• The racks are for Grill, Mix, Convection and recom-
mended automatic operations.
Never touch the grills when they are hot.
PART NAMES
12
14
13
17
7
56701 9 8
11
1516
1819
2
1
4
3
NOTES:
• The waveguide cover is fragile. Care should be
taken when cleaning inside the oven to ensure that
it is not damaged.
• After cooking fatty foods without a cover, always
clean the cavity and especially the grill heating ele-
ments thoroughly, these must be dry and free from
grease. Built-up grease may overheat and begin to
smokeorcatchre.
• Alwaysoperatethe oven with theturntabletted
correctly. This promotes thorough, even cooking.
• Abadlyttedturntablemayrattle,maynotrotate
properly and could cause damage to the oven.
• The turntable rotates clockwise or anti-clockwise.
The rotary direction may change each time you start
the oven. This does not affect cooking performance.
Warning:
The accessories will become very hot whenever the
top heater, bottom heater or convection symbols are
lighted in the display and use thick oven mittens when
inserting/removing the food or turntable from the oven
to PREVENT BURNS.

1 3
6
9
11
15
14
5
10
4
7
12
2
8
13
1110
INFORMATION YOU NEED TO KNOW
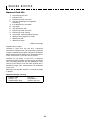
TOUCH CONTROL PANEL
The operation of the oven is controlled by pressing the appropriate pads arranged on the surface of the control
panel. An entry signal tone should be heard each time you press the control panel to make a correct entry. In ad-
dition the oven will beep for approximately 2 seconds at the end of the cooking cycle, or 4 times when a cooking
procedure is required.
1
2
3
4
7 6 5
CONTROL PANEL DISPLAY
TOUCH CONTROL PANEL
1. TOP GRILL SYMBOL - It will appear when setting
a program using the top element, or when the top
element is in use.
2. BOTTOM GRILL SYMBOL - It will appear when
setting a program using the bottom element, or
when the bottom element is in use.
3. CONVECTION SYMBOL - It will appear when set-
ting a program using the convection mode, or when
in a convection cooking.
4. MICROWAVE SYMBOL - It will appear when setting
a program using the microwave mode, or when in
a microwave cooking.
5. MORE (
) / LESS ( ) indicators - They will ap-
pear when setting the MORE or LESS function.
6. HELP indicator - It will appear when setting the
HELP feature or an automatic operation.
7. COOK indicator - It will light up when cooking.
1. AUTO ROAST - Press to select Auto Roast mode.
2. AUTO COOK - Press to select 7 popular menus.
3. AUTO DEFROST - Press to defrost meat by enter-
ing weight.
4. ROAST - Press to select roast cooking.
5. CONVEC - Press to select convection cooking.
6. MIX - Press to select mix cooking.
7. POWER LEVEL - Press to select microwave power
setting. If not pressed, 100% is automatically se-
lected.
8. PREHEAT - Press to preheat the oven prior to
cooking.
9. HELP/SETTINGS - Press to select auto start, au-
dible signal elimination, demonstration modes or
info on pads. Press to obtain cooking information.
10. MORE, LESS - Press to adjust the doneness of
food in 30 seconds increments during cooking
or to increase/decrease 10% the time whilst
programming the automatic operations.
11. NUMBER AND TEMPERATURE - Press to enter
cooking times, clock time, convection temperature,
weight or quantity of food.
12. STOP/CLEAR - Press to clear during program-
ming. Press once to stop operation of oven during
cooking; press twice to cancel cooking program.
Press and hold to set or reset Child Lock
13. TIMER/CLOCK - Press to set timer or clock time.
14. START/+30 SEC - Press once to cook for 30
seconds at 100% power level or increase by 30
seconds multiples each time this pad is pressed
during manual cooking. Press to start oven after
setting programs.
15. INSTANT ACTION - Press to cook or reheat 6
popular menus.

12
GETTING STARTED
• Before operating your new microwave oven make
sure you read and understand this operation
manual completely.
• Before the oven can be used, follow these proce-
dures:
1. Plug in the oven. Close the door. The display will
show
SHARP SIMPLY THE BEST PRESS CLEAR THEN PRESS CLOCK.
2. Press the STOP/CLEAR pad. : will appear.
3. Press CLOCK pad.
TO SET THE CLOCK
• Suppose you want to enter the correct time of day
11:34 (A.M. or P.M.).
PrOCEDUrE DisPlay
1. Press TIMER/CLOCK and
number
2 pads.
SET
CLOCK-
ENTER
TIME
2. Enter the correct time of day
by pressing the numbers in
sequence
1134. The dots
(:)willashonandoff.
11:34
PRESS
CLOCK
3. Press TIMER/CLOCK pad
again.
11:34
BEFORE OPERATINg
This is a 12 hour clock. If you attempt to enter an
incorrect clock time, ERROR PRESS CLEAR THEN REPROGRAM will
appear in the display. Press the STOP/CLEAR pad
and re-enter the time.
* If the electrical power supply to your microwave oven
should be interrupted, the display will intermittently
show
SHARP SIMPLY THE BEST PRESS CLEAR THEN PRESS CLOCK after
the power is reinstated. If this occurs during cooking,
the program will be erased. The time of day will also
be erased. Simply press STOP/CLEAR pad and reset
the clock for the correct time of day.
STOP / CLEAR
Press the STOP/CLEAR pad to:
1. Erase if you make a mistake during programming.
2. Cancel kitchen timer.
3. Stop the oven temporarily during cooking.
4. Return the time of day to the display.
5. Cancel a program during cooking, touch twice.

12 13
MICROWAvE OPERATION
MICROWAVE TIME COOKING
Your oven can be programmed for 99 minutes 99
seconds (99.99). Always enter the seconds after the
minutes, even if they are both zeros.
• Suppose you want to cook for 5 minutes at 100%.
PrOCEDUrE DisPlay
1. Enter cooking time
500.
5.00
2. Press START/+30 SEC pad.
5.00
TO SET POWER LEVEL
There are eleven preset power levels. Using lower
power levels increases the cooking time, which is rec-
ommended for foods such as cheese, milk and long
slow cooking of meats. Consult a microwave cookbook
orrecipesforspecicrecommendations.
TOUCHPOWER
LEVELPADNUMBEROF
TIMESFORDESIREDPOWER
PERCENTAgE
OFPOWER
DISPLAY
POWER LEVEL x 1 100% HIGH
POWER LEVEL x 2 90% P-90
POWER LEVEL x 3 80% P-80
POWER LEVEL x 4 70% P-70
POWER LEVEL x 5 60% P-60
POWER LEVEL x 6 50% P-50
POWER LEVEL x 7 40% P-40
POWER LEVEL x 8 30% P-30
POWER LEVEL x 9 20% P-20
POWER LEVEL x 10 10% P-10
POWER LEVEL x 11 0% P-0
• Suppose you want to defrost for 5 minutes at 30%.
PrOCEDUrE DisPlay
1. Press POWER LEVEL pad
8 times.
P-30
ENTER
COOKING
TIME
2. Enter cooking time by pressing
the numbers in sequence
500.
5.00
PRESS
START
3. Press START/+30 SEC pad.
5.00

14
MICROWAvE OPERATION
AUTO DEFROST CHART
FOOD aMOUNT PrOCEDUrE
1. Steak &
Chops
0.7 - 2.0 lbs Halfway through the defrosting process the oven will beep 4 times and stop.
Remove defrosted food, turn over and shield warm edges. Press START/+30 SEC
to resume defrosting. Let stand covered with foil 5 to 50 minutes.
2. Poultry 0.7 - 2.0 lbs Halfway through the defrosting process the oven will beep 4 times and stop.
Remove defrosted food, turn over and shield warm edges. Press START/+30 SEC
to resume defrosting. Let stand covered with foil 5 to 50 minutes.
3. Ground
Beef
0.5 - 2.0 lbs Halfway through the defrosting process the oven will beep 4 times and stop.
Remove defrosted food, turn over and shield warm edges. Press START/+30
SEC to resume defrosting. Let stand covered with foil 5 minutes.
4. Chicken
Pieces
0.7 - 2.0 lbs Halfway through the defrosting process the oven will beep 4 times and stop.
Remove defrosted food, turn over and shield warm edges. Press START/+30 SEC
to resume defrosting. Let stand covered with foil 5 to 50 minutes.
5. Roasts
(Beef/
Lanb/Pork)
0.7 - 2.0 lbs Halfway through the defrosting process the oven will beep 4 times and stop.
Remove defrosted food, turn over and shield warm edges. Press START/+30 SEC
to resume defrosting. Let stand covered with foil 5 to 50 minutes.
AUTO DEFROST
The AUTO DEFROST feature allows you to easily
defrost many types of meat simply by entering their
weight.
• Suppose you want to defrost 1 pound of ground beef
PrOCEDUrE DisPlay
1. Press AUTO DEFROST pad.
SELECT
MENU
NUMBER
2. Press number 3 for ground
beef.
GROUND
BEEF
ENTER
WEIGHT
3. Press number 10 to enter
the weight (in pounds and
tenths of a pound).
1.0
PRESS
START
4. Press START/+30 SEC pad.
5.45
INSTANT ACTION
Press once to cook 6 popular menus.
1. DINNER PLATE
2. POPCORN
3. VEGETABLES
4. FROZEN VEGETABLES
5. POTATOES
6. FROZEN ENTRÉE
• Suppose you want to cook 2 cups of soft fresh
vegetables like broccoli.
PrOCEDUrE DisPlay
Press VEGETABLES pad twice.
2 CUPS
FRESH
VEGGIES
The timer begins to count down. When the timer
reaches 0,
LET
STAND
COVERED
1 TO 5
MINUTES
THEN
STIR
will be displayed.
PrOCEDUrE DisPlay
The oven will stop and directions will be displayed.
Follow the indicated message.
5. After the 1st stage, open the
door. Turn over and shield
any warm portions.
Close the door.
Press START/+30 SEC pad.
REMOVE
DE-
FROSTED
FOOD
TURN
OVER
AND
SHIELD
WARM
EDGES
PRESS
START
After defrost cycle ends, cover and let stand as
indicated in chart below.

14 15
MICROWAvE OPERATION
INSTANT ACTION CHART
FOOD aMOUNT PrOCEDUrE
DINNER PLATE 1 serving Place on the low rack and cover with plastic wrap. Touch DINNER PLATE
once. Let stand covered 2 minutes.
POPCORN 1 package Use only popcorn packaged for microwave oven use. Try several brands to
decide which you like the best. Do not try to pop un-popped kernels. Use
low rack and microwave safe plate.
2.7 - 3.3 oz
(Regular)
Touch POPCORN once for regular size bags.
1.1 - 1.6 oz
(Mini)
Touch POPCORN twice for mini size bags.
VEGETABLES
(Soft)
1 - 4 cups Place on turntable and cover with a lid or plastic wrap. Let stand 1 to 5
minutes then stir.
Touch VEGETABLES once for 1 cup.
Touch VEGETABLES twice for 2 cups.
Touch VEGETABLES three times for 3 cups.
Touch VEGETABLES 4 times for 4 cups.
FROZEN
VEGETABLES
1 - 4 cups Place on low rack and cover with a lid or plastic wrap. Let stand 1 to 5
minutes then stir.
Touch FROZEN VEGETABLES once for 1 cup.
Touch FROZEN VEGETABLES twice for 2 cups.
Touch FROZEN VEGETABLES three times for 3 cups.
Touch FROZEN VEGETABLES 4 times for 4 cups.
POTATOES 1 - 4 potatoes Place on turntable and pierce each potato twice on each side. (Average
weight of 7 to 10 ounces). Let potatoes stand covered in foil 3 to 10 minutes.
Touch POTATOES once for 1 potato.
Touch POTATOES twice for 2 potatoes.
Touch POTATOES three times for 3 potatoes.
Touch POTATOES four times for 4 potatoes.
FROZEN
ENTRÉE
4 size options Do not cover while cooking, always use the low rack.
Touch FROZEN ENTRÉE once for 6 to 8 ounces.
Touch FROZEN ENTRÉE twice for 9 to 11 ounces.
Touch FROZEN ENTRÉE three times for 12 to 14 ounces.
Touch FROZEN ENTRÉE four times for 15 to 17 ounces.
Let stand covered 1 to 5 minutes then stir.
NOTES
1.
ERROR will be displayed if: More or less than the
quantity or weight of foods suggested in the menu
guides are programmed. To clear, press the STOP/
CLEAR pad and reprogram.
2. Carefully follow the details provided in each MENU
CHART to achieve the best result. If the details are
not followed carefully the food may be overcooked,
undercooked or ERROR may be displayed.
3. Food weighing more or less than the quantity or
weight listed in each MENU CHART should not be
cooked with the automatic menus or Instant Action.
4. When entering the weight of the food, round off the
weight to the nearest tenth of a pound. For example
1.34 pounds becomes 1.3 pounds and 1.76 pounds
becomes 1.8 pounds.
5. Tochangethenalcookingresultfromthestan-
dard setting, press the MORE or LESS pad prior
to pressing the START/+30 SEC pad or within 2
seconds after pressing the INSTANT ACTION pad.
6. Thenalcookingresultwillvaryaccordingtothe
food condition (e.g. initial temperature, shape, qual-
ity).Check the food after cooking and if necessary
continue cooking manually.
7. For hard vegetables like carrots, use the HARD
VEGETABLES option in the AUTO COOK menu.

16
CONvECTION/AUTOMATIC MIX OPERATION
CONVECTION COOKING
During convection heating, hot air is circulated through-
out the oven cavity to brown and crisp foods quickly
and evenly. This oven can be programmed for ten dif-
ferent convection cooking temperatures for up to 99
minutes, 99 seconds.
The oven should not be used without the turntable in
place, and it should never be restricted so that it cannot
rotate. You may remove the turntable when preheating
the oven and when preparing food to be cooked directly
on the turntable.
WARNING:
All of the oven parts, including the bottom heater as
well as the rack and cooking containers, may become
very hot. Use caution when removing any item from
the oven. Use heavy potholders or oven mitts to PRE-
VENT BURNS.
TO COOK WITH CONVECTION (NO PREHEAT)
• Suppose you want to convection cook for 10 min-
utesat350˚F.
PrOCEDUrE DisPlay
1. Press CONVEC pad.
SELECT
CONVEC
TEMP
2. Press number 6for350˚F.
350 F
ENTER
COOKING
TIME
3. Enter cooking time by press-
ing the numbers in sequence
1000.
10.00
PRESS
START
4. Press START/+30 SEC pad.
10.00
NOTE: If you wish to know the programmed oven
temperature, simply touch the CONVEC pad. As long
asyourngeristouchingtheCONVECpad,thepro-
grammed oven temperature will be displayed.
TO PREHEAT AND COOK WITH CONVECTION
Your oven can be programmed to combine preheating
and convection cooking operations. You can preheat to
the same temperature as the convection temperature
or change to a higher or lower temperature.
• Supposeyouwanttopreheat to350˚F,andthen
cook25minutesat375˚F.convection.
PrOCEDUrE DisPlay
1. Press PREHEAT pad.
SELECT
PREHEAT
TEMP
2. Press number 6for350˚F.
350 F
PRESS
START
OR
CONVEC
3. Press CONVEC pad.
SELECT
CONVEC
TEMP
4. Press number 7for375˚F.
375 F
ENTER
COOKING
TIME
5. Enter cooking time by press-
ing the numbers in sequence
2500.
25.00
PRESS
START
6. Press START/+30 SEC pad.
PREHEAT
PREHEAT
will be displayed until the oven reaches the
programmed preheat temperature then, a signal
will sound 4 times*.The oven will stop, and
ADD
FOOD
will be displayed. Follow the indicated mes-
sage. Open the door, place food in the oven, close
the door.
7. Press START/+30 SEC pad.
25.00
* If the oven door is not opened, the oven will au-
tomatically hold at the preheat temperature for 30
minutes. After this time has elapsed, an audible
signal will sound, and the oven will turn off.
NOTE:
1. To program only PREHEAT, touch the START/+30
SEC pad after step 2. Preheating will start. When
the oven reaches the programmed temperature,
follow the indicated message.
2. To preheat and cook with the same temperature,
enter same temperature in steps 2 and 4. Touch
START/+30 SEC pad.

1716
AUTOMATIC MIX COOKING
This oven has four pre-programmed settings that
make it easy to cook with both convection heat and
microwave automatically.
Most foods are well suited to mix microwave cooking
ROASTING
This oven has three roasting modes, select the desired
roast mode by pressing the ROAST pad.
rOasTiNg COOkiNg MODE rOasT PaD
Top Element Only Once
Bottom Element Only
Twice
Top and Bottom Elements Three times
Mix COOkiNg MODE OvEN COOkiNg POwEr
High Mix Top Grill Top Element 30% Top Grill and 70% Microwave
Low Mix Top Grill Top Element 50% Top Grill and 50% Microwave
High Mix Convection 100° to 450° F 70% Convection and 30% Microwave
Low Mix Convection 100° to 450° F 90% Convection and 10% Microwave
with either the Top Grill or Convection. The marriage
of these two cooking methods produces juicy meats,
moistandtendercakesandnetexturedbreads,all
with just the right amount of browning and crispness.
• Suppose you want to roast for 20 minutes using the
top and bottom elements.
It is not necessary to preheat for roasting.
PrOCEDUrE DisPlay
1. Press ROAST pad 3 times .
TOP AND
BOTTOM
ELEMENT
ENTER
COOKING
TIME
2. Enter cooking time by press-
ing the numbers in sequence
1500.
15.00
PRESS
START
3. Press START/+30 SEC pad.
15.00
CONvECTION /AUTOMATIC MIX OPERATION
• Suppose you want to cook with microwave power
50% of the time and roast with the top grill the other
50% for a total of 15 minutes.
PrOCEDUrE DisPlay
1. Press MIX pad twice .
LOW
MIX
TOP
GRILL
ENTER
COOKING
TIME
2. Enter cooking time by press-
ing the numbers in sequence
1500.
15.00
PRESS
START
3. Press START/+30 SEC pad.
15.00
• Suppose you want to cook with microwave power
10% of the time and convection cook at 350°F the
remainder of the time for a total of 12 minutes and
30 seconds.
PrOCEDUrE DisPlay
1. Press MIX pad 4 times .
LOW
MIX
CONVEC
SELECT
CONVEC
TEMP
2. Press number 6for350˚F.
350 F
ENTER
COOKING
TIME
3. Enter cooking time by press-
ing the numbers in sequence
1230.
12.30
PRESS
START
4. Press START/+30 SEC pad.
12.30

18
AUTO ROAST
Press to select from 6 automatic roasting menu items.
These are well suited to mix the convenience of micro-
wave cooking with convection and roasting. The mar-
riage of these cooking methods produces juicy meats,
with just the right amount of browning and crispness.
• Suppose you want to roast 2.2 pounds of chicken.
PrOCEDUrE DisPlay
1. Press AUTO ROAST pad.
SELECT
MENU
NUMBER
2. Press number
3 for roast
chicken.
ROAST
CHICKEN
ENTER
WEIGHT
3. Press number 22 to enter
the weight (in pounds and
tenths of a pound).
2.2
PRESS
START
4. Press START/+30 SEC pad.
36.12
5. Halfway the oven will beep 4
times and stop cooking, open
the door. Turn chicken over.
Close the door.
Press START/+30 SEC pad.
PRESS
START
6. Press START/+30 SEC pad.
18.06
HELPFUL HINT:
You can get a cooking hint whenever HELP is lit in
the display.
WARNING:
The oven cavity, door, turntable, racks, dishes and
especially bottom heater will become very hot, use
thick oven mittens when inserting/removing the food
or turntable from the oven to PREVENT BURNS.
NOTES
1. After cooking completion and removing food, there
is a case that the cooling fan remains on and NOW
COOLING
is displayed until the oven cavity has cooled.
2.
ERROR will be displayed if: More or less than the
quantity or weight of foods suggested in the menu
guides are programmed. To clear, press the STOP/
CLEAR pad and reprogram.
3. Carefully follow the details provided in each MENU
GUIDE to achieve the best result. If the details are
not followed carefully the food may be overcooked,
undercooked or
ERROR may be displayed.
4. Food weighing more or less than the quantity or
weight listed in each MENU CHART should not be
cooked with the automatic menus or Instant Action.
5. When entering the weight of the food, round off the
weight to the nearest tenth of a pound. For example
1.34 pounds becomes 1.3 pounds and 1.76 pounds
becomes 1.8 pounds.
6. Tochangethenalcookingresultfromthestan-
dard setting, press the MORE or LESS pad prior
to pressing the START/+30 SEC pad.
7. Thenalcookingresultwillvaryaccordingtothe
food condition (e.g. initial temperature, shape, qual-
ity). Check the food after cooking and if necessary
continue cooking manually.
CONvECTION/AUTOMATIC MIX OPERATION
AUTO ROAST CHART
FOOD aMOUNT PrOCEDUrE
1. Roast Beef 1.1 - 3.3 lbs Place on low rack. Let stand covered with foil 5 to 15 minutes.
2. Fried Chicken 0.7 - 2.2 lbs Place on low rack. Let stand covered with foil 5 minutes.
3. Roast Chicken 2.2 - 4.4 lbs Place on low rack. Let stand covered with foil 5 to 15 minutes.
4. Roast Pork 1.1 - 3.3 lbs Place on low rack. Let stand covered with foil 5 to 15 minutes.
5. Grilled Steak & Chops 0.4 - 2.2 lbs Place on turntable. Drain juices when turning.
6. Grilled Chicken Pieces 0.4 - 2.2 lbs Placeonhighrack.Butterythickpieces.Letstandcoveredwith
foil 5 minutes.

18 19
AUTO COOK
Press to select from 7 automatic convenience food
menu items. These menu items provide for the ideal
mix of microwave cooking with roasting sure to be one
of your favorites.
• Suppose you want to cook 1.2 pounds of frozen
pasta.
PrOCEDUrE DisPlay
1. Press AUTO COOK pad.
SELECT
MENU
NUMBER
2. Press number
4 for frozen
pasta.
FROZEN
PASTA
ENTER
WEIGHT
3. Press number 12 to enter
the weight.
1.2
PRESS
START
4. Press START/+30 SEC pad.
7.18
HELPFUL HINT:
You can get a cooking hint whenever HELP is lit in
the display.
WARNING:
The oven cavity, door, turntable, racks, dishes and
especially bottom heater will become very hot, use
thick oven mittens when inserting/removing the food or
turntable from the oven to PREVENT BURNS.
NOTES
1. After cooking completion and removing food, there
is a case that the cooling fan remains on and
NOW
COOLING
is displayed until the oven cavity has cooled.
2.
ERROR will be displayed if: More or less than the
quantity or weight of foods suggested in the menu
guides are programmed. To clear, press the STOP/
CLEAR pad and reprogram.
3. Carefully follow the details provided in each MENU
GUIDE to achieve the best result. If the details are
not followed carefully the food may be overcooked,
undercooked or ERROR may be displayed.
4. Food weighing more or less than the quantity or
weight listed in each MENU GUIDE should not be
cooked with the automatic menus or Instant Action.
5. When entering the weight of the food, round off the
weight to the nearest tenth of a pound. For example
1.34 pounds becomes 1.3 pounds and 1.76 pounds
becomes 1.7 pounds.
6. Tochangethenalcookingresultfromthestan-
dard setting, press the MORE or LESS pad prior
to pressing the START/+30 SEC pad.
7. Thenalcookingresultwillvaryaccordingtothe
food condition (e.g. initial temperature, shape, qual-
ity). Check the food after cooking and if necessary
continue cooking manually.
AUTO COOK CHART
FOOD aMOUNT PrOCEDUrE
1. Frozen Pizza 6 - 20 oz Place on turntable. Enter the weight in ounces rounded to the nearest tenth.
2. Reheat Pizza 1 - 3 slices Place on turntable. Enter the amount of slices.
3. Fries 0.4 - 1.1 lbs Place on turntable. Enter the weight in pounds rounded to the nearest tenth.
4. Frozen Pasta 0.4 - 1.8 lbs Remove from tray and place in heat resistant dish. Do not cover, place
on the turntable.
5. Fish Sticks &
Cakes
0.2 - 1.1 lbs Place on turntable. Enter the weight in pounds rounded to the nearest tenth.
6. Finger Foods 0.4 - 1.1 lbs Place on turntable. Enter the weight in pounds rounded to the nearest tenth.
7. Hard Vegetables 1 - 4 cups Cover with lid or plastic wrap. Let stand 1 to 5 minutes then stir.
CONvECTION/AUTOMATIC MIX OPERATION

20
MULTI SEQUENCE COOKING
Preheating, Microwave Cooking, Convection Cooking,
Roasting or Mix Cooking can be programmed up to
4 automatic cooking sequences, switching from one
variable power setting.
NotethatPOWERLEVELmustbeenteredrstwhen
programming sequence cooking.
MUlTi sEqUENCE COMBiNaTiONs ExaMPlEs
PREHEAT + CONVEC + MIX 3 Stages
Micro + Micro + Micro + Micro
4 Stages
PREHEAT + ROAST + Micro 3 Stages
Micro + CONVEC + Micro 3 Stages
• Suppose you want to cook for 10 minutes at 30%
power level, cook 5 minutes at 100% power level
and cook with Top Grill for 20 minutes.
PrOCEDUrE DisPlay
1. Press POWER LEVEL pad
8 times.
P-30
ENTER
COOKING
TIME
2. Enter cooking time by press-
ing the numbers in sequence
1000.
10.00
PRESS
START
3. Press POWER LEVEL once.
HIGH
ENTER
COOKING
TIME
4. Enter time by pressing the
numbers in sequence 500.
5.00
PRESS
START
5. Press ROAST once.
TOP
ELEMENT
ENTER
COOKING
TIME
6. Enter time by pressing
the numbers in sequence
2000.
20.00
PRESS
START
7. Press START/+30 SEC pad.
10.00
CHILD LOCK
The child lock feature prevents unwanted operation
such as by small children. The microwave can be set
so that the control panel is deactivated or locked.
TO LOCK
Touch STOP/CLEAR pad and hold for 3 seconds. The
display shows LOCK then the time of day.
TO UNLOCK
Touch STOP/CLEAR pad and hold for 3 seconds. The
display shows LOCK OFF then the time of day .
The child lock is canceled when the electrical power
supply to your oven is interrupted. Set the child lock
again when power to the oven is restored.
HELP
INFORMATION ON PADS
Each pad carries useful guide.
• To get the guide for CONVEC pad.
PrOCEDUrE DisPlay
1. Press HELP/SETTINGS pad.
AUTO
START
PRESS 1
2. Press CONVEC pad.
PRESS
FOR
CONVEC-
TION
COOKING
100 F TO
450 F
SETTINGS
Settings provides 3 features which makes using your
oven easy.
1. AUTO START
If you wish to program the microwave to begin cooking
automatically at a designated time of day.
• To program the oven to start cooking at 70% power
automatically at 4:30 for 40 minutes
PrOCEDUrE DisPlay
1. Press HELP/SETTINGS pad.
AUTO
START
PRESS 1
2. Press number 1.
ENTER
AUTO
START
TIME
3. Enter start time by pressing
the numbers in sequence
430.
4:30
PRESS
CLOCK
4. Press CLOCK pad.
4:30
SELECT
POWER
LEVEL
5. Press POWER LEVEL pad
4 times.
P-70
ENTER
COOKING
TIME
6. Enter cooking time by press-
ing the numbers in sequence
4000.
40.00
PRESS
START
7. Press START/+30 SEC pad.
AUTO
START
4:30 ON
2. AUDIBLE SIGNAL ELIMINATION
If you wish to have the oven operate with no audible
signal, touch HELP/SETTINGS, the number 2 and
STOP/CLEAR.
OTHER CONvENIENT FEATURES
Page is loading ...
Page is loading ...
Page is loading ...
Page is loading ...
Page is loading ...
Page is loading ...
Page is loading ...
Page is loading ...
Page is loading ...
Page is loading ...
Page is loading ...
Page is loading ...
Page is loading ...
Page is loading ...
Page is loading ...
Page is loading ...
Page is loading ...
Page is loading ...
Page is loading ...
Page is loading ...
-
 1
1
-
 2
2
-
 3
3
-
 4
4
-
 5
5
-
 6
6
-
 7
7
-
 8
8
-
 9
9
-
 10
10
-
 11
11
-
 12
12
-
 13
13
-
 14
14
-
 15
15
-
 16
16
-
 17
17
-
 18
18
-
 19
19
-
 20
20
-
 21
21
-
 22
22
-
 23
23
-
 24
24
-
 25
25
-
 26
26
-
 27
27
-
 28
28
-
 29
29
-
 30
30
-
 31
31
-
 32
32
-
 33
33
-
 34
34
-
 35
35
-
 36
36
-
 37
37
-
 38
38
-
 39
39
-
 40
40


Ask a question and I''ll find the answer in the document
Finding information in a document is now easier with AI
Related papers
-
Sharp Carousel R-55TS Operating instructions
-
-
Sharp R930CS Owner's manual
-
-
-
Sharp R-1870 User manual
-
-
Sharp R1874 - 1.1 cu. Ft. Microwave Oven User manual
-
-
Sharp SMC1585BS User manual
Other documents
-
Electrolux EI24MO45IBDY Owner's manual
-
Viking Range VMOR205 Owner's manual
-
Viking VMOR506 Owner's manual
-
Viking 988946 User manual
-
Beko WOSP30100SS User manual
-
-
-
-
-
Galanz WD900EP23-K7 User manual