Quadra-Fire Quadra-Fire VOYAGEUR-PMH User manual
- Category
- Stoves
- Type
- User manual
This manual is also suitable for

R
www.quadrafi re.com 7063-173D November 22, 2011
DO NOT DISCARD THIS MANUAL
CAUTION
• Important operating
and maintenance
instructions included.
• Leave this manual with
party responsible for
use and operation.
• Read, understand and
follow these instructions
for safe installation and
operation.
WARNING
If the information in these instruc-
tions is not followed exactly, a
fi re may result causing property
damage, personal injury, or death.
• Do not store or use gasoline or other fl am-
mable vapors and liquids in the vicinity of
this or any other appliance.
• Do not overfi re - If heater or chimney con-
nector glows, you are overfi ring. Overfi ring
will void your warranty.
• Comply with all minimum clearances to
combustibles as specifi ed. Failure to
comply may cause house fi re.
Fire Risk.
WARNING
For use with solid wood fuel only.
Other fuels may overfi re and generate
poisonous gases (i.e. carbon monoxide).
Installation and service of this appliance should
be performed by qualifi ed personnel. Hearth &
Home Technologies recommends NFI certifi ed
professionals, or technicians supervised by an
NFI certifi ed professional.
WARNING
Hot glass will cause burns.
• Do not touch glass until it is cooled
• NEVER allow children to touch glass
• Keep children away
• CAREFULLY SUPERVISE children in same room as
fi replace.
• Alert children and adults to hazards of high
temperatures.
High temperatures may ignite clothing or other
fl ammable materials.
• Keep clothing, furniture, draperies and other
fl ammable materials away.
HOT SURFACES!
Glass and other surfaces are
hot during operation AND
cool down.
OWNER’S MANUAL
Installation and Operation
Model:
VOYAGEUR-MBK
VOYAGEUR-PMH
VOYAGEUR WOOD INSERT
Advanced Combustion Control (ACC)

Page 2
7063-173D
November 22, 2011
R
VOYAGEUR Wood Insert
Serial Number
Model Name
Test Lab & Report
Number
Mfg Date
Hearth & Home Technologies welcomes you to our tradition
of excellence! In choosing a Quadra-Fire appliance, you
have our assurance of commitment to quality, durability, and
performance.
This commitment begins with our research of the market,
including ‘Voice of the Customer’ contacts, ensuring we
make products that will satisfy your needs. Our Research
and Development facility then employs the world’s most
advanced technology to achieve the optimum operation
of our stoves, inserts and fi replaces. And yet we are old-
fashioned when it comes to craftsmanship. Each unit is
meticulously fabricated and gold and nickel surfaces are
hand-fi nished for lasting beauty and enjoyment. Our pledge
to quality is completed as each model undergoes a quality
control inspection.
We wish you and your family many years of enjoyment in
the warmth and comfort of your hearth appliance. Thank
you for choosing Quadra-Fire.
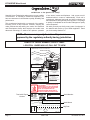
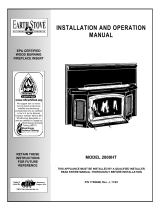
SAMPLE OF SERIAL NUMBER / SAFETY LABEL
LOCATION: UNDER ASH LIP, PULL OUT TO VIEW
and Welcome to the Quadra-Fire Family!
NOTE: Clearances may only be reduced by means
approved by the regulatory authority having jurisdiction
LISTED ROOM HEATER, SOLID FUEL TYPE. "For Use with Solid
Wood Fuel Only." Also for use in Mobile Home.
PREVENT HOUSE FIRES
HOT WHILE IN OPERATION DO
NOT TOUCH, KEEP CHILDREN
CAUTION:
AND CLOTHING AWAY. CONTACT MAY CAUSE SKIN
BURNS. KEEP FURNISHINGS AND OTHER
COMBUSTIBLE MATERIAL FAR AWAY FROM THE
APPLIANCE. SEE NAMEPLATE AND INSTRUCTIONS.
Model:
VOYAGEUR
WOOD INSERT
Report: 100116597
R
TESTED TO:
UL 1482, ULC S628-93
Serial No.
007022
U.S. ENVIRONMENTAL PROTECTION AGENCY - Certified to comply with July 1990 particulate emission standards.
2010
2011
2012
DO NOT REMOVE THIS LABEL
Mfg by:
1445 N. Highway, Colville, WA 99114 www.quadrafire.com
Made in U.S.A. of US and
imported parts.
Jan Feb Mar Apr May June July Aug Sept Oct. Nov. Dec.
7063-174
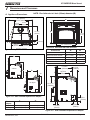
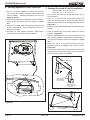
NOTICE:
All measurements are
from the fuel loading door
opening.
TRIM DEPTH
*Maximum 1-1/2 (38mm) Top Trim Depth
**Maximum 3-1/2 (89mm) Side Trim Depth
Minimum Clearances To Combustible Material
Masonry, Heat Circulating & Factory Built
USA ONLY
A Sidewall to Fuel Loading Door 20-1/2 in.
B Mantel to Fuel Loading Door 29 in.
C Top Trim to Fuel Loading Door 22 in.
D Side Trim to Fuel Loading Door 10-1/2 in.
E Hearth Extension from Glass 16 in.
F H
earth Extenson from Fuel Loading Door
8 in.
Refer to Clearances on other label for Canada
Factory Built Floor
Protection under Hearth
Extension
Thermal & Ember Protection
Floor height 0 to 3.5 inches
below Insert Base:
1 inch (25mm) R=0.52
Ember Protection Only
Greater than 3.5 inches below
Insert Base:
Hearth Extension
A
B
*C
**
D
F
E
Insert
SideWall
Maximum Mantel Depth - 12 inch (305mm)
Fascia or Trim
Mantel
Fuel Door
SAMPLE

November 22, 2011
7063-173D
Page 3
VOYAGEUR Wood Insert
R
Congratulations ...............................................................2
Sample of Safety/Serial Number Label ...........................2
Warranty Policy ...............................................................4-5
Section 1: Listing and Code Approvals
A. Appliance Certifi cations.....................................6
B. Mobile Home Approved.....................................6
C. Glass Specifi cations ..........................................6
D. BTU & Effi ciency Specifi cations ........................6
User’s Guide
Section 2: Operating Instructions
A. Your Wood Appliance .......................................7
B. Fire Safety .........................................................8
C. Overfi ring ...........................................................8
D. Combustible/Non-combustible Material ............8
E. Seasoned Wood................................................8
F. Burning Process ................................................9
G. Automatic Combustion Control (ACC) ..............10
H. Air Controls .......................................................10
I. Burn Rates and Operating Effi ciency ................11
J. Correct Baffl e & Blanket Placement ..................12
K. Building a Fire ...................................................13
L. Fuel Reloading Instructions...............................13
M. Wood Fuel & Storage ........................................14
N. Blower Control Box Snap Disc Operations .......15
O. Blower Operating Instructions ...........................15
P. Clear Space ......................................................16
Q. Frequently Asked Questions .............................16
R. Opacity (Smoke) ...............................................16
S. Quick Start Guide ..............................................17
Section 3: Maintenance and Service
A. Disposal of Ashes .............................................18
B. Chimney & Chimney Connector
Inspection/Cleaning...........................................18
C. Appliance Inspection - Routine .........................18
D. Cleaning of Plated Surfaces..............................18
E. Glass Cleaning ..................................................19
F. Firebrick Inspection & Replacement Instruction 19
G. Quick Reference Maintenance Guide ...............20
Section 4: Troubleshooting Guide .....................21
Section 5: Service Parts Replacement
A. Glass Replacement ...........................................22
B. Snap Disc Replacement....................................22
C. Wiring Diagram .................................................22
D. Blower Replacement .........................................23
E. Door Handle Assembly .....................................24
F. Baffl e & Ceramic Blanket Removal ...................25
G. Tube Channel Assembly Replacement .............24
Installer’s Guide
Section 6: Getting Started
A. Design, Installation & Location
Considerations ..................................................26
B. Draft ..................................................................26
C. Negative Pressure.............................................27
D. Locating Your Appliance and Chimney .............28
E. Chimney Termination Requirements.................28
F. 2-10-3 Rule .......................................................29
G. Tools and Supplies Needed ..............................30
H. Fire Safety .........................................................30
I. Inspect Appliance and Components
and Pre-Burn Checklist .....................................30
Section 7: Dimensions and Clearances
A. Appliance Dimensions.......................................31
B. Clearances to Combustibles (UL and ULC)
and Hearth Protection Requirements ................32-33
C. Alternate Floor Protection Calculation...............34
Section 8: Chimney Systems
A. Venting Systems ...............................................35
B. Inspections ........................................................35
C. Larger Chimneys ...............................................35
D. Masonry Chimney .............................................35-36
E. Metal Heat Circulating Chimney........................37
F. Prefabricated Metal Chimney ............................37
G. Securing Chimney Components .......................38
H. Altering the Fireplace ........................................38
I. Factory-Built Solid Fuel Fireplaces ...................38
J. Ovalizing Round Stainless Steel Liners ............39
K. Chimney Height / Rise and Run ........................39
Section 9: Appliance Set-up
A. Outside Air Installation ......................................40
B. Optional Elbow Flue Adapter Installation ..........41
C. Securing Stove Pipe/Liner to Flue Collar ..........41
D. Leveling Legs ....................................................41
E. Securing Appliance to Stove Pipe/Liner ............42
F. Standard Surround & Trim Installation ..............42
G. Standard Surround & Cast Trim, .......................43
H. All Cast Surround ..............................................44
I. Blower Cord Installation - Left Side ...................44-46
Section 10: Moble Home Installation .................47
Section 11: Reference Materials
A. Exploded Drawings ...........................................48-49
B. Service Parts & Accessories .............................50-53
C. Service Maintenance Log..................................54-5
D. Contact Information ...........................................56
TABLE OF CONTENTS
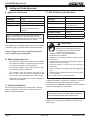
Safety Alert Key:
• DANGER! Indicates a hazardous situation which, if not avoided will result in death or serious injury.
• WARNING! Indicates a hazardous situation which, if not avoided may result in death or serious injury.
• CAUTION! Indicates a hazardous situation which, if not avoided, may result in minor or moderate injury.
• NOTICE: Indicates practices which may cause damage to the appliance or to property.
!

Page 4
7063-173D
November 22, 2011
R
VOYAGEUR Wood Insert
Warranty Policy

November 22, 2011
7063-173D
Page 5
VOYAGEUR Wood Insert
R

Page 6
7063-173D
November 22, 2011
R
VOYAGEUR Wood Insert
1
Listing and Code Approvals
The Quadra-Fire VOYAGEUR meets the U.S. Environmental
Protection Agency’s 1990 particulate emission standards.
A. Appliance Certifi cation
C. Glass Specifi cations
D. BTU & Effi ciency Specifi cations
This stove is equipped with 5mm ceramic glass. Replace
glass only with 5mm ceramic glass. Please contact your
dealer for replacement glass.
B. Mobile Home Approved
EPA Certifi ed:
4.1 grams per hour
Effi ciency:
77%
BTU Output:
11,550 to 23,9300 per hr
Heating Capacity:
1,303 to 2,335 sq ft depend-
ing on climate zone
Vent Size:
6 inches
Firebox Size:
1.87 cubic feet
Max Wood Length:
18 inches
Fuel:
Cord Wood
Shipping Weight:
355 lbs
Model:
VOYAGEUR Wood Insert
Laboratory: Intertek
Report No:
100116597
Type:
Solid Fuel Type, Listed Room Heater
Standard: UL1482 and ULC S628-93 and
(UM) 84-HUD, Mobile Home
Approved.
NOTE: Hearth & Home Technologies, manufacturer of
this appliance, reserves the right to alter its products,
their specifi cations and/or price without notice.
NOTE: This installation must conform with local codes. In the
absence of local codes you must comply with the UL1482,
(UM) 84-HUD and NPFA211 in the U.S.A. and the ULC S628-
93 and CAN/CSA-B365 Installation Codes in Canada.
• This appliance is approved for mobile home installa-
tions when not installed in a sleeping room and when
an outside combustion air inlet is provided.
• The structural integrity of the mobile home fl oor, ceil-
ing, and walls must be maintained.
• The appliance must be properly grounded to the
frame of the mobile home with #8 copper ground
wire, and use only listed double-wall connector pipe.
• Outside Air Kit, part OAK-ACC must be installed in a
mobile home installation.
Improper installation, adjustment, alteration, service or
maintenance can cause injury or property damage.
For assistance or additional information, consult a qualifi ed
installer, service agency or your dealer.
Quadra-Fire is a registered trademark of Hearth & Home
Technologies.
• Installation and use of any damaged appliance.
• Modifi cation of the appliance.
• Installation other than as instructed by Hearth & Home
Technologies.
• Installation and/or use of any component part not approved
by Hearth & Home Technologies.
• Operating appliance without fully assembling all
components.
• Operating appliance without legs attached (if supplied with
unit).
• Do NOT Overfi re - If appliance or chimney connector glows,
you are overfi ring.
Any such action that may cause a fi re hazard.
WARNING
Fire Risk.
Hearth & Home Technologies disclaims any
responsibility for, and the warranty will be
voided by, the following actions:
Intertek Testing Laboratory is a National Recognized
Test Lab (NRTL) approved by OSHA.

November 22, 2011
7063-173D
Page 7
VOYAGEUR Wood Insert
R
2
Operating Instructions
WARNING! DO NOT operate appliance before reading and understanding operating instructions.
Failure to operate appliance according to operating instructions could cause fi re or injury.
User Guide
A. Your Wood Appliance
WARNING
Hot glass will cause burns.
• DO NOT touch glass until it is cooled
• NEVER allow children to touch glass
• Keep children away
• CAREFULLY SUPERVISE children in same room as appliance.
• Alert children and adults to hazards of high temperatures.
High temperatures may ignite clothing or other fl ammable materials.
• Keep clothing, furniture, draperies and other fl ammable materials away.
HOT SURFACES!
Glass and other surfaces are hot during operation AND cool down.
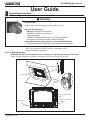
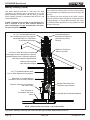
Figure 7.1 General Operating Parts
If you expect that children may come into contact with this appli-
ance, we recommend a barrier such as a decorative screen.
See your dealer for suggestions.
Surround & Trim Set
Burn Rate Control
ACC Start-up
Air Control
Door Handle & Fiber Handle
Blower Controls & Snap Disc
Under Ash Lip
Blower Assembly

Page 8
7063-173D
November 22, 2011
R
VOYAGEUR Wood Insert
B. Fire Safety
To provide reasonable fi re safety, the following should be
given serious consideration:
1. Install at least one smoke detector on each fl oor of
your home to ensure your safety. They should be
located away from the heating appliance and close
to the sleeping areas. Follow the smoke detector
manufacturer’s placement and installation instructions,
and be sure to maintain regularly.
2. A conveniently located Class A fi re extinguisher.
3. A practiced evacuation plan, consisting of at least two
escape routes.
4. In the event of a chimney fi re:
a. Prepare occupants for immediate evacuation
b. Notify fi re department
D. Combustible/Non-combustible Materials
• Combustible Material
Material made of or surfaced with wood, compressed
paper, plant fi bers, plastics, or any material capable
of igniting and burning, whether fl ame-proofed or not,
plastered or unplastered.
• Non-combustible Material
Material which will not ignite and burn. Such materials are
those consisting entirely of steel, iron, brick, tile, slate,
glass or plasters, or any combination thereof.
Materials that are reported as passing ASTM E 136,
Standard Test Method for Behavior of Materials in a
Vertical Tube Furnance at 750
o
C and UL763 shall be
considered non-combustible materials.
• Non-combustible Sealant Material
Sealants which will not ignite and burn: Rutland, Inc.
Fireplace Mortar #63, Rutland 76R, Nuflex 304, GE
RTV106 or GE RTB116 (or equivalent).
E. Seasoned Wood
Burn only dry seasoned wood.
• Store wood under cover, out of the rain and snow.
• Dry and well-seasoned wood will not only minimize the
chance of creosote formation, but will give you the most
effi cient fi re.
• Even dry wood contains at least 15% moisture by weight,
and should be burned hot enough to keep the chimney
hot for as long as it takes to dry the wood out - about one
hour.
• It is a waste of energy to burn unseasoned wood of any
kind.
Dead wood lying on the forest fl oor should be considered wet,
and requires full seasoning time.
• Standing dead wood can be considered to be about 2/3
seasoned.
• To tell if wood is dry enough to burn, check the ends of
the logs.
• If there are cracks radiating in all directions from the center,
it is dry.
• If your wood sizzles in the fi re, even though the surface
is dry, it may not be fully cured.
C. Overfi ring
Do not over-fi re.
Over-fi ring may ignite creosote or will damage
the stove and chimney.
To prevent over-fi ring your stove, DO NOT:
• Use fl ammable liquids
• Overload with wood
• Burn trash or large amounts of scrap lumber
• Permit too much air to the fi re
• Use of processed solid fuel fi re logs
WARNING
Fire Risk
Symptoms of over-fi ring may include one or more of the
following:
• Chimney connector or appliance glowing
• Roaring, rumbling noises
• Loud cracking or banging sounds
• Metal warping
• Chimney fi re
1. Symptoms of Over-Firing
2. What To Do if Your Appliance is Over-Firing
• Immediately close the door and air controls to reduce
air supply to the fi re.
• If you suspect a chimney fi re, call the fi re department
and evacuate your house.
• Contact your local chimney professional and have
your appliance and stove pipe inspected for any dam-
age.
• Do not use your appliance until the chimney profes-
sional informs you it is safe to do so.
Hearth & Home Technologies WILL NOT warranty appli-
ances that exhibit evidence of over-fi ring. Evidence of
over-fi ring includes, but is not limited to:
• Warped air tube
• Deteriorated refractory brick retainers
• Deteriorated baffl e and other interior components

November 22, 2011
7063-173D
Page 9
VOYAGEUR Wood Insert
R
F. Burning Process
In recent years there has been an increasing concern about
air quality. Much of the blame for poor air quality has been
placed on the burning of wood for home heating.
In order to improve the situation, we at Quadra-Fire have
developed cleaner-burning wood appliances that surpass
the requirements for emissions established by our governing
agencies.
These wood appliances must be properly operated in order
to ensure that they perform the way they are designed to
perform.
1. Kindling or First Stage
It helps to know a little about the actual process of burning in
order to understand what goes on inside the appliance. The
fi rst stage of burning is called the kindling stage.
In this stage:
• Wood is heated to a temperature high enough to evapo-
rate the moisture present in all wood.
• Wood will reach the boiling point of water (212°F) and will
not get any hotter until the water is evaporated.
This process takes heat from the coals and tends to cool the
appliance.
Fire requires three things to burn:
• Fuel
• Air
• Heat
If heat is robbed from the appliance during the drying stage,
the new load of wood has reduced the chances for a good
clean burn.
It is always best to burn dry, seasoned fi rewood. When the
wood isn’t dry, you must open the air controls and burn at a
high burn setting for a longer time to start it burning.
The heat generated from the fi re should be warming your
home and establishing the fl ue draft, not evaporating the
moisture out of wet, unseasoned wood, resulting in wasted
heat.
2. Second Stage
In the secondary stage wood gives off fl ammable gases which
burn above the fuel with bright fl ames.
During this stage of burning:
• The fl ames must be maintained and not allowed to go out
to ensure the cleanest possible fi re.
• If the fl ames tend to go out, it is set too low for your burn-
ing conditions.
The air control located at the upper right hand corner is used to
adjust for burn rates. This is called the Burn Rate Air Control.
Figure 10.1 on page 10.
3. Final Stage
The fi nal stage of burning is the charcoal stage. This occurs
when the fl ammable gases have been mostly burned and
only charcoal remains. This is a naturally clean portion of
the burn. The coals burn with hot blue fl ames.
• It is very important to reload your appliance while enough
lively hot coals remain in order to provide the amount of
heat needed to dry and rekindle the next load of wood.
• It is best to open the Burn Rate Air and Start-Up Air Con-
trols before reloading. This livens up the coalbed and
reduces excessive emissions (opacity/smoke).
• Open door slowly so that ash or smoke does not exit ap-
pliance through opening.
•
Break up any large chunks and distribute the coals so
that the new wood is laid on hot coals.
Air quality is important to all of us, and if we choose to use
wood to heat our homes we should do so responsibly.
We need to learn to burn in the cleanest way possible al-
lowing us to continue using our wood appliances for many
years to come.
NOTICE: Improper operation can turn any wood appli-
ance into a smoldering environmental hazard.

Page 10
7063-173D
November 22, 2011
R
VOYAGEUR Wood Insert
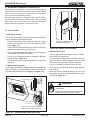
H. Air Controls
1. Start-Up Air Control
The function of the Start-Up Air Control is to activate the Auto-
matic Combustion Control system (ACC).
• Push the Start-Up Air Control all the way back until it stops
and then pull forward to the front of the appliance until it
stops. Figure 10.1.
• The air channel opens and allows air to enter the front of the
appliance for approximately 20-25 minutes.
• The air channel gradually shuts down until it is completely
closed at the end of the 20-25 minutes.
• The fi re is now controlled by the air supplied by the Burn
Rate Air Control. Figure 10.1.
• This function should be performed each time you reload the
appliance.
2. Manual Timer Over-Ride
If you need to shut the ACC system off before it shuts itself off
after 25 minutes (i.e. overfi re situation), lift up on the Start-up
Air Control and pull away from the appliance. Figure 10.2.
Figure 10.1 Start-up and Burn Rate Air Controls
Figure 10.2 Manual Timer Over-Ride
3. Burn Rate Air Control
• The air supply enters at the upper front of the fi rebox,
near the top of the glass door.
• This preheated air supplies the necessary fresh oxy-
gen to mix with the unburned gases, helping to create
the second, third and fourth combustion process.
• This air is regulated by the Burn Rate Air Control.
• There are four settings High, Medium-High, Medium-
Low and Low.
• When the control is raised all the way up it is on the
High setting and when pushed all the down it is on the
Low setting. Figure 11.1.
G. Automatic Combustion Control (ACC)
Typically, when you build a fi re, you open the air controls fully and
monitor the fi re to prevent it from going into an overfi re situation
and/or burning your wood up too quickly before you shut down
the air controls to the desired burn rate.
When using the Automatic Combustion Control (ACC) system,
you do not have to continually monitor the fi re. Once you set the
ACC system it will control the fi re for you. Follow the instructions
below to learn how to operate your stove with ease.
WARNING
Risk of Fire or Chimney Fire.
Avoid Overfi re
DO NOT over-ride the Automatic Combustion
Control when the burn rate is set to HIGH
Burn Rate Control
ACC Start-up
Air Control
HIGH
LOW
To activate: Push back until it stops
and then pull forward until it stops
Lift Up on Control and Pull
Away from Appliance

November 22, 2011
7063-173D
Page 11
VOYAGEUR Wood Insert
R
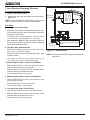
I. Burn Rates and Operating Effi ciency
For maximum operating effi ciency
1. Burn dry, well-seasoned wood.
2. Follow these burn rate instructions below and refer to
Figure 11.1.
*NOTE:
These are guidelines. Actual settings may vary with
type of wood, chimney draft, altitude and other variables.
Burn Rates
1. Starting a Fire and Reloading
• Open both controls fully by raising the Burn Rate Air Con-
trol all the way up until it stops and push the Start-up Air
Control back until it stops.
•
The blower tends to cool the appliance. Leave the blower
off until the burn is well established, i.e., 30 minutes.
• After loading the appliance with wood and starting the
fi re, set both controls to the desired setting by following
the burn rate instructions below.
2. High Burn Rate - Maximum Heat*
•
Raise the Burn Rate Air Control all the way up until it stops
(top marker) to a fully open position.
•
Push the Start-Up Air Control all the way back until it stops
and leave it there.
•
This setting over-rides the timer system (ACC) so you
must monitor the fi re closely while in this setting.
3.
Medium-High Burn Rate - 15,000 to 30,000 BTU/hr*
• Raise the Burn Rate Air Control all the way up until it
stops (top marker) to a fully open position.
• Push the Start-Up Air Control all the way back until it
stops and then pull forward until it stops.
• This activates the timer system (ACC).
4.
Medium-Low Burn Rate - 10,000 to 15,000 BTU/hr*
• Raise the Burn Rate Air Control up to the bottom of the
middle marker and stop.
• Push the Start-Up Air Control until it stops.
• This activates the timer system (ACC).
5. Low Burn Rate - Below 10,000 BTU/hr*
• Leave the Burn Rate Air Control at the bottom marker.
• Push the Start-Up Air Control all the way back until it
stops and then pull forward until it stops.
• This activates the timer system (ACC).
Figure 11.1 Activating Timer
NOTE: If control is pushed all the way in it over-rides the
timer (ACC).
HIGH
LOW
To Activate Timer: Push back
until it stops then pull forward until
it stops.
Burn Rate
Air Control
Start-Up
Air Control

Page 12
7063-173D
November 22, 2011
R
VOYAGEUR Wood Insert
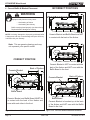
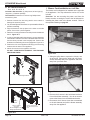
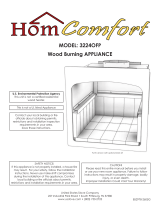
CORRECT POSITION
INCORRECT POSITIONS
Improper baffl e placement may cause:
• Overheating of fi rebox
• Overheating the chimney
Baffl e must be placed properly (see instructions)
Replace baffl e if damaged or missing.
WARNING
Fire Risk
J. Correct Baffl e & Blanket Placement
Ceramic Blanket and Baffl e Board are NOT
in contact with the back of the fi rebox.
Ceramic Blanket is NOT in contact with the
back of the fi rebox and NOT even with the
Baffl e Board in the front.
Ceramic Blanket is bunched up at the back
of the fi rebox and NOT even with the Baffl e
Board in the front.
Ceramic Blanket
Back of Firebox
Baffle Board
Ceramic Blanket and Baffl e Board MUST be
in contact with the back of the fi rebox and
even with each other in the front.
Ceramic Blanket
Back of Firebox
Baffle Board
Figure 12.1 - Correct Baffl e and Blanket Positions Figure 12.2 - Incorrect Baffl e and Blanket Positions
Note: This are generic drawings and may
not represent your specifi c model.
NOTE: A missing, damaged or improperly positioned baffl e
is dangerous and may cause damage and poor effi ciency.
It will also void your warranty.

November 22, 2011
7063-173D
Page 13
VOYAGEUR Wood Insert
R
K. Building A Fire
Before lighting your fi rst fi re in the appliance:
1. Confi rm the baffl e and ceramic blanket are correctly
positioned. They should be even with the front tube and
resting on all tubes. See page 12.
2. Remove all labels from glass.
There are many ways to build a fi re. The basic principle is
to light easily-ignitable tinder or paper, which ignites the fast
burning kindling, which in turn ignites the slow-burning fi re-
wood. Here is one method that works well:
1.
Open the Burn Rate Air and Start-Up Air Controls fully.
2. Place several wads of crushed paper on the fi rebox fl oor.
Heating the fl ue with slightly crumpled newspaper before
adding kindling keeps smoke to a minimum.
3. Lay small dry sticks of kindling on top of the paper.
4. Make sure that no matches or other combustibles are in
the immediate area of the appliance. Be sure the room
is ventilated and the fl ue unobstructed.
5. Light the paper in the appliance. NEVER light or rekindle
fi re with kerosene, gasoline, or charcoal lighter fl uid; the
results can be fatal.
6. Once the kindling is burning quickly, add several full-length
logs 3 to 4 inches (76 - 102mm) in diameter. Be careful
not to smother the fi re. Stack the pieces of wood 1/2 to
1 inch apart (13-25mm); near enough to keep each other
hot, but far enough away from each other to allow air fl ow
between them.
7. Set the Burn Rate Air Control and activate the timer sys-
tem (ACC).
8. When ready to reload, it is best to fully open both the Burn
Rate Air and Start-up Air Controls before reloading.
• This livens up the coalbed and reduces excessive emis-
sions (opacity/smoke).
• Large logs burn slowly, holding a fi re longer.
• Small logs burn fast and hot, giving quick heat.
NOTE:
• Build fi re on brick fi rebox fl oor only.
• Do NOT use grates or other methods to support fuel.
It will adversely affect emissions.
Odors and vapors released during initial operation.
• Curing of high temperature paint.
• Open windows for air circulation.
Odors may be irritating to sensitive individuals.
CAUTION
Fire Risk.
Keep combustible materials, gasoline
and other fl ammable vapors and liquids
clear of appliance.
WARNING
• Do NOT store fl ammable materials in the appliance’s
vicinity.
• DO NOT USE GASOLINE, LANTERN FUEL,
KEROSENE, CHARCOAL LIGHTER FLUID OR
SIMILAR LIQUIDS TO START OR “FRESHEN UP” A
FIRE IN THIS HEATER.
• Keep all such liquids well away from the heater while it
is in use.
• Combustible materials may ignite.
L. Fuel Reloading Instructions
1. This appliance has a large door with an exceptional
view of the fi re.
• Opens to about 90 degrees and has a built-in stop.
• Door opens 26 inches (660mm) which goes beyond
the standard size hearth pad covering the fl oor in
front of the appliance.
• May want to use a hearth rug in front of the hearth
pad to protect the fl ooring from ash spillage and
continuous cleaning of carpet, etc. See drawing
on page 32.
2. Open door slowly so that ash or smoke does not exit
appliance through opening.
• Check the level of the ash build-up. Remove ash if it
reaches the top of the brick covers. Ash should not
be spilling over the brick covers onto the ashlip.
• Any ash on the ashlip can be pressed into the door
gasket and shorten the life of the gasket.
• If the ash is left to accumulate on the ashlip it can
interfere with the door closing and/or falling out onto
the hearth pad or beyond.
Check the ash level each time you reload.

Page 14
7063-173D
November 22, 2011
R
VOYAGEUR Wood Insert
M. Wood Fuel
Moisture
Seasoned Wood
• Cut logs to size
• Split to 6 inches (152 mm) or less in diameter
• Air dry to a moisture content of not more than 20%
- Soft wood - about nine months to dry
- Hard wood - about eighteen months to dry
Soft woods Hard woods
• Douglas Fir • Oak
• Pine • Maple
• Spruce • Apple
• Cedar • Birch
• Poplar
• Aspen
• Alder
The majority of the problems appliance owners experience
are caused by trying to burn wet, unseasoned wood.
• Wet, unseasoned wood requires energy to evaporate the
water instead of heating your home, and
• Causes evaporating moisture which cools your chimney,
accelerating formation of creosote.
Storing Wood
Steps to ensure properly seasoned wood:
• Stack wood to allow air to circulate freely around and
through woodpile.
• Elevate wood pile off ground to allow air circulation
underneath.
• Smaller pieces of wood dry faster. Any piece over 6 in.
(152 mm) in diameter should be split.
• Wood (whole or split) should be stacked so both ends of
each piece are exposed to air. More drying occurs through
the cut ends than the sides.
• Store wood under cover to prevent water absorption
from rain or snow. Avoid covering the sides and ends
completely.
Processed Solid Fuel Fire Logs
• NOT permitted for use in this appliance
WARNING
Fire Risk.
• DO NOT BURN GARBAGE OR FLAMMABLE
FLUIDS SUCH AS GASOLINE, NAPTHA OR
ENGINE OIL.
• DO NOT USE CHEMICALS OR FLUIDS TO START A
FIRE.
• Do NOT burn treated wood or wood with salt (driftwood).
• May generate carbon monooxide if burn material other
than wood.
May result in illness or possible death.
Hardwood vs Softwood
Your appliance performance depends on the quality of the
fi rewood you use.
• Seasoned wood contains about 8,000 BTUs per pound .
• Hard woods are more dense than soft woods.
• Hard woods contain 60% more BTUs than soft woods.
• Hard woods require more time to season, burn slower and
are harder to ignite.
• Soft woods require less time to dry, burn faster and are
easier to ignite.
• Start the fi re with softwood to bring the appliance up to
operating temperature and to establish draft.
• Add hardwood for slow, even heat and longer burn time.
• Do NOT burn wet or green wood.
• Store wood in dry location.
• Stack wood so both ends are exposed to air.
Wet, unseasoned wood can cause accumulation of
creosote.
Fire Risk.
WARNING
WARNING
Fire Risk
Do NOT store wood:
• In front of the appliance.
• In space required for loading or ash
removal.
NOTICE: Seasoning time may vary depending on drying
conditions.

November 22, 2011
7063-173D
Page 15
VOYAGEUR Wood Insert
R
O. Blower Operating Instructions
1. Initial (cold) startup: Open both controls fully by rais-
ing the Burn Rate Air Control all the way up until it stops
and PUSH the Start-up Air Control back until it stops.
The blower tends to cool the appliance. Leave the blower
off until the burn is well established, i.e., 30 minutes.
2. High Burn Setting: Both controls are open. Burn Rate
Air Control is pulled up and the Start-up Air Control is
fully pushed in. Blower may remain on.
3. Medium-High Burn Setting*: Burn Rate Air Control
is closed then opened to 1 inch to fully open (pull up).
Blower may remain on.
4. Medium-Low Burn Setting*: Burn Rate Air Control
is closed then opened to 1/4 inch to 1/2 inch (pull up).
Leave the blower off until the burn is well established, i.e.,
30 minutes.
5. Low Burn Setting*: Burn Rate Air Control is closed
(down position).
Leave the blower off until the burn is
well established, i.e., 30 minutes.
*NOTE: For burn settings 3 to 5 the Start-up Air Control
needs to be pushed in (Open) then pulled forward to
activate the Automatic Combustion Control (ACC).
NOTE: For maximum effi ciency and lowest emissions,
when operating the blower in either the automatic or
manual setting for the low and medium low burn settings
leave the blower off until the burn is well established, i.e.,
30 minutes.
6. The blower is equipped with a rheostat (speed control).
The highest blower speed is obtained by turning the
rheostat on, then adjusting back towards “OFF” as far
as possible without turning the blower off. For a low
blower speed, turn the control knob clockwise as far as
possible
Blower Controls Under Ash Lip
MANUAL: over-
rides the internal
snap disc
AUTO: Fan with turn ON/OFF
automatically and is controlled
by the internal Snap Disc
1. The blower will turn on/off automatically when set to
AUTO. Figure 15.1.
2. When set to MANUAL, the fan will turn on/off only when
you turn it on or off. This setting over-rides the internal
snap disc.
3. Swing the grille downward to expose the blower con-
trols. Adjust the speed of the fan by turning the HIGH/
LOW knob to the desired setting.
N. Blower Control Box & Snap Disc
Operating Instructions
Figure 15.1
NOTICE!
Do NOT operate a circulating fan within close proxim-
ity, approximately 4 ft (1.2m), of appliance
• Can reverse air fl ow, blowing hot air into appliance
cavity.
• Can damage appliance blower due to overheating.

Page 16
7063-173D
November 22, 2011
R
VOYAGEUR Wood Insert
R. Opacity (Smoke)
Opacity is the measure of how cleanly your appliance is
burning.
Opacity is measured in percent:
• 100% opacity is when an object is totally obscured by
the smoke column from a chimney, and
• 0% opacity means that no smoke column can be seen.
As you become familiar with your appliance, you should
periodically check the opacity. This will allow you to know
how to burn as nearly smoke-free as possible (goal of 0%
opacity).
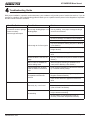
Q. Frequently Asked Questions
ISSUES SOLUTIONS
Odor from appliance When fi rst operated, this appliance may release an odor for the fi rst several hours. This is
caused by the curing of the paint and the burning off of any oils remaining from manufacturing.
Metallic noise Noise is caused by metal expanding and contracting as it heats up and cools down, similar to
the sound produced by a furnace or heating duct. This noise does not affect the operation or
longevity of the appliance.
Whirring sound The blower may produce a whirring sound which increases in volume as the speed is
increased.
Odors and vapors released during initial operation.
• Curing of high temperature paint.
• Open windows for air circulation.
Odors may be irritating to sensitive individuals.
CAUTION
Figure 16.1 - Clear Space
P. Clear Space
• Do NOT place combustible objects within 4 ft (1.2 m) of
the front of fi replace. Figure 16.1.
• Do NOT place combustible objects within 48
inches in front of the appliance.
• High temperatures may ignite clothing, furniture or
draperies.
Fire Risk.
WARNING
NOTICE!
Do NOT operate a circulating fan within close prox-
imity, approximately 4 ft (1.2m), of appliance
• Can reverse air fl ow, blowing hot air into appli-
ance cavity.
• Can damage appliance blower due to overheat-
ing.
Maintain 4 ft (1.22m) clearance to
combustible in front of appliance

November 22, 2011
7063-173D
Page 17
VOYAGEUR Wood Insert
R
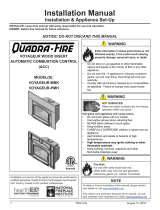
S. Quick Start Guide
Note: This are generic drawings and may not represent
your specifi c model.
The stove is ready for
normal operation.
1
2
3
5
6
7
FIRST FIRE ITEMS NEEDED:
10 Pieces of Newspaper, 10-20 Pieces of Dry Kindling
and a Few Pieces of Dry Split Wood.
HIGH
LOW
Push In and then Pull Out
BURN
RATE
Upper
right
corner
Lower
right
corner
START-UP
AIR
LOW
HIGH
BURN RATE CONTROL
Upper Right Corner
LOAD WOOD
ADD NEWSPAPER
ADD KINDLING
ADD MORE WOOD &
SECURELY LATCH THE DOOR
4
LIGHT THE PAPER
OPEN AIR
CONTROLS
REDUCE AIR
CONTROL
Set to desired heat
output
WARNING! Risk Of Fire
DO NOT LEAVE UNATTENDED
During startup, if additional draft is needed,
allow the door to remain open approxi-
mately1/2 inch. Once the draft is established,
close and securely latch the door to prevent:
• Spillage of smoke, fl ame and carbon
monoxide
• Spillage of sparks, coals and logs
• Over-fi ring
DO NOT leave the stove unat-
tended with the door open

Page 18
7063-173D
November 22, 2011
R
VOYAGEUR Wood Insert
• Frequency: When ash reaches the top of the brick
covers (should not spill over covers). Leave 1/4 inch
(6mm) of ash in the bottom of the firebox.
• By: Homeowner
A. Disposal of Ashes
• Place ashes in a metal container with a tight-fi tting lid.
• The closed container should be placed on a noncombustible
fl oor or on the ground, well away from all combustible
materials, pending fi nal disposal.
• If the ashes are disposed of by burial in soil or otherwise
locally dispersed, they should be retained in the closed
container until all cinders have thoroughly cooled
WARNING! Risk of Fire! Ashes could contain hot embers.
3
Maintenance and Service
B. Chimney and Chimney Connector
Inspection/Cleaning
• Frequency: Every 2 months during heating season or
as recommended by a certifi ed chimney sweep; more
frequently if chimney exceeds or is under 14-16 feet (4.3
to 4.8m) measured from bottom of appliance.
• By: Certifi ed chimney sweep
• Remove all ash from the fi rebox and extinguish all hot
embers before disposal.
• Allow the appliance to cool completely.
• If your type of installation involves a full reline of the
chimney, it will be necessary to either remove the baffl e
from the insert, or remove the insert from the fi replace
and disconnect the vent prior to cleaning the chimney.
Refer to page 22 in this manual for instructions on Baffl e
Removal.
• If your type of installation is direct connect within a masonry
chimney, the insert will need to be pulled out from the
fi replace and disconnected from the fl ue prior to cleaning
the chimney.
• The creosote or soot should be removed with a brush
specifi cally designed for the type of chimney in use.
• Clean out fallen ashes from the fi rebox.
• It is also recommended that before each heating season
the entire system be professionally inspected, cleaned
and repaired if necessary.
WARNING! Risk of Fire!
Do not use chimney cleaners or fl ame colorants in your
appliance. It will corrode your pipe.
Creosote - Formation and Need for Removal
• When wood is burned slowly, it produces tar and other
organic vapors, which combine with expelled moisture
to form creosote.
• The creosote vapors condense in the relatively cool
chimney fl ue of a slow-burning fi re.
• As a result, creosote residue accumulates on the fl ue
lining. When ignited this creosote makes an extremely
hot fi re.
• The chimney and chimney connector shall be inspected
every two months during the heating season to determine
when a creosote buildup has occurred.
• When creosote has accumulated it shall be removed to
reduce the risk of a chimney fi re.
C. Appliance Inspection - Routine
• Frequency: Every 2 months at the same time the chim-
ney and chimney connector are inspected.
• By: Homeowner
Check for:
• Cracks in glass
• Door handle - smooth cam operation
• Baffl e and ceramic blanket correct placement
• Baffl e for warpage
• Firebrick for cracks, broken or crumbly
• Door gasket. (Dollar bill test). Place a dollar bill between
the stove and the door and then shut the door. If you can
pull the dollar bill out, replace the door gasket.
• Glass frame for loose screws
D. Cleaning Plated Surfaces
• Frequency: As desired
• By: Homeowner
• Clean all the fi ngerprints and oils from plated surfaces
BEFORE fi ring the appliance for the fi rst time.
• If not cleaned properly before lighting your fi rst fi re, the
oils can cause permanent markings on the plating.
• After the plating is cured, the oils will not affect the fi nish
and little maintenance is required.
• Wipe clean as needed.
CAUTION! Do not use polishes with abrasives. It will
scratch plated surfaces.

November 22, 2011
7063-173D
Page 19
VOYAGEUR Wood Insert
R
• Frequency: As desired
• By: Homeowner
• Clean glass with a non-abrasive glass cleaner. Abrasive
cleaners may scratch and cause glass to crack.
• If the deposits on the glass are not very heavy, normal
glass cleaners work well. Heavier deposits may be
removed by using a damp cloth dipped in wood ashes or
by using a commercially available oven cleaner.
• After using an oven cleaner, it is advisable to remove any
residue with a glass cleaner or soap and water. Oven
cleaner left on during the next fi ring can permanently
stain the glass and damage the fi nish on plated metal
surfaces.
• A portion of the combustion air entering the fi rebox is de-
fl ected down over the inside of the door glass.
• This air fl ow “washes” the glass, helping to keep smoke
from adhering to its surface.
• When operated at a low burn rate, less air will be fl owing
over the glass and the smoky, relatively cool condition of
a low fi re will cause the glass to become coated.
• Operating the appliance with the Burn Rate Air Control
and Start-Up Air Control all the way open for 15-20 min-
utes should remove the built up coating.
E. Glass Cleaning
CAUTION! Handle glass assembly with care. Glass is
breakable.
• Avoid striking, scratching or slamming glass
• Avoid abrasive cleaners
• Do not clean glass while it is hot
Replace the fi rebrick if they become crumbly and/or if
there is a 1/4 inch (6.35mm) gap between the bricks.
The fi rebox is lined with fi rebrick, which has exceptional
insulating properties. Do not use a grate; simply build
a fi re on the fi rebox fl oor. Do not operate appliance
without fi rebrick.
1. After the coals have completely cooled, remove all
old brick and ash from unit and vacuum fi rebox.
2. Remove new brick set from box and lay out to the
diagram shown in the instructions that come with
the replacement brick set.
3. Lay bottom bricks in unit.
4.
Install rear bricks on the top of the bottom bricks.
5. Install side bricks. Slide top of brick under clips
on side of fi rebox and push the bottom of the brick
until it is fl ush with the side of the unit.
F. Inspect Firebrick & Replacement
Instructions
• Frequency: After each ash removal
• By: Homeowner
Use Part 832-0550 when ordering individual brick. Provide
brick dimension or copy the page in the service parts list, mark
the desired brick and take it to your authorized dealer.

Page 20
7063-173D
November 22, 2011
R
VOYAGEUR Wood Insert
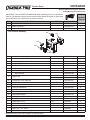
Note: These are generic drawings and may not represent your specifi c model.
Baffle
Blanket
Latch Cam
Spacing Washers
Baffl e & Blanket
Optional Blower
Chimney System
Firebrick & Ash Removal
Door & Glass Assemblies
Door Handle
Frequency
MONTHLY
or
After Every
Cord of Wood
Baffl e and blanket placement is critical to
heat output, effi ciency and overall life of the
unit. Make sure the baffl e is pushed all of the
way to the back of the fi rebox and the blanket
is laying fl at. Inspect baffl e for cracks.
YEARLY
or
After Every
4 Cords of
Wood
Vacuum the blower impellers.
EVERY 2
MONTHS
or
After Every
4 Cords of
Wood
T
he chimney and chimney cap must be in-
spected for soot and creosote every two
months during the burn season or more fre-
quency if chimney exceeds or is under 14-16 ft
(4.3m-4.8m) measured from bottom of appli-
ance.
This will prevent pipe blockage, poor draft,
and chimney fi res.
Always burn dry wood to help prevent cap
blockage and creosote build-up.
WEEKLY
or
After Every
25 Loads of
Wood
Ashes must be cool before you can dispose
of the ashes in a non-combustible container.
Firebrick is designed to protect your fi rebox.
After ashes are removed, inspect the fi re-
brick and replace fi rebricks that are crum-
bling, cracked or broken.
WEEKLY
or
After Every
25 Loads of
Wood
Keep door and glass gasket in good shape to
maintain good burn times on a low burn setting.
To test: place a dollar bill between the stove
and door and then shut the door. If you can
pull the dollar out, remove one washer from
door handle behind latch cam and try again. If
you can still pull it out, replace the door gasket.
Check the glass frame for loose screws to
prevent air leakage. Check glass for cracks.
WEEKLY
or
After Every 25
Loads of Wood
Check the door latch for proper adjustment.
This is very important especially after the door
rope has formed to the stove face.
Check door handle for smooth cam operation.
Task
CAUTION! Allow the appliance to completely cool
down before performing any cleaning or maintenance.
Start the fi rst inspection after the fi rst 2 months of use,
or if performance changes, and adjust your schedule
accordingly. Maintenance is required for safe operation
and must be performed to maintain your warranty.
G. Quick Reference Maintenance Guide
Page is loading ...
Page is loading ...
Page is loading ...
Page is loading ...
Page is loading ...
Page is loading ...
Page is loading ...
Page is loading ...
Page is loading ...
Page is loading ...
Page is loading ...
Page is loading ...
Page is loading ...
Page is loading ...
Page is loading ...
Page is loading ...
Page is loading ...
Page is loading ...
Page is loading ...
Page is loading ...
Page is loading ...
Page is loading ...
Page is loading ...
Page is loading ...
Page is loading ...
Page is loading ...
Page is loading ...
Page is loading ...
Page is loading ...
Page is loading ...
Page is loading ...
Page is loading ...
Page is loading ...
Page is loading ...
Page is loading ...
Page is loading ...
-
 1
1
-
 2
2
-
 3
3
-
 4
4
-
 5
5
-
 6
6
-
 7
7
-
 8
8
-
 9
9
-
 10
10
-
 11
11
-
 12
12
-
 13
13
-
 14
14
-
 15
15
-
 16
16
-
 17
17
-
 18
18
-
 19
19
-
 20
20
-
 21
21
-
 22
22
-
 23
23
-
 24
24
-
 25
25
-
 26
26
-
 27
27
-
 28
28
-
 29
29
-
 30
30
-
 31
31
-
 32
32
-
 33
33
-
 34
34
-
 35
35
-
 36
36
-
 37
37
-
 38
38
-
 39
39
-
 40
40
-
 41
41
-
 42
42
-
 43
43
-
 44
44
-
 45
45
-
 46
46
-
 47
47
-
 48
48
-
 49
49
-
 50
50
-
 51
51
-
 52
52
-
 53
53
-
 54
54
-
 55
55
-
 56
56


Quadra-Fire Quadra-Fire VOYAGEUR-PMH User manual
- Category
- Stoves
- Type
- User manual
- This manual is also suitable for
Ask a question and I''ll find the answer in the document
Finding information in a document is now easier with AI
Related papers
-
Aladdin 1900 User manual
-
Quadra-Fire VOYA-GRAND-PMH Owner's manual
-
Hearth and Home Technologies Indoor Fireplace 2700-I User manual
-
-
-
-
-
Quadra-Fire 31M-ACC-MBK User manual
-
-
Other documents
-
American Pro Decor 5APD10664 Installation guide
-
Lennox C260 User manual
-
kozy heat Masonry Owner's manual
-
-
Drolet ESCAPE 1800-I WOOD INSERT Assembly Instructions
-
 Lennox Hearth 2800HT User manual
-
 Earth Stove 2800HT User manual
-
 HomComfort 3224OFP User manual
-
Builders Edge 130130003030 Installation guide
-
 Quadrafire Voyageur Wood Insert Installation guide


