Page is loading ...


DALIBOX Broadcast 6CH/4CH
http://www.zennio.com Technical Support: http://support.zennio.com
2
CONTENTS
Contents ........................................................................................................................................ 2
Document Updates ....................................................................................................................... 3
1 Introduction .......................................................................................................................... 4
1.1 DALIBOX Broadcast 6CH ................................................................................................ 4
1.2 Installation ..................................................................................................................... 6
1.3 Compatible Ballasts ....................................................................................................... 7
2 Configuration......................................................................................................................... 8
2.1 General Configuration ................................................................................................. 10
2.2 Channels ...................................................................................................................... 16
2.2.1 Main Configuration ............................................................................................. 16
2.2.2 Limits ................................................................................................................... 19
2.2.3 Switch On/Off ..................................................................................................... 20
2.2.4 Dimming .............................................................................................................. 22
2.2.5 Error Objects ....................................................................................................... 23
2.2.6 Status Objects ..................................................................................................... 27
2.2.7 Custom On/Off .................................................................................................... 28
2.2.8 Timers ................................................................................................................. 29
2.2.9 Scenes/Sequences .............................................................................................. 34
2.2.10 Lock ..................................................................................................................... 37
2.2.11 Custom Initialisation ........................................................................................... 38
2.2.12 Modes ................................................................................................................. 39
ANNEX I. Error indicators ............................................................................................................ 44
ANNEX II. Communication Objects.............................................................................................. 45

DALIBOX Broadcast 6CH/4CH
http://www.zennio.com Technical Support: http://support.zennio.com
3
DOCUMENT UPDATES
Version
Changes
Page(s)
[1.2]_b
Clarification about ballast change directions.
24
[1.2]_a
Changes in the application program:
Heartbeat functionality added.
New parameter to configure bit timing.
-
[1.1]_a
Changes in the application program:
Internal code revision.
-

DALIBOX Broadcast 6CH/4CH
http://www.zennio.com Technical Support: http://support.zennio.com
4
1 INTRODUCTION
1.1 DALIBOX BROADCAST 6CH
DALIBOX Broadcast 6CH and DALIBOX Broadcast 4CH are the KNX-DALI broadcast
gateways from Zennio. Featuring six and four DALI channels respectively, they are
intended for interconnection of the KNX and DALI buses, thus making it possible to
send broadcast control messages (i.e., addressed to all ballasts that may be present)
through the output channels, as well as to monitor the DALI installation.
Their main functions are:
General ballast control through universal DALI.
Support for up to 20 ballasts per channel, and therefore up to 120 ballasts
(6CH model) or up to 80 ballasts (4CH model) in total.
110V or 230V power supply.
Ballast swap with automatic address re-assignment.
Light regulation with customisable dimming limits and times, or by manually
characterising the dimming curve.
Lock function.
Timed actions: simple timers, flashing sequences and automatic switch-off.
Scenes and sequences,
Custom On/Off controls,
Standby Mode to help save power consumption in the ballasts by controlling
the power supply to the output channels.
Error detection and notification: short circuit, overconsumption, power
failure, open circuit, ballast error and lamp failure.
Support for the Burn-in mode, required by certain lamps during the switch-on
in order to ensure an optimal life period.

DALIBOX Broadcast 6CH/4CH
http://www.zennio.com Technical Support: http://support.zennio.com
5
Manual control through the on-board pushbuttons and LEDs.
Heartbeat or periodical “still-alive” notification.
Figure 1. DALIBOX Broadcast 6CH
Note: certain figures or sections of this manual may refer specifically to DALIBOX
Broadcast 6CH. However, please bear in mind that everything applies to DALIBOX
Broadcast 4CH as well, with the only difference of the available output channels.

DALIBOX Broadcast 6CH/4CH
http://www.zennio.com Technical Support: http://support.zennio.com
6
1.2 INSTALLATION
DALIBOX Broadcast 6CH / 4CH connects to the KNX bus through the on-board KNX
connector. Once the device is provided with power from the KNX bus, both the
individual address and the associated application program can be downloaded.
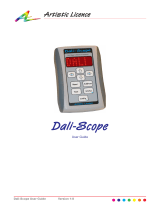
Figure 2. Element Diagram.
The main elements of the device are described next:
Prog./Test Pushbutton (5): a short press on this button sets the device into
the programming mode, making the associated LED (7) light in red.
Note: if this button is held while plugging the device into the KNX bus, the
device will enter into safe mode. In such case, the LED will blink in red every
0.5 seconds.
Output Channels (1): slots for the connection of the DALI bus wires.
Neutral and Phase Inputs (2): slots for the connection of the neutral and the
phase of the power line.
To get detailed information about the technical features of the device, as well as on the
installation and security procedures, please refer to the corresponding Datasheet,
bundled with the original package of the device and also available at www.zennio.com.
1. DALI output channel.
2. External power supply.
3. DALI channel control button.
4. DALI channel status LED.
5. Prog./Test button.
6. External power supply LED.
7. Prog./Test LED.
8. KNX connector.

DALIBOX Broadcast 6CH/4CH
http://www.zennio.com Technical Support: http://support.zennio.com
7
1.3 COMPATIBLE BALLASTS
DALIBOX Broadcast 6CH / 4CH is able to control DALI-certified ballasts (i.e., with
the DALI logo) that make use of only one individual address.
Correct operation cannot be guaranteed for other ballasts.
Nevertheless, not all DALI-certified ballasts behave the same way – certain
particularities apply:
Ballasts with LED loads do not report lamp failures; therefore, with these
ballasts it is not possible to notify such circumstance to the KNX bus.
When a lamp failure takes place, certain ballasts with fluorescent lamps may
cause the remaining lamps flash briefly.
Fluorescent-lamp ballasts need an extra time to switch off the load when a
non-immediate regulation to 0% is commanded.
Certain ballast models, on the event of a DALI communication error (e.g.,
short-circuit or power failure), do not switch to the dimming value configured
for such circumstance – the ballast will maintain the last dimming value that
may have been set.
Some lamps may implement a significant delay when they are switched on.
Such circumstance must be taken into account in case of parameterising
timed actions or flashing and dimming sequences.
There may be some other (minor) particularities depending on the ballasts and on the
lamps in the installation. Therefore, the integrator is advised to perform some testing to
ensure compatibility.

DALIBOX Broadcast 6CH/4CH
http://www.zennio.com Technical Support: http://support.zennio.com
8
2 CONFIGURATION
The DALIBOX Broadcast 6CH / 4CH application program allows, as stated in previous
sections, controlling DALI ballasts grouped into up to six or four channels. Such control
is performed according to a set of customisable options which make DALIBOX
Broadcast 6CH / 4CH a very versatile device:
Different alternatives to control the luminosity of the connected loads:
One-bit objects to switch on / switch off each channel,
Four-bit objects for per-channel step dimming,
One-byte objects for per-channel absolute dimming (in percentage).
General dimming features:
Configurable dimming times, being possible to modify them through
communication objects. Up to three different dimming times are available.
Dimming limits, i.e., maximum and minimum lighting levels.
Minimum luminosity level reachable by each channel, i.e., the ballast
physical minimum.
Maximum luminosity level allowed in the ballasts under the economy
mode.
Custom on/off: possibility of enabling and configuring up to two different
switch-on/off controls, with custom dimming values and times.
Simple timer and flashing: timed switch-on and switch-off sequences of the
ballasts connected to the device.
Scenes/Sequences: up to ten different, customisable scenes or sequences
(with up to five configurable steps each), being possible to define the dimming
type of each step action, among other things.
Lock: channel control enabling/disabling, with the additional option to define
actions for the lock and unlock events.

DALIBOX Broadcast 6CH/4CH
http://www.zennio.com Technical Support: http://support.zennio.com
9
Initialization: custom configuration of the initial status (upon the recovery of
the KNX bus power or after an ETS download or a restart) for each channel,
or either of an initial sending (immediate or delayed) of the status to the bus.
Error identification: detection of anomalies that may affect the proper
operation of the device: power supply error, short circuit, ballast error, ballast
overload, open circuit or lamp failure.
Special operation modes:
Standby: mode that allows notifying an external actuator after switching
off a channel, so the power supply to the ballasts in such channel can be
interrupted, thus reducing the power consumption.
Auto Off: mode that allows automatically switching off one channel,
provided that it remains steady under a certain, parameterisable dimming
threshold for more than a certain, parameterisable time period.
Burn-in: mode that prevents the execution of dimming orders during a
certain, parameterisable time period after the switch-on of the ballast, with
the aim of stabilising the lamp response and of optimising its life time. This
feature may be required by certain lamp models.

DALIBOX Broadcast 6CH/4CH
http://www.zennio.com Technical Support: http://support.zennio.com
10
2.1 GENERAL CONFIGURATION
The general configuration of DALIBOX Broadcast 6CH / 4CH entails enabling the
desired number of channels, depending on the number of loads to be controlled and
their distribution along the DALI installation.
Besides, the manual control type desired (i.e., the control type that will be available
through the on-board pushbuttons of the device) may be selected.
Moreover, the general configuration allows enabling the following functions:
Power Supply Error Object: notification to the KNX bus about an external
power supply failure in the device.
Heartbeat or periodical “still-alive” notification.
Standard Bit Timing: this function allows customising the time threshold
after which the arrival of a new bit through the DALI bus will be considered
corrupt, for instance to prevent telegram collisions in case several ballast
have been assigned the same address. Preserving the standard threshold is
highly encouraged, unless intending to connect very specific ballasts that may
require modifying it.
Once the basic configuration is defined, it is possible to enable and configure some
additional functions for each channel (please refer to section 2.2).
Related to the manual control, DALIBOX Broadcast 6CH / 4CH allows manually
switching the state of its channels through the respective pushbuttons on the top side
of the device. A specific pushbutton is therefore available per channel.
Manual operation can be done in two different ways, named as Test On mode (for
testing purposes during the configuration of the device) and Test Off mode (for a
normal use, anytime). Whether both, only one, or none of these modes should be
accessible needs to be parameterised in ETS. Moreover, it is possible to enable a
specific binary object for locking and unlocking the manual control in runtime.

DALIBOX Broadcast 6CH/4CH
http://www.zennio.com Technical Support: http://support.zennio.com
11
Notes:
The Test Off mode will be active (unless it has been disabled in parameters)
after a download or a reset with no need of a specific activation – the
pushbuttons will respond to user presses from the start.
On the contrary, switching to the Test On mode (unless disabled in
parameters) needs to be done by long-pressing the Prog./Test button (for at
least three seconds), until the LED is no longer red and turns yellow. From
that moment, once the button is released, the LED light will remain green to
confirm that the device has switched from the Test Off mode to the Test On
mode. After that, an additional press will turn the LED yellow and then off,
once the button is released. This way, the device leaves the Test On mode.
Note that it will also leave this mode if a bus power failure takes place.
Test Off Mode
Under the Test Off Mode, the channels can be controlled through both their
communication objects and the actual pushbuttons located on the top of the device.
When any of these buttons is pressed, the corresponding channel will behave as if an
order had been received through the analogous communication object, depending on
the channel configuration:
A short press will be equivalent to receiving a switch order (either a switch-
on or a switch-off – this will alternate on every short press). The first time, it
will always consist in a switch-on, unless the current level is already
maximum (in such case, the regulation will be towards 0%). This regulation is
subject to the “On/Off Dimming Time” (see section 2.2.3) for each channel.
A long press will be equivalent to receiving a relative dimming command
(see section 2.2.4). The dimming direction will be contrary to that of the
previous regulation, although the first time the regulation will always be
upwards (unless the current level is already the maximum one – in such case
the regulation will be towards 0%). The dimming speed will correspond to that
defined in parameters for the relative dimming. Once the pushbutton is
released, the regulation is interrupted.

DALIBOX Broadcast 6CH/4CH
http://www.zennio.com Technical Support: http://support.zennio.com
12
Regarding the rest of the functions, the device will behave under the Test Off mode as
usual. As stated, button presses during this mode are entirely analogous to the
reception of the corresponding orders from the KNX bus, thus the status objects will
also be sent normally.
Test On Mode
After entering the Test On mode, it will only be possible to control the output channels
through the on-board manual control pushbuttons. Orders received through
communication objects will be ignored, with independence of the channel they are
addressed to.
Enabling the Test On mode allows the direct control of every channel with
independence of the device parameterisation – the output channels can be controlled
in the Test On mode no matter if they have not been enabled in parameters:
During the Test On mode, a physical minimum (see section 2.2.2) of 3% will
be applied to all channels (thus, making the response of all ballasts
homogeneous).
The channel dimming through the on-board pushbuttons will be analogous
the that in the Test Off mode, with the following remarks:
A short press will cause immediate regulations to 0% or to 100% (and not
to the maximum level configured).
The long press dimming period will be 10 seconds (from 0% to 100%).
Any orders received from the KXN bus related to the channel operation will be ignored.
Moreover, the device will not send the status objects that may correspond to the
manual actions performed by the user. The only exceptions are the lock objects.
Important: the device is delivered from factory with both manual modes (Test Off and
Test On) enabled, although with all channels disabled (thus, the Test Off mode will
result functionless).

DALIBOX Broadcast 6CH/4CH
http://www.zennio.com Technical Support: http://support.zennio.com
13
ETS PARAMETERISATION
After importing the corresponding ETS database and adding the device to the project
topology, the configuration process begins by entering the Parameters tab of the
device.
The tab tree on the left shows the “General” tab in the first place. This entry itself
comprises the following parameters:
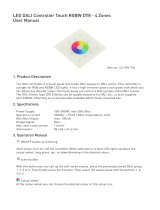
Figure 3. General
Channel ‘x’: checkboxes to enable or disable the required output channels.
Manual Control: options are “Disabled”, “Only Test Off Mode”, “Only Test On
Mode” and “Test Off Mode + Test On Mode” (default). Depending on the
selection, the device will permit using the manual control under the Test Off,
the Test On, or both modes. Note that, as stated before, using the Test Off
mode does not require any special action, while switching to the Test On
mode does require long-pressing the Prog./Test button.
Manual Control Lock: unless the above parameter has been disabled,
the Lock Manual Control parameter provides an optional procedure for
locking the manual control in runtime. When this checkbox is enabled,
object “Manual Control Lock” turns visible, as well as two more
parameters:

DALIBOX Broadcast 6CH/4CH
http://www.zennio.com Technical Support: http://support.zennio.com
14
Value: defines whether the manual control lock/unlock should take
place respectively upon the reception (through the aforementioned
object) of values “0” and “1”, or the opposite.
Initialization: sets how the lock state of the manual control should
remain after the device start-up (after an ETS download or a bus power
failure): “Unlocked”, “Locked” or “Last Value” (default; on the very first
start-up, this will be Unlocked).
Power Supply Error Object: enables/disables a one-bit object (“Error: Power
Supply”) that will notify (by sending the value “1” periodically) the existence of
a power supply failure. See section 2.2.5. Once the error is over, it will send
the value “0” (once).
Heartbeat (Periodical Alive Notification): this parameter lets the integrator
incorporate a one-bit object to the project (“[Heartbeat] Object to Send ‘1’”)
that will be sent periodically with a value of “1” to notify that the device is still
working (still alive).
Figure 4. Heartbeat (Periodical Alive Notification).
Note: The first sending after download or bus failure takes place with a delay
of up to 255 seconds, to prevent bus overload. The following sendings match
the period set.
Standard Bit Timing: enables/disables the possibility of configuring the bit
detection time. The standard value set by default is 500 μs.
Maximum time for one bit phase: sets the new threshold value between
500 μs and 650 μs.
Note: preserving the standard threshold is highly encouraged, unless
intending to connect very specific ballasts that may require modifying it.


DALIBOX Broadcast 6CH/4CH
http://www.zennio.com Technical Support: http://support.zennio.com
16
2.2 CHANNELS
2.2.1 MAIN CONFIGURATION
The general configuration for each output channel involves the following options:
Dimming times: the dimming time is the length of the transition from
switched off (0%) to the maximum luminosity level (100%), which determines
the speed of the regulation. Up to three different dimming times can be
applied to the different orders or actions, and their values may be changed
through three communication objects (one per each dimming time).
Note: in case of configuring dimming limits (see section 2.2.2), the dimming
times will be applied as follows:
Transitions between 0% and the minimum dimming value will be
instantaneous.
Transitions between the minimum dimming value and the maximum
dimming value will take the proportional part of the parameterised dimming
time (which must be understood as the time corresponding to the entire
transition from 0% to 100%).
Bus failure: it is important to distinguish between the two bus failure types:
KNX bus failure: during the absence of the KNX bus, DALIBOX
Broadcast 6CH/4CH will keep powering the DALI channels (even if the
external power LED indicator remains off), thus making the ballast remain
in the last dimming level. Note that timed actions will be stopped and will
not be resumed when the KNX bus voltage is recovered.
DALI bus failure: this may happen if communication errors take place
between the device and the ballasts, which may be due to short-circuits
in the channel or to a power supply failure. In such cases, the ballasts
will adopt a customisable dimming value named as dimming value
during DALI bus failure.
Functions: it is possible to configure a set of custom functions per channel:

DALIBOX Broadcast 6CH/4CH
http://www.zennio.com Technical Support: http://support.zennio.com
17
Error Objects: enables or disables the error notification objects for each
cannel. See section 2.2.5.
Status Objects: enabled or disables the status objects associated to each
cannel (On/Off and dimming value). See section 2.2.6.
Custom On/Off: allows enabling two custom On/Off controls, with different
dimming values and times. See section 2.2.7.
Timers: allows defining timed or delayed on/off switches. See section
2.2.8.
Scenes/Sequences: enables the configuration of up to ten custom
dimming sequences and scenes. See section 2.2.9.
Lock: enables a lock object, which allows locking and unlocking the output
channel, i.e., disabling the control. See section 2.2.10.
Custom Initialization: permits setting the initial state of the channels (or
after a KNX bus failure). See section 2.2.11.
Modes: allows enabling and configuring different operation modes:
Standby, Auto Off and Burn-in. See section 2.2.12.
ETS PARAMETERISATION
After enabling the desired channels, their corresponding tabs will be shown, as in
Figure 6.
The “Configuration” screen contains the following parameters:
Dimming Times: three dimming times may be parameterised, through the
following parameters:
Dimming Time [n]: sets dimming time n (1-3), between 1 and 255
(seconds or minutes).
Dimming Time Objects: enables three two-byte objects, named “[Ch]
Dimming Time n”, which allow changing the dimming times
parameterised (between 1 and 255 minutes or seconds). This parameter is
disabled by default.

DALIBOX Broadcast 6CH/4CH
http://www.zennio.com Technical Support: http://support.zennio.com
18
Diming Value During DALI Bus Failure: allows configuring the behaviour of
the ballasts on the event of a DALI bus failure: “No Change” (by default); “Off”
(which makes the ballast switch off) or “Defined Value” (the ballast will switch
to a customisable value, between 0% and 100%).
Figure 6. Channel “x”. Configuration
Functions: checkboxes for enable or disable several additional functionalities
for the channel (when active, more tabs and communication objects are
incorporated):
Error Objects: see section 2.2.5.
Status Objects: see section 2.2.6.
Custom On/Off: see section 2.2.7.
Timers: see section 2.2.8.
Scenes/Sequences: see section 2.2.9.

DALIBOX Broadcast 6CH/4CH
http://www.zennio.com Technical Support: http://support.zennio.com
19
Lock: see section 2.2.10.
Custom Initialisation: see section 2.2.11.
Modes: see section 2.2.12.
2.2.2 LIMITS
DALIBOX Broadcast 6CH / 4CH allows configuring two different limit types:
Luminosity Limits: they limit the luminosity ranges controlled by the ballast.
These limits are not perceptible by the user, i.e., the dimming range for the
KNX bus will still be 0-100%, and the dimming time between both ends (0%
to 100%) will be exactly the dimming time parameterised.
Ballast Physical Minimum: minimum luminosity value that the ballast is
actually able to produce, as specified by the manufacturer. This
determines the actual luminosity level that will correspond to a dimming
percentage of 1%.
Note: physical minimum must be configured as indicated in the ballast or
in the datasheet.
Economic Mode: maximum luminosity level the ballast will be allowed to
reach. It determines the actual luminosity level that will correspond to a
dimming percentage of 100%.
Dimming Limits: perceptible limits that allow restricting the percentage value
range of the control objects. Note that the actual meaning of the values of
these objects depends itself on the luminosity limits configured. The effect of
these limits over the dimming times is explained in section 2.2.1.
Minimum Dimming Value: lower dimming percentage allowed. The load
will remain at this level in case of receiving a lower value (only switch-off
orders will be handled).
Maximum Dimming Value: upper dimming percentage allowed. The load
will remain at this level in case of receiving a greater value.
The dimming curve takes into account all the above limits.

DALIBOX Broadcast 6CH/4CH
http://www.zennio.com Technical Support: http://support.zennio.com
20
ETS PARAMETERISATION
The tab ‘Limits’ has the following configurable options available:
Figure 7. Channel X. Limits
Luminosity Limits:
Ballast Physical Minimum: enables or disables the physical minimum of
the channel.
Minimum Luminosity Level: the available range is 1 to 100 tenths
(0.1% to 10%).
Economical Mode: enables or disables the economic mode.
Maximum Luminosity Level: the available range is 100 to 1000 tenths
(10% to 100%).
Dimming Limits:
Minimum Dimming Value: the available range is 0% to 100%.
Maximum Dimming Value: the available range is 0% to 100%.
2.2.3 SWITCH ON/OFF
DALIBOX Broadcast 6CH / 4CH lets configuring the general On/Off switch control so
that these actions are performed immediately or through a smooth regulation
(according to one of the three configurable dimming times; see section 2.2.1).
/