Page is loading ...

2-Drawer Lateral File Cabinet

Introduction
Please read the following instruction carefully and use the product properly.
Please keep this manual and hand it over when you transfer the product.
This summary may not include every detailed information of all variations and
considered steps. Please contact us when further information and help needed.
Before Starting
Recommend no. of people needed for assembly:2
Read each section carefully before starting. It is very important
that each step is performed in the correct order. If these steps
are not followed in sequence, assembly difficulties will occur.
Make sure all parts are included. Most board parts are labeled
or stamped on the raw edge.
Please assemble the product according to the steps on the diagram
strictly. Do not fully tighten the screws until all pieces are
situated in place.
For continued use,it's suggested you regularly check the tight
ness of bolts and connections to ensure safety.
Work in spacious area, preferably on a carpet, near the place
the unit will be located.
Have the following tools close at hand.
Warning
Keep all accessories and packaging of this product away from
babies, children and pets as the units contains small parts which
could be a choking hazard for small children. Children should be
under adult supervision at all times or serious injury could occur.
Do not put the product in a humid environment for a long time to
prevent mildew.
Keep the product away from sharp objects and corrosive chemical
to avoid damage.
Do not overload unit. If any shelf, top, or bottom of units
bows or bends, it is overloaded. The shelf, top, or bottom
could collapse and cause serious bodily injury and/or damage
to personal belongings.
Do not climb or step on the unit. The unit may become unstable
and either tip or collapse. Serious bodily injury and/or damage
to personal belongings may occur.
1

E
D
H
OP
Q
◆Start assembling furniture
2
A
F
G
B
E
C
N
L
M
K
D
I*2
2
J*2
a*2 b*4 c*26+2 d*1 *1

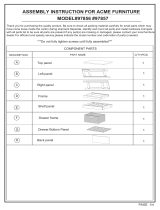
A
LEFT SIDE PANEL
693x450mm
QTY:1PC
RIGHT SIDE PANEL
693x450mm
QTY:1PC
FRONT UNDERSIDE FRAME
898x80mm
QTY:1PC
FRONT LOCK BAR
615x18mm
QTY:2PCS
LEFT BACK PANLE
693x426mm
QTY:1PC
RIGHT BACK PANLE
693x426mm
QTY:1PC
TOP PANEL
902x452mm
QTY:1PC
DRAWER FACE PANLE
851x300mm
QTY:2PCS
DRAWER BODY
825x433mm
QTY:2PCS
FRONT PANEL
823x248mm
QTY:2PCS
REAR PANEL
823x248mm
QTY:2PCS
Components of furniture
Please check the board number and the hole on the board
3
BCD
E F GH
ANTI-TIPPING LOCK BAR
WITH SMALL RIVETS
472x18mm
QTY:2PCS
K L M N

HORIZONTAL FILE
FOLDER BAR
837x57mm
QTY:2PCS
VERTICAL FILE
FOLDER BAR
397x47mm
QTY:4PCS
BOTTOM PANEL
898x356mm
QTY:1PC
Hardware accessories
LEFT SIDE RAIL
425x50mm
QTY:2PCS
RIGHT SIDE RAIL
425x50mm
QTY:2PCS
a b c
d
REAR INTERLOCKING BLOCK
QTY:2PCS
FLOOR PROTECTOR
QTY:4PCS
SCREW
M4*8
QTY:26+2 PCS
PHILLIPS SCREWDRIVER
QTY:1PC
LOCK KEY
QTY:1PC
4
OPQ
I J

◆We recommend you assemble on a soft surface to avoid damage to the
unit or surface.
5

A
a*2
B
E
STEP 1
Assemble Anti-tipping lock bar (E)
Please put Anti-tipping lock bar(E) in the interlocking slots on the side panels and fix
them with the Rear interlocking block(a).
Note: The Rear interlocking block needs to pass through the small rivets on the rear
interlocking rod and correspond to the screw holes on the left and right sides of the
interlocking groove.
c*4
AB
6

FG
c*2
F
G
STEP 2
Assembly Back Panel
Connect Left back panel(F)with Right back panel(G)using two Screws(c).
7

A
B
c*4
A
B
FG
STEP 3
Assemble Left and Right Side Panels
As shown, place the Left panel (A) and the Right panel (B) under the Back panel
and connect them with four Screws(c).
8

C
c*8
b*4
STEP 4
Assemble Front Bottom Frame (C)
The side panels are placed horizontally, the Front underside frame(C) is
inserted, and the four corners are fixed with four Floor protector(b) using
eight Screws(c).
9

Q
10
Q
Q
Note
STEP 5
Assembly Bottom Panel (Q )
Assemble the bottom panel. The Bottom panel is inclined into the cabinet, which
is fastened in the square holes of the left and right sides and the bottom bracket
of the back panel. (Note: The direction of the gap is in the back)

H
c*8
STEP 6
Assemble the Top Panel(H)
Note: Install the Top Panel (H) on the left, right side panel and the back panel as
shown in the picture, then connect them with eight Screws(c).
11

D
STEP 7
Connect the Front Lock Bar(D) with the top panel (H) and side panels (A&B).Then
insert the Front Lock Bar (D) into the left and right pin as shown.
12

IJ
STEP 8
Assemble Left Side Rail(I*2)and Right Side Rail(J*2)
8.1 Put Left Side Rail (I) on the left side panel(A).
8.2 Put Right Side Rail(J) on the right side panel(B).
13

STEP 9
Assemble three Drawers
9.1 Connect Drawer Panel(L)with Drawer Panel(K).
9.2 Put Front Panel (F) on the Drawer Panel (K).
9.3 Connect Rear Panel(N) with Drawer Panel(L).
Note: when installing the drawer body(L), do not fold the both sides of the drawer
body(L)too many times in order to breaking.
K
L
M
N
14

STEP 10
Separate the Inner Rails(I&J )
10.1 Pull out the rail core from I1.
10.2 Press the black part to take out the rail core (I2).
10.3 As shown in the picture, the left side rail(I )has been divided into two parts,
I1&I2.
Note: The steps for separating the right side rail(J )are the same as above.
15
I-(left)
J-(right)
I2
I1
J2
J1
I1J1

STEP 11
Install inner drawer rails (I1, J1 )
Put Inner Rail on the Drawer Frame(L ).
Attach the left inner drawer runners (I1 ) to the left side of the assembled drawer,
and attach the right inner drawer runners (J1 ) to the right side of the assembled
drawer.
Note: the front hook of the rail core is always facing up
16

STEP 12
Finish assembly
Silde the Drawer Frame into the Body Frame.
O
STEP 13
Put Hanging file folder bar(O )and (P ) on the Drawer panel(L ).
17

60KG/132LBS
60KG/132LBS
WEIGHT LIMITS:
18
Enjoy your furniture!
WARNING
This unit has been designed to support the maximum loads shown.
Exceeding these load limits could cause sagging, instability, product collapse,
and/or serious injury.

Please make sure that all panels are attached securely.
All nails must be driven into the parts straight and
tightened firmly. Failure to do so could cause instability,
product collapse, and/or serious injury.
To prevent tip over:
◆ Place heaviest items in the second drawer.
◆ Unless specifically designed to accommodate,do not
set TVs or other heavy objects on the top of this product.
◆ Never allow children to climb or hang on drawers.
◆Only one drawer can be open at one time.
◆Never open more than one drawer at a time.
19
WARNING
/