Summit FFBF279SSX Two-Door Refrigerator User manual
- Category
- Fridge-freezers
- Type
- User manual

TWO-DOOR REFRIGERATOR WITH
BOTTOM FREEZER
Model: FFBF279SSX
User Manual
BEFORE USE, PLEASE READ AND FOLLOW ALL SAFETY RULES AND OPERATING INSTRUCTIONS.
Felix Storch, Inc.
An ISO 9001:2015 registered company
770 Garrison Ave
Bronx, New York 10474
www.summitappliance.com
Write Model and Serial Numbers here:
Model No.:
Serial No.:
1

2
TABLE OF CONTENTS
Appliance Safety 3
Important Safeguards 3-5
Location of Parts 6
Installing your Appliance 7-12
Locating your Appliance 7
Leveling your Appliance 7
Reversing the Door Swing 8-11
Accessories 11-12
Operating your Appliance 13-15
Control Panel 13
Power 13
°C and °F 13
Refrigerator Compartment Temperature 13
Freezer Compartment Temperature 14
Super Cool 14
Super Freeze 14
Energy Saving 14
Open Door Alarm 15
Demo Mode 15
Cleaning and Care 16-17
Exterior Cleaning 16
Interior Cleaning 16
Door Seals Cleaning 16
Defrosting 16
Replacing the LED Light 17
Energy-saving Tips 17
Troubleshooting 18
Disposal 19
Limited Warranty 20

3
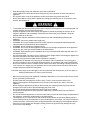
APPLIANCE SAFETY
Your safety and the safety of others are very important.
We have provided many important safety messages in this manual and on your appliance. Always read
and obey all safety messages.
This is the Safety Alert Symbol. The symbol alerts you to potential hazards that
can kill or injure you and others. All safety messages will follow the Safety Alert
Symbol and either the word DANGER or WARNING.
DANGER means that failure to heed this safety
statement may result in severe personal injury or
death.
WARNING means that failure to
heed this safety statement may
result in extensive product damage,
serious personal injury, or death.
All safety messages will alert you about the potential hazard, tell you how to reduce the chance of injury,
and let you know what can happen if the instructions are not followed.
IMPORTANT SAFEGUARDS
Before the appliance is used, it must be properly positioned and installed as
described in this manual, so read the manual carefully. To reduce the risk of fire,
electrical shock or injury when using the appliance, follow basic precautions, including
the following:
This appliance is intended to be used in a household or similar application such as:
o
Staff kitchen areas in shops, offices, and other working environments
o
Farmhouses and by clients in hotels, motels, and other residential type environments
o
Bed and breakfast type environments
o
Catering and similar non-retail applications
• Do not use mechanical devices or any other means to speed up the defrosting process unless they
are approved by the manufacturer.
• Do not try to repair the appliance yourself. It is dangerous to alter the specifications or modify this
product in any way. Any damage to the cord may cause a short circuit, fire, or electric shock.
• Pay attention not to damage the tubing of the refrigerant circuit.
• Keep ventilation openings in the appliance enclosure or in the built-in structure clear of obstruction
• Do not place too much food directly against the air outlet on the rear wall of both the refrigerator and
freezer compartment, as it affects sufficient air circulation.
• Do not place hot items near the plastic components of this appliance.
• Frozen food must not be refrozen once it has been thawed.
• Do not store bottled or canned drinks (especially carbonated drinks) in the freezer compartment.
Bottles and cans may explode.
• To avoid items falling and causing damage to the appliance, do not overload the door racks or put too
much food in the crisper drawers.
• This appliance is not intended for use by persons (including children) with reduced physical sensory
or mental capabilities, or a lack of experience and knowledge, unless they have been given
supervision or instruction concerning the use of the appliance by a person responsible for their safety.

4
• Keep all packaging away from children to avoid risk of suffocation.
• Protect children from being burned by touching the very hot compressor or at the rear bottom of
appliance.
• Do not place items on top of the appliance as this could cause injury should they fall off.
• Never allow children to play with the appliance by hanging or standing over or on the doors, racks,
shelves, and drawers etc.
• To avoid the risks that are always present when using an electric appliance, we recommend that you
carefully read the electrical instructions below:
• Unpack the appliance and check through the appliance. Should any damage be evident, do not
plugin the appliance and immediately contact the store from which you purchased it. Keep all
packing materials in this case.
• Do not store explosive substances such as aerosol cans with a flammable propellant in this
appliance.
• WARNING: Connect to potable water supply only.
• WARNING: Do not use mechanical devices or other means to accelerate the defrosting process,
other than those recommended by the manufacturer.
• WARNING: Do not damage the refrigerant circuit.
• WARNING: Do not use electrical appliances inside the food storage compartments of the appliance,
unless they are of the type recommended by the manufacturer.
• WARNING: When disposing of the appliance do so only at an authorized waste disposal center. Do
not expose to flame.
• We recommend that you wait for 4 hours, with the product upright, before connecting the appliance to
allow the refrigerant to flow back into the compressor.
• The main plug must be accessible when the appliance is installed.
• This appliance is fitted with a 3-prong plug in accordance with local standards. The 3-prong plug
should be suitable for use in all houses fitted with sockets, in accordance with current specifications.
• Do not use extension cords or multiple sockets, which could cause overloading of wiring circuits and
could cause a fire. Always plug your appliance into its own individual electrical socket, which has a
voltage rating that matches the rating plate.
CAUTION: If the supply cord is damaged, it must be replaced by the manufacturer, its service agent, or
similarly qualified person in order to avoid a hazard.
• Make sure that the plug is not squashed or damaged. Otherwise, it may cause a short circuit, electric
shock, overheating, and even fire.
• DO NOT insert the main plug if the socket is loose. There is a risk of electric shock or fire.
• Switch off the appliance and disconnect it from the main power before you clean or move the
appliance.
• Never unplug the appliance by pulling on the electrical cord. Always grip the plug firmly and pull
straight out from the socket to prevent damaging the power cord.
• Do not operate the appliance without the interior light cover installed.
• Any electrical components must be replaced or repaired by a qualified electrician or authorized
service engineer.
• Do not use electrical appliances, such as ice cream makers, inside the food storage compartments of
the appliance, unless they are approved by the manufacturer.
• This appliance is CFC- and HFC-free and contains small quantities of Isobutane (R600a) which is
environmentally friendly, but flammable. It does not damage the ozone layer, nor does it increase the
• greenhouse effect. Care must be taken during transportation and setting up of the appliance that no
parts of the cooling system are damaged. Leaking coolant can ignite and may damage the eyes.
• In the event of any damage:

5
CALIFORNIA CARB/SNAP DISCLOSURE
This product uses eco-friendly hydrocarbon refrigerant and fully complies with
California CARB regulations.
However, we are required by California law to provide the following disclosure statement in
every product sold in California:
"This equipment is prohibited from use in California with any refrigerants on the 'List of
Prohibited Substances' for that specific end-use, in accordance with California Code of
Regulations, title 17, section 95374. This disclosure statement has been reviewed and
approved by Felix Storch, Inc. and Felix Storch, Inc. attests, under penalty of perjury, that
these statements are true and accurate."
This product does not use any refrigerants on the 'List of Prohibited Substances'"
o
Avoid open flames and anything that creates a spark,
o
Disconnect from the electrical power line,
o
Air the room in which the appliance is located for several minutes, and
o
Contact the Service Department for advice.
• The more coolant there is in an appliance, the larger the room it should be installed in. In the event of
a leakage, if the appliance is in a small room, there is the danger of combustible gases building up.
For every ounce of coolant, at least 325 cubic feet of room space is required. The amount of coolant
• in the appliance is stated on the data plate on the back of the appliance. It is hazardous for anyone
other than an authorized Service Person to carry out servicing or repairs to this appliance.
• Take serious care when handling, moving, and using the appliance to avoid either damaging the
refrigerant tubing or increasing the risk of a leak.
• Replacing component parts and servicing shall be done by factory authorized service personnel so as
to minimize the risk of possible ignition due to incorrect parts or improper service.
Child entrapment and suffocation are not problems of the past. Junked or abandoned appliances are still
dangerous, even if they will “just sit for a few days.”
Before discarding your old appliance:
• Take off the doors
• Leave the shelves in place so that children may not easily climb inside.
- SAVE THESE INSTRUCTIONS -

6
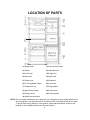
LOCATION OF PARTS
1) Display panel
2) Cabinet
3) Air flow duct
4) Glass shelf
11) Lower freezer drawer
12) Adjustable feet
13) Fridge door
14) Upper rack
5) Crisper cover 15) Small rack
6) Fruit & Vegetable Crisper
7) Twistable ice tray
8) Upper freezer drawer
9) Storage ice box
10) Middle freezer drawer
16) Lower rack
17) Fridge gasket
18) Freezer door
19) Freezer gasket
NOTE: Due to constant modification of our products, your refrigerator may be slightly different from
the unit depicted in this User Manual, but its functions and using methods remain the same.
To get the best energy efficiency of this product, please place all shelves, drawers, and
baskets on their original position as the illustration above.

7
INSTALLING YOUR APPLIANCE
• For proper installation, this refrigerator must be placed on a level surface of hard material that is
the same height as the rest of the flooring. The surface should be strong enough to support a
fully loaded refrigerator.
• The rollers are not casters and should only be used for forward or backward movement. Moving
the refrigerator sideways may damage your floor and the rollers.
Locating your Appliance
In order to improve the efficiency of the cooling system and save energy, it is necessary to maintain
good ventilation around the appliance for the dissipation of heat. For this reason, sufficient clear
space should be available around the refrigerator.
• Keep the appliance out of direct sunlight, rain, or frost. Make the appliance is placed away from
heat sources, such as stoves, fires, or heaters.
• Avoid placing the appliance in a dry place to avoid moisture.
NOTE: Before connecting the appliance to the power source, let it stand upright for four hours, to
allow the refrigerant to flow back into the compressor.
• This appliance is meant for a free-standing installation. Please allow these minimum clearances
to ensure the best operation and proper ventilation:
o
2” on each side (and even more space on the hinge side to allow the doors to open wider
than their width to make it easier to remove shelves and storage bins)
o
2” at the rear
o
4” at the top
CAUTION: Be sure that airflow at the bottom of the appliance is not blocked.
Place the appliance in a room with an ambient temperature between 55°F and 110°F. The
refrigerator may not work properly if it is left in temperatures above or below the indicated
temperature range.
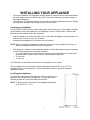
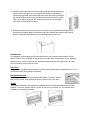
Leveling your Appliance
For sufficient leveling and air circulation in the lower rear area of your
appliance, the bottom feet may be adjusted. You may adjust them
manually by hand or by using a suitably sized wrench.
NOTE: To allow the doors to self-close, tilt the appliance backward
by10-15mm (1/3” – 2/3”).

8
Reversing the Door Swing
CAUTION: When reversing the door, the appliance must not be connected to the power source.
Ensure the appliance is not plugged in before reversing the door.
The side at which the door opens can be changed from the right side (as supplied) to the left side, if
desired.
NOTE: You may have to lay the refrigerator on its back in order to gain access to the base. Be
careful to rest it on soft foam packaging or a similar material to avoid damaging the back of
the refrigerator.
To reverse the direction of the door swing, follow these steps:
1. Stand the refrigerator upright. Open the door and remove all door
racks and close the door.
NOTE: Slightly squeeze the door rack from the two sides toward the
center and inside of the rack, then move it upward to remove
from the door.
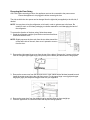
2. Remove the right upper hinge cover from the top of the cabinet. Remove the 3 screws, which are
used for fixing the right upper hinge part (see the picture below) and take down the hinge parts.
3. Remove the screw cover from the left-front corner of the cabinet with a flat-head screwdriver and
install the screw cover-right to the right front corner. Put the upper hinge cover (right) and upper
hinge part (right) into the plastic bag provided with your appliance.
4. Remove the upper door from the middle hinge by carefully lifting the door straight up.
5. Place the upper door on a smooth surface with its panel facing upwards.

9
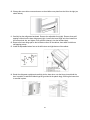
6. Loosen the self-tapping screw and remove the stop block and the door stopper. Install the
replacement door stopper (left) provided (in the plastic bag) and left stop block to the left side,
using the self-tapping screws. Keep the door stopper and right stop block for future use.
7. Use the Allen wrench (provided in the plastic bag) to loosen the screws used to fix the right
middle hinge and remove the right middle hinge. Then remove the lower door.
8. Place the lower door on a smooth surface with its panel facing upwards. Loosen the self-tapping
screw and remove the stop block and door stopper.
9. Install the replacement door stopper (provided in the plastic bag) and left stop block to the left
side with the self-tapping screws. Keep the door stopper and right stop block for future use.

10
10. Change the screw hole covers and screw on the middle cover plate from the left to the right (as
shown below).
11. Carefully lay the refrigerator backward. Remove the adjustable feet (right). Remove three self-
tapping screws from the lower hinge part (right). Loosen the lower hinge axis, then install it on
the reverse hole site, and tighten it into position (change it into the left-hand part).
12. Remove the lower hinge part to the left-bottom corner of the cabinet, then attach it with three
self-tapping screws.
13. Install the adjustable bottom feet on the left-bottom and right-bottom of the cabinet.
14. Stand the refrigerator upright and carefully slot the lower door onto the hinge pin and hold the
door in position. Install the middle hinge-left (provided in the plastic bag), ensuring the lower door
is secured in place.

11
15. Carefully slot the upper door onto the middle hinge pin and hold the door in
position. Move the upper door to an appropriate position, adjust the left
upper hinge (provided in the plastic bag) and upper door, then fit the hinge
pin into the hinge hole at the top and the door to secure the door in place.
Then, fix the upper hinge part with screws. Be careful to hold the upper
door with your hand when installing.
16. Install the temperature sensor part on the left hinge cover. Assemble the left hinge cover
(provided in the plastic bag) to match the hinge and install the door racks to their original
positions. Keep the right hinge cover with the appliance for future use.
Accessories
Your appliance comes equipped with several accessories, as outlined in the Location of Parts
section. This section is intended to suggest how to use the various components of your appliance.
Slightly squeeze the door rack from the two sides toward the center and inside of the rack, then
move it upward to remove from the door.
Door Rack
The door rack is suitable for the storage of canned liquids, bottled drinks, and packed food, etc. Do
not place too many heavy things in the racks.
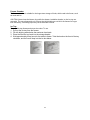
Refrigerator Shelves
The refrigerator shelves can be removed and cleaned. To remove, take all
items off of the shelf, push upward on the front, then lift free of the shelf
Crisper
The crisper is suitable for the storage of vegetables and fruit. These can also be removed and
cleaned. To remove, pull the crisper out, then tip the front up, and pull out. The crisper can be
installed by reversing this process.

12
Freezer Chamber
The freezer chamber is suitable for the longer-term storage of foods, which need to be frozen, such
as meat and ice.
CAUTION: Never close the freezer door while the drawer, installation bracket, or the ice tray are
extended. This may damage the unit. Ensure that drink bottles are not left in the freezer for longer
than necessary, as freezing liquid may cause the bottle to break.
Ice Tray
The twistable tray freezes and stores ice cubes. To use:
1. Pull out the ice tray from the freezer.
2. Fill with drinking water below the maximum level mark.
3. Place the filled ice tray back into the storage bracket.
4. Wait approximately three hours for the water to freeze. Twist the knob on the front of the tray
clockwise, and the ice will drop into the ice box below.

13
OPERATING YOUR APPLIANCE
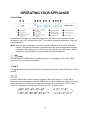
Control Panel
We recommend that when you start your refrigerator for the first time, the temperature for the
refrigerator is set to 39°F and the freezer to 0°F. If you want to change the temperature, follow the
instructions below.
NOTE: When you set a temperature, you set an average temperature for the whole refrigerator
cabinet. Temperatures inside each compartment may vary from the temperature displayed
on the panel, depending on how much food you store and where you place them. Ambient
temperature may also affect the actual temperature inside the appliance.
Power
Press and hold the POWER button for three seconds to turn the appliance ON or OFF. When
powered on, the icon will be illuminated.
°C and °F
To toggle between Celsius and Fahrenheit on the display, press and hold the TEMP button for three
seconds.
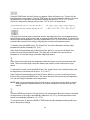
Press the ZONE button until the Fridge icon appears. When the Fridge is on, “Fridge” will be
illuminated on the control panel. Press the TEMP button to select a temperature setting. If you have
set the temperature in Fahrenheit, the temperature settings will cycle from 46°F to 36°F. If set in
Celsius, the temperature settings will cycle from 8°C to 2°C, as shown below:

14
Press the ZONE button until the Freezer icon appears. When the freezer is on, “Freezer” will be
illuminated on the control panel. Press the TEMP button to select a temperature setting. If you have
the temperature in Fahrenheit, the temperature settings will cycle from 7°F to -11°F. IT set in
Celsius, the temperature settings will cycle from -14°C to -24°C, as shown below.
The Super Cool function helps to keep food stored in the refrigerator at the set temperature during
periods of high usage, large grocery loads, or temporarily warm room temperatures. The Super Cool
function lowers the temperature in the fridge compartment to 36°F (2°C) to cool food faster. It is best
to activate this function before loading a large amount of warm/room temperature items.
To activate, press the MODE button. The “Super Cool” icon will be illuminated, and the fridge
temperature indicator will display 36°F (2°C).
Super Cool will automatically turn off after three hours. While on, you can turn the Super Cool
function off by pressing the MODE button. The fridge will revert back to the previously set
temperature. You can also simply set another fridge temperature.
Super Freeze will quickly lower the temperature within the freezer so food will freeze faster than
usual. This function also helps to keep the vitamins and nutrition of fresh food fresh for longer
period.
To activate this function, press the MODE button. The “Super Freeze” icon will be illuminated, and
the temperature of the freezer will be set to -11°F (-24°C).
Super Freeze will automatically turn off after 52 hours. While on, you can turn the Super Freeze
function off by pressing the MODE button. The freezer will revert to the previously set temperature.
You can also simply set another freezer temperature.
NOTE: When you are selecting the Super Freeze function, ensure there are no bottled or canned
drinks (especially carbonated drinks) in the freezer compartment. Bottles and cans may
explode.
Press the MODE button until the “Energy Saving” icon is illuminated. When this function is activated,
the temperature of the fridge is automatically switched to 43°F (6°C), and the temperature of the
freezer is automatically switched to 1°F (-17°C).
To turn this function off, press the MODE or TEMP button and the temperature settings will revert
back to the previous settings.

15
Door Open Alarm
If the fridge door is opened for longer than two minutes, the control panel will display “dr” and an
alarm will sound 3x every minute for eight minutes. Close the door completely to turn off the alarm.
Demo Mode
•
Demo Mode is for store displaying only.
•
In this mode, the light and the display operations are normal, but the refrigerator is not cooling.
When the refrigerator is in the Demo Mode, if consumers open the door or no keys operation for
30 seconds with the door opened, the temperature control panel will show as follow from A to F.
•
To exit this mode, press and hold the POWER and MODE buttons at the same time for three
seconds. The control panel will illuminate for one second, and you can resume regular
operation.
NOTE: The Demo Mode stays on even if the appliance powers off. If you enter the mode
accidentally, exit as soon as possible since the appliance will not cool in this mode.

16
CLEANING AND CARE
CAUTION: The appliance must not be connected to the power source during cleaning as there is a
danger of electrical shock. Before cleaning, turn the appliance off and unplug the unit.
It is recommended the appliance (interior and exterior) should be cleaned regularly at least every
two months.
Exterior Cleaning
•
Wipe the control panel with a clean, soft cloth.
•
Spray mild detergent onto the cleaning cloth instead of spraying directly onto the surface of the
appliance. This helps to ensure even distribution of moisture to the surface.
•
Clean the doors, handles, and cabinet surfaces with a mild detergent, and then wipe dry with a
soft cloth.
CAUTION: Do not use sharp objects to clean the appliance, as they are likely to scratch the surface.
Do not use thinner, car detergent, Clorox, ethereal oil, abrasive cleansers, or an organic
solvent, such as Benzene, for cleaning. These products may damage the surface of the
appliance and may cause a fire.
Interior Cleaning
•
Clean the interior of the appliance regularly. It will be easier to clean with fewer items stored
inside.
•
Wipe the inside of the fridge freezer with a weak solution of baking soda and water, and then
rinse with warm water using a wrung-out sponge or cloth. Wipe completely dry before replacing
the shelves and baskets. Thoroughly dry all surfaces and removeable parts before putting them
back into place.
Door Seals Cleaning
Keep the door seals clean. Sticky food and drinks can cause the door seals to stick to the cabinet
and tear when the door is opened. Wash the seal with a mild detergent and warm water. Rinse and
dry it thoroughly after cleaning.
CAUTION: Only after the door seals are completely dry should the appliance be turned back on and
plugged back into the power source.
Defrosting
Although this appliance defrosts automatically, a layer of frost may build up on the freezer
compartment’s interior walls if the freezer door is opened too frequently or kept open too long. If the
frost is too thick, choose a time when the freezer is nearly empty and proceed as follows:
Remove any existing food or storage baskets, unplug the appliance from the power source, and
leave the doors open. Ventilate the room thoroughly to accelerate this process.
When the defrosting is completed, clean your freezer as described above.
CAUTION: Do not use sharp objects to remove frost from the freezer compartment. Only after the
interior is completely dry should the appliance be turned back on and plugged back into
the power source.

17
Replacing the LED Light
The LED light should only be replaced by a competent person. If the LED light is damaged, contact
the customer service helpline for assistance.
To replace the LED light, follow these steps:
1. Unplug the appliance.
2. Remove the light cover by pushing up and out.
3. Hold the LED cover with one hand and pull it with the other hand while pressing the connector
latch.
4. Replace the LED light and snap it correctly in place.
Energy-saving Tips
We recommend that you follow the tips below to save energy.
• Try to avoid keeping the door open for long periods in order to conserve energy. Ensure the
appliance is away from any sources of heat (Direct sunlight, electric oven, or cooker etc.)
• Do not set the temperature colder than necessary.
• Do not store warm food or evaporating liquid in the appliance.
• Place the appliance in a well ventilated, humidity free, room. Please refer to Installing your new
appliance chapter.
• If the diagram shows the correct combination for the drawers, crisper and shelves, do not adjust
the combination as this is designed to be the most energy efficient configuration.

18
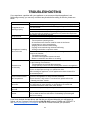
TROUBLESHOOTING
If you experience a problem with your appliance or are concerned that the appliance is not
functioning correctly, you can carry out some easy checks before calling for service, please see
below.
Problem
Possible Cause and Solution
The appliance is not
working properly.
Check whether the power cord is plugged into the power outlet properly.
Check whether the “Power” function is on by pressing the POWER button
for one second.
Check the fuse or circuit of your power supply, and replace it, if necessary.
It is normal that the freezer is not operating during the defrost cycle, or for
a short time after the appliance is switched on to protect the compressor.
Odors emitting from the
compartments.
The interior may need to be cleaned.
Some food, containers, or wrapping may cause odors.
The appliance is making
too much noise.
The sounds below are normal:
The compressor operating noises.
Air movement noise from the small fan motor in the freezer
compartment or other compartments.
Gurgling sounds similar to water boiling.
Popping noises made during automatic defrosting.
Clicking noise before compressor starts.
Other unusual noises may be caused by the following reasons and may
need to be checked:
The cabinet is not level.
The back of the appliance touches the wall.
Bottles or containers have fallen or are rolling.
The motor runs
continuously.
It is normal to frequently hear the sound of the motor, and it will run more
in the following circumstances:
The temperature is set colder than necessary
A large quantity of warm food has recently been stored in the appliance.
The ambient temperature where the appliance is located is too high. The
doors are kept open too long or is opened too often.
After installing the appliance or if the appliance has been turned off for
an extended period.
A layer of frost occurs in
the compartment.
Check that the air outlets are not blocked by food and ensure food is
placed in the appliance to allow sufficient ventilation.
Ensure the door is fully closed. To remove frost, please refer to the
“Cleaning and Care” section.
The temperature inside is
too warm.
You may have left the doors open too long or too frequently, the doors
are kept open by some obstacle, or the appliance is located with
insufficient clearance at the sides, back, and top
The temperature inside is
too cold.
Increase the temperature by following the “Control Panel” section
The doors cannot be easily
closed.
Check whether the top of the refrigerator is tilted back by 10-15mm (1/3-
2/3”) to allow the doors to self-close or if something is preventing the
doors from closing.
If you have checked the table above and find that you still need help with your refrigerator or
freezer, call our Customer Service facility at 800-932-4267 between 9:00AM and 5:00PM ET or
visit: www.summitappliance.com/support. We will do our best to answer your questions.

19
DISPOSAL
CAUTION: It is prohibited to dispose of this appliance as household waste.
Packaging materials
Packaging materials with the recycle symbol are recyclable. Dispose of the packaging into a suitable
waste collection container to recycle it.
Before disposal of the appliance
• Pull out the mains plug from the mains socket.
• Cut off the power cord and discard with the mains plug.
Correct Disposal of this Product
This symbol on the product or its packaging indicates that this product may not be
treated as household waste. Instead, it should be taken to the appropriate waste
collection point for the recycling of electrical and electronic equipment. By ensuring
this product is disposed of correctly, you will help prevent potential negative
consequences for the environment and human health, which could otherwise be
caused by the inappropriate waste handling of this product. For more detailed
information about the recycling of this product, please contact your local council,
your local household waste disposal service, or the shop where you purchased the
product.

20
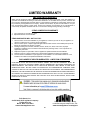
LIMITED WARRANTY
ONE-YEAR LIMITED WARRANTY
Within the 48 contiguous United States, for one year from the date of purchase, when this appliance is
operated and maintained according to instructions attached to or furnished with the product, warrantor will
pay for factory-specified parts and repair labor to correct defects in materials or workmanship. Service must
be provided by a designated service company. Outside the 48 states, all parts are warranted for one year
from manufacturing defects. Plastic parts, shelves and cabinets are warranted to be manufactured to
commercially acceptable standards and are not covered from damage during handling or breakage.
5-YEAR COMPRESSOR WARRANTY
1. The compressor is covered for 5 years.
2. Replacement does not include labor.
ITEMS WARRANTOR WILL NOT PAY FOR:
1. Service calls to correct the installation of your appliance, to instruct you how to use your appliance, to
replace or repair fuses or to correct wiring or plumbing.
2. Service calls to repair or replace appliance light bulbs or broken shelves. Consumable parts (such as
filters) are excluded from warranty coverage.
3. Damage resulting from accident, alteration, misuse, abuse, fire, flood, acts of God, improper
installation, installation not in accordance with electrical or plumbing codes, or use of products not
approved by warrantor.
4. Replacement parts or repair labor costs for appliances operated outside the United States.
5. Repairs to parts or systems resulting from unauthorized modifications made to the appliance.
6. The removal and reinstallation of your appliance if it is installed in an inaccessible location or is not
installed in accordance with published installation instructions.
DISCLAIMER OF IMPLIED WARRANTIES – LIMITATION OF REMEDIES
CUSTOMER'S SOLE AND EXCLUSIVE REMEDY UNDER THIS LIMITED WARRANTY SHALL BE
PRODUCT REPAIR AS PROVIDED HEREIN. IMPLIED WARRANTIES, INCLUDING WARRANTIES OF
MERCHANTABILITY OR FITNESS FOR A PARTICULAR PURPOSE, ARE LIMITED TO ONE YEAR.
WARRANTOR SHALL NOT BE LIABLE FOR INCIDENTAL OR CONSEQUENTIAL DAMAGES. SOME
STATES DO NOT ALLOW THE EXCLUSION OR LIMITATION OF INCIDENTAL OR CONSEQUENTIAL
DAMAGES, OR LIMITATIONS ON THE DURATION OF IMPLIED WARRANTIES OF MERCHANTABILITY
OR FITNESS, SO THESE EXCLUSIONS OR LIMITATIONS MAY NOT APPLY TO YOU. THIS WARRANTY
GIVES YOU SPECIFIC LEGAL RIGHTS AND YOU MAY ALSO HAVE OTHER RIGHTS, WHICH VARY
FROM STATE TO STATE.
Felix Storch, Inc.
An ISO 9001:2015 registered company
770 Garrison Ave
Bronx, New York 10474
www.summitappliance.com
For parts and accessory ordering,
troubleshooting and helpful hints, visit:
www.summitappliance.com/support
-
 1
1
-
 2
2
-
 3
3
-
 4
4
-
 5
5
-
 6
6
-
 7
7
-
 8
8
-
 9
9
-
 10
10
-
 11
11
-
 12
12
-
 13
13
-
 14
14
-
 15
15
-
 16
16
-
 17
17
-
 18
18
-
 19
19
-
 20
20


Summit FFBF279SSX Two-Door Refrigerator User manual
- Category
- Fridge-freezers
- Type
- User manual
Ask a question and I''ll find the answer in the document
Finding information in a document is now easier with AI
Related papers
Other documents
-
COOKOLOGY CBUIB601 User manual
-
Fridgemaster MBUR60121MF Owner's manual
-
Hisense RUR156D4AW1 Refrigerator User manual
-
-
Hisense RB11N6CSE User manual
-
-
-
 TEKNIX BITH50FF User manual
-
Fridgemaster MC55264A Fridge Freezer Owner's manual
-
Gorenje HZSF67982 Operating instructions
