

2
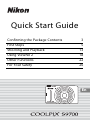
Thank you for purchasing a Nikon COOLPIX S9700 digital camera. This guide introduces the procedures
necessary for first time use of this camera.
To ensure proper use, please read and thoroughly understand the information in “For Your Safety”
(A26) before using the camera.
Make sure to read “Notes About Location Data Functions (GPS/GLONASS, Electronic
Compass)” (A34) and “Wi-Fi (Wireless LAN Network)” (A35) before using this camera.
C Downloading the "Reference Manual"
Refer to the Reference Manual (PDF format) for more detailed information.
The Reference Manual can be downloaded from the Nikon website.
http://nikonimglib.com/manual/
The Reference Manual can be viewed using Adobe Reader, available for free download from the Adobe
website.
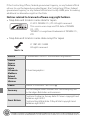
Nikon User Support
Visit the site below to register your camera and keep up-to-date with the latest product information.
You will find answers to frequently asked questions (FAQs) and can contact us for technical assistance.
http://www.europe-nikon.com/support
An Important Notice about Accessories
Nikon COOLPIX digital cameras are designed to meet the highest standards and are equipped
with complex electronic circuitry. Only Nikon accessories, including chargers, batteries,
charging AC adapters, AC adapters, and cables are certified by Nikon specifically for use with
your Nikon COOLPIX digital camera. These accessories have been engineered and tested to
operate within the requirements of the electronic circuitry of our cameras.

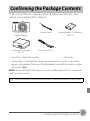
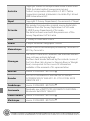
Confirming the Package Contents
3
In the event that any items are missing, please contact the store
where you purchased the camera.
Confirming the Package Contents
COOLPIX S9700
Digital Camera
Camera Strap Rechargeable Li-ion Battery
EN-EL12
Charging AC Adapter
EH-71P*
USB Cable UC-E21
• Quick Start Guide (this guide) • Warranty
*
A plug adapter is included if the camera was purchased in a country or region that
requires a plug adapter. The shape of the plug adapter varies with the country or region
of purchase (
A
8).
NOTE: A Secure Digital (SD) memory card, hereafter referred to as a “memory
card,” is not provided.
A:
This icon indicates that more information is available elsewhere in this guide.

Confirming the Package Contents
4
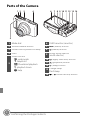
Parts of the Camera
1 Mode dial
2 Shutter-release button
3 Power switch/power-on lamp
4 Flash
5
Zoom control
f: wide-angle
g: telephoto
h: thumbnail playback
i: playback zoom
j: help
6 OLED monitor (monitor)
7 d (menu) button
8 l (delete) button
9
Rotary multi selector
(multi selector)
10 k (apply selection) button
11 c (playback) button
12 U (map) button
13
Charge lamp
Flash lamp
14 b (e movie-record) button
12 3 4
5
67 910 148 11 12 13

First Steps
5
Step 1 Attach the Camera Strap
Step 2 Insert the Battery and Memory Card
If a memory card is inserted, images will be saved on the memory
card when you take images. If a memory card is not inserted, images
will be saved in the camera’s internal memory.
2.1 Open the battery-chamber/memory
card slot cover.
First Steps

First Steps
6
2.2 Insert the battery.
• Push the orange battery latch in the
direction indicated by the arrow (1),
and fully insert the battery (2).
• The battery locks into place when
inserted correctly.
Be Careful to Insert the Battery in Correct
Direction
Inserting the battery upside down or
backwards could damage the camera.
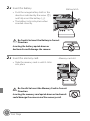
2.3 Insert the memory card.
• Slide the memory card in until it clicks
into place.
Be Careful to Insert the Memory Card in Correct
Direction
Inserting the memory card upside down or backwards
could damage the camera and the memory card.
Battery latch
Memory card slot

First Steps
7
2.4 Close the battery-chamber/memory
card slot cover.
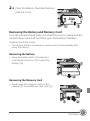
Removing the Battery and Memory Card
Turn the camera off and make sure that the power-on lamp and the
monitor have turned off, and then open the battery-chamber/
memory card slot cover.
• The camera, battery, and memory card may be hot immediately after
using the camera.
Removing the Battery
• Move the battery latch in the direction
indicated by the arrow (1) to eject the
battery (2).
Removing the Memory Card
• Gently push the memory card into the
camera (1) to partially eject the card (2).

First Steps
8
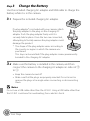
Step 3 Charge the Battery
Use the included charging AC adapter and USB cable to charge the
battery while it is in the camera.
3.1 Prepare the included charging AC adapter.
If a plug adapter* is included with your camera, attach
the plug adapter to the plug on the charging AC
adapter. Push the plug adapter firmly until it is
securely held in place. Once the two are connected,
attempting to forcibly remove the plug adapter could
damage the product.
* The shape of the plug adapter varies according to
the country or region in which the camera was
purchased.
This step can be omitted if the plug adapter comes permanently
bonded to the charging AC adapter.
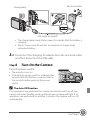
3.2 Make sure the battery is installed in the camera, and then
connect the camera to the charging AC adapter in order of 1
to 3.
• Keep the camera turned off.
• Make sure that the plugs are properly oriented. Do not insert or
remove the plugs at an angle when connecting or disconnecting
them.
B Notes
Do not use a USB cable other than the UC-E21. Using a USB cable other than
the UC-E21 could result in overheating, fire or electric shock.

First Steps
9
• The charge lamp slowly flashes green to indicate that the battery is
charging.
• About 2 hours and 20 minutes are required to charge a fully
exhausted battery.
3.3 Disconnect the charging AC adapter from the electrical outlet
and then disconnect the USB cable.
Step 4 Turn On the Camera
Press the power switch.
• The monitor turns on.
• Note that the power switch is enabled a few
seconds after the battery is inserted. Wait a
few seconds before pressing the power
switch.
C The Auto Off Function
If no operations are performed for a while, the monitor will turn off, the
camera will enter standby mode, and the power-on lamp will flash. If no
operations are performed for another 3 minutes, the camera will turn off
automatically.
Charge lamp
Electrical outlet
USB cable (included)

First Steps
10
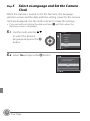
Step 5 Select a Language and Set the Camera
Clock
When the camera is turned on for the first time, the language-
selection screen and the date and time setting screen for the camera
clock are displayed. Use the multi selector to make the settings.
• If you exit without setting the date and time, O will flash when the
shooting screen is displayed.
5.1 Use the multi selector HI
to select the desired
language and press the k
button.
5.2 Select Yes and press the k button.
Dansk
Български
Čeština
Deutsch
English
Español
Cancel
Language
Choose time zone and
set date and time?
No
Yes
Cancel

First Steps
11
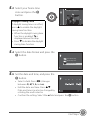
5.3 Select your home time
zone and press the k
button.
5.4 Select the date format and press the
k button.
5.5 Set the date and time, and press the
k button.
• Select a field: Press JK (changes
between D, M, Y, h, and m).
• Edit the date and time: Press HI.
Date and time can also be changed by
rotating the multi selector.
• Confirm the setting: Select the m field and press the k button.
Back
London, Casablanca
Daylight Saving Time
If daylight saving time is in effect,
press H to enable the daylight
saving time function.
• When the daylight saving time
function is enabled, W is
displayed above the map.
• Press I to disable the daylight
saving time function.
Day/Month/Year
Month/Day/Year
Year/Month/Day
Date format
Edit
Date and time
2014
0515 15 30
mhDM Y

First Steps
12
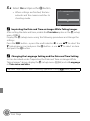
5.6 Select Yes and press the k button.
• When settings are finished, the lens
extends and the camera switches to
shooting mode.
C Imprinting the Date and Time on Images While Taking Images
After setting the date and time, enable the Print date option in the z (setup)
menu (A24).
Display the z (setup) menu using the following procedure and change the
settings.
Press the d button ➝ press the multi selector J ➝ use HI to select the
z (setup) menu icon and press the k button ➝ use HI to select an item
and press the k button.
C Changing the Language Setting and the Date and Time Setting
Just as described under “Imprinting the Date and Time on Images While
Taking Images” above, display the z (setup) menu (A24) and set Language
or Time zone and date.
15/05/2014 15:30
No
Yes
OK?
The next step explains basic shooting operations using A (auto) mode.

Shooting and Playback
13
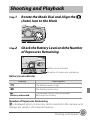
Step 1 Rotate the Mode Dial and Align the A
(Auto) Icon to the Mark
Step 2 Check the Battery Level and the Number
of Exposures Remaining
Battery level indicator
Number of Exposures Remaining
C is displayed when no memory card is inserted in the camera, and
images are saved in the internal memory.
Shooting and Playback
Display Description
b The battery level is high.
B The battery level is low.
N
Battery exhausted.
The camera cannot capture images.
Recharge the battery.
Battery level indicator
Number of exposures remaining
880
880
25
m
0s
25
m
0s
1/ 25 0
1/250
F3.7
F3.7

Shooting and Playback
14
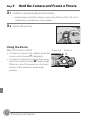
Step 3 Hold the Camera and Frame a Picture
3.1 Hold the camera steady in both hands.
• Keep fingers and other objects away from the lens, flash, AF-assist
illuminator, microphones, and speaker.
3.2 Frame the picture.
Using the Zoom
Move the zoom control.
• To zoom in closer to the subject, move the
zoom control toward g (telephoto).
• To zoom out and view a larger area, move
the zoom control toward f (wide-angle).
When you turn the camera on, the zoom
moves to the maximum wide-angle
position.
25
m
0s
25
m
0s
880
880
1/ 25 0
1/250
F3.7
F3.7
Zoom out Zoom in

Shooting and Playback
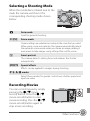
16
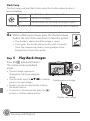
Flash lamp
The flash lamp indicates flash status when the shutter-release button is
pressed halfway.
* If the battery level is low, the monitor turns off while the flash is charging.
4.2 Without lifting your finger, press the shutter-release
button the rest of the way down to take the picture.
• The shutter is released and the image is saved.
• If you press the shutter-release button with too much
force, the camera may shake, causing images to be
blurred. Press the button gently.
Step 5 Play Back Images
Press the c (playback) button.
The camera enters playback
mode.
• The last image captured is
displayed in full-frame playback
mode.
• Use the multi selector HIJK to display
previous or next images.
• Images can also be selected by rotating
the multi selector.
• To return to shooting mode, press the c
button or shutter-release button.
On The flash fires when an image is taken.
Flashing The flash is charging.*
Off The flash does not fire when an image is taken.
15/ 05/2 014 15: 30
000 4.
JPG
0004.
JPG
4
/
4
4
/
4
15/05/2014 15:30
Display previous image
Display next image

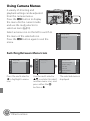
Shooting and Playback
17
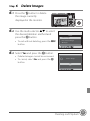
Step 6 Delete Images
6.1 Press the l button to delete
the image currently
displayed in the monitor.
6.2 Use the multi selector HI to select
the desired deletion method and
press the k button.
• To exit without deleting, press the d
button.
6.3 Select Yes and press the k button.
• Deleted images cannot be recovered.
• To cancel, select No and press the k
button.
15/ 05/2 014 15: 30
000 4.
JPG
0004.
JPG
4
/
4
4
/
4
15/05/2014 15:30
All images
Erase selected images
Current image
Delete
No
Yes
Erase 1 image?

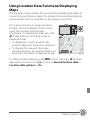
Using ViewNX 2
18
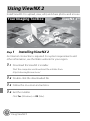
Install ViewNX 2 to upload, view, edit, and share photos and movies.
Step
1 Installing ViewNX 2
An Internet connection is required. For system requirements and
other information, see the Nikon website for your region.
1.1 Download the ViewNX 2 installer.
Start the computer and download the installer from:
http://nikonimglib.com/nvnx/
1.2 Double-click the downloaded file.
1.3 Follow the on-screen instructions.
1.4 Exit the installer.
Click Yes (Windows) or OK (Mac).
Using ViewNX 2
ViewNX 2™
Your Imaging Toolbox

Using ViewNX 2
19
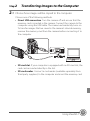
Step 2 Transferring Images to the Computer
2.1 Choose how images will be copied to the computer.
Choose one of the following methods:
• Direct USB connection: Turn the camera off and ensure that the
memory card is inserted in the camera. Connect the camera to the
computer using the USB cable. The camera automatically turns on.
To transfer images that are saved in the camera’s internal memory,
remove the memory card from the camera before connecting it to
the computer.
• SD card slot: If your computer is equipped with an SD card slot, the
card can be inserted directly in the slot.
• SD card reader: Connect a card reader (available separately from
third-party suppliers) to the computer and insert the memory card.

Using ViewNX 2
20
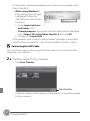
If a message is displayed prompting you to choose a program, select
Nikon Transfer 2.
• When using Windows 7
If the dialog shown at right
is displayed, follow the
steps below to select Nikon
Transfer 2.
1Under Import pictures
and videos, click
Change program. A program selection dialog will be displayed;
select Import File using Nikon Transfer 2 and click OK.
2Double-click Import File.
If the memory card contains a large number of images, it may take a
while for Nikon Transfer 2 to start. Wait until Nikon Transfer 2 starts.
B Connecting the USB Cable
The connection may not be recognized if the camera is connected to the
computer via a USB hub.
2.2 Transfer images to the computer.
• Click Start Transfer.
• At default settings, all the images on the memory card will be copied
to the computer.
Start Transfer

Using ViewNX 2
21
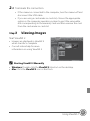
2.3 Terminate the connection.
• If the camera is connected to the computer, turn the camera off and
disconnect the USB cable.
• If you are using a card reader or card slot, choose the appropriate
option in the computer operating system to eject the removable
disk corresponding to the memory card and then remove the card
from the card reader or card slot.
Step 3 Viewing Images
Start ViewNX 2.
• Images are displayed in ViewNX 2
when transfer is complete.
• Consult online help for more
information on using ViewNX 2.
C Starting ViewNX 2 Manually
• Windows: Double-click the ViewNX 2 shortcut on the desktop.
• Mac: Click the ViewNX 2 icon in the Dock.
Page is loading ...
Page is loading ...
Page is loading ...
Page is loading ...
Page is loading ...
Page is loading ...
Page is loading ...
Page is loading ...
Page is loading ...
Page is loading ...
Page is loading ...
Page is loading ...
Page is loading ...
Page is loading ...
Page is loading ...
Page is loading ...
Page is loading ...
Page is loading ...
Page is loading ...
Page is loading ...
Page is loading ...
Page is loading ...
Page is loading ...
Page is loading ...
Page is loading ...
Page is loading ...
Page is loading ...
-
 1
1
-
 2
2
-
 3
3
-
 4
4
-
 5
5
-
 6
6
-
 7
7
-
 8
8
-
 9
9
-
 10
10
-
 11
11
-
 12
12
-
 13
13
-
 14
14
-
 15
15
-
 16
16
-
 17
17
-
 18
18
-
 19
19
-
 20
20
-
 21
21
-
 22
22
-
 23
23
-
 24
24
-
 25
25
-
 26
26
-
 27
27
-
 28
28
-
 29
29
-
 30
30
-
 31
31
-
 32
32
-
 33
33
-
 34
34
-
 35
35
-
 36
36
-
 37
37
-
 38
38
-
 39
39
-
 40
40
-
 41
41
-
 42
42
-
 43
43
-
 44
44
-
 45
45
-
 46
46
-
 47
47


Ask a question and I''ll find the answer in the document
Finding information in a document is now easier with AI
in other languages
Related papers
-
Nikon D300 User manual
-
Nikon COOLPIX P900 Quick start guide
-
Nikon KeyMission 80 Reference guide
-
Nikon Nikon 1 V2 Reference guide
-
Nikon D750 User manual
-
Nikon COOLPIX P340 User manual
-
Nikon COOLPIX S4300 Reference guide
-
Nikon D3000 Reference guide
-
Nikon COOLPIX S3600 User manual
-
Nikon COOLPIX S2900 Quick start guide
Other documents
-
Canon CanoScan LiDE 300 User manual
-
Canon imageCLASS MF236n User manual
-
Canon XF105 User manual
-
Canon LV-WX300ST Owner's manual
-
Canon PIXMA MG5550 User manual
-
Magic Home MH-DTT18B-DTL1G User guide
-
Canon PIXMA MX455 Owner's manual
-
Adobe 12020596 Supplement Manual
-
Canon Wireless File Transmitter WFT-E2II B User manual
-
Canon PowerShot G5X Owner's manual