Sony TA-DA9000ES Installation guide

Type
Installation guide

Sony TA-DA9000ES is a powerful multi-channel integrated amplifier that offers exceptional audio quality and immersive surround sound experience. It features easy setup with a user-friendly interface, making it simple to connect and configure various audio components like DVD players, PlayStations, and speakers. With its advanced digital processing capabilities, the TA-DA9000ES delivers crystal-clear sound and supports a wide range of audio formats, including Dolby Digital and DTS, ensuring a thrilling cinematic experience.

Sony TA-DA9000ES is a powerful multi-channel integrated amplifier that offers exceptional audio quality and immersive surround sound experience. It features easy setup with a user-friendly interface, making it simple to connect and configure various audio components like DVD players, PlayStations, and speakers. With its advanced digital processing capabilities, the TA-DA9000ES delivers crystal-clear sound and supports a wide range of audio formats, including Dolby Digital and DTS, ensuring a thrilling cinematic experience.

ININ
DVD
IN
DVD
A
B
B
A
R
L
SURROUND
FRONT
A
B
B
A
R
L
CENTER
RL
SURROUND BACK
DIGITAL
AUDIO VIDEO
CONTROL A1II
i.LINK S200
MONITOR OUT
VIDEO 1
IN
P
B
/C
B
/B-Y
P
R
/C
R
/R-Y
P
R
/C
R
/R-Y
PB/CB/B-Y
DVD
IN
P
B
/C
B
/B-Y
P
B
/C
B
/B-Y
P
R
/C
R
/R-Y
P
R
/C
R
/R-Y
MONI
TOR
OUT
TV/
SAT
IN
S2 VIDEOVIDEO
OUT
OUT
ININ
OUT
IN
OUT
IN
OUT
IN
OUT
IN
IN
IN
IN
IN
IN
IN
IN
VIDEO 1
VIDEO 2
VIDEO 3
VIDEO
LD
DVD
TUNER
IN
DVD
IN
LD
IN
IN
VIDEO 3
OUT
IN
VIDEO 2
OUT
OUT
IN
VIDEO 1
PHONO
IN
IN
AUDIO
VIDEO
S2 VIDEO
OUT 1 OUT 1
OUT 2
OUT 2
R
L
AUDIO
R
L
R
L
OUT
IN
OUT
IN
TAPE
MD/DAT
CD/
SACD
IN
FRONT
SURR
OUND
SURR
BACK
CENTER
FRONT
SURR
OUND
SURR
BACK
MULTI CHANNEL IN
CENTER
1
2
AUDIO IN
RS232C
COAXIAL
OPTICAL
COMPONENT
VIDEO
4
SUB
WOOFER
VIDEO
4
Y
Y
Y
Y
SUB
WOOFER
FRONT
SURROUND
SURR BACK
CENTER
SUB WOOFER
PRE OUT
SIGNAL
GND
VIDEO 1
OUT
DVD
IN
CD/SACD
IN
MD/DAT
IN
MD/DAT
OUT
TV/SAT
IN
LD
IN
IN
TV/
SAT
LD
IN
DVD
IN
TV/SAT
IN
CD/SACD
IN
VIDEO 1
IN
VIDEO 1
IN
IN
TV/
SAT
A
B
B
A
RL
R
L
SURROUND BACK
SURROUND
FRONT
IMPEDANCE USE 4-16
A+B USE 8-16
84
CENTER
AC OUTLET
A
B
B
A
R
L
SPEAKERS
AC IN
IMPEDANCE
SELECTOR
INPUT
VIDEO
INPUT
AUDIO
OUTPUT
R L VIDEOAUDIO
DIGITAL OUT
COAXIAL
4-249-350-12(2)
Sony Corporation © 2003 Printed in Japan
Multi-Channel
Integrated
Amplifier
English
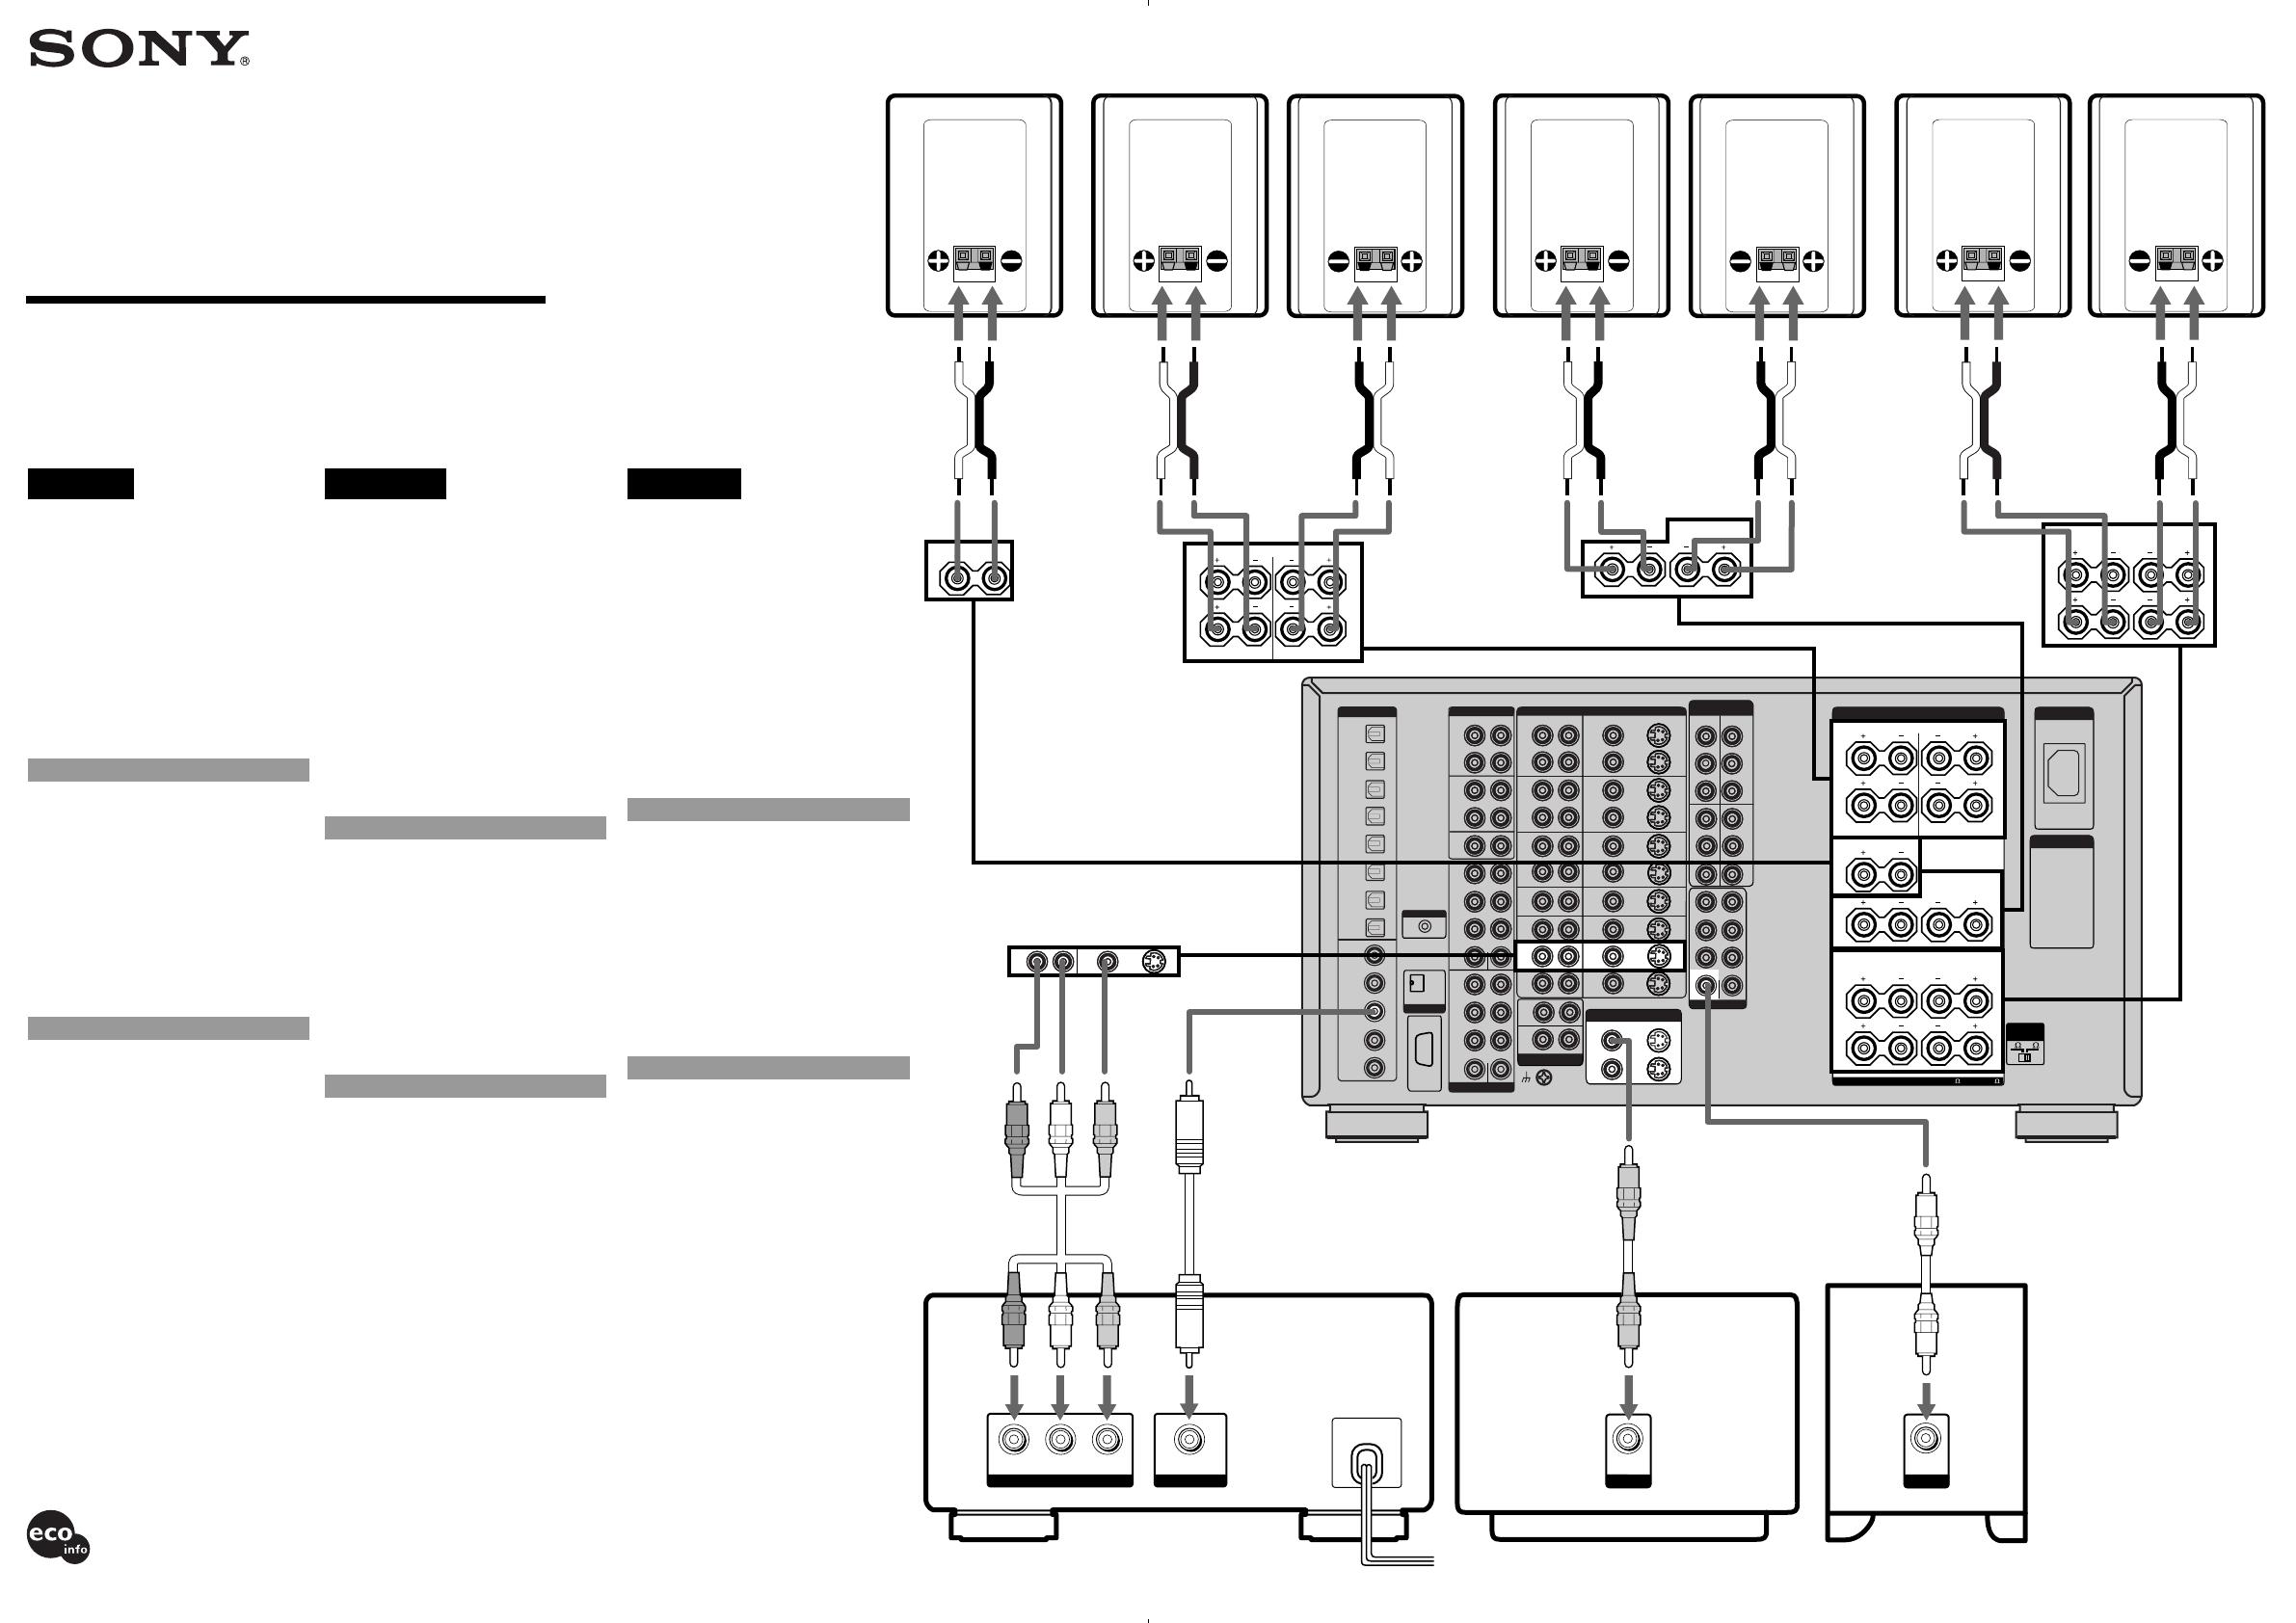
This Easy Setup Guide explains how to
connect the DVD player, TV, speakers, and
sub woofer so you can enjoy multi channel
surround sound from the DVD player. For
details, refer to the operating instructions
supplied with the amplifier.
Setting for when you use DVD
player or “Play Station 2”
When you connect DVD player or “Play
Station 2”, perform the following settings on
each component.
DVD player*
1 Select “AUDIO SETUP” in the
setup display.
2 Set “AUDIO DRC” to “WIDE
RANGE”.
3 Set “DIGITAL OUT” to “ON”.
4 Set “DOLBY DIGITAL” to “DOLBY
DIGITAL”.
5 Set “DTS” to “ON”.
* The above setting is an example of Sony DVD
player.
“Play Station 2”
1 Select “AUDIO SETTING” in the
setup display.
2 Select “AUDIO DIGITAL OUTPUT”.
3 Set “OPTICAL DIGITAL OUTPUT”
to “ON”.
4 Set “DOLBY DIGITAL” to “DOLBY
DIGITAL”.
5 Set “DTS” to “ON”.
“Play Station 2” is a trademark of Sony
Computer Entertainment.
Note
When connecting a DVD player, be sure
to connect to analog (AUDIO L/R) jacks,
not only digital (COAXIAL or OPTICAL)
jacks.
If no sound comes out
Press INPUT MODE to select “AUTO
2CH”.
TA-DA9000ES
Easy Setup Guide / Guide de réglage rapide /
Guía de configuración fácil
Français
Ce guide de réglage rapide vous explique
comment raccorder le lecteur DVD, le
téléviseur, les enceintes et le caisson de grave
afin que vous puissiez écouter le son surround
multicanaux de votre lecteur DVD dans les
meilleures conditions. Pour les détails, veuillez
vous reporter aux instructions de
fonctionnement livrées avec l’amplificateur.
Réglage pour l’utilisation
d’un lecteur DVD ou d’une
« Play Station 2 »
Lorsque vous raccordez un lecteur DVD ou
une « Play Station 2 », effectuez les réglages
suivants sur chaque appareil.
Lecteur DVD*
1 Sélectionnez « AUDIO SETUP »
dans l’affichage de configuration.
2 Réglez « AUDIO DRC » sur « WIDE
RANGE ».
3
Réglez « DIGITAL OUT » sur « ON ».
4 Réglez « DOLBY DIGITAL » sur
« DOLBY DIGITAL ».
5 Réglez « DTS » sur « ON ».
* Les réglages ci-dessus s’appliquent à un
lecteur DVD Sony pris comme exemple.
« Play Station 2 »
1 Sélectionnez « AUDIO SETTING »
dans l’affichage de configuration.
2
Sélectionnez « AUDIO DIGITAL OUTPUT ».
3 Réglez « OPTICAL DIGITAL
OUTPUT » sur « ON ».
4 Réglez « DOLBY DIGITAL » sur
« DOLBY DIGITAL ».
5 Réglez « DTS » sur « ON ».
« Play Station 2 » est une marque de fabrique de
Sony Computer Entertainment.
Remarque
Lorsque vous raccordez un lecteur DVD,
veillez à le raccorder aux prises
analogiques (AUDIO L/R), et pas
seulement aux prises numériques
(COAXIAL ou OPTICAL).
Si aucun son n’est audible
Appuyez sur INPUT MODE pour
sélectionner « AUTO 2CH ».
Español
Esta guía de configuración fácil explica cómo
conectar un reproductor de discos DVD, un
televisor, altavoces, y un altavoz de subgraves a
fin de poder disfrutar de sonido perimétrico
multicanal del reproductor de discos DVD. Con
respecto a los detalles, consulte el manual de
instrucciones suministrado con el amplificador.
Configuración cuando utilice
un reproductor de discos
DVD o “Play Station 2”
Cuando haya conectado un reproductor de
discos DVD o “Play Station 2”, realice los
ajustes siguientes en cada componente.
Reproductor de discos DVD*
1 Seleccione “AUDIO SETUP” en la
visualización de configuración.
2 Ajuste “AUDIO DRC” a “WIDE
RANGE”.
3 Ajuste “DIGITAL OUT” a “ON”.
4 Ajuste “DOLBY DIGITAL” a
“DOLBY DIGITAL”.
5 Ajuste “DTS” a “ON”.
* El ajuste de arriba es un ejemplo de
reproductor de discos DVD Sony.
“Play Station 2”
1 Seleccione “AUDIO SETTING” en la
visualización de configuración.
2 Seleccione “AUDIO DIGITAL
OUTPUT”.
3 Ajuste “OPTICAL DIGITAL
OUTPUT” a “ON”.
4 Ajuste “DOLBY DIGITAL” a
“DOLBY DIGITAL”.
5 Ajuste “DTS” a “ON”.
“Play Station 2” es marca comercial de Sony
Computer Entertainment.
Nota
Cuando conecte un reproductor de
discos DVD, cerciórese de hacerlo a las
tomas analógicas (AUDIO L/R), no
solamente a las tomas digitales
(COAXIAL u OPTICAL).
Si no hay sonido
Presione INPUT MODE para seleccionar
“AUTO 2CH”.
DVD player
Lecteur DVD
Reproductor de discos DVD
D
AB
Speaker cord
Cordon d’enceinte
Cables de altavoces
Video cord
Cordon vidéo
Cable de vídeo
Audio/video cord
Cordon audio/vidéo
Cable de audio/vídeo
Sub woofer
Caisson de grave
Altavoz del altavoz de graves
Front speaker (R)
Enceinte avant (D)
Altavoz delantero
(derecho)
Front speaker (L)
Enceinte avant (G)
Altavoz delantero
(izquierdo)
Monaural audio cord
Cordon audio
monophonique
Cable de audio
monoaural
Speaker cord
Cordon d’enceinte
Cables de altavoces
Speaker cord
Cordon d’enceinte
Cables de altavoces
Speaker cord
Cordon d’enceinte
Cables de altavoces
Coaxial cord
Cordon coaxial
Cable coaxial
C
Surround speaker (R)
Enceinte surround (D)
Altavoz perimétrico
(derecho)
E
F
Center speaker
Enceinte centrale
Altavoz central
Surround speaker (L)
Enceinte surround (G)
Altavoz perimétrico
(izquierdo)
Surround back speaker (L)
Enceinte surround arrière (G)
Altavoz perimétrico
trasero (izquierdo)
G
Surround back speaker (R)
Enceinte surround arrière (D)
Altavoz perimétrico
trasero (derecho)
H
TV
Téléviseur
Televisor
Printed on 100% recycled paper
using VOC (Volatile Organic
Compound)-free vegetable oil based
ink.
Imprimé sur papier 100% recyclé avec de
l’encre à base d’huile végétale sans COV
(composés organiques volatils).
Impreso en papel 100% reciclado utilizando
tinta a base de aceite vegetal sin compuesto
orgánico volátil (VOC).
2-0
4-0
5C0
3-0
5-0
6-0
7-0
2-1
4-1
5C1
3-1
5-1
6-1
7-1
and
et
y
6C0
6C1
D
Sub woofer
Caisson de grave
Altavoz del altavoz
de graves
English
Easy setup guide for speaker system
Refer to the front page for speaker connections (AH).
You can setup the speakers easily by selecting
the speaker pattern.
1 Find your speaker pattern refering to the illustration on the
right. You can use the flow chart on the right.
2 Press ?/1 to turn on the system.
3 Rotate MAIN MENU to select “SPEAKER SET UP”.
4 Rotate MENU to select “SP EASY SET UP”.
5 Rotate –/+ to select “YES”.
6 Rotate MENU to select “SPEAKER PATTERN [XXX]”.
7 Rotate –/+ to select your speaker pattern, then press ENTER.
Français
Guide de réglage rapide pour le
système acoustique
Veuillez vous reporter à la page de couverture pour le raccordement des
enceintes (AH).
Vous pouvez régler facilement les enceintes en
sélectionnant une configuration d’enceintes.
1 Identifiez votre configuration d’enceintes en vous reportant à
l’illustration à droite. Vous pouvez aussi utiliser
l’organigramme à droite.
2 Appuyez sur ?/1 pour mettre le système sous tension.
3 Tournez MAIN MENU pour sélectionner « SPEAKER SET UP ».
4 Tournez MENU pour sélectionner « SP EASY SET UP ».
5 Tournez –/+ pour sélectionner « YES ».
6
Tournez MENU pour sélectionner « SPEAKER PATTERN
[XXX]
».
7 Tournez –/+ pour sélectionner votre configuration d’enceintes,
puis appuyez sur ENTER.
Español
Guía de configuración fácil para el
sistema de altavoces
Con respecto a la conexión de los altavoces (AH), consulte la página
frontal.
Usted podrá configurar fácilmente los altavoces
seleccionando el patrón de altavoces.
1 Busque su patrón de altavoces consultando la ilustración de
la derecha. Usted podrá utilizar el diagrama de flujo de la
derecha.
2 Presione ?/1 para conectar la alimentación del sistema.
3 Gire MAIN MENU para seleccionar “SPEAKER SET UP”.
4 Gire MENU para seleccionar “SP EASY SET UP”.
5 Gire –/+ para seleccionar “YES”.
6
Gire MENU para seleccionar “SPEAKER PATTERN
[XXX]
”.
7 Gire –/+ para seleccionar su sistema de altavoces, y después
presione ENTER.
A
F
E
B
Set to
Réglez sur
Ajuste a
4-0
2 speakers
2 enceintes
2 altavoces
C
A
B
Set to
Réglez sur
Ajuste a
3-0
A
B
Set to
Réglez sur
Ajuste a
2-0
3 speakers
3 enceintes
3 altavoces
7 speakers and a sub woofer
7 enceintes et un caisson de grave
7 altavoces y un altavoz de subgraves
C
A
F
E
D
B
H
Set to
Réglez sur
Ajuste a
7-1
Set to
Réglez sur
Ajuste a
6-1
Set to
Réglez sur
Ajuste a
5-1
4 speakers
4 enceintes
4 altavoces
6 speakers and a sub woofer
6 enceintes et un caisson de grave
6 altavoces y un altavoz de subgraves
C
A
F
E
D
B
G
5 speakers and a sub woofer
5 enceintes et un caisson de grave
5 altavoces y un altavoz de subgraves
C
A
F
E
D
B
What is your speaker pattern ?
Quelle est votre configuration d’enceintes ?
¿Cuál es su patrón de altavoces?
The speaker pattern depends on the number of speakers you have.
La configuration d’enceintes dépend du nombre d’enceintes utilisées.
El patrón de altavoces dependerá del número de altavoces que usted posea.
A Front speaker (L) / Enceinte avant (G) / Altavoz delantero (izquierdo)
B Front speaker (R) / Enceinte avant (D) / Altavoz delantero (derecho)
C Center speaker / Enceinte centrale / Altavoz central
D Sub woofer / Caisson de grave / Altavoz del altavoz de graves
E Surround speaker (L) / Enceinte surround (G) / Altavoz perimétrico (izquierdo)
F Surround speaker (R) / Enceinte surround (D) / Altavoz perimétrico (derecho)
G Surround back speaker (L) / Enceinte surround arrière (G) / Altavoz perimétrico
trasero (izquierdo)
H Surround back speaker (R) / Enceinte surround arrière (D) / Altavoz perimétrico
trasero (derecho)
G
2
3 574,6
Refer to the illustration at left, follow (yes) if you have the speakers and follow (no) if you do not.
En vous reportant à l’illustration à gauche, suivez
(Oui) si vous avez les enceintes et suivez
(Non) si vous ne les avez pas.
Refiriéndose a la ilustración de la izquierda de la izquierda, siga (Sí) si posee los altavoces, y siga
(No) en caso contrario.
Set to
Réglez sur
Ajuste a
Set to
Réglez sur
Ajuste a
Set to
Réglez sur
Ajuste a
Set to
Réglez sur
Ajuste a
Set to
Réglez sur
Ajuste a
Set to
Réglez sur
Ajuste a
Set to
Réglez sur
Ajuste a
Set to
Réglez sur
Ajuste a
Set to
Réglez sur
Ajuste a
Set to
Réglez sur
Ajuste a
Set to
Réglez sur
Ajuste a
Set to
Réglez sur
Ajuste a
Set to
Réglez sur
Ajuste a
Set to
Réglez sur
Ajuste a
Set to
Réglez sur
Ajuste a
Set to
Réglez sur
Ajuste a
Yes
Oui
No
Non
No
No
Non
No
No
Non
No
Yes
Oui
Yes
Oui
No
Non
No
Yes
Oui
No
Non
No
Yes
Oui
No
Non
No
Yes
Oui
No
Non
No
Yes
Oui
No
Non
No
Yes
Oui
No
Non
No
Yes
Oui
No
Non
No
Yes
Oui
No
Non
No
No
Non
No
No
Non
No
No
Non
No
No
Non
No
Yes
Oui
Yes
Oui
Yes
Oui
Yes
Oui
Yes
Oui
or
ou
o
C
Center speaker
Enceinte centrale
Altavoz central
Surround back speaker
Enceinte surround arrière
Altavoz perimétrico trasero
Surround speakers
Enceintes surround
Altavoces perimétrico
and
et
y
E F
D
Sub woofer
Caisson de grave
Altavoz del altavoz
de graves
D
Sub woofer
Caisson de grave
Altavoz del altavoz
de graves
D
Sub woofer
Caisson de grave
Altavoz del altavoz
de graves
D
Sub woofer
Caisson de grave
Altavoz del altavoz
de graves
D
Sub woofer
Caisson de grave
Altavoz del altavoz
de graves
D
Sub woofer
Caisson de grave
Altavoz del altavoz
de graves
D
Sub woofer
Caisson de grave
Altavoz del altavoz
de graves
Surround speakers
Enceintes surround
Altavoces perimétrico
and
et
y
E F
Surround back speakers
Enceintes surround arrière
Altavoces perimétrico trasero
G H
G H
and
et
y
or
ou
o
Surround back speaker
Enceinte surround arrière
Altavoz perimétrico trasero
Surround back speakers
Enceintes surround arrière
Altavoces perimétrico trasero
G H
G H
  • Page 1 1
  • Page 2 2

Sony TA-DA9000ES Installation guide

Type
Installation guide

Sony TA-DA9000ES is a powerful multi-channel integrated amplifier that offers exceptional audio quality and immersive surround sound experience. It features easy setup with a user-friendly interface, making it simple to connect and configure various audio components like DVD players, PlayStations, and speakers. With its advanced digital processing capabilities, the TA-DA9000ES delivers crystal-clear sound and supports a wide range of audio formats, including Dolby Digital and DTS, ensuring a thrilling cinematic experience.

Ask a question and I''ll find the answer in the document

Finding information in a document is now easier with AI