
1. Do not FULLY-TIGHTEN the nut or nut bolt until all nut
or bolt is ready assembled.
2. Do not OVER-TIGHTEN the nut or nut bolt to avoid
causing damages to the thread.
3. Keep all hardware part out of reach of children.
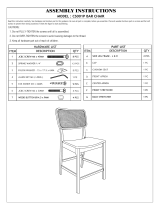
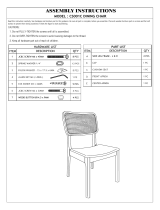
PRODUCT CODE : CS004P BAR CHAIR
Read this instruction carefully. See hardware and furniture part list for guidance. Be sure all
part is complete, before you assemble. Place all wooden furniture part on a clean and flat soft
surface to prevent from being scratched. Follow the figure to start assembling.
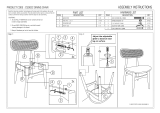
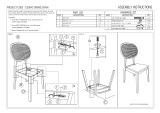
Step 1 :
CAUTIONS : 6 PCS
1 PC
CUSHION SEAT 3
1 PC
C
SPRING WASHER 1/4"
ALLEN KEY (M4) LONG
5
4
ASSEMBLY INSTRUCTIONS
ITEM DESCRIPTION
PART LIST
ABACK REST JCBC SCREW M6 x 50MM
QTY ITEM
1 PC 1
2
HARWARE LIST
DESCRIPTION QTY
CSK SCREW M4 x 32MM 10 PCS
FRONT LEG 1 PC
D
COMPLETED CHAIR ASSEMBLY
NYLON WASHER - 15 x 17.5 x 6MM 6 PCS
SIDE RAIL - L & R
B2 PCS
Step 2 :
6x
6 PCS
4
1
2
3
4x
42
13
A
B
2x
5
C
E
SIDE STRETCHER - L & R
E2 PCS
5
4x

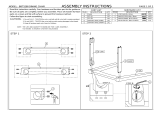
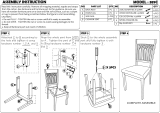
ASSEMBLY INSTRUCTION
MODEL: LEENA SQUARE BAR TABLE
Read this instruction carefully. Remove all wrapping material, staples and straps from the carton. See hardware and furniture part list for guidance. Be sure you have all wooden furniture parts on a
clean and flat soft surface, such as a carpet or rug, to prevent from being scratched.
CAUTION :
1.Do Not FULLY - TIGHTEN the nut or screw until all is ready to assemble.
2.Do Not OVER - TIGHTEN the nut or screw to avoid causing damages to the tread.
3.Keep all hardware part out reach of children.
Qty.
1pc
pcs
No.
A
B
Description
Table Top
Table Leg
Qty.
pcs
pcs
No.
1
2
Description
Hex Comb 516" x 2 12"
pcs
3
Spring Washer 516"
Flat Washer 516" x 22mm
Hardware ListPart List
pcs
4CSK Screw M4 x 32mm
4
SCREW DRIVER
NOT INCLUDE x 2 People
Step 1
Install 3 parts of Part (B) as shown below.
Please do not fully tighten the bolts.
2pcs
C Stertcher
5pc1
5
8
8
8
Spanner 12.8
Step 2
Install Part (C) as shown below.
Please do not fully tighten the screws.
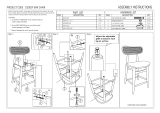
Step 3
Install last part of Part (B) as shown below.
Make sure to tighten the bolts and screws in this step.
B
BBB
B
B
BB
C
A
A
3
2
1
5
4
4
C
4
B
3
2
15
-
 1
1
-
 2
2


Baxton Studio CS004P-Black/Cream-5PC Assembly Instructions
- Type
- Assembly Instructions
- This manual is also suitable for
Ask a question and I''ll find the answer in the document
Finding information in a document is now easier with AI
Related papers
-
 Baxton Studio CS001P-Black/Cream-5PC Assembly Instructions
-
 Baxton Studio CS002C-Walnut/Light Grey-5PC Dining Set Assembly Instructions
-
 Baxton Studio CS004C-Natural Oak/Light Grey-5PC Dining Set Assembly Instructions
-
 Baxton Studio BBT5280-Gravel-DC-TH1308 Assembly Instructions
-
 Baxton Studio CS002P-Walnut/Light Grey-PC-2PK Assembly Instructions
-
 Baxton Studio CS001C-Walnut/Light Grey-5PC Dining Set Assembly Instructions
-
 Baxton Studio CS004C-Walnut/Light Grey-7PC Dining Set Assembly Instructions
-
 Baxton Studio CS002C-Black/Cream-DC-2PK Assembly Instructions
-
 Baxton Studio CS003C-Black/Cream-5PC Dining Set Assembly Instructions
-
 Baxton Studio RH389C-Grey/Dark Brown-6PC Dining Set Assembly Instructions


