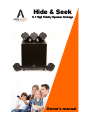
Accent Acoustics Hide & Seek Owner's manual
- Type
- Owner's manual

Hide & Seek
5.1 High Fidelity Speaker Package
5.1 High Fidelity Speaker Package5.1 High Fidelity Speaker Package
5.1 High Fidelity Speaker Package
Owner’s manual

Thank you for purchasing our newest Accent Acoustics model, the
Hide & Seek
Hide & SeekHide & Seek
Hide & Seek 5.1 High Fidelity Speaker Package
5.1 High Fidelity Speaker Package5.1 High Fidelity Speaker Package
5.1 High Fidelity Speaker Package.
The Hide & Seek
Hide & SeekHide & Seek
Hide & Seek was developed through computer modelling and is constructed using precisely engineered
components. This system will deliver deep bass, coherent vocals and pin-point accurate sound placement
required for that exciting “large cinema experience” while at the same time providing a sweet tonal balance
and wide sound stage required for accurate music reproduction. All of this in a room-friendly, astonishingly
small, form-factor package.
To obtain the best from your new product we recommend that you carefully read this manual and follow the
set-up guide lines.
Please keep this document for future reference.
Regards,
The Accent team
Safety Precautions
Safety Precautions Safety Precautions
Safety Precautions
Your speakers will deliver years of reliable and safe service provided the following safety practices are
followed:
1) Water and Moisture — The speakers should not be exposed to water or high moisture environments.
2) Ventilation — Your subwoofer requires ventilation, therefore it must not be built in or located in a cupboard
(while operating), or covered. The ventilation holes/slots must be kept clear and will require occasional
cleaning to ensure that they remain clear.
3) Power Supply —The unit is designed to operate from mains power and we do not recommend the use of
generators or power inverters.
4) Power Cable – Power cables should be positioned so that they have direct access to mains power. Ensure
the cables cannot be pinched or squashed and avoid crossing doorways.
5) Cleaning — Clean the unit as recommended in the maintenance section.
6) Objects and Liquid Entry — Care should be taken to ensure that the unit is safe from falling objects or
liquid. See item 1 above.
7) Attachments — Do not use attachments not recommended by the manufacturer.
8) Lightning and Power Surges — We strongly recommend you disconnect the unit from the mains power
when not in use. This will protect the unit from possible damage due to power surges during electrical storms,
for example. Additionally, this ensures that no stand-by power will be consumed.
9) Overloading — Do not overload wall sockets with multiple power plugs.
Five Satellite Speakers Powered Subwoofer
3 x 6 metres of figure 8 speaker cables (Front) 2 x 12 metres of figure 8 speaker cables (surround)
1 x 4.5 metre RCA to RCA cable for Subwoofer AC (Mains) Power cord
Instruction Manual
Included with your speakers.
Included with your speakers.Included with your speakers.
Included with your speakers.
Warnings
Warnings Warnings
Warnings
No attempt should be made to open the speakers or subwoofer.
There are no user serviceable parts inside.
Please return the product to Amber Technology or an authorised service agent in the unlikely event that
servicing is required.
No User Serviceable
Parts Inside
Introduction
IntroductionIntroduction
Introduction

Step One: Positioning the Seek satellite speakers
Step One: Positioning the Seek satellite speakers Step One: Positioning the Seek satellite speakers
Step One: Positioning the Seek satellite speakers
Please refer to the industry's recommendations for speaker placement below:
1) Primary seating position.
2) Your front speakers should be positioned on either side of the screen with an angle of 22 to 30
degrees towards the primary seating position.
3) Position the centre speaker as close as possible to the TV and directed towards the primary seating
position.
4) The optimum location for surround speakers is on either side of your seating position. Alternative
placement is the back corner of the room.
5) The recommended initial subwoofer placement is in line with the front speakers. Alternative placement
is along the side wall. For larger rooms additional subwoofers may be introduced as required.
Step Two: Connecting the speakers
Step Two: Connecting the speakersStep Two: Connecting the speakers
Step Two: Connecting the speakers
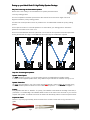
Speaker Cable Options:
Speaker Cable Options: Speaker Cable Options:
Speaker Cable Options:
The Seek
SeekSeek
Seek satellites connect to your home theatre receiver via standard figure 8 speaker cables.
In addition to the supplied speaker cables, many different styles and sizes are available. See fig 2,3 & 4
Speaker Cable Size:
Speaker Cable Size:Speaker Cable Size:
Speaker Cable Size:
18 gauge wires are ideal for runs of 6-7 metres (supplied). Beyond 7 metres please use 16 gauge wires.
The Seek
SeekSeek
Seek satellite speaker terminals are colour coded
RED
RED RED
RED for positive “+” and BLACK
BLACK BLACK
BLACK for negative “-”.
Polarity:
Polarity:Polarity:
Polarity:
Every speaker cable has an “identifier” for polarity. This identifier could include the branding of the cable, a
printed line or a moulded ridge. This identifier MUST connect to the same colour terminals on your receiver /
amplifier and speaker. Accidental reversal of the cables will dramatically reduce overall sound performance.
Prepare the Cable:
Prepare the Cable:Prepare the Cable:
Prepare the Cable:
Remove / strip away approximately 20mm (3/4inch) of the insulator. Please refer to Fig 2 & 3 below as a
guide.
Fig 2
Fig 3
Fig 4
Setting up your Hide & Seek
Setting up your Hide & SeekSetting up your Hide & Seek
Setting up your Hide & Seek 5.1 High Fidelity Speaker Package
5.1 High Fidelity Speaker Package5.1 High Fidelity Speaker Package
5.1 High Fidelity Speaker Package.

Receiver / Amplifier:
Receiver / Amplifier: Receiver / Amplifier:
Receiver / Amplifier:
Now connect the Seek
SeekSeek
Seek satellite speakers to your receiver /
amplifier’s speaker terminals as per Fig 6. (Please refer to
the receiver’s owner’s manual for the manufacturer’s
connection recommendations).
Fig 6
Subwoofer Connection:
Subwoofer Connection: Subwoofer Connection:
Subwoofer Connection:
To connect the subwoofer to your receiver / amplifier you will require an RCA style cable, as shown in Fig 7
(supplied). Connect one end to the terminal marked LFE on the rear of your
subwoofer (Fig 8).
Refer to your owner’s manual for the correct connection point for your Hide
HideHide
Hide Subwoofer on your
receiver / amplifier.
Electronics manufacturers may call this connection by one of the following:
1) Sub Pre Out
2) Sub Out
3) LFE Output.
4) Subwoofer out
Two additional terminals are also provided on your subwoofer, these accept signals from receivers equipped
with left and right stereo outputs. Longer Subwoofer cables are available from your retailer.
Speakers:
Speakers:Speakers:
Speakers:
The Seek
SeekSeek
Seek is fitted with quick fit spring terminals.
Simply push down firmly until the terminal stops,
insert cable and release.
Ensure all strands of the wire pass through the
connector as loose strands can damage the
receiver / amplifier.
Fig 7
Subwoofer Controls:
Subwoofer Controls: Subwoofer Controls:
Subwoofer Controls:
The power switch connects / disconnects the subwoofer from mains power.
(If your receiver has a 240 Volt power outlet DO NOT
DO NOTDO NOT
DO NOT connect to this socket, your receiver will not provide
the necessary current to power the subwoofer correctly and receiver damage may occur).
LED Indicator Light
LED Indicator LightLED Indicator Light
LED Indicator Light:
Red indicates that the mains power switch is on and that power
is available. Green indicates that either the power on mode switch
is set to “on”, or in “auto” mode (if low frequency signal is available from the receiver).
Crossover:
Crossover:Crossover:
Crossover:
Please adjust the Hide
Hide Hide
Hide subwoofer crossover control to the Seek
SeekSeek
Seek setting see Fig 9.
Power ON Mode Switch:
Power ON Mode Switch:Power ON Mode Switch:
Power ON Mode Switch:
ON: Always on
Auto: Auto power on when a signal is present. If no sound is detected, a timer will switch
the subwoofer off automatically. (This may take up to 15 minutes)
Subwoofer Level:
Subwoofer Level:Subwoofer Level:
Subwoofer Level:
Set this control to the 12 o’clock position for calibration setup. This allows flexibility for
quick changes of volume control without entering the receiver’s set up menu (If required).
Fig 8
Making the connection:
Making the connection: Making the connection:
Making the connection:
Setting up your Hide & Seek 5.1 High Fidelity Speaker Package
Setting up your Hide & Seek 5.1 High Fidelity Speaker PackageSetting up your Hide & Seek 5.1 High Fidelity Speaker Package
Setting up your Hide & Seek 5.1 High Fidelity Speaker Package.
Fig 9

Phase / Polarity:
Phase / Polarity: Phase / Polarity:
Phase / Polarity:
Your room’s acoustics play a part in the final acoustic result of any speaker package.
The phase switch may assist you with improving the sound for your seating position.
‘Normal’, or in-phase with the satellites, ‘Reverse’, or inverted
with the satellites.
Play music that contains a constant or repeating bass track, sit in your preferred location
and ask for assistance to flip the switch. Listen for the best result and set (Fig 10).
Calibration of the System:
Calibration of the System:Calibration of the System:
Calibration of the System:
For the system to operate at its full potential your receiver / amplifier requires configuring.
These settings and the volume levels calibrate the system to deliver the best possible sound balance to suit
your seating location.
Speaker Size:
Speaker Size:Speaker Size:
Speaker Size:
In the set up menu of your receiver / amplifier, usually located under the speaker menu settings, is speaker
size.
Please select the setting to ‘small’ speakers for all channels i.e. front, centre and surround speakers.
If your receiver / amplifier is equipped with a crossover setting, please select 150 Hz for all channels.
Speaker Distance:
Speaker Distance:Speaker Distance:
Speaker Distance:
This is how the receiver / amplifier creates the illusion of space. Set the distance in this menu to the distance
between your preferred seating location and each speaker.
Level Calibration:
Level Calibration:Level Calibration:
Level Calibration:
This sets the volume level to match the distance settings previously entered. Speakers located closer will play
softer while speakers further away will be set to play louder.
Many receiver / amplifiers include auto calibration for these settings, please refer to you receiver / amplifier
manual.
Mounting Brackets:
Mounting Brackets:Mounting Brackets:
Mounting Brackets:
Any commercially available bracket may be used to mount the Seek
SeekSeek
Seek satellite speakers. We do not recommend
wall / ceiling mounting of the Hide
HideHide
Hide Subwoofer.
We have developed the optional AN-WCM (Fig 11 & 14) mounting bracket. This mount offers the advantage
of wall or ceiling placement and provides cable management. Designed to compliment the small form factor of
the Seek
SeekSeek
Seek satellite speaker, the mount comprises of: 2 x mounting plates, 2 x friction nuts, 2 x cam nuts and
one support tube.
This design allows for the speaker cables to pass through the centre of the mount and disappear completely.
Directions for mounting:
Directions for mounting:Directions for mounting:
Directions for mounting:
1) Attach the mounting plate to the speaker using the (M3) screws provided (Fig 13).
2) Some fasteners are supplied for your convenience for attaching to the wall or ceiling, however specialty
mounting hardware may be required to suit the materials used in your home.
3) Take the pre-assembled mid section that includes the friction nuts, cam nuts and support tube and carefully
pass the cable from the wall side through the centre of the mount.
4) Loosely secure the mount on to the wall base plate.
5) Pass the excess cable through the centre of the mounting plate (attached to the speaker) and through the
tube into the terminal area. (Fig 14)
6) Loosely attach the speaker
to the mount.
7) Connect the speaker cable, push the excess speaker cable back through the mount (keeping the mount
straight).
8) Adjust your speakers to the desired angle and tighten both friction nuts.
Setting up your Hide & Seek
Setting up your Hide & SeekSetting up your Hide & Seek
Setting up your Hide & Seek 5.1 High Fidelity Speaker
5.1 High Fidelity Speaker 5.1 High Fidelity Speaker
5.1 High Fidelity Speaker
Fig 10
Fig 11
Fig 12
Fig 13
Fig 14

The Accent family of products are proudly distributed in Australia and New Zealand by
Amber Technology Limited
Amber Technology Limited Amber Technology Limited
Amber Technology Limited
Unit 1, 2 Daydream Street
Warriewood 2102
NSW Australia
Phone: +61 (0) 2 9998 7600
Fax: +61 (0) 2 9999 0770
Email: consumer@ambertech.com.au
www.ambertech.com.au
ABN 86 003 231 187
Amber Technology (NZ) Limited
Amber Technology (NZ) LimitedAmber Technology (NZ) Limited
Amber Technology (NZ) Limited
3/77 Porana Road,
Glenfield Auckland,
New Zealand 0627
Phone: +64 9 4430753
Fax: +64 9 4430752
www.amber.co.nz
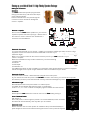
Specifications
SpecificationsSpecifications
Specifications
SEEK Satellite Speaker
SEEK Satellite SpeakerSEEK Satellite Speaker
SEEK Satellite Speaker
HIDE Subwoofer
HIDE SubwooferHIDE Subwoofer
HIDE Subwoofer
Nominal Impedance
6 Ohms
Not Applicable
Frequency Response
150Hz – 20kHz
40Hz – 150Hz
Recommended
Receiver / Amplifier
10 – 100 Watts
Not Applicable
Amplifier Output
Not Applicable
100 Watts RMS (250 Watt Peak)
Protection
Speaker Driver Size Tweeter
13mm (1/2 inch)
Not Applicable
Speaker Driver Size Midrange
76mm (3 inches)
Not Applicable
Speaker Driver Size Woofer
Not Applicable
203 mm (8 inches)
Crossover points
5kHz
120Hz (Adjustable 80Hz -140Hz)
System Sensitivity
83db Nominal
Dimensions (H x W x D)
90 x 90 x 110 mm
(3.54 x 3.54 x 4.33 inches)
340 x 300 x 300mm
(13.38 x 11.81 x 11.81 Inches)
Weight
0.8kg (1.76lbs)
10kg (22lbs)
Includes Max limit Technology

The benefits given to the purchaser by this Warranty are in addition to all other rights and remedies which the
purchaser has in respect of the product under the Competition and Consumer Act 2010 or other
applicable law. Subject to the stated conditions and exceptions, Amber Technology Limited ABN 86 003 231
187, warrants this Accent product to be free from defects in materials and/or workmanship under normal
domestic use for a period of Three (3) years from the original date of purchase. Any defects in materials and/
or workmanship in the product occurring within the respective time period from the original date of purchase
will be rectified free of charge by Amber Technology, or one of its Authorised Service Agents in Australia or
New Zealand. This Warranty is not applicable outside Australia and New Zealand
Warranty Conditions
Warranty ConditionsWarranty Conditions
Warranty Conditions
———————————————————————————————————————————————
——————————————————————————————————————————————————————————————————————————————————————————————
———————————————————————————————————————————————-
--
-
1. All claims for Warranty Service should be made to Amber Technology, or your nearest Authorised Accent
Service Agent, or to the Accent Dealer from whom the purchase was made.
2. Reasonable evidence of the date of your original purchase must be provided to qualify for Warranty
Service. The original Sales Receipt is your best proof of purchase.
3. This Warranty extends only to defects occurring in materials and/or workmanship under normal domestic
use of the product, when operated in accordance with the supplied instructions.
Products employed in professional or commercial applications are covered by a three (3) month Warranty
period.
4. Warranty Against Defect:
Warranty Against Defect: Warranty Against Defect:
Warranty Against Defect: Our goods come with guarantees that cannot be excluded under the Australian or
New Zealand Consumer Law. You are entitled to a replacement or refund for a major failure and for
compensation for any other reasonably foreseeable loss or damage. You are also entitled to have the Goods
repaired or replaced if the Goods fail to be of acceptable quality and the failure does not amount to a major
failure.
5. The Warranty does not cover:
The Warranty does not cover: The Warranty does not cover:
The Warranty does not cover:
a) Unreasonable mileage or travelling time, pick-up or delivery, or the cost of insurance.
b) Service costs arising from failure to correctly adjust the controls of the product or to observe the
manufacturer’s instructions, or inspections that reveal that the product is in normal working order.
c) Cleaning of laser pick-up assemblies. (if applicable)
d) Inadequate receiving antennae.
e) Product failures caused by misuse, neglect, abnormal wear and tear, accidental breakage, inexpert repairs
or modification by unauthorised persons, lightning strikes, external electromagnetic radiation, mains voltage
fluctuation, earthquakes, vermin infestation or liquid spillage.
f) Replacement of worn or used batteries, styli or other consumables.
g) Products that have their serial number altered or removed.
h) Accessories attached to or to be used with Accent products, such as antennas, cables etc.
i) Installation and removal of Accent products.
6. It is recommended that any product that is the subject of this warranty should be prepared for
transportation in accordance with the manufacturer’s instructions described in the instruction manual, and
packed in its original packaging and/or carton or other suitable packaging which offers the same degree of
protection. Damage incurred in transit resulting from inadequate packaging is not covered by this Warranty.
7. As an owner of high quality Accent equipment it is recommended that you read the instruction manual to
familiarise yourself with the correct operating and maintenance procedures and ensure that any recommended
routine maintenance is performed in accordance with the manufacturer’s recommendations.
8. The benefits given to you in this warranty are in addition to other rights and remedies under a law in relation
to the products to which this warranty applies.
3
33
3-
--
-Year Warranty
Year Warranty Year Warranty
Year Warranty

OBTAINING WARRANTY SERVICE:
OBTAINING WARRANTY SERVICE:OBTAINING WARRANTY SERVICE:
OBTAINING WARRANTY SERVICE:
———————————————————————————————————
——————————————————————————————————————————————————————————————————————
———————————————————————————————————–
––
–————
————————
————
T
TT
To obtain warranty service, please contact Amber Technology. Please refer to Clause 6 for packing details.
Amber Technology will bear costs for shipping of Accent products that have been serviced under this
Warranty via their approved freight carrier. Should the goods need to be freighted, the goods must be packed
in a similar manner to the original packaging to ensure there is no damage during transit and the goods must
be delivered by the Customer to the relevant shipping point as notified by Amber Technology. Please contact
Amber Technology for shipping details. Amber Technology will not be responsible for costs associated with
matters set out in Clause 5(a). All costs referred to in Clause 5(a) are the Customers responsibility.
WARRANTY AGAINST DEFECTS:
WARRANTY AGAINST DEFECTS:WARRANTY AGAINST DEFECTS:
WARRANTY AGAINST DEFECTS:
——————————————————————————————————————————————
————————————————————————————————————————————————————————————————————————————————————————————
——————————————————————————————————————————————
T
TT
To obtain warranty service, please contact Amber Technology (details listed below) or the original place of
purchase. Amber Technology will bear costs for shipping for Accent products that have been serviced under
this Warranty via their approved freight carrier. Should the goods need to be freighted, the goods must be
packed in a similar manner to the original packaging to ensure there is no damage during transit. Please
contact Amber Technology for shipping details.
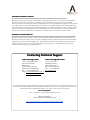
Contacting Technical Support
Contacting Technical SupportContacting Technical Support
Contacting Technical Support
For information concerning product features and hook-ups, please include your name and business hours
contact number (eastern standard time) along with the model number you are inquiring about, and one of our
experienced product specialists will reply to your query at their earliest convenience.
Hours of Operation:
Hours of Operation:Hours of Operation:
Hours of Operation:
Mon - Fri 9.00am - 5.00pm (Eastern Standard Time)
Warranty Registration
Please register your product on line at
http://www.ambertech.com.au/support/register-your-product
Amber Technology Limited
Amber Technology Limited Amber Technology Limited
Amber Technology Limited
Unit 1, 2 Daydream Street
Warriewood Sydney
NSW 2102
Free Call 1800 251 367
Phone:+61 (0) 2 9998 7600
Fax: +61 (0) 2 99990770
Email: consumer@ambertech.com.au
www.ambertech.com.au
Amber Technology (NZ) Limited
Amber Technology (NZ) LimitedAmber Technology (NZ) Limited
Amber Technology (NZ) Limited
3/77 Porana Road,
Glenfield Auckland,
New Zealand 0627
Phone: +64 9 4430753
Fax: +64 9 4430752
www.amber.co.nz
-
 1
1
-
 2
2
-
 3
3
-
 4
4
-
 5
5
-
 6
6
-
 7
7
-
 8
8