FREESTANDER 2009
Monteringsanvisning • Erection Instructions • Aufbauanleitung • Opbouwinstructie • Instruction de Montage • Instrucciones de montaje
FREESTANDER 2009
Monteringsanvisning • Erection Instructions • Aufbauanleitung • Opbouwinstructie • Instruction de Montage • Instrucciones de montaje
DK/NO: Stellet hæves.
GB: Lift the frame up by connecting the "broken" legs.
DE: Die F-stangen einsetzen.
NL: De F-stangen plaatsen en de staanders omhoog zetten.
SE: Stativet lyftes upp. Montera uthängsrören (F-rör).
DK/NO:
1. Det bagerste hjørne pløkkes. 2. Stram gavlen ud ved hjørneben og pløk. Gentag pkt. 1 & 2 i den anden side.
Nu kan resten af pløkkene slås i (husk at pløkke på kryds ved lynlåse!).
GB: Re-zip front panels. 1. Peg corners nearest motorhome. 2. Tension and peg one side at the corner leg. Repeat on other side.
Peg the rest of the canvas - crossing rubbers at all zip ends.
DE: 1. Häring in der hinteren Ecke einschlagen. 2. Die Seitenwand beim Eckbein ausspannen und Häring einschlagen.
Dieses an der anderen Seite wiederholen. Die restlichen Häringe einschlagen.
Kreuzen Sie bei allen Reißverschlüssen die Gummischlingen.
NL: 1. Haringen plaatsen bij de achterste hoeken.
2. De zijwanden en het front kunnen nu via de hoekstaanders strak gespannen worden, ook hier haringen plaatsen.
Nu de rest van de haringen plaatsen, bij de ritssluitingen moeten de tentrubbers kruiselings geplaatst worden.
SE: 1. Bakre hörn fästs i marken. 2. Sträck gaveln vid hörnbenet och fäst i marken. Upprepa 1 och 2 i den andra gaveln.
Nu kan resten fästas i marken (kom ihåg att kryssätta vid dragkedjorna).
DK/NO:
1a. tunnel, 1b. kabel, 1c. hul for torpedo(3)
2. Torpedo/bånd for tilpasning af tag
3. torpedo bruges til nedlukning.
GB:
1a. tunnel, 1b. cabel, 1c. hole for torpedo (3)
2. torpedo/bindle for fitting the roof
3. torpedo is used for closing
DE:
1a. Tunnel, 1b. Kabel, 1c. Loch für Torpedo (3)
2. Torpedo/Band für Zupassung des Daches
3. Torpedo wird beim Schließen benutzt
NL:
1a. tunnel, 1b. kabel 1c. opening voor torpedo (3)
2. Torpedo/ band voor toepassing bij het dak
3. Torpedo wordt voor afsluiting gebruikt
SE:
1a. Kanal för rör, 1b. Kederlist, 1c. Hål för Torpedo justerband (3)
2. Torpedo justerband
3. Torpedo-banden används även vid stängning
DK/NO: Placer benene i reguleringsstroppe, og stram ud.
V-stang: Verandastang kan evt. monteres for nedfældning af forside (vinduesfolien bør altid være beskyttet).
GB: Place legs in regulator tabs and tension.
V-pole: Mount V-verandah pole (always protect windows with curtains).
DE: Placieren Sie die Beine in die Regulierungsschnüre und spannen Sie aus.
V-stange: Montieren Sie die Veranda Stange (Das Fensterfolie muß immer geschütz werden).
NL: Plaats de staanders in de regelsnoer en span deze uit.
SE: Placera ben i reguleringsstropparna och sträck ut.
V-stang: Montera evt. veranda stang (vinduesfolien bør altid være beskyttet).
DK/NO: Fronten lynes ned.
1. F-rør spændes ud. 2. AM-overligger spændes ud.
GB: Unzip front panels. Tension poles in the following order:
1. F-poles (canopy). 2. AM-pole (roof center).
DE: Die Frontteile während des Ausspannens herabrollen.
1. Spannen Sie die F-stangen aus (Vordach).
2. Spannen Sie die AM-stange aus (Dach Mitte).
NL: Het frontgedeelte openritsen wat het uitspannen lichter maakt.
1. Span de F-stangen uit, 2. Span de AM-stang uit.
SE: Front läggs ner till hälften.1. F-rör sträcks ut. 2. AM-stang sträcks ut.
DK/NO: Bred et tæppe ud foran vognen, så snavsede stænger og telt undgås.
Stængerne lægges på tæppet, hvor de skal bruges.
GB: Lay out the frame in its correct position on a carpet or other protective covering.
DE: Sortieren Sie das Gestänge anhand unseres Gerüstplanes. Legen Sie die Stangen jeweils an die Stelle,
an der diese später auch benötigt werden.
NL: Allereerst zorgt u voor een droge ondergrond (bv. Bolon Voortenttapijt) waarop u de stokken
sorteert volgens de frame-tekening. Leg de stokken daar neer waar u ze straks nodig heeft.
Controleer de dakrail op beschadigingen en onregelmatigheden en maak deze schoon.
SE: Lägg ut tältmattan framför vagnen, förhindrar att tält och stänger blir smutsiga.
Lägg stängerna ut där de skall användas.
DK/NO: Benene monteres i de fire hjørner, og "knækkes"/sænkes, så stellet bliver lavere.
GB: Adjust the legs down to the minimum and break them at the joint. Mount the legs to the four corners.
DE: Die unteren Zeltbeine umbiegen, damit das zusammengesteckte Gestänge für den Aufbau niedriger wird.
NL: De gehalveerde staanders onder de hoekstukken plaatsen, zodat het totale frame laag blijft.
SE: Benen vikes så att stativet blir lägre.
DK/NO: F-rør monteres i CVF/CHF-hjørner. Derefter monteres teltet således, at slusen,
som skal hægtes på bilen, lægges over baghjørnerne.
GB: Place canopy F-poles into CVF/CHF-corners. Place the canvas over the frame with the
elasticated tunnel over the back legs.
DE: Das Zelt durch anheben der Zeltbeine aufrichten. Danach die Zelthaut von hinten nach vorne
über die beiden Rohrenden der
Vorderstangeneinsätzte (F) stülpen. Das Dach über dem Gestänge glatt ziehen.
NL: Denk aan de F-stangen. Nu het tentdoek van achter naar voren over de frameconstructie trekken.
Daarna het doek glad trekken.
SE: Montera uthängsrören (F-rör). Tältduken dras över så att slussen, som skall häktas på bilen, kommer över bakre hörnen.
DK/NO:
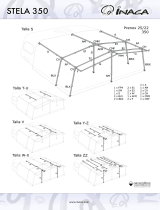
Stængerne samles. Først samles CVB/CHB og CVF/CHF-hjørner med E- og A-stængerne.
Derefter monteres AM-overliggeren.
GB: Make oneself familiar with the framework before erecting. Rear corners CVB/CHB and front corners CVF/CHF
are connected with E-roof poles. Left hand corners CVB/CVF and right hand corners CHB/CHF are connected
with A-roof poles. Mount AM-roof pole on E-roof poles.
DE: Zunächst das Gestänge vorsortieren (siehe Skizze 2). Die mit CVB/CHB/CVF+CHF bezeichneten Gestängeteile mit
den beiden A-Dachstangen und E-Dachstangen verbinden. Montieren Sie die mittlere AM-Dachstange.
NL: De met CVB/CHB/CVF/CHF omschreven hoekstukken d.m.v. A-stangen en E-stangen met elkaar verbinden.
Plaats ook de middelste AM-dakstang.
SE: Stängerna kopplas ihop. Först CVB/CHB och CVF/CHF med A-sidoöverliggarna och E-stänger. Därefter monteras AM-överliggaren.
F
F
V
A
A
E
E
AM
CVF
CVB
CHF
CHB
F
F
V
F
F
V
A
A
E
E
AM
CVF
CVB
CHF
CHB
V
V
F
F
V
1
1
2
(V)
V
1
2
3
2
1a
1b
1c
3
3
1
2
3
145 cm
110 cm


 1
1
 2
2
Two Notes Torpedo Reload Owner's manual
Leckey Freestander User manual
Outwell Greenwood 4 Pitching Instruction
Outwell Montana 6PE Pitching Instruction
Outwell Ashwood 5 Pitching Instruction
Outwell Cloud 5 Plus Pitching Instruction
 Two notes Audio Engineering Torpedo C.A.B. User manual
Outwell Harrier L Owner's manual
 Easy Camp Base Air 500 Zelt Owner's manual
 Inaca STELA 350 Erection Instructions


