Avaya 6211 User manual

Category
Telephones
Type
User manual

This manual is also suitable for

Avaya Definity 6211 is a single-line telephone capable of operating behind any Avaya Business Communications System switch. It features a data jack for connecting a device like a modem, adjustable ringer and handset volume controls, a message light that flashes when a call comes in or a message is left, and a hold button to put a call on hold. It also has a redial button to redial the last dialed number, a mute button to silence the microphone, and a speakerphone button to allow hands-free conversation.

Avaya Definity 6211 is a single-line telephone capable of operating behind any Avaya Business Communications System switch. It features a data jack for connecting a device like a modem, adjustable ringer and handset volume controls, a message light that flashes when a call comes in or a message is left, and a hold button to put a call on hold. It also has a redial button to redial the last dialed number, a mute button to silence the microphone, and a speakerphone button to allow hands-free conversation.

The 6211 telephone is a single-line set capable of operating
behind
any Avaya Business Communications System
(BCS) switch including DEFINITY, MERLIN LEGEND, and
DIM
ENSION PBXs.
6211 Telephone Quick Reference
Issue 2, June 2001
555-233-7
15
Comcode 700211626
Figure 1. The 6211 Telephone, Top View
Telephone Features:
1 The Data Jack; labeled ) — You can use this jack on
the 6211 telephone for connecting a device such as a
mode
m to your telephone.
2 The Ringer volume controlOn the 6211 telephone,
se
t the 3-position Ringer volume control to raise or lower
the volume of the tone ringer. The volume control is
labe
led .
3 The Message LightThe red Message light, on the
62
11 telephone, flashes when you have a message and
wheneve
r a call rings at your telephone. This light is
labe
led .
4 The Handset volume control (labeled ) — On the
62
11 telephone, use this Handset volume control button
to raise or lower the volume of the handset receive level.
To raise the volume, press the upper half of the button
labe
led ; to lower the handset volume, press the lower
hal
f of the button labeled .There are four available
volume levels.
5 Dial pad
6 Line jack (on the bottom of the telephone)
IMPORTANT SAFETY INSTRUCTIONS
The most careful attention has been devoted to quality standards
in the manufacture of your new telephone. Safety is a major
factor in the design of every set, but, safety is YOUR
responsibility too.
Please read carefully the helpful tips listed below and on the next
page. These suggestions will enable you to take full advantage of
your new telephone. Then, retain these tips for later use.
Use
When using your telephone equipment, the following safety
precautions should always be followed to reduce the risk of fire,
electric shock, and injury to persons.
Read and understand all instructions.
Follow all warnings and instructions marked on the telephone.
This telephone can be hazardous if immersed in water. To
avoid the possibility of electric shock, do not use it while you
are wet. If you accidentally drop the telephone into water, do
not retrieve it until you have first unplugged the line cord from
the modular jack. Then, call service personnel to ask about a
replacement.
Avoid using the telephone during electrical storms in your
imm
ediate area. There is a risk of electric shock from lightning.
Ur
gent calls should be brief. Even though protective measures
may have been installed to limit electrical surges from entering
your business, absolute protection from lightning is impossible.
If you suspect a natural gas leak, report it immediately, but use
a telephone away from the area in question. The telephone’s
electrical contacts could generate a tiny spark. While unlikely, it
is possible that this spark could ignite heavy concentrations of
gas.
Never push objects of any kind into the equipment through
housing slots since they may touch hazardous voltage points or
short out parts that could result in a risk of electric shock.
Never spill liquid of any kind on the telephone. If liquid is
spilled, however, refer servicing to proper service personnel.
To reduce the risk of electric shock, do not disassemble this
telephone. There are no user serviceable parts. Opening or
removing covers may expose you to hazardous voltages.
Incorrect reassembly can cause electric shock when the
telephone is subsequently used.
7 — Press the red button, on the telephone,
in
order to put a call on hold while you perform another
task.
8 Press , on the telephone, in order to
redial
the last number that you dialed from the dial pad.
9 Press , on the telephone, instead of
pressing the switchhook for features such as Conference
wi
th business communications systems.
10 Handset cord jack
11 Handset
Note
: The 6211 telephone has only Touch-Tone Dialing.
This telephone also supports the Timed Disconnect
feat
ure. No special settings are needed to engage these
features.
Service
1 Before cleaning, unplug the telephone from the modular wall
jack. Do not use liquid cleaners or aerosol cleaners. Use a
damp cloth for cleaning.
2 Unplug the telephone from the modular wall jack. Be sure to
refer servicing to qualified service personnel when these
conditions exist:
If liquid has been spilled into the telephone.
If the telephone has been exposed to rain or water.
If the telephone has been dropped or the housing has
been damaged.
If you note a distinct change in the performance of the
telephone.
SAVE THESE INSTRUCTIONS
HEARING AID COMPATIBILITY
This telephone is Hearing Aid Compatible (HAC) and thus has
“H
AC” printed on it.
When you see this warning symbol on the product,
refer to these instructions for more information
before proceeding with installation.
!
1
2
PROCEDURES FOR USING THE FEATURES
To answer or place a call
Note
: The Message light flashes when a call is coming in
(that is, when the telephone is ringing).
1 To place or answer a call, lift the handset.
2 To place a call, next, dial the desired number.
3 To end the call, hang up the handset.
Note
: To raise the volume of the handset, press the upper
hal
f of the Handset volume control button labeled ; to
lower
the volume of the handset, press the lower half of the
Handse
t volume control button labeled .
To put a call on hold
1 Press . (The red light next to goes on.)
To return to the held call
1 Press , or, if you have hung up the handset,
lift the handset again from the cradle.
(The red light next to goes off.)
You are reconnected to the other party.
ANSWERING AND PLACING A CALL
HOLD
To retrieve a message when your Message light is
blinking
1 See your system manager for instructions about your
local
message retrieval procedures.
Note
: The Message light also flashes when a call is coming
in
(that is, when the telephone is ringing).
To redial the last number that you dialed
1 While off-hook, press .
(The telephone will redial up to 32 digits.)
To control the volume of the tone ringer
Note
: The volume control is labeled .
1 To raise the volume of the ringer, slide the Ringer volume
con
trol upwards; to lower the volume of the ringer, slide
the Ringer volume control downwards.
M
ESSAGE
REDIAL
RINGER VOLUME
Figure 2. The Bottom of the 6200 Series Telephones
2 Remove the desk stand by sliding it to the left until it is
free of the telephone base.
PROCEDURES FOR INSTALLING THE
TELEPHONE
TABLE/DESK INSTALLATION
Use the 7-foot straight line cord that came with your
telephone to connect the telephone to a modular jack.
!
WARNING:
Do
not plug the handset cord into the line jack or the
da
ta jack on your telephone since it could damage your
handse
t and the telephone.
1 Turn the telephone upside down so that you can see the
bo
ttom of the telephone. See Figure 2.
Desktop
Line jack
stand
wall mounting
4 holes for
Figure 3. Sliding the Base from the Bottom of the Set
3 Plug one end of the line cord into the line jack on the
bo
ttom of the telephone.
4 Align the other end of the line cord so that it appears
through the slot at the top of the stand and reattach the
stand to the telephone by sliding the stand into the
appropria
te tabs and then to the right.
5 After you have attached the stand to the telephone, use
the screw provided to tighten the stand onto the back of
the telephone set.
Slide stand
to left and lift
Desktop
stand
Figure 4. Tightening the Stand to Back of the Telephone
6 Turn the telephone right-side up and place it on your desk
or
table.
7 Plug one end of the coiled handset cord into the handset
jack
on the side of the telephone.
8 Plug the other end of the handset cord into the handset.
9 Hang up the handset.
10 Plug the free end of the line cord into a modular wall jack.
11 Lift the handset and listen for dial tone.
12 Set the Ringer Volume Control switch to the setting you
wan
t.
WALL INSTALLATION
Use
the following directions to mount the telephone on a
standard wallphone jack with mounting studs.
Note
: For wall installation, do NOT unbundle the line cord
pack
aged with the telephone; that is, leave the line cord in its
coiled position.
1 You must reverse the handset tab (which holds the
handse
t when you hang up). See Figure 4.
Hold down the switchhook and slide the handset tab up
and
out of its slot.
Turn the tab so that the curved end is facing up.
Insert the tab back into its slot.
a. Handset b. Press to release
retainer
in place
and then remove
handset retainer
3
d. Replace handsetc. Reposition
handset
retainer
down
retainer
(down
(up
position)
po
sition)
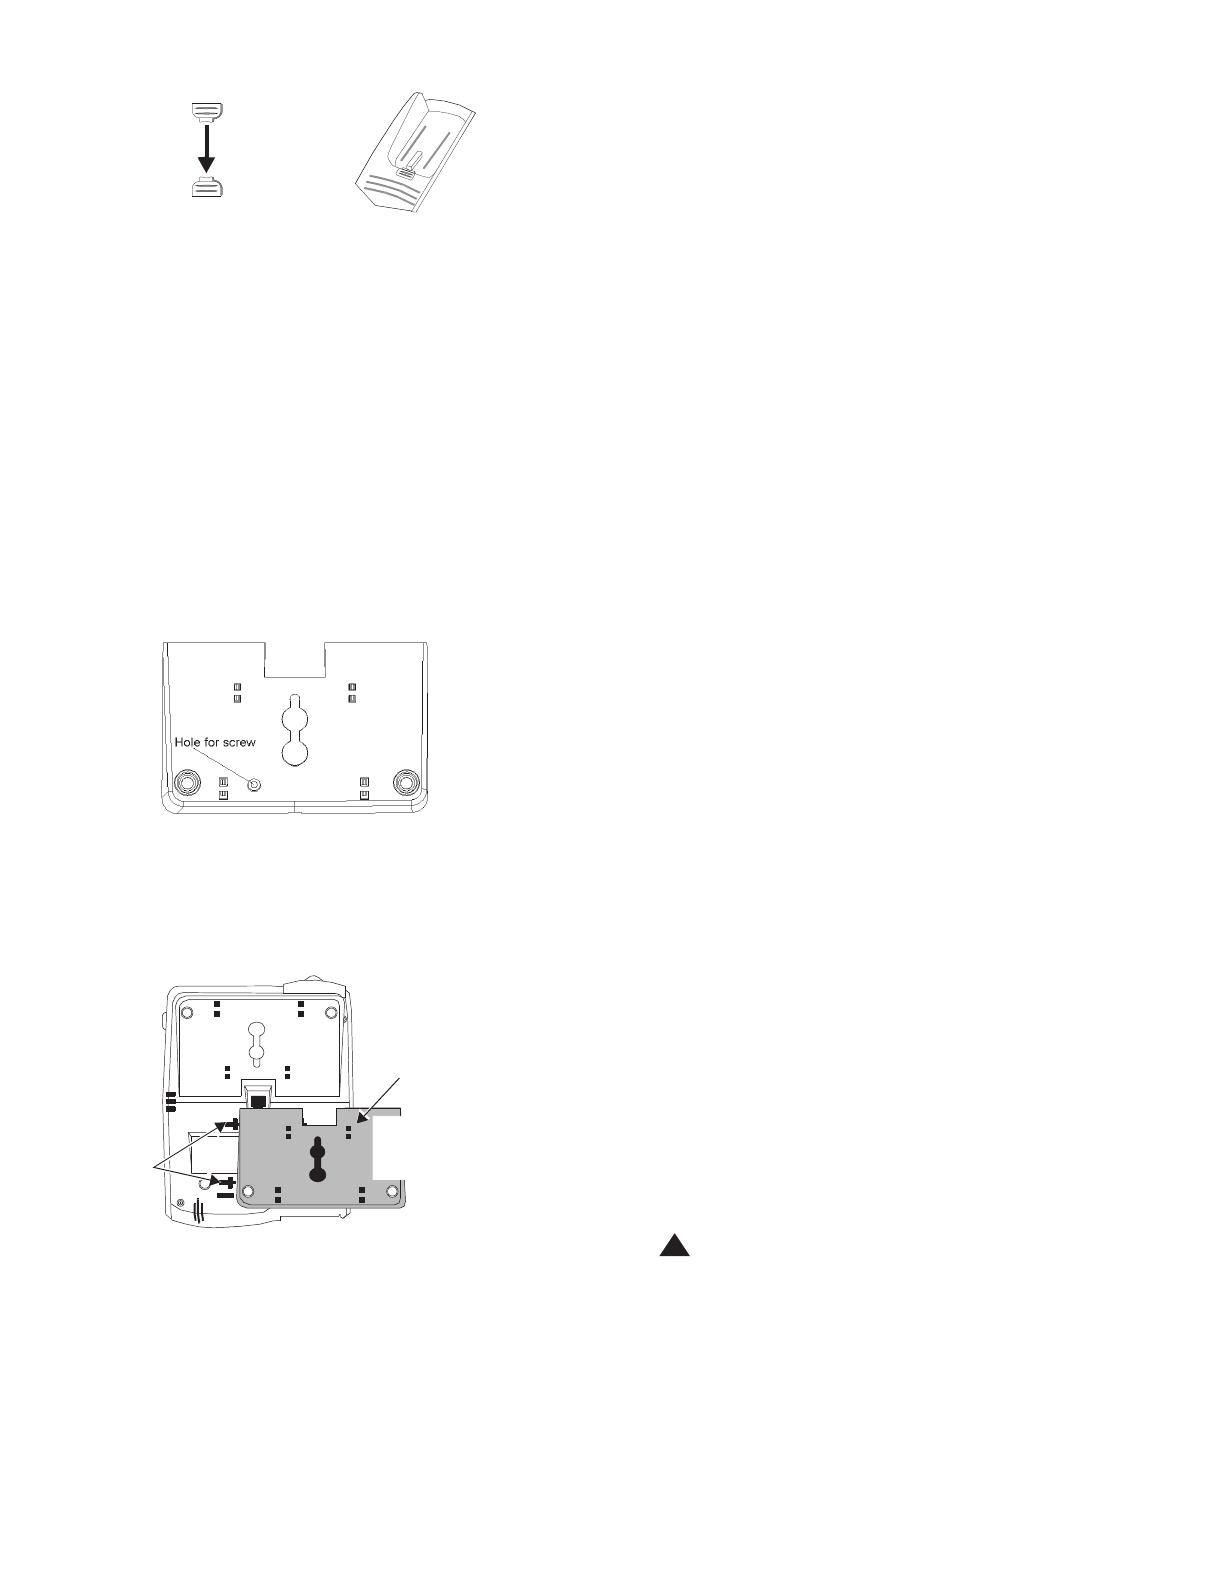
Figure 5. Reversing the Handset Hook
2 Turn the telephone upside down so that you can see the
bo
ttom of the telephone.
3 Remove the mounting base by sliding the base to the left
un
til it is free of the telephone. See Figure 5.
4 Turn the base so the larger end is down.
5 Plug one end of the line cord into the line jack on the
bo
ttom of the telephone. (Keep the cord bundle in the
cavi
ty on the lower housing.) Leave the other end of the
cord
unattached for later use.
Note
: You may prefer to use an 8-inch line cord rather
than the 14-foot cord provided with the telephone. If you
use the 14-foot cord, you will need to place it into the
back
of the telephone in its original coiled position.
6 After you have attached the stand to the telephone, use
the screw provided to tighten the stand onto the back of
the telephone set.
Figure 6. Tightening the Stand to Back of the Telephone
7 Slide the reversed base onto the telephone into the
appropria
te tabs near the bottom of the set and then slide
it to the right until it snaps into place. See Figure 6.
Invert stand
Holes
for wall
mounting
Position stand
over 4 holes,
push stand down,
and slide to left
Figure 6. Installing the Stand for Wall-Mounting
8 Plug one end of the coiled handset cord into the handset
jack
on the side of the telephone.
9 Plug the free end of the line cord into a modular wall jack.
10 Place the telephone against the wall jack mount and push
down
so that the base locks into the slots on the
telephone.
11 Plug the free end of the coiled handset cord into the
handse
t and hang up the handset.
12 Lift the handset and listen for dial tone.
13 Set the Ringer Volume Control switch to the settings you
wan
t.
PART 68: NETWORK REGISTRATION NUMBER
This equipment is registered with the FCC in accordance with
Part 68 of the FCC Rules.
PART 68: ANSWER SUPERVISION SIGNALLING
Allowing this equipment to be operated in a manner that does not
provide proper answer-supervision signaling is in violation of Part
68 Rules. This equipment returns answer-supervision signals to
the public switched network when:
Answered by the called station
Answered by the attendant
Routed to a recorded announcement that can be administered
by the CPE user
This equipment returns answer-supervision signals on all DID
calls forwarded back to the public switched telephone network.
Permissible exceptions are:
A call is unanswered
A busy tone is received
A reorder tone is received
CONNECTION AND USE WITH THE NATIONWIDE
TELEPHONE NETWORK
The FCC requires that you connect your telephone equipment to
the nationwide telephone network through a modular telephone
outlet or jack. The modular telephone outlet or jack to which the
telephone must be connected is a USOC RJ11C or RJ11W. The
telephone may not be used on coin service provided by the
telephone company. Connection to party lines is subject to state
tariffs. (Contact your state public utility commission or corporation
commission for information.)
INFORMATION FOR THE TELEPHONE COMPANY
Upon request of your local telephone company, you are required
to provide them with the following information: A.) Your phone
number. B.) The telephone equipment’s FCC registration number
and ringer equivalence number (REN). These numbers are on
the back or bottom of your telephone equipment. The REN is
useful to determine how many devices you may connect to your
telephone line and still have them ring when your telephone line
is called. At most, but not all areas, the sum of all REN’s should
be 5 or less. You may want to contact your local telephone
company.
REPAIR INSTRUCTIONS
If it is determined that your telephone is malfunctioning, the FCC
requires that it not be used and that it be unplugged from the
modular outlet until the problem is corrected. Repairs can only be
made by the manufacturer or its authorized agents or by others
wh
o may be authorized by the FCC.
RIGHT OF THE TELEPHONE COMPANY
If telephone equipment is causing harm to the telephone network,
the telephone company may temporarily discontinue your
telephone service. If possible, they’ll notify you before they
interrupt service. If advance notice isn’t practical, you’ll be notified
as soon as possible. You’ll be given the opportunity to correct the
problem, and you’ll be informed of your right to file a complaint
wi
th the FCC. Your telephone company may make changes in its
facilities, equipment, operations or procedures that could affect
the proper functioning of your Avaya product. If such changes are
planned, you’ll be notified.
INTERFERENCE INFORMATION
!
WARNING:
Some telephone equipment generates and uses radio
frequency energy and if not installed and used properly, that
is,
in strict accordance with the manufacturer’s instructions,
may cause interference to radio and television reception.
This telephone has been type tested and found to comply
wi
th the limits for a Class B computing device in
accordance with the specifications in Subpart J of Part 15 of
FCC Rules, which are designed to provide reasonable
protection against such interference in a residential
installation.
4
However, there is no guarantee that interference will not occur in
a particular installation. If this equipment does cause interference
to radio or television reception, which can be determined by
turning the equipment on and off, the user is encouraged to try to
correct the interference by one or more of the following
measures:
Reorient the receiving television or radio antennae where this
may be done safely.
To the extent possible, relocate the receiver with respect to the
telephone equipment.
Where the telephone equipment requires ac power, plug the
telephone into a different ac outlet so that the telephone
equipment and receiver are on different branch circuits.
AVAYA WARRANTY INFORMATION
WHAT IS COVERED: All terms and conditions specified in your
agreement with Avaya apply.
TO GET WARRANTY SERVICE FOR YOUR TELEPHONE: Call
the Avaya Customer Service Support Operations toll-free at 1
800 242-2121 or call the distributor from whom the product was
purchased. If you are directed to ship your telephone to an
authorized service location, you must prepay all shipping costs.
We
suggest that you retain the original packing material in the
event you need to ship the unit. When sending your telephone to
a service location, include your name, address, phone number,
proof of purchase (or original shipping receipt), and description of
the operating problem. After replacing your telephone, Avaya will
ship it to you at no cost to you.
Copyright
©
2001 Avaya Inc.
1 / 1

Avaya 6211 User manual

Category
Telephones
Type
User manual
This manual is also suitable for

Avaya Definity 6211 is a single-line telephone capable of operating behind any Avaya Business Communications System switch. It features a data jack for connecting a device like a modem, adjustable ringer and handset volume controls, a message light that flashes when a call comes in or a message is left, and a hold button to put a call on hold. It also has a redial button to redial the last dialed number, a mute button to silence the microphone, and a speakerphone button to allow hands-free conversation.

Ask a question and I''ll find the answer in the document

Finding information in a document is now easier with AI

Ask the document