Sanyo PJ-Net Organizer User manual
- Category
- Projectors
- Type
- User manual
This manual is also suitable for

OWNER'S MANUAL
PJ-Net Organizer
MODEL No. POA-PN40
LINK
AC
T

2
Compliance and Caution
Trademarks
PJ-Net Organizer is a registered trademark of Sanyo Electric Co. Ltd. PJLink is a reg-
istered trademark of JBMIA. Ethernet is a registered trademark of Xerox Corporation.
Microsoft, Windows, Windows NT are registered trademarks of Microsoft Corporation.
Internet Explorer is a registered trademark of Microsoft Corporation. Netscape
Navigator and Netscape Communicator are trademarks or registered trademarks of
Netscape Communications Corporation. JavaScript is a registered trademark of Sun
Microsystems, Inc. Macromedia and Macromedia Flash Player are registered trade
-
marks of Macromedia Inc.
Other product or brand names in this manual are registered trademarks or trademarks
of their respective owners.
* Unauthorized use of a part or whole of the contents in this manual is prohibited.
* The contents of this manual are subject to change without notice.
Compliance
Federal Communication Commission Notice
This equipment has been tested and found to comply
with the limits for a Class B digital device, pursuant to
part 15 of the FCC Rules. These limits are designed
to provide reasonable protection against harmful
interference in a residential installation. This equip
-
ment generates, uses and can radiate radio frequency
energy and, if not installed and used in accordance with the instructions, may cause
harmful interference to radio communications. However, there is no guarantee that
interference will not occur in a particular installation. If this equipment causes harmful
interference to radio or television reception which can be determined by turning the
equipment off and on, the user is encouraged to try to correct the interference by one
or more of the following measures:
- Reorient or relocate the receiving antenna.
- Increase the separation between the equipment and receiver.
- Connect the equipment into an outlet on a circuit different from that to which
the receiver is connected.
- Consult the dealer or an experienced radio/TV technician for help.
Use of shielded cable is required to comply with class B limits in Subpart B of Part 15
of FCC Rules.
Do not make any changes or modifications to the equipment unless otherwise speci
-
fied in the manual. If such changes or modifications should be made, you could be
required to stop operation of the equipment.
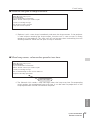
Model Numbers : POA-PN40
Trade Name : Sanyo
Responsible party : SANYO FISHER COMPANY
Address : 21605 Plummer Street, Chatsworth, California 91300
Telephone No. : (818)998-7322
Tested To Comply
With FCC Standards
FOR HOME OR OFFICE USE
SANYO POA-PN40

3
PJ-NET ORGANIZER
OWNER'S MANUAL
ENGLISH
CAUTION
SANYO Electric Co., Ltd. assumes no responsibility for the loss or damage of data
or damage of the computer caused by usung this product.
CAUTION ON USE IN NETWORK
- When you receive an alert e-mail from the projector, you must check the projector
immediately. Fire or accident may result if the projector is used in an abnormal
condition.
- When you install the projector at remote location and use it through the network,
you must perform the safety inspections periodically. In this case you must pay
attention to the change of environment in which you installed the projector. It may
cause fire or an accident depending on the change of environment.
The CE Mark is a Directive conformity mark of the European Community
(EC).
Expression/Abbreviation
The word "projector" found in this manual means "LCD projector provided with PJ-Net
Organizer" unless otherwise noted.
The OS of the computer and the web browser described in this manual is Windows XP
Professional and Internet Explorer 6.0. In case of another OS or web browser, some
instruction procedures may differ from the actual operation depending on your com
-
puter environment.
Use of this manual
This manual does not provide the description of basic operation and functions for
computer, web browser, projector and network. For instructions about each piece of
equipment or application software, please refer to the respective booklet.
Compliance and Caution

4
Compliance ..............................................................................................................2
Federal Communication Commission Notice .......................................................
2
Trademarks ..........................................................................................................
2
Contents ...................................................................................................................4
Chapter 1 Preparation .........................................................................................7
Features ....................................................................................................................8
Operating environment ........................................................................................ 10
Before use ............................................................................................................. 11
Chapter 2 Installation ........................................................................................ 13
Flow of installation ...............................................................................................14
[1] Name and function of each part ................................................................... 15
[2] Installation and network configuration ........................................................16
Mounting ........................................................................................................... 16
Connection of LAN cable ................................................................................... 17
Network configuration .......................................................................................
18
Network PIN code setting ..................................................................................
20
How to enter the numbers with the screen 10-key pallet .................................
21
Notice about system construction .....................................................................
22
Chapter 3 Basic Setting and Operation ....................................................23
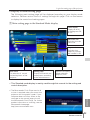
Login the setting page of the projector ............................................................24
1 Enter the IP address .......................................................................................24
2 Select a display mode and login .....................................................................24
3 Display of main setting page ...........................................................................25
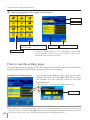
How to use the setting page ..............................................................................26
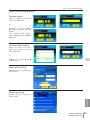
Initial setting ..........................................................................................................28
Network PIN code setting ..................................................................................
29
PJLink and password setting .............................................................................
29
What's PJLink? .............................................................................................29
Date and time setting ........................................................................................
30
Network configuration .........................................................................................31
E-mail setting .........................................................................................................32
Examples: Type and contents of alert mail .........................................................
34
SNMP setting ........................................................................................................36
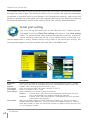
Chapter 4 Controlling the Projector ...........................................................39
Power control and status check .........................................................................40
Controls ..................................................................................................................42
Input ...................................................................................................................42
System ...............................................................................................................
43
Image adjustment .............................................................................................44
Sound ................................................................................................................45
Menu ................................................................................................................45
PC adjustment .......................................................................................................46
Setting up the projector .......................................................................................47
Contents

5
PJ-NET ORGANIZER
OWNER'S MANUAL
ENGLISH
Contents
Save the controls and settings ...........................................................................49
Save/delete the settings ....................................................................................
49
Check the saved items ......................................................................................
50
Load a control set ..............................................................................................
50
Timer setting .........................................................................................................51
How to set the timer .........................................................................................
51
Check the timer events ......................................................................................
52
Change the event mode ....................................................................................
52
Projector information ............................................................................................54
Multi-control ..........................................................................................................56
Controlling and setting the multi-projectors .......................................................
56
Start/stop the multi control ................................................................................
57
Register the projector ........................................................................................
58
Confirmation of registered projector ..................................................................58
Change the mode of the registered projector ...................................................59
Status .................................................................................................................
59
Conf. & Change page in the light mode .............................................................60
Controlling all together .......................................................................................60
Setting all together .............................................................................................
60
Chapter 5 Use of Serial Port ..........................................................................61
Serial port setting ..................................................................................................62
Setting examples for the serial control ..............................................................
63
Control examples ..................................................................................................64
Use of telnet ..........................................................................................................66
Control the projector with telnet ........................................................................68
Chapter 6 Appendix ..........................................................................................69
Examples of connection ......................................................................................70
Web browser setting ............................................................................................72
Examples: OS/Browsers .....................................................................................73
Product specification ............................................................................................77
Port specification ..................................................................................................78
Q&A ........................................................................................................................79

6

7
PJ-NET ORGANIZER
OWNSER'S MANUAL
ENGLISH
7
1
Chapter 1
Preparation
Describes features and operating environment of this product.

8
Chapter 1 Preparation
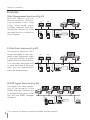
Features
E-Mail Alert function (☞p.32)
The projector (Network Unit)
sends messages to the regis
-
tered e-mail addresses when
a lamp abnormality or power
failure occurs on the projector.
This message describes how
to solve the cause of the prob
-
lems. You can take efficient
action for quick recovery.
PC4PC3
PC6
PC5
PC1
PC2
You’ve got
Mail.
PJ2
PJ1
Web Management function (☞p.39)
With this function, you can
monitor projector functions
such as power status, lamp
status, input mode, signal
condition, lamp-use time, etc.
through the network by using
the web browser installed on
your computer.
PC4PC3
PC6
PC5
PC1
PC2
Turn on PJ2.
PJ2
PJ1
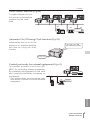
SNMP Agent function (☞p.36)
The function to send informa-
tion of the projector to the
SNMP manager. Enables you
to manage the projector condi
-
tion with the SNMP manager
software *.
PC6
PC4
PC5
SNMP Manager
Trap
Trap
You received
a trap.
PJ2PJ1 PJ4
PJ3
* This network unit does not provide the SNMP manager software.

9
PJ-NET ORGANIZER
OWNER'S MANUAL
ENGLISH
Features
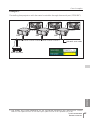
Multi-control function (☞p.56)
A single computer can con-
trol and set up the multiple
projectors at the same
time.
PC6
PC4
PC5
Select Input 2
for PJ1 to PJ
4
PJ2PJ1 PJ4
PJ3
Automatic On/Off using Clock function (☞p.51)
Automatically turn on or off the
projectors at specified date/day
and time by using the clock
function.
Now it’s 11:30
I am ready to turn ON,
and select Input 3 (Video)
Control port ready for external equipment (☞p.61)
This product provides a serial port (RS-
232C) for controlling external equipment.
By connecting the equipment to the serial
port, it can be controlled by a computer via
the network.
* This product does not provide the inter
-
face driver software to control external
equipment.
PC3
PC5
Playback DVD
PJ2
DVD Player

10
Chapter 1 Preparation
*1 The "Light Mode" and "Standard Mode" will be explained on item "Display Mode" (☞ p.24-26)
PDA restriction
The PDA can be used for the Light mode*
1
only. The operating system of the PDA is
PocketPC2002 or higher. The version of the Macromedia Flash Player is 6,0,81,0 or higher.
Operating environment
To perform the managing and setting up the projector using this product, the environ-
ment described below is required.
Operating System
Standard mode*
1
: Windows 98, Windows Me, Windows 2000,
Windows NT4.0 SP6, Windows XP
Network
Network must handle Ethernet correctly and accept TCP/IP protocol.
Computer
The computer must provide a 10Base-T or 100Base-TX network card.
Web browser application*
● Microsoft Internet Explorer version 5.0, 5.5 or 6.0
● Netscape Navigator version 6.2, 7.0 or 7.1
* Used to control and set up the projector. The layout of pages in the browser may
slightly differ from each type of application or operating system you use.
● Plug-Ins: Macromedia Flash Player version 6,0,79,0(6.0r79) or later
Internet mail application*
● Microsoft Outlook ● Microsoft OutlookExpress
● Netscape Mail
* Required the internet e-mail application software to receive an e-mail alert sent
from this product. If you do not use the function E-mail Alert, this application is
not required.

11
PJ-NET ORGANIZER
OWNER'S MANUAL
ENGLISH
Operating environment
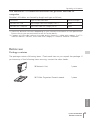
Before use
Package contains
The package contains following items. Check each item as you unpack the package. If
you have any of the following items missing, contact the sales dealer.
L
I
N
K
A
C
T
❑ Network Unit 1 piece
L
I
N
K
A
C
T
❑ PJ-Net Organizer Owner’s manual 1 piece
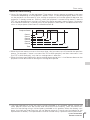
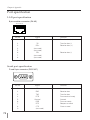
The limitation
*1
of connection between this product and hub or
computer
Suitable LAN cables are limited by length and type as follows;
Connection Type of usable LAN cable Maximum length
Network Unit - Hub UTP Straight Cable with category 3 or 5 *
2
100m
Network Unit - Computer UTP Cross Cable with category 3 or 5*
2
100m
*1 There may be other limitations depending on your network environment or LAN specification.
Please consult your network administrator for further details.
*2 Category of LAN cable indicates the cable quality. Normally, a cable with category 3 or 5 is
used for 10Base-T network, and a cable with category 5 is used for 100Base-TX network.

12
Chapter 1 Preparation

13
PJ-NET ORGANIZER
OWNSER'S MANUAL
ENGLISH
Chapter 2
Installation
2
Describes how to install the Network Unit, and configure the
network.

14
Chapter 2 Installation
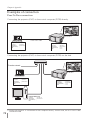
The following are instructions for attaching this product to the projector and connect-
ing it to the network. Please review the entire procedure to become familiar with it.
Function of the Network Unit (☞ p.15)1
Installation and network configuration (☞ p.16-22)2
Set up is complete
1 Mount this product onto the projector.
2 Connect the LAN cable and join it to the network.
3 Configure the network of the Network Unit.
4 Set the network PIN code.
Flow of installation
The preparation is complete to control the projector connected to the network. At next
step, set up and control the projector via the network by using the web browser installed
on your computer. Please see chapter 3 "Basic Setting and Operation". (☞ p.23)
Explains the name and functions of each part of the Network Unit.

15
PJ-NET ORGANIZER
OWNER'S MANUAL
ENGLISH
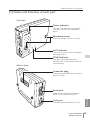
[1] Name and function of each part
Name and function of each part
LINK
AC
T
Serial port
Used to control the external equip-
ment via the network. (
☞ p.61)
Power indicator
This lights up red when the network
function is set ON in the projector
menu.
LAN port
Connecting the LAN cable. (☞ p.17)
Connector plug
Connecting to the terminal on the pro-
jector. (
☞ p.16)
Mounting screws
Mount by using a coin etc. (☞ p.16)
LINK indicator
This lights up orange when the
Network Unit is connected to the net
-
work correctly.
ACT indicator
This turns on and off when sending or
receiving of data
(Top View)
(Bottom View)

16
Chapter 2 Installation
Mounting
✐ AC cord must be disconnected when mounting or removing this product otherwise it may
damage the product.
✐ Do not install multiple Network Units into a projector otherwise it may damage the product.
✐ Connect the AC cord after connecting the LAN cable and computer.
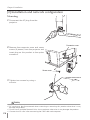
[2] Installation and network configuration
Caution
!
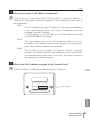
1 Disconnect the AC plug from the
projector.
2 Remove the connector cover and screw
covers (2 pieces) from the projector and
insert plug on this product to the option
connector.
3 Tighten two screws by using a
coin etc.
Connector cover
Screw cover

17
PJ-NET ORGANIZER
OWNER'S MANUAL
ENGLISH
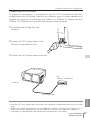
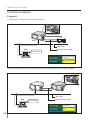
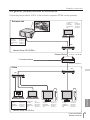
Connection of LAN cable
To connect to the network, it is required to use the UTP (Unshielded Twisted Pair)
straight cable with RJ-45 plug. There are two different types of cables depending on
whether the network is constructed with 10Base-T or 100Base-TX. Prepare the Hub
(10Base-T or 100Base-TX) to distribute the network cable if required.
1 Disconnect the AC plug from the
projector.
2 Connect the UTP straight cable to the
LAN port on the Network Unit.
3 Connect the UTP straight cable to the hub.
✐ Use the UTP cross cable when you connect the computer and projector directly not using the
hub.
✐ When you connect the projector into the 10Base-T network, use cable with category 3 or 5.
When you connect the projector into the 100Base-TX network, use cable with category 5.
✐ The length of cable between hub and projector should be less than 100m.
Hub
(10Base-T, 100Base-TX)
UTP straight cable
Projector
Installation and network configuration

18
Chapter 2 Installation
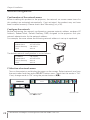
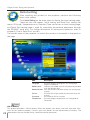
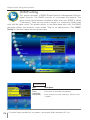
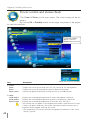
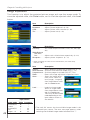
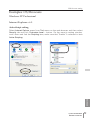
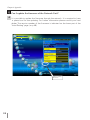
1 Selection of network menu
Turn on the projector and display the menu on the screen. Select network icon from
the main menu and then press
SELECT button once. Check that the mode is "On".
If not, change mode to "On" using the pointer buttons (
7,8).
Network configuration
Confirmation of the network menu
When installing this product to the projector, the network on-screen menu items for
this product are activated automatically. If not activated, the product may not have
been installed correctly. Please check item "Mounting" (
☞ p.16).
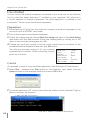
Configure the network
Before performing the network configuration, prepare network address numbers (IP
Address, Subnet Mask, Default Gateway, DNS) assigned to the projector. Ask your
network administrator for the network address.
For example, the case where the following network address is set up is explained.
IP Address : 192.168.1.201
Subnet Mask : 255.255.255.0
Default Gateway : 192.168.1.1
DNS : 0.0.0.0
The default network configuration is set as follows.
IP Address : 192.168.0.2
Subnet Mask : 255.255.255.0
Default Gateway : 0.0.0.0
DNS : 0.0.0.0
L
I
N
K
A
C
T
Network icon
Select "On" or "Off"
with 7,8 button
✐ The network unit begins restarting each time the mode is set "On".

19
PJ-NET ORGANIZER
OWNER'S MANUAL
ENGLISH
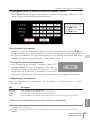
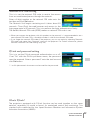
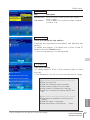
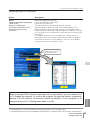
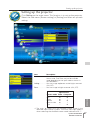
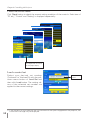
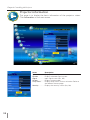
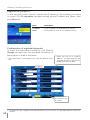
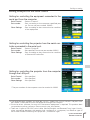
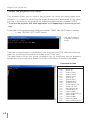
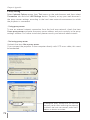
2 Configuration for IP Address/ Sub net/ Gateway*
1
/DNS*
2
Press SELECT button again. The following network setting pallet appears on the
screen. Enter the specified network addresses.
How to enter the numbers
There are 2 ways to enter the numbers, one is by using the point buttons (d e ) on
the remote control or on the projector, the other is by using the screen 10-key pallet
by which the numbers can be entered directory. For further information see "How
to enter the numbers with the screen 10-key pallet" (
☞ p.21).
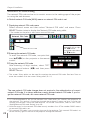
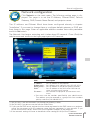
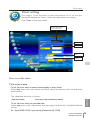
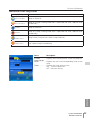
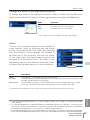
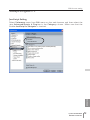
3 Fixing the network configuration
After completing the entering of address, select "SET"
and press
SELECT button.
The Network Unit starts re-
booting and displays message "Please wait..." on the
screen until the re-booting is complete.
Do not discon-
nect the AC cord during this period. After that the menu will disappear on the screen.
Completing of installation
Now the installation is complete. The IP address of this projector is set to
"192.168.1.201".
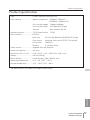
Item Description
IP address ..........Sets IP address of the projector
Sub net ..............Sets Subnet mask. Normally sets 255.255.255.0
Gateway*
1
..........Sets IP address of the default gateway (Router)
DNS*
2
................Sets IP address of the DNS server. Must be set when using the e-mail function
*1 In the network environments not using a Gateway or Router, the Default Gateway address
should be set to [0.0.0.0].
*2 If you do not use the functions E-mail or DNS server, it is also set [0.0.0.0] for the DNS
address.
✻ Refer to the projector's owner's manual for operation of the projector.
Installation and network configuration
The red frame moves
sequentially left or right
with 7 8 button.
The number up or down
with d e button.

20
Chapter 2 Installation
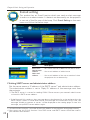
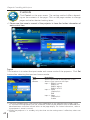
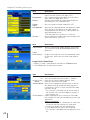
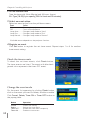
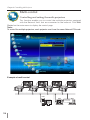
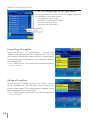
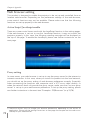
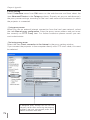
Network PIN code setting
The network PIN code can be set to restrict access to the setting page of the projec-
tor using the web browser.
✽ Default network PIN code [0000] means no network PIN code is set.
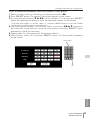
1 Displaying network PIN code menu
Select network menu and then select "Network PIN code" sub menu. Press
SELECT button twice to display the Network PIN code entry pallet.
* The number on the pallet is the current network PIN code.
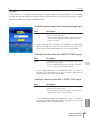
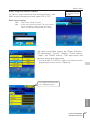
2 Entering the network PIN code
To enter the network PIN code, use point but
-
tons (
▲,▼,7,8) on the projector or the remote
control.
3 Fixing the network PIN code
After entering a 4-digit number, select "SET"
by using point buttons (
7,8) and then press
SELECT button.
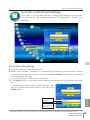
✐ The screen 10-key pallet can be used for entering the network PIN code. See item "How to
enter the numbers with the screen 10-key pallet" (
☞. 21)
✐ It is recommended to set up the Network PIN code when you connect the projector to
the network. This setting is carried out through the projector’s menu and also it can be set
through the network using the web browser. For further information, refer to item "Initial
Setting/Network PIN code setting" (
☞ p.29).
✐ Valid characters for the network PIN code are only numbers 0 to 9. The number "0000" means
no network PIN code is set.
✐ This network PIN code is not to restrict the use of the projector. This network PIN code is to
set the security against the use of the projector through the network.
The new network PIN code change does not require for the authentication of current
network PIN code. It is always effective a newly entered network PIN code. If you for
-
get the network PIN code, set a new network PIN code.
Network PIN Code
The red frame moves
sequentially left or right
with 7 8 button.
The number up or down
with d e button.
Page is loading ...
Page is loading ...
Page is loading ...
Page is loading ...
Page is loading ...
Page is loading ...
Page is loading ...
Page is loading ...
Page is loading ...
Page is loading ...
Page is loading ...
Page is loading ...
Page is loading ...
Page is loading ...
Page is loading ...
Page is loading ...
Page is loading ...
Page is loading ...
Page is loading ...
Page is loading ...
Page is loading ...
Page is loading ...
Page is loading ...
Page is loading ...
Page is loading ...
Page is loading ...
Page is loading ...
Page is loading ...
Page is loading ...
Page is loading ...
Page is loading ...
Page is loading ...
Page is loading ...
Page is loading ...
Page is loading ...
Page is loading ...
Page is loading ...
Page is loading ...
Page is loading ...
Page is loading ...
Page is loading ...
Page is loading ...
Page is loading ...
Page is loading ...
Page is loading ...
Page is loading ...
Page is loading ...
Page is loading ...
Page is loading ...
Page is loading ...
Page is loading ...
Page is loading ...
Page is loading ...
Page is loading ...
Page is loading ...
Page is loading ...
Page is loading ...
Page is loading ...
Page is loading ...
Page is loading ...
Page is loading ...
Page is loading ...
Page is loading ...
Page is loading ...
Page is loading ...
Page is loading ...
-
 1
1
-
 2
2
-
 3
3
-
 4
4
-
 5
5
-
 6
6
-
 7
7
-
 8
8
-
 9
9
-
 10
10
-
 11
11
-
 12
12
-
 13
13
-
 14
14
-
 15
15
-
 16
16
-
 17
17
-
 18
18
-
 19
19
-
 20
20
-
 21
21
-
 22
22
-
 23
23
-
 24
24
-
 25
25
-
 26
26
-
 27
27
-
 28
28
-
 29
29
-
 30
30
-
 31
31
-
 32
32
-
 33
33
-
 34
34
-
 35
35
-
 36
36
-
 37
37
-
 38
38
-
 39
39
-
 40
40
-
 41
41
-
 42
42
-
 43
43
-
 44
44
-
 45
45
-
 46
46
-
 47
47
-
 48
48
-
 49
49
-
 50
50
-
 51
51
-
 52
52
-
 53
53
-
 54
54
-
 55
55
-
 56
56
-
 57
57
-
 58
58
-
 59
59
-
 60
60
-
 61
61
-
 62
62
-
 63
63
-
 64
64
-
 65
65
-
 66
66
-
 67
67
-
 68
68
-
 69
69
-
 70
70
-
 71
71
-
 72
72
-
 73
73
-
 74
74
-
 75
75
-
 76
76
-
 77
77
-
 78
78
-
 79
79
-
 80
80
-
 81
81
-
 82
82
-
 83
83
-
 84
84
-
 85
85
-
 86
86


Sanyo PJ-Net Organizer User manual
- Category
- Projectors
- Type
- User manual
- This manual is also suitable for
Ask a question and I''ll find the answer in the document
Finding information in a document is now easier with AI
Related papers
-
Sanyo PLC-XM100L Network Manual
-
Sanyo PDG-DHT8000L - 8000 Lumens Owner's manual
-
-
-
Sanyo QuaDrive PLC-HF15000L Owner's manual
-
-
Sanyo PLC-WM4500/L Owner's manual
-
Eiki POA-MD13NET User manual
-
-