Electrolux EOG23400K User manual

Category
Kitchen & houseware accessories
Type
User manual

This manual is also suitable for

user manual
Gas oven
EOG 23400
Electrolux. Thinking of you.
Share more of our thinking at www.electrolux.com
Contents
Safety information 2
Product description 3
Before first use 4
Operation 5
Use, tables and tips 9
Care and cleaning 12
Technical data 13
Installation 14
Gas supply 16
What to do if… 18
Service and spare parts 19
Disposal 19
Subject to change without notice
Safety information
Warning! This new appliance is easy to
use.
However, make sure to read this hand-
book before installing and using it for the
first time. In this way you can obtain best
performance, avoid incorrect opera-
tions, use the appliance in complete
safety and respect the environment.
Installation
•This oven must be installed by qualified
personnel in accordance with existing
rules and regulations.
This oven is heavy. Take care when mov-
ing it.
Remove all packaging, both inside and
outside the oven, before using the oven.
This appliance is not connected to a com-
bustion products evacuation device. It
must be installed and connected in ac-
cordance with current installation regula-
tions. Particular attention shall be given to
the relevant requirements regarding venti-
lation.
The use of a gas cooking appliance results
in the production of heat and moisture in
the room in which it is installed. Ensure that
the kitchen is well ventilated: keep natural
ventilation holes open or install a mechan-
ical ventilation device (mechanical extrac-
tor hood).
Prolonged intensive use of the appliance
may call for additional ventilation, for ex-
ample opening a window, or more effec-
tive ventilation, for example increasing the
level of mechanical ventilation where
present.
People Safety
This oven is designed to be operated by
adults. Do not allow children to play near
or with the oven.
This appliance is not intended for use by
children or other persons whose physical,
sensory or mental capabilities or lack of
experience and knowledge prevents them
from using the appliance safely without su-
pervision or instruction by a responsible
person to ensure that they can use the ap-
pliance safely.
The oven gets hot when it is in use. Chil-
dren should be kept away until it has
cooled.
During Use
This oven is intended for domestic cooking
only. It is not designed for commercial or
industrial purposes.
Appliances become very hot with use, and
retain their heat for a long period after use.
Care should be taken to avoid touching
heating elements inside the oven.
Always stand back from the oven
when opening the oven door during
cooking or at the end of it to allow any
build up of steam or heat to release.
Do not block any of the oven vents. Never
line any part of the oven with aluminium foil.
Do not allow heatproof cooking material,
e.g. roasting bags, to come into contact
with oven elements.
2 electrolux
When cleaning the oven, proceed with
care: never spray anything onto the grease
filter (if fitted), the heating elements and the
thermostat sensor.
Never place plastic or any other material
which may melt in or on the oven.
Do not place sealed cans or aerosols in-
side the oven. They may explode if they are
heated.
Do not hang towels, dishcloths or clothes
from the oven or its handle.
Do not use this oven if it is in contact with
water and never operate it with wet hands.
Take great care when heating fats and oils
as they will ignite if they become too hot.
Always use oven gloves to remove and re-
place food in the oven.
Ensure that all control knobs are in the OFF
position when not in use.
Do not leave cookware containing food-
stuffs, e.g. fat or oil in or on the oven in
case it is inadvertently switched ON.
Do not use harsh abrasive cleaners or
sharp metal scraper to clean the oven door
glass since they can scratch the surface,
which may result in shattering of the glass.
Maintenance and Cleaning
Only clean this oven in accordance with
the instructions.
This appliance cannot be cleaned with
steam or with a steam cleaning machine.
Do not use abrasive cleaners or sharp met-
al scrapers. These can scratch the glass in
the oven door, which may result in the
shattering of the glass.
The oven should be kept clean at all times.
A build-up of fats or other foodstuffs could
result in a fire, especially in the grill pan.
Always allow the oven to cool down and
switch off the electrical supply before car-
rying out any cleaning or maintenance
work.
Product description
1
2
3 4
5 6
7
8
9
10
1 Control panel
2 Thermostat control knob
3 Thermostat indicator
4 Electronic Programmer
5 Block warning light
6 Oven Function Control Knob
7 Grill
8 Oven lamp
9 Turnspit hole
10 Rating plate
electrolux 3
Controls
Oven function control knob
This control is used for selecting the type of
cooking.
Turn the knob to one of these symbols to
obtain the required function. At the same
time, the oven light is switched on.
Thermostat control knob
The cooking temperature can be set be-
tween 50°C and MAX (240°C), turning the
thermostat knob clockwise.
Oven functions
The oven is off
The oven emits heat from the bottom.
Electric grill and rotisserie operation.
The grill is switched on: the oven emits
heat only from the top (suitable for
browning food)
The oven light is switched on but the
oven does not heat
Thermostat light
This light on the control panel comes on
when the oven is heating. The light goes off
when the oven temperature reaches the level
selected with the thermostat. Simultaneous-
ly, the gas flow is stopped. The light may
come on several times during cooking with
the automatic lightning of the burner, to keep
the temperature constant.
Block” warning light
This light comes on to indicate gas “block”
and therefore burner shutdown. To eliminate
the block, turn the selector knob to “0” and
the thermostat knob to
(off), wait for one
minute then repeat the lighting operation.
Safety Thermostat
To prevent dangerous overheating (through
incorrect use of the appliance or defective
components), the oven is fitted with a safety
thermostat, which interrupts the power sup-
ply. The oven switches back on again auto-
matically, when the temperature drops.
Should the safety thermostat trigger due to
incorrect use of the appliance, it is enough to
remedy the error after the oven has cooled
down; if on the other hand, the thermostat
triggers because of a defective component,
please contact Customer Service.
Cooling fan
The cooling fan operates during cooking. Air
is expelled through vents between the oven
door and the control panel, as shown in the
diagram.
The cooling fan may run on after the oven is
switched off to keep the controls cool. This
is quite normal.
Before first use
The oven will work only if the time of day
has been set.
When using the oven for the first time, set the
current time with the programmer (refer to
the instructions in the section “The timer”)
4 electrolux
When used for the first time, it is advisable to
heat the oven empty in order to eliminate any
unpleasant odours caused by the insulation
and manufacturing residues.
When switching the oven on for the first time:
1. set the thermostat to MAX;
2. heat the oven EMPTY for about 45 mins;
3. switch the grill on for 5-10 minutes
4. air the room during the entire operation.
During the first minutes of operation, IT IS
ABSOLUTELY NORMALif the oven produ-
ces unpleasant odours and fumes. This is
due to heating of the insulation and manu-
facturing residues.
Before cooking for the first time, carefully
wash the GRILL and DRIP-TRAY (i.e. the
enamelled metal tray with raised edges
located inside the oven).
To open the oven door, always grip the
handle in the middle.
Operation
The timer
12 3
4
5
6
7
8
1
“Cooking Duration” pilot lamp
2 Display
3
“Minute minder” pilot lamp
4
“Time of day” pilot lamp
5 Increasing control button "+"
6
Push button for selecting a function
7 Decreasing control button "-"
8
“End of cooking” pilot lamp
The oven will only work if the time of day
has been set. However, the oven can al-
so be operated without any programme.
In the event of a power failure, all the
settings (time of day, programme setting
or programme in operation) will be can-
celled. When the power is restored, the
numbers in the display will flash, and the
clock/timer has to be reset.
Setting the time of day
When the power supply is switched on, or
after a power failure, the “Time of day” pilot
lamp
will flash on the display.
To set the correct time of day:
1. Press button +” or “-”.
2. After the setting is carried out, wait for 5
seconds: the “Time of day” pilot lamp
will go out and the display will show
the set time. The appliance is ready for
use.
To reset the correct time of day:
1.
Press button
repeatedly to select the
“Time of day” function. The relevant pilot
lamp will start flashing. Then proceed as
described above.
The time of day can only be reset if no auto-
matic function (cooking duration
or end of
cooking
) has been set.
electrolux 5
Cooking Duration function
This function allows the oven to automatically
switch off at the end of a programmed cook-
ing duration time. Place food in the oven, se-
lect a cooking function and adjust the cook-
ing temperature. Press button
repeatedly
to select the “Cooking Duration” function.
The relevant pilot lamp
will start flashing.
To set the duration time
1. Press button "+" or "-".
2. After the setting is carried out, wait for 5
seconds: the "Cooking Duration" pilot
lamp
will come on and the display will
revert to the time of day.
3. When cooking time is over, the oven will
be switched off automatically and an
acoustic alarm will be heard, while the pi-
lot lamp will start flashing. Turn the oven
function and the thermostat control knob
to zero.
To switch off the acoustic alarm, press
any button.
Turning the acoustic alarm off will reset the
oven to manual, and if the oven function and
the thermostat knobs are not set to zero the
oven will start to heat again.
To cancel the duration time
1.
Press button
repeatedly to select the
“Cooking Duration” function. The relevant
pilot lamp
will flash and the display will
show the remaining cooking time.
2.
Press button "-" until the display shows
“0:00”. After 5 seconds the pilot lamp will
go out and the display will revert to the
time of day.
End of cooking
With this function, you can set the oven to
switch off automatically when a programmed
end of cooking time is over. Place food in the
oven, select a cooking function and adjust
the cooking temperature. Press button
repeatedly to select the “End of cooking”
function. The relevant pilot lamp
will start
flashing.
To set the End of cooking time
1.
Press button "+" or "-".
2. After the setting is carried out, wait for 5
seconds: the “End of cooking” pilot lamp
will come on and the display will revert
to the time of day.
3. When cooking time is over, the oven will
be switched off automatically and an
acoustic alarm will be heard, and the pilot
lamp will start flashing. Turn the oven
function and the thermostat control knob
to zero.
To switch off the acoustic alarm, press
any button.
6 electrolux
Turning the acoustic alarm off will reset the
oven to manual, and if the oven function and
the thermostat knobs are not set to zero the
oven will start to heat again.
To cancel the End of cooking time
1.
Press button
repeatedly to select the
“End of cooking” function. The relevant
pilot lamp
will flash and the display will
show the programmed End of cooking
time.
2.
Press button "-"until the display shows
the current time of day. The programmer
will beep and the pilot lamp will go out.
Cooking duration
and End of cooking
time
combined
The functions “Cooking duration” and “End
of cooking time” can be used simultaneously
to set the oven to switch on and off auto-
matically at a later time.
1.
With the “Cooking duration” function
(carry out the cooking duration setting as
described in the relevant chapter) set the
duration time. Then, press button
and
the display will show the programmed
setting.
2. With the “End of cooking time” function
(carry out the End of cooking setting
as described in the relevant chapter) set
the end of cooking time.
The relevant pilot lamps will come on and
the display will show the time of day. The
oven will switch on and off according to
the set programmes.
Minute minder
The minute minder alarm will sound at the
end of a timed period, but the oven will re-
main on, if it is in use.
To set the minute minder
1.
Press button
repeatedly to select the
“Minute minder” function. The relevant pi-
lot lamp
will start flashing.
2. Press button "+"or "-" (maximum: 2
hours, 30 minutes).
3. After the setting is carried out, wait for 5
seconds: the “Minute minder” pilot lamp
will come on.
4. At the end of the timed period, the pilot
lamp will start flashing and an acoustic
alarm will be heard. To switch off the
acoustic alarm, press any button.
To cancel the minute minder
1.
Press button
repeatedly to select the
“Minute minder” function. The relevant pi-
lot lamp
will flash and the display will
show the remaining time.
2. Press button "-" until the display shows
“0:00”. After 5 seconds the pilot lamp will
go out and the display will revert to the
time of day.
To switch off the display
1. Press two programmer push buttons at
the same time and keep them pressed for
about 5 seconds. The display will switch
off.
2. To switch on the display, press any but-
ton.
electrolux 7
The display can be switched off only
if no other functions have been set.
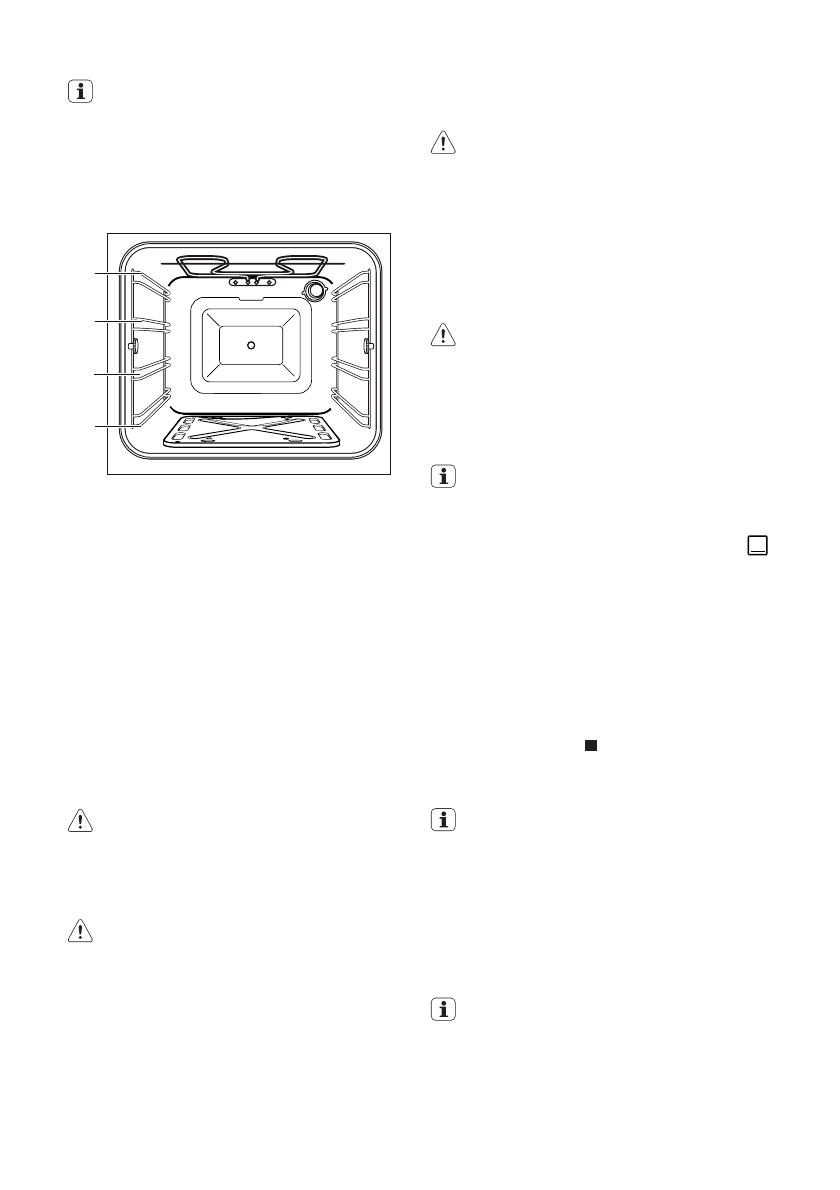
Using the oven
The oven has four shelf levels. The shelf po-
sitions are counted from the bottom of the
oven as shown in the diagram.
1
2
3
4
It is important that these shelves are correctly
positioned as shown in the diagram.
Do not place cookware directly on the oven
base.
The oven is supplied with an exclusive sys-
tem which produces a natural circulation of
air and the constant recycling of steam.
This system makes it possible to cook in a
steamy environment and keep the dishes
soft inside and crusty outside. Moreover, the
cooking time and energy consumption are
reduced to a minimum. During cooking
steam may be produced which can be re-
leased when opening the oven door. This is
absolutely normal.
Warning! However, always stand back
from the oven when opening the oven
door during cooking or at the end of it to
allow any build up of steam or heat to
release.
Warning! Do not place objects on the
oven base and do not cover any part of
the oven with aluminium foil while
cooking, as this could cause a heat
build-up which would affect the baking
results and damage the oven enamel.
Always place pans, heat-resisting pans
and aluminium trays on the shelf which
has been inserted in the shelf runners.
When food is heated, steam is created,
like in a kettle. When the steam comes
into contact with the glass in the oven
door, it condenses and creates water
droplets.
Warning! Take care not to damage the
enamelled parts of the oven when
inserting and removing the driptray and
grill.
To reduce condensation, always pre-
heat the empty oven for 10 minutes.
We recommend you wipe the water droplets
away after every cooking process.
Warning! Always cook with the oven
door closed. Stand clear when opening
the drop down oven door. Do not allow
it to fall open - support the door using
the door handle, until it is fully open.
Gas oven operation
The oven cannot be lit with a naked
flame.
To light the oven:
1.
Turn the selector knob to the symbol
(the oven light comes on);
2. Turn the thermostat knob to the required
temperature (the thermostat light comes
on);
3. The oven starts the lightning phase in
about 6 seconds. The “block” light
comes on after 6 seconds (safety time) if
the oven fails to light. To try lighting again,
turn the selector knob to “0” and the ther-
mostat knob to
(off), wait for one mi-
nute then repeat the operations descri-
bed above.
When used for the first time, several
lighting attempts are normally required
due to the presence of air in the gas
pipe.
4. The thermostat light goes off when the
oven temperature reaches the level set
with the thermostat. The light may come
on several times during cooking, to keep
the temperature constant.
In case of a power failure during gas
oven operation, the oven switches off
and the gas flow is stopped. The appli-
ance switches on again automatically as
soon as the power is restored.
8 electrolux
Cooking with the turnspit
To use the turnspit, proceed as follows:
1. Insert the spit frame on the second guide
from the bottom, as shown in the figure.
2. Insert the first fork in the spit, skewer the
food to be cooked and secure it by in-
serting the second fork; fix the two forks
by tightening the special screws.
3. Insert the tip of the spit in the hole of the
turnspit motor, clearly visible in the middle
of the rear wall of the oven.
4. Place the front part of the spit on the spit
frame.
5. Unscrew the grip.
6. Turn the selector knob to the turnspit
symbol
and the thermostat knob to
“200”.
It is advisable to insert the dripping pan
on the first guide from the bottom, after
pouring about two cups of water in it.
Electric grill
To switch on the electric grill, turn the selec-
tor knob to the symbol
and the thermostat
knob to “max”.
Use, tables and tips
Advice for cooking meat and fish
Meat can be arranged in recipients suit-
able for cooking in the oven, or directly
on the grill.
In the latter case, ALWAYS pour a little
water in the drip-tray and insert it on the
guides under the grill.
The drip-tray will collect the fats melted dur-
ing cooking, and the water prevents the fats
from burning and producing unpleasant
odours or smoke.
White meats, poultry and fish usually require
cooking at medium temperature (between
150° C and 175°C), whereas cooking red
meats “rare” requires temperatures between
200° C and 240° C for short times.
Advice for baking cakes
Cakes require a moderate temperature, be-
tween 150°C and 200°C.
Before baking a cake, it is advisable to heat
the oven for about 10 minutes, and avoid
opening the oven door during baking.
Advice for grilling
To grill meat or fish, baste it with a little oil and
place on the grill.
When grilling, the heat only comes from
above, therefore the grill must be inserted on
the upper or lower guides depending on the
thickness of the meat or fish. In which case,
ALWAYS make sure to insert the drip-
tray on the lowest guides, but not on the
bottom of the oven, after pouring about
two cups of water in it.
The possible formation of condensate
on the oven door glass, walls and bot-
tom does not affect oven operation. It is
advisable to dry the condensate at the
end of cooking.
Gas oven
Cooking times in the tables do not in-
clude pre-heating.
A short oven pre-heating (about 10
minutes) will then be necessary be-
fore any cooking.
electrolux 9
CAKES AND PASTRIES
FOOD TYPE Level
4
3
2
1
Temperature
°C
Cooking time in mi-
nutes
NOTES
With whisked mix-
ture
2 175 45-60 -
With leavened
mixture
3 175 20-35 -
Short pastry,
mould bottom
2 175 20-30 -
Cheese-cake 2 150 60-80 -
Apple pie 2 175 40-60 -
Strudel 2 150 60-80 -
Tarts 3 200 30-40 Cook on baking tray
BREAD and PIZZA
WEIGHT IN
G
FOOD TYPE Level
4
3
2
1
Temperature
°C
Cooking time in
minutes
NOTES
1000 White bread 3 200 50-60 Cooked on bak-
ing tray
500 Rye-bread 2 150 30-45 -
500 Bread rolls 3 175 20-35 8 bread rolls
250 Pizza 3 200 20-35 on drip-tray
TIMBALES, PIES AND PUDDINGS
FOOD TYPE
Level
4
3
2
1
Temperature °C Cooking time in minutes
With macaroni 2 175 40-50
With vegeta-
bles
2 175 45-60
Quiches 2 175 35-45
Lasagne 2 175 45-60
MEAT
WEIGHT IN G FOOD TYPE Level
4
3
2
1
Temperature
°C
Cooking time in
minutes
NOTES
1000 Roast beef 2 175 50-70 Cooked on grill
1200 Roast pork 2 175 100-130 Cooked on grill
100 Roast veal 2 175 90-120 Cooked on grill
1500 Roast beef
(English style)
2 200 50-70 Cooked on grill
1200 Lamb 2 175 110-130 Leg
1000 Chicken 2 225 60-80 Whole
4000 Turkey 2 180 210-240 Whole
1500 Duck 2 190 120-150 Whole
10 electrolux
WEIGHT IN G FOOD TYPE Level
4
3
2
1
Temperature
°C
Cooking time in
minutes
NOTES
3000 Goose 2 190 150-200 Whole
1200 Rabbit 2 175 60-80 In pieces
FISH
WEIGHT IN G FOOD TYPE Level
4
3
2
1
Temperature
°C
Cooking time in
minutes
NOTES
1000 Whole 2 175 40-60 2 fish
800 Fillets 2 175 30-40 4 fillets
Grilling
Cooking times in the tables do not include
pre-heating.
A short oven pre-heating (about 10 mi-
nutes) will then be necessary before any
cooking.
FOOD
TYPE
Quantity
Grilling
Cooking time minutes
Num-
ber
Pieces
Grams Level
4
3
2
1
Temperature
°C
Upper part Lower part
Steak 4 800 4 max 10 8
Chops 4 600 4 max 12 8
Sausages 8 500 4 max 10 6
Chicken in
pieces
6 800 3 max 30 20
Kebabs 4 700 4 max 12 10
Chicken
breast
4 400 4 max 13 10
Halved to-
matoes
8 500 4 max 12 -
Fish, fillets 4 400 4 max 8 6
Scallops 6 - 4 max 12 -
Toasted
sandwich-
es
4 - 4 max 8 -
Sliced
bread
4 - 4 max 2-3 1
Cooking with the turnspit
FOOD TYPE Quantity
(grams)
Level
4
3
2
1
Temp. °C Cooking time in mi-
nutes
Poultry 1000 2 200 50/60
Roasts 800 2 200 50/60
electrolux 11
Care and cleaning
Warning! Before any cleaning switch
the oven off and let it cool down. Never
use steam or steam machines to clean
the appliance. Important! Before
carrying out maintenance and cleaning
operations, make sure that your oven is
disconnected from the mains power
supply.
Cleaning must be carried out after the oven
has cooled down. Wash the enamelled parts
with lukewarm water and detergent. Do not
use abrasive products, such as steel wool
pads, acids etc. since these could damage
the various surfaces. Rinse stainless steel
parts with water after use, and dry them with
a soft cloth or chamois leather.
In the case of persistent stains, you can use
normal non-abrasive detergents or products
specific for stainless steel readily available on
the market. Another alternative is a drop of
hot vinegar. When cleaning the oven door
with the glass top cover use just hot water,
taking care to avoid using coarse cloths or
abrasive products
The hot acids of fruit (e.g. Iemons, stewed
prunes, etc.) leave difficult-to-remove stains
on the enamelled surfaces; this inconvenient
may remove enamel gloss, but, it does not
impair oven operation.
Clean the oven thoroughly after use; in this
way it will be possible to remove cooking re-
siduals more easily, thus avoiding these from
burning the next time the oven is used.
The oven door
Warning! Important - Remove the oven
door before cleaning it.
To do so, proceed as follows.
1. Open the door fully.
2. Locate the two door hinges.
3. Lift and turn the levers on the two hinges.
4. Hold the door by the side edges and
close it slowly but not COMPLETELY.
5. Pull the door forward, removing it from its
seat.
6. Place the door on a stable surface pro-
tected by a soft cloth to prevent the han-
dle surface from being damaged.
Warning! Do not clean the oven door
when it is still hot, as the glass could
shatter. If scratches or deep cracks are
noted on the surface of the glass,
contact the authorised Assistance
Centre for replacing the glass.
12 electrolux
Models in stainless steel or
aluminium:
It is advisable to clean the oven door and
control panel in stainless steel or alumi-
nium only with a moist sponge, carefully
drying with a soft cloth after cleaning.
Never use steel wool, acids or abrasive
products as they can damage the sur-
face.
Replacing the oven light
Warning! Disconnect the appliance
from the electricity supply.
If the oven bulb needs replacing, it must
comply with the following specifications:
electric power, 15 W/25 W; electric rate, 230
V (50 Hz); resistant to temperatures of
300°C; connection type: E14. These bulbs
are available from your local Service Force
Centre.
To replace the faulty bulb:
1. Ensure the oven is disconnected from the
electrical supply.
2. Turn the glass cover anticlockwise.
3. Remove the faulty bulb and replace it with
the new one.
4. Refit the glass cover.
5. Reconnect to the electrical supply.
Technical data
Gas oven burner power
Natural gas (20 mbar) 2.7 kW
Natural gas (13 mbar) 2.5 kW
LPG 2.5 kW
Electric power
Grill 1650W
Oven light 25 W
Cooling fan 25 W
Turnspit motor 4 W
Total electric power 1700 W
Power supply (50Hz)
230 V
Gas category
II2H3B/P
Appliance arranged
for:
Natural gas G20 (2H) /
20 mbar
Appliance class 3
Min. dimensions of installation
compartment
Undercounter height: 59.3 cm
electrolux 13
Undercounter in column: 58.0 cm
Width 56.0-57.0 cm
Depth min. 55.0 cm
Useful dimensions of oven recess
Height 33.5 cm
Width 39.5 cm
Depth 41.0 cm
Installation
Connecting to the electrical supply
Warning! Installation and connection
must be done in compliance with the
regulations in force. Any interventions
must be carried out when the appliance
is switched off. Only accredited
engineers may work on the appliance.
The manufacturer disclaims any liability
if the safety measures are not observed.
Before connecting to the electrical supply,
please make sure:
The fuse and the domestic electrical in-
stallation must be designed for the max.
load of the appliance (see rating plate).
The domestic electrical installation must
be equipped with a proper earth connec-
tion in accordance with the regulations in
force.
The socket or the multi-pole off switch
must be easy to access after the appliance
has been installed.
The appliance is supplied with a power cable.
The cable must be equipped with a standard
plug suitable for the load indicated on the
rating plate. The plug must be inserted in a
suitable power socket. If you require a direct
connection to the electric network (mains), it
will be necessary to fit between the appliance
and the mains an omnipole switch, with a
minimum gap between contacts of 3 mm,
suitable for the required load and in compli-
ance with rules in force. The green & yellow
ground wire must not be interrupted by the
switch and it should be 2-3 cm. longer than
the other cables.
The mains cable and plug are to be connec-
ted to a shockproof socket (230 V~, 50 Hz).
The shockproof socket must be installed in
accordance with the regulations.
The following types of mains cable are suit-
able, taking the necessary rated cross sec-
tion into account: H07 RN-F, H05 RN-F, H05
RR-F, H05 VV-F, H05 V2V2-F (T90), H05
BB-F.
The connection cable must in any case be
laid out so that at no point does it reach 50°C
(over room temperature).
After the connection has been carried out,
the heating elements must be tested by be-
ing operated for about 3 minutes.
Terminal block
The oven is fitted with an easily accessible
terminal block which is designed to operate
with a single phase power supply of 230 V.
Letter L Live terminal
Letter N Neutral terminal
or E
Earth terminal
Building In
For problem-free functioning of the built-in
appliance, the kitchen unit or the recess into
which the appliance is built must have suita-
ble dimensions.
In accordance with the regulations in force,
all parts which ensure the shock protection
of live and insulated parts must be fastened
in such a way that they cannot be undone
without tools.
These also include the fixing of any end walls
at the beginning or end of a line of built-in
units.
14 electrolux
The shock protection must in any case be
ensured by the building in of the appliance.
The appliance can be placed with its back or
a side wall against higher kitchen units, ap-
pliances or walls. However, only other appli-
ances or units of the same height as the ap-
pliance can be placed against the other side
wall.
Overall oven dimensions
594
2
20
570
590
540
560
In column building-in
The recess must have the dimensions shown
in the picture below.
Building-in under a kitchen counter
The recess must have the dimensions shown
in the picture below.
Securing the appliance to the cabinet
electrolux 15
A
B
1. Open the oven door.
2. Fasten the oven to the cabinet placing the
four distance holders provided with the
appliance (A) which fit exactly into the
holes in the frame and then fit four wood
screws (B).
When installing a hob over the oven, the hob
electrical connection and the oven one have
to be carried out separately for security rea-
sons and to let the oven be taken off the
cabinet easier, if necessary.
Any extensions must be made with cables
suitable for the required power.
Gas supply
The gas connection must be carried out
in compliance with the current regula-
tions.
The appliances leave the factory, tested and
adjusted for the type of gas specified on the
plate located in the bottom protection, near
the gas connection pipe. Make sure the type
of gas used is the same as that specified on
the plate. Otherwise, proceed according to
the instructions given in the section “Con-
verting to different types of gas”.
To ensure maximum efficiency and lower
consumption, make sure the gas supply
pressure respects the values given in the
“Oven burner specifications” table.
If the pressure of the gas used is different (or
variable) from that provided for, a suitable
pressure regulator for the gas (NOT LPG),
complying with current standards, must be
installed on the inlet pipe. The use of pres-
sure regulators for liquified gases (LPG) is al-
lowed provided they comply with current
standards.
The use of a gas cooking appliance pro-
duces heat and humidity in the room
where it is installed. Ensure good venti-
lation in the room by keeping air inlets
open and efficient, or install an extractor
hood with exhaust flue.
Intensive and prolonged use of the ap-
pliance may require extra ventilation,
e.g. by opening a window or by increas-
ing the power of the extractor, if present.
Connection
The oven feed gas train is located at the front,
behind the control panel.
Connection:
1. Partially insert the oven in the cabinet (ap-
prox. 30 cm) and access the gas train
from above. Make the gas connection,
choosing from one of the two systems:
flexible metal tube limited to those
not longer than 2 m: screw the union
onto the 1/2 inch gas train, inserting
the gasket, which is included in the bag
of accessories.
1
2
1 Flexible tube
2 Gasket
16 electrolux
rigid metal pipe(annealed copper Ø
8mm), insert the copper pipe in the gas
train union after positioning the nut and
double cone, which are included in the
bag of accessories.
1
2
3
1 Rigid pipe
2 Nut
3 Double conne
2. To complete the connection, tighten the
nuts with a 24 mm wrench, taking care
not to mechanically stress the gas circuit.
3. Insert the oven in the cabinet and fix it as
indicated in the section “Fixing to the cab-
inet”, making sure the gas supply con-
nection pipe is not crushed.
IMPORTANT:
After installation, always check the per-
fect seal of all unions using a soapy sol-
ution. Never carry out this check with a
flame.
Conversion to different types of gas
To convert the appliance to a different type
of gas from that for which it is arranged, the
nozzle must be replaced with one suitable for
the new type of gas.
The oven burner does not require pri-
mary air adjustment.
Replacing the oven burner nozzle
1. Remove the bottom of the oven (“A”);
2. Undo the two screws (“C”) fixing the
burner;
electrolux 17
3. Slowly remove the burner from the nozzle
holder, making sure the burner bush re-
mains in the correct position inside the
burner; carefully move the burner to the
left, avoiding any kind of strain on the ig-
niter plug connection cable (“E”);
4. Undo the nozzle (“D”) with the special 7
mm wrench and replace it with one suit-
able for the new type of gas (refer to the
table “Oven burner specifications”).
5. Then refit everything, repeating the oper-
ations in reverse order.
6. Replace the rating plate (located near the
gas connection) with that corresponding
to the new type of gas, included in the
bag of injectors supplied.
Oven burner specifications
GAS TYPE INJECTOR
MARK 1/100
mm
NOMINAL
GAS POWER
(kW)
NOMINAL GAS FOLLOW IN NOMINAL
GAS PRES-
SURE (mbar)
m3/h g/h
NaturalGas
(G20)
114 2.7 0.257 - 20
LPG (G30/
G31)
078 2.5 - 182 30
NaturalGas
(G20)
124 2.5 0.238 - 13
What to do if…
If the appliance is not working correctly,
please check the following before contacting
the Electrolux Service Centre:
Important! If you call out an engineer to a
fault listed below, or to repair a fault caused
by incorrect use or installation, a charge will
be made even if the appliance is under
guarantee.
PROBLEM SOLUTION
The oven is not switching on. Check that both a cooking function and tem-
perature have been selected
Check whether the appliance is correctly con-
nected and the socket switch or the mains sup-
ply to the oven is ON
The oven temperature light does not come on . Select a temperature with the thermostat con-
trol knob
Select a function with the oven function control
knob
18 electrolux
PROBLEM SOLUTION
The oven light does not come on. Select a function with the oven function control
knob
Check the light bulb, and replace it if necessary
(see "Care and cleaning")
It takes too long to cook the dishes or they cook
too quickly.
The temperature may need adjusting
Following the advice contained in these instruc-
tions, especially the section “Using the Oven“.
Steam and condensation settle on the food and
in the oven cavity.
When the cooking process is completed, do not
leave the dishes standing in the oven for longer
than 15-20 minutes
The electronic programmer does not work. Check the instructions for the timer.
The display shows "12.00". Set the time of day (see chapter "Setting the
time of day").
Service and spare parts
If after the checks listed in the chapter "What
to do if... ", the appliance still does not work
correctly, contact your local Service Centre,
specifying the type of malfunctioning, the ap-
pliance model (Mod.), the product number
(Prod. No.) and the serial number (Ser. No.)
marked on the identification plate. The data-
plate is located on the outside of the oven
and is visible, opening the door, in the place
shown in the Figure.
Original spare parts, certified by the product
manufacturer and carrying this symbol, are
only available at our Service Centre and au-
thorized spare parts shops.
Disposal
The symbol on the product or on its
packaging indicates that this product may
not be treated as household waste. Instead
it should be taken to the appropriate
collection point for the recycling of electrical
and electronic equipment. By ensuring this
product is disposed of correctly, you will help
electrolux 19
prevent potential negative consequences for
the environment and human health, which
could otherwise be caused by inappropriate
waste handling of this product. For more
detailed information about recycling of this
product, please contact your local council,
your household waste disposal service or the
shop where you purchased the product.
Packaging material
The packaging materials are environ-
mentally friendly and can be recycled.
The plastic components are identified by
markings, e.g. >PE<, >PS<, etc. Please
dispose of the packaging materials in the
appropriate container at the community
waste disposal facilities.
20 electrolux
  • Page 1 1
  • Page 2 2
  • Page 3 3
  • Page 4 4
  • Page 5 5
  • Page 6 6
  • Page 7 7
  • Page 8 8
  • Page 9 9
  • Page 10 10
  • Page 11 11
  • Page 12 12
  • Page 13 13
  • Page 14 14
  • Page 15 15
  • Page 16 16
  • Page 17 17
  • Page 18 18
  • Page 19 19
  • Page 20 20
  • Page 21 21
  • Page 22 22
  • Page 23 23
  • Page 24 24

Electrolux EOG23400K User manual

Category
Kitchen & houseware accessories
Type
User manual
This manual is also suitable for

Ask a question and I''ll find the answer in the document

Finding information in a document is now easier with AI