Page is loading ...
User and maintenance manual
EN
AMW 882

3
Table of contents
IMPORTANT SAFETY INSTRUCTIONS 4
SCRAPPING OF HOUSEHOLD APPLIANCES 7
DECLARATION OF CONFORMITY CE 7
SAFEGUARDING THE ENVIRONMENT
MOUNTING HE APPLIANCE
PRIOR TO CONNECTING
AFTER CONNECTING
7
8
8
INSTALLATION
8
8
BEFORE FIRST USE
9
PUSH-PUSH KNOBS
9
10
10
ACCESSORIES
GENERAL
10
CHOOSING COOKING CONTAINER
10
SPONGE
10
DRIP TRAY
10
ST E A M T R A Y
10
WATER CONTAINER
APPLIANCE FEATURES
11
CONTROL PANEL
11
START PROTECTION / KEY LOCK
11

4
e
CHANGING SETTINGS 12
CLOCK SETTING 12
BRIGHTNESS 13
SOUND SETTING 13
ECO 13
CA L I B R A T E 14
SPECIALS 15
KITCHEN TIMER 15
DESCALING 16
DRAINING 17
MANUAL STEAM 18
QUICK STEAM
POULTRY 21
20
FISH / SHELLFISH 21
VEGETABLES 22
MAINTENANCE & CLEANING 23
GENERAL 23
DISHWASHER SAFE 23
REMOVING THE SHELF SUPPORTS 24
DISHWASHER UNSAFE 24
REPLACING THE OVEN LIGHT BULB 24
TROUBLE SHOOTING GUIDE
25
TECHNICAL SPECIFICATION
25
4
YOUR SAFETY AND THAT OF
OTHERS IS VERY IMPORTANT
This manual and the appliance
itself provide important safety
warnings, to be read and
observed at all times.
This is the danger symbol,
pertaining to safety, which
alerts users to potential
risks to themselves and
others. All safety warnings
are preceded by the
danger symbol and the
following terms:
DANGER
Indicates a hazardous
situation which, if not avoided,
will cause serious injury.
WARNING
Indicates a hazardous
situation which, if not avoided,
could cause serious injury.
A
details of the potential risk
present and indicate how to
reduce risk of injury, damage and
electric shock resulting from
improper use of the appliance.
Carefully observe the following
instructions:
esolc snoitcurtsni eseht peeK-
at hand for future reference.
ot sevolg evitcetorp esU-
perform all unpacking and
installation operations.
eb tsum ecnailppa ehT-
handled and installed by two
or more persons.
eb tsum ecnailpp
a ehT-
disconnected from the power
supply before carrying out any
installation work.
ecnanetniam dna noitallatsnI-
must be carried out by a
compliance with the
manufacturer’s instructions
and local safety regulations.
Do not repair or replace any
part of the appliance unless
manual.
IMPORTANT SAFETY INSTRUCTIONS
EN

5
tnemecalper elbac rewoP-
must be carried out by a
Contact
an authorised service centre.
eht taht eriuqer snoitalugeR-
appliance is earthed.
O-
its housing, the power cable
must be long enough to
connect the appliance to the
main power supply.
htiw ylpmoc ot noitallatsni roF-
current safety regulations, an
omnipolar switch with
minimum contact gap of 3
mm must be used.
,sdael noisnetxe esu ton oD-
multiple socket adapters.
ecnailppa eht tcennoc ton oD-
to a socket which can be
operated by remote control or
timer.
ylp
pus rewop eht llup ton oD-
cable.
stnenopmoc lacirtcele ehT-
must not be accessible to the
user after installation.
ecnailppa eht hcuot ton oD-
with any wet part of the body
and do not operate it when
barefoot.
dengised si ecna
ilppa sihT-
solely for use as a domestic
appliance for cooking food.
No other type of use is
permitted (e.g.: heating
rooms). The Manufacturer
declines any liability for injury
to persons or animals or
damage to property if these
advices and precautions are
not respected.
sti dna ecnailppa ehT-
accessible parts become hot
during use. Care should be
taken to avoid touching
heating elements.
dna )sraey 3-0( gnuoy yreV-
young children (3-8 years)
shall be kept away unless
continuously supervised.
evoba dna sraey 8 fo nerdlihC-
and persons with reduced
physical, sensory or mental
capabilities or lack of
experience and knowledge,
can use this appliance only if
they are supervised or have
been given instructions on
safe appliance use and
understand the hazards
involved. Children must not
play with the appliance.
Cleaning and user
maintenance must not be
performed by children
without supervision.
EN
6
ton od ,esu retfa dna gniruD-
touch the heating elements or
interior surfaces of the
appliance – risk of burns. Do
not allow the appliance to
come into contact with cloths
until all the components have
cooled down completely.
t tA- he end of cooking, exercise
caution when opening the
appliance door, letting the hot
air or steam exit gradually
before accessing the oven.
When the appliance door is
shut, hot air is vented from the
aperture above the control
panel. Do not obstruct the
vent apertures.
- Use oven gloves to remove
pans and accessories, taking
care not to touch the heating
elements.
D-
materials in or near the
if the appliance is
inadvertently switched on.
sraj delaes kooc ro taeh ton oD-
or containers in the appliance.
The pressure that builds up
inside might cause the jar to
explode, damaging the
appliance.
fo edam sreniatnoc esu ton oD-
synthetic materials.
hctac staf dna slio detaehrevO-
Always remain
vigilant when cooking foods
rich in fat and oil.
- Never leave the appliance
unattended during food
drying.
era segareveb cilohocla fI-
used when cooking foods (e.g.
rum, cognac, wine), remember
that alcohol evaporates at
high temperatures. As a result,
there is a risk that vapours
released by the alcohol may
contact with the electrical
heating element.
hctac staf dna slio detaehrevO-
re easily. Always remain
vigilant when cooking foods
rich in fat, oil or alcohol (e.g.
rum, cognac, wine).
- Never use steam cleaning
equipment.
epmet eht ylno esU- rature
probe recommended for this
oven.
evisarba hsrah esu ton oD-
cleaners or sharp metal
scrapers to clean the oven
door glass as they can scratch
the surface, which may result
in the glass shattering.
si ecnailppa e
ht taht erusnE-
the lamp to avoid the
possibility of electric shock.
EN
7
DECLARATION OF CONFORMITY
THIS OVEN , which is intended to come into
European Regulation (
) n. 1935/2004 and
has been designed, manufactured and sold in
conformity with the safety requirements of the
“Low Voltage” directive 2006/95/CE (which
replaces 73/23/CEE and subsequent
amendments), the protection requirements of
“EMC” 2004/108/CE.
SAFEGUARDING THE ENVIRONMENT
D
ISPOSAL OF PACKAGING MATERIALS
The packaging material is 100% recyclable and
is marked with the recycle symbol (
).
The various parts of the packing must therefore
be disposed of responsibly and in full
compliance with local authority regulations
governing waste disposal.
E
NERGY SAVING TIPS
- Only pre-heat the microwave oven if
- Use dark lacquered or enameled baking
moulds as they absorb heat far better.
-S
before the set cooking time. Food requiring
prolonged cooking will continue to cook
SCRAPPING THE PRO DUC T
- This appliance is marked in conformity with
European Directive 2012/19/EU, Waste
Electrical and Electronic Equipment (WEEE).
- By ensuring this product is disposed of
correctly, you will help prevent potential
negative consequences for the
environment and human health, which
could otherwise be caused by inappropriate
waste handling of this product.
- The symbol
on the product or on the
accompanying documentation indicates
that it should not be treated as domestic
waste but must be taken to an appropriate
collection centre for the recycling of
electrical and electronic equipment.
T
HIS APPLIANCE MEE TS the eco design requirements
of European regulations n. 65/2014 and n.
66/2014 in conformity to the European
standard EN 60350-1.
SCRAPPING OF HOUSEHOLD APPLIANCES
- This appliance is manufactured with recyclable or reusable materials. Scrap the appliance in
so that the appliances cannot be connected to the mains.
- For further information on the treatment, recovery and recycling of household electrical
appliances, contact a competent local authority, the collection service for household waste or
the store where the appliance is purchased.
EN

8
PRIOR TO CONNECTING
MOUNTING THE APPLIANCE
INSTALLATION
AFTER UNPACKING THE APPLIANCE, make sure that it has
not been damaged during transport and that the
appliance door closes properly.
I
N THE EVENT OF PROBLEMS, contact the dealer or the
nearest After-sales Service.
T
O PREVENT ANY DAMAGE, only remove the appliance
from its polystyrene foam base at the time of
installation.
F
OLLOW THE SUPPLIE D SEPARA TE MOUN TING INSTRUC TIONS
when installing the appliance.
C
HECK THAT THE VOLTAGE on the rating plate
corresponds to the voltage in the home.
E
NSURE THE APPLIANCE oven cavity is empty before
mounting.
E
NSURE THAT THE APPLIANCE IS NOT DAMAGE D. Check
door support and that the internal door seal is
not damaged. Empty the appliance oven and
clean the interior with a soft, damp cloth.
D
O NOT OPERA TE this appliance if it has a damaged
mains cord, if it is not working properly, or if it
has been damaged or dropped. Do not immerse
the mains cord in water. Keep the cord away
hazards may result.
I
F THE POWER CABLE is too short or damaged it must
be replaced. The power cable must only be
compliance with the manufacturer instruction
and current safety regulations. Contact an
authorized service center.
T
HE POWER SUPPLY COR D must be long enough for
housing, to the main power supply.
F
OR INSTALLATION to comply with current safety
regulations, an omnipolar disconnect switch
with minimum contact gap of 3 mm must be
utilized.
AFTER CONNECTING
T
HE APPLIANCE can be operated only if the
THE EAR THING OF THIS APPLIANCE IS COMPULSORY . The
manufacturer will accept no responsibility for
injury to persons, animals or damage to objects
arising from the non-observance of this
requirement.
C
HILDREN SHOULD NOT perform installation
operations. Keep children away during
installation of the appliance. Keep the packaging
materials (plastic bags, polystyrene parts, etc.) out
of reach of children, during and after the
installation of the appliance.
T
HE MANUFAC TURERS are not liable for any
problems caused by the user’s failure to observe
these instructions.
EN
9
.
OPEN THE DOOR , remove the accessories and
ensure the oven is empty.
R
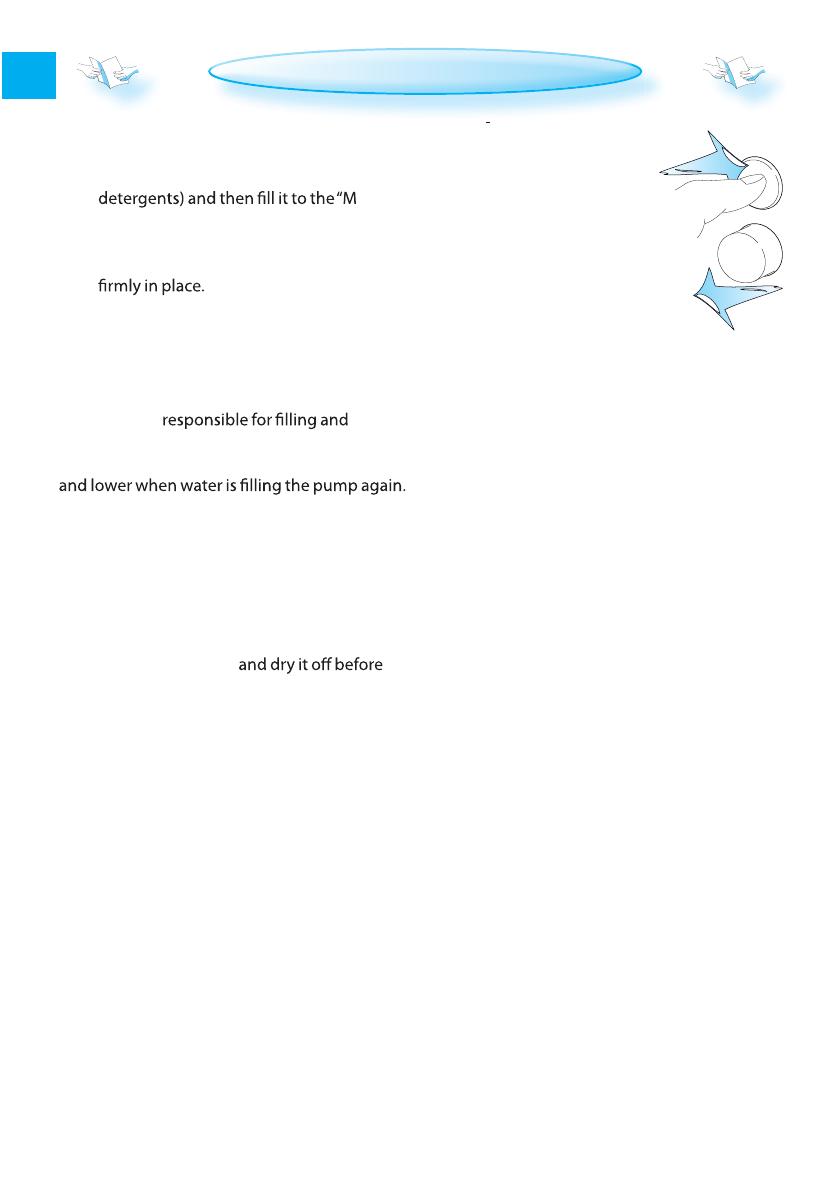
INSE THE WA TER CON TAINER with tap water (no
AX”
mark.
S
LIDE THE WA TER CON TAINER into it’s socket
until it engages the contact point and sits
3
RUN THE CALIBRA TION FUNC TION and follow on
screen instructions.
N
OTE
T
HE WATERPUMP
draining the steam boiler is now activated. It
will initially sound louder during airpumping
THIS IS NORMAL and no concern for alarm.
A
FTER CALIBRA TION , let the oven cool to room
temperature and then wipe dry any damp areas
if present.
E
MPTY THE WAT ER CON TAINER
further use.
BEFORE FIRST USE
PUSH PUSH KNOBS
T
HE KNOBS OF THIS OVEN are aligned
with the buttons on the
panel, at delivery.
The knobs will slide out if pushed
and their various functions can be
accessed. It is not necessary to
have them petruding from the
panel during operation.
Simply push them back into the
panel when you are done with the
setting and continue to operate the oven.
EN
10
ACCESSORIES
GENERAL
T
HERE ARE a number of accessories available on
the market. Before you buy, ensure they are
suitable for cooking with steam.
E
NSU RE THAT THERE IS a space of at least 30 mm
between the upper rim of the container and
the cavity ceiling to allow sucient steam en-
trance to the container.
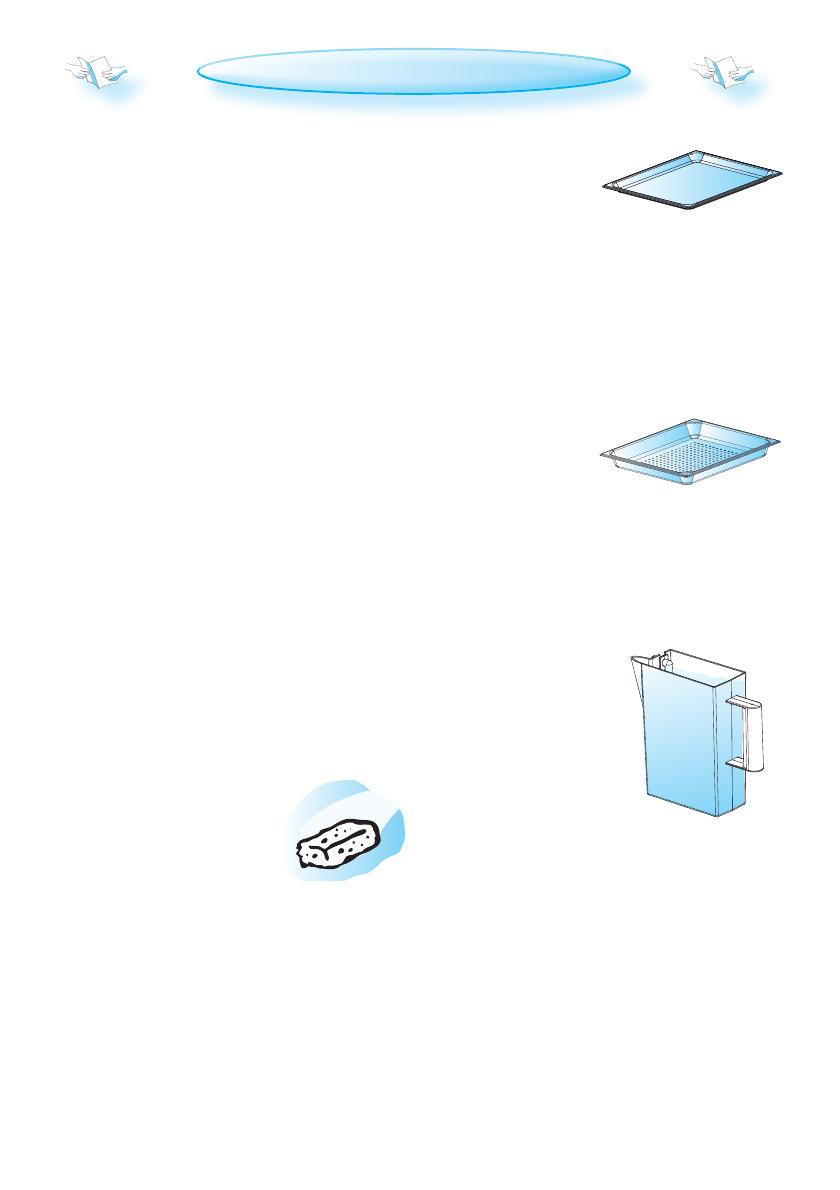
STEAM TRAY
U
SE THE STEAM TR AY for foods such as sh, vege-
tables and potatoes.
U
SE THE OVEN WITH-
OU T THE STEAM TR AY
for foods such as rice, and
grains.
DRIP TRAY
U
SE THE DRIP TR AY beneath the Steam tray. It may
also be used as a cook-
ing utensil
The Drip tray is used
to collect the dripping juices and food parti-
cles that otherwise would stain and soil the in-
terior of the oven.
Avoid placing vessels directly on the oven bot-
tom.
WATER CONTAINER
T
HE WATER CON TAINE R IS LOCA TED behind the
door and is accessible as soon as the door is
opened.
A
LL COOKING FUNC TION S re-
quire the water container
to be full.
F
ILL WA TE R CON TAINE R to the
“MAX” mark with tap water.
U
SE ONLY fresh tap water or
still bottled water. Never use
distilled or ltered water nor any
other liquids in the water container.
I
T IS IMPO RTAN T TO EMP TY THE WA TE R CON TAINE R AF TER
EACH USE . This is for hygienic reasons. It also pre-
vents condensate from building up inside the
appliance.
C
AREFULL Y (slowly not to spill) pull the water
container out of it’s compartment. Keep it hor-
izontal to allow remaining water to drain out of
the valve seat.
CHOOSING COOKING CONTAINER
U
SE PERFO RATED COOKIN G containers whenev-
er possible, e.g. for cooking vegetables. The
steam has free access to the food from all sides
and the food is cooked evenly.
S
TEAM EASILY REACHE S into the space between big
pieces of food such as large potatoes. This en-
sures even and eective cooking. It enables
a large quantity to nish in the same amount
of time as a smaller quantity. Placing (spacing)
food to allow the steam even and easy access
to individual pieces of food enables it to be
cooked in the same amount of time as small-
er quantities.
M
ORE COMPAC T DISHE S such as casseroles or
bakes, or food such as peas or asparagus
spears, which have very small / no space be-
tween them will take longer to cook because
the steam has less space to work in.
SPONGE
T
HE SUPPLIED SPONG E is used for
wiping o residual condensa-
tion that may be present in the
cooled oven after cooking. It
is important that you allow the
oven to cool o to avoid scalding.

11
CONTROL PANEL
DIGI TAL DISPLAY
MULTIFUNC TION KNOB
BACK BU TTON
OK BU TTON
START BU TT ON
ADJUS T KNOB
OFF BUTT ON
APPLIANCE FEATURES
TEMPE RATURE SENSO R
DOO R SEAL
WATER CON TAINE R
VALVE SEAT
S
HELF
LEVELS
STEAM INLE T
Lift & pull
Push
START PROTECTION / KEY LOCK
THIS AU TOMA TIC SAFETY FUNCTION IS ACTIVATED ONE
MINUT E AF TER the oven has returned to
“stand by mode“. (The oven is in
“stand by” when the 24-hour clock is
displayed or if the clock has not been
set, when the display is blank).
T
HE DOO R MUS T BE OPENED AND CLOSE D e.g. putting
food into it, before the safety lock is released.
Else the display will show “DOOR”.
.
$
/
3
V
AL
Li
ft
R
E
S
EN
SO R
ON
T
A
RT
B
U
B
AC
K
B
UTT

12
CLOCK SETTING
W
HEN THE APPLIANCE IS FIRST PLUGGED
IN it will ask you to set the Clock.
A
FTER A POWE R FAILURE the Clock will
ash and needs to be reset.
Y
OU R OVEN HAS a number of func-
tions which can be adjusted to
your personal taste.
.
TURN THE MULTIFUNCTION KNOB until Setting is shown.
3
USE THE ADJUST KNOB to choose one of the following settings to adjust.
Clock
Sound
ECO
Brightness
Calibrate
$
PRESS THE STOP BUTT ON TO EXIT the settings function and save
all your changes when you are done.
.
PRESS THE OK BUTTON. (The left right hand digits (hours) icker).
3
TURN THE ADJUST KNOB to set the hours.
$
PRESS THE OK BUTTON . (The two right hand digits (minutes) icker).
/
TURN THE ADJUST KNOB to set the minutes.
1
PRESS THE OK BUTTON again to conrm the change.
T
HE CLOCK IS SET AND IN OPE RATION .
I
F YOU WISH TO REMOVE THE CLOC K from the display once it has been set,
simply enter the clock setting mode again and press the Stop but-
ton while the digits icker.
CHANGING SETTINGS
.
3
/
$
1
.
3
13
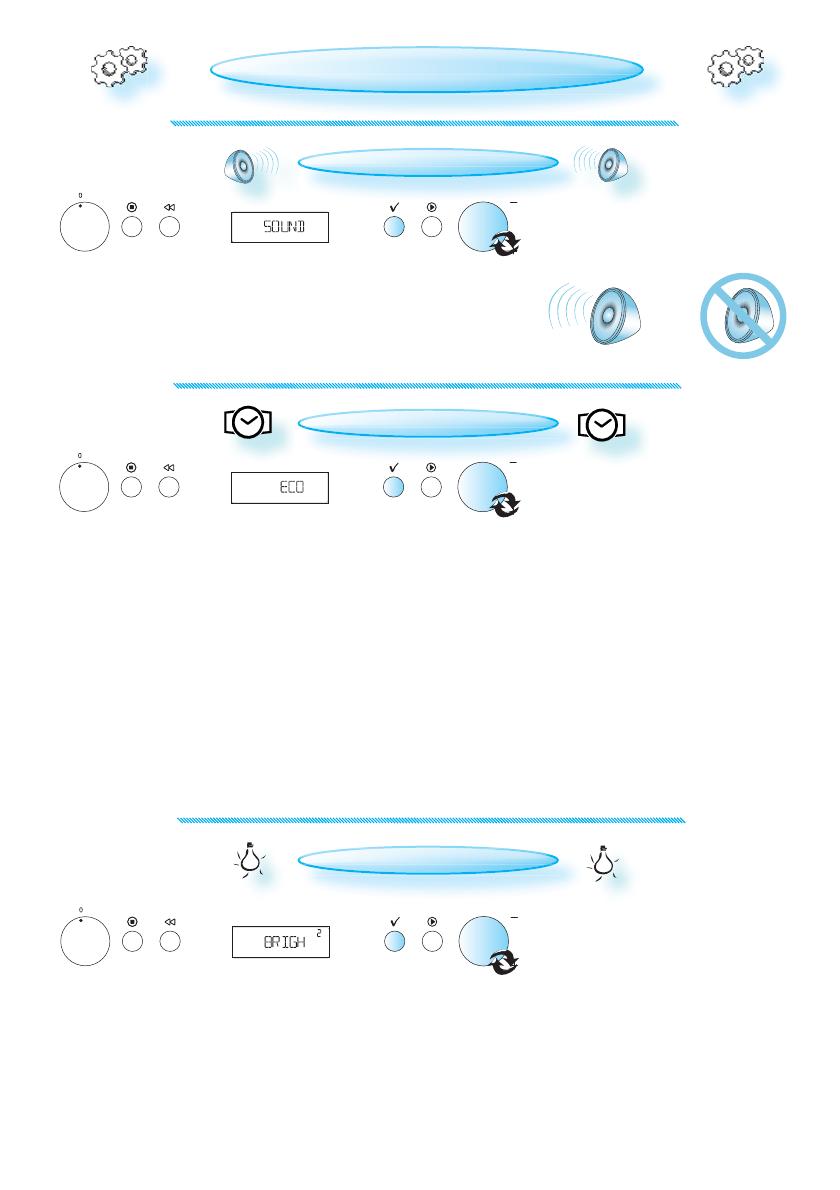
BRIGHTNESS
.
PRESS THE OK BUTTON.
3
TURN THE ADJUS T KNOB to set the level of brightness suitable to your preference.
$
PRESS THE OK BUTTON again to conrm your selection.
SOUND SETTING
.
PRESS THE OK BUTTON.
3
TURN THE ADJUST KNOB to turn the buzzer ON or OFF.
$
PRESS THE OK BUTTON again to conrm the change.
ECO
.
PRESS THE OK BUTTON.
3
TURN THE ADJUS T KNOB to turn the ECO setting ON or OFF.
$
PRESS THE OK BUTTON again to conrm the change.
W
HEN ECO IS ON , the display will automatically turn o after a while
to save energy. It will automatically light up again when a button is
pressed or the door is opened. At cooking end cavity lamp switches
o after 30 seconds.
W
HEN OFF IS SE T, the display will not turn o and the 24 h clock will
always be visible. At cooking end cavity lamp switches o after 3
minutes.
CHANGING SETTINGS
.
3
$
.
3
$
.
3
$

14
CHANGING SETTINGS
CALIBRATE
.
PRESS THE OK BUTTON.
3
PRESS THE OK BUTTON . Follow the instructions on the display.
$
PRESS THE START BUTT ON . It is important that you do not open the door until the entire process
is complete.
C
ALIBRATION
THE BOILING TEMPERATURE OF WA T ER is air pressure dependent. It boils
easier at high altitudes than at sea level.
D
URING THE CALIB RATION the appliance is automatically congured to
the current pressure ratios at the present location. This may cause
more steam than usual - It is normal.
A
FTER CALIBRATION
LET THE OVEN COOL OF F and wipe dry the damp parts.
R
ECALIBRATION
USUALL Y the calibration is carried out once and should be enough if
the oven is permanently installed in a house.
H
OWEVER, if you have installed your appliance in a mobile home or
similar, moved to another town or in any other way altered the alti-
tude where it is installed, it must be recalibrated before use.
R
ESE T
IF A CALIBRATION HAS BEEN PE RFO RME D and the cooking results isn’t satis-
factory, you may reset the calibration to the default factory setting
by disconnecting the oven from the power supply and reconnect
it (minimum) 10 minutes later. Please note that performed calibra-
tions are always reset after a power failure.
B
EFORE USING THIS FUNCTION ,
E
NSURE the water container is lled with fresh tap water.
I
F THE APPLIANCE IS INS TALLED at an al-
titude higher than 1000 m above
sea level, it should be calibrated
before use. It is not neccessary to
perform this calibration process
at lower altitudes.
.
$
3
15
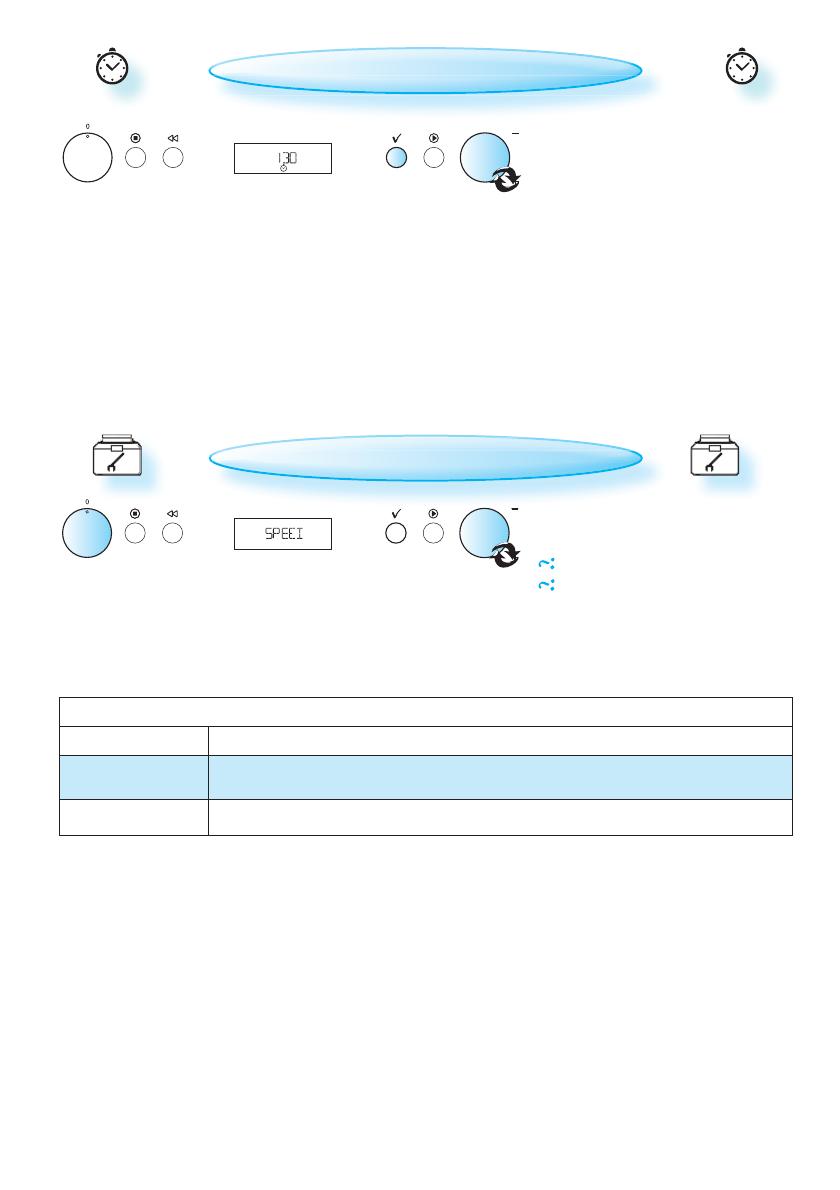
USE THIS FUNC TIO N when you need
a kitchen timer to measure exact
time for various purposes such
as cooking eggs or letting the
dough rise before baking etc.
KITCHEN TIMER
.
TURN THE ADJUST KNOB to set the desired length of the timer.
3
PRESS THE OK BUTTON.
A
N ACOUSTIC SIGNAL will be heard when the timer has nished to
count down.
P
RESSING THE STOP BUTT ON before the timer has nished will reset the
timer to zero. The clock will be displayed if the clock has been set.
SPECIALS
SPECIAL CON TAINS THE FOLLOWING FUNC -
TIONS
Drain
Descaling
.
TURN THE MULTIFUNCTION KNOB until Specials is shown.
3
TURN THE ADJUST KNOB to choose one of the special functions.
.
3
.
3
SPECIAL FUNCTIONS
F
UNCTION SUGGESTED USE:
DESCALE U
SE TO DESCALE the boiler.
DRAIN M
ANUAL DRAINING of the boiler
16
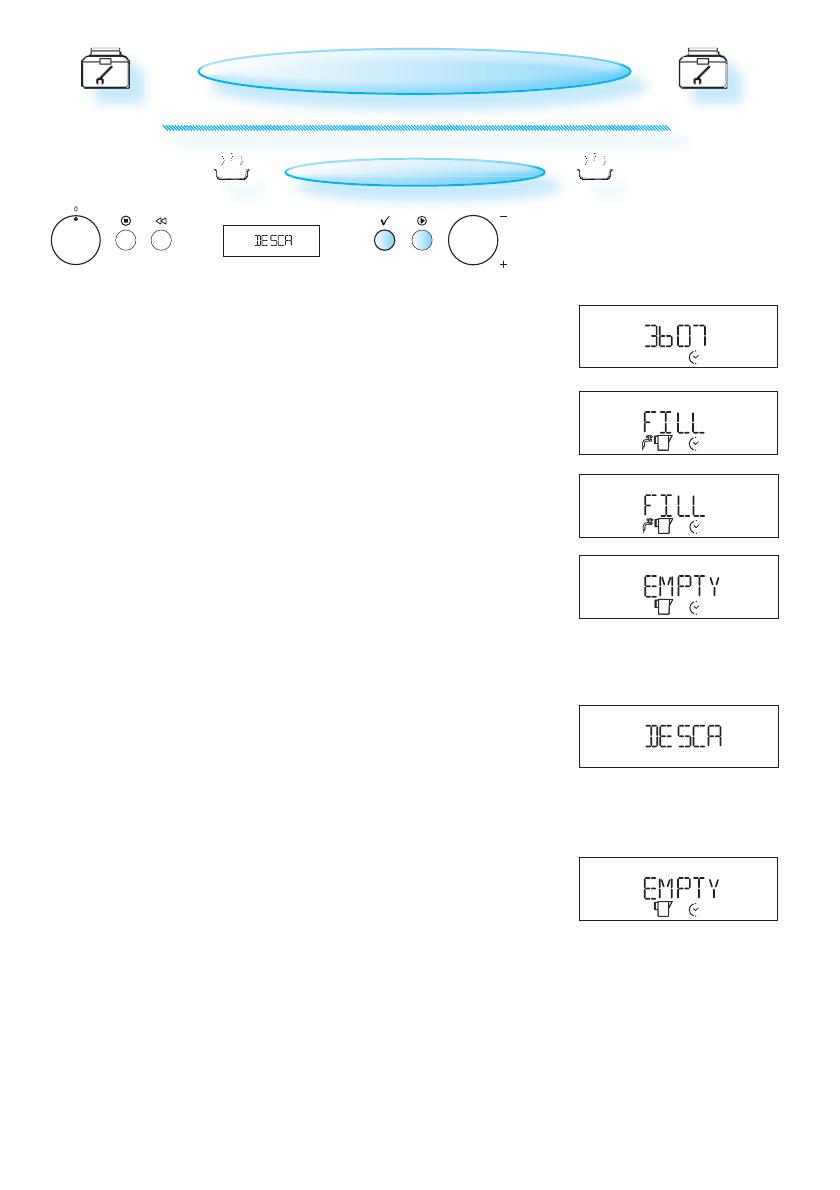
DESCALING
.
PRESS THE OK BUTTON. (Oven now prepares for descaling)
T
HE APPLIANCE HAS A SYSTEM that indicates when oven descaling is nec-
essary. Carry out descaling when the message “Descale” appears
on the display. Before carrying out descaling, make sure
you have enough descaling liquid available. We recom-
mend that you use “Wpro active’clean” descaler suit-
able for coee / espresso machines and kettles.
3
PRESS THE START BUTT O N after placing the water container with des-
caler in its place. Follow on screen guides. Do not interrupt the
process until it has nished.
D
ESCALING LAS TS about ½ hour, during which no cooking function
can be activated. A message (“Please remove...”) indicates the end
of the operation.
A
FTER EMP TYIN G the water container, no residue should
be present in the system, the appliance is properly des-
caled and safe to use.
N
OTE: ONCE STARTED, the descaling procedure must always be com-
pleted.
D
ESCALE R AMOUN T
MIX 1 liter of water with all of the content in one full bottle (250 ml)
“Wpro active’clean” descaler. If “Wpro active’clean” descaler is un-
available, use only white vinegar.
SPECIALS
.
3
17
SPECIALS
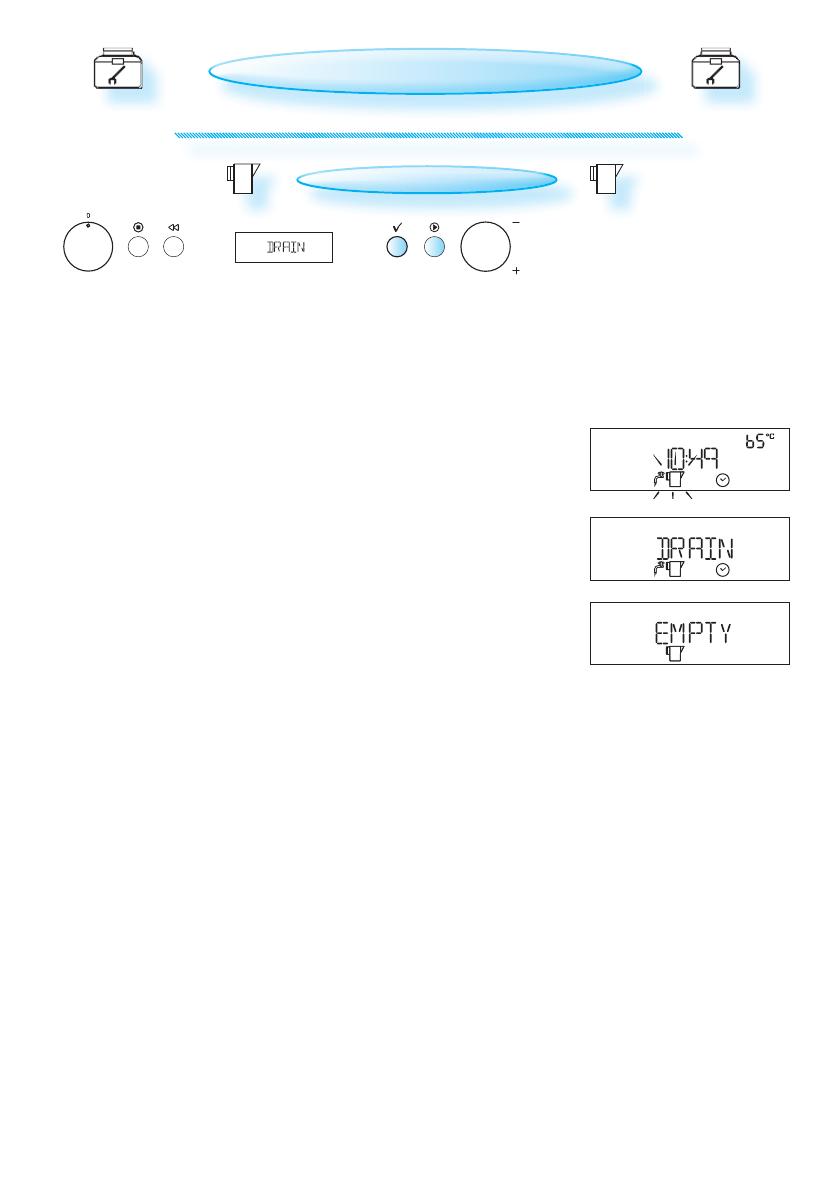
DRAINING
.
PRESS THE OK BUTTON.
3
PRESS THE START BUTT O N.
D
RAINING OF THE BOILE R is automatically performed after
every steaming session.
M
ANUAL DRAINING of the boiler can
be performed to ensure no re-
sidual water is left behind before
moving, storage or after a power
failure where the cooking process
was interrupted.
I
F TEMPE RATURE in the boiler is too high, the oven will
not start the draining procedure (symbols ashing)
until the temperature has chilled to under 60°C. Once
it has chilled enough it will start automatically.
.
3

18
MANUAL STEAM
.
TURN THE MULTIFUNC TION KNO B to the Manual Steam position.
3
TURN THE ADJUS T KNO B to change the temperature setting.
$
PRESS THE OK BUTTON to conrm.
/
TURN THE ADJUS T KNO B to change the time setting.
1
PRESS THE OK BUTTON to conrm.
4
PRESS THE START BUTT O N.
N
OTE:
T
HE OVEN IS RESTARTED automatically when the door is closed after in-
terruption.
U
SE THIS FUNC TION FO R such food as
vegetables, sh, juicing fruit and
blanching.
.
3
$
/
1
4
19
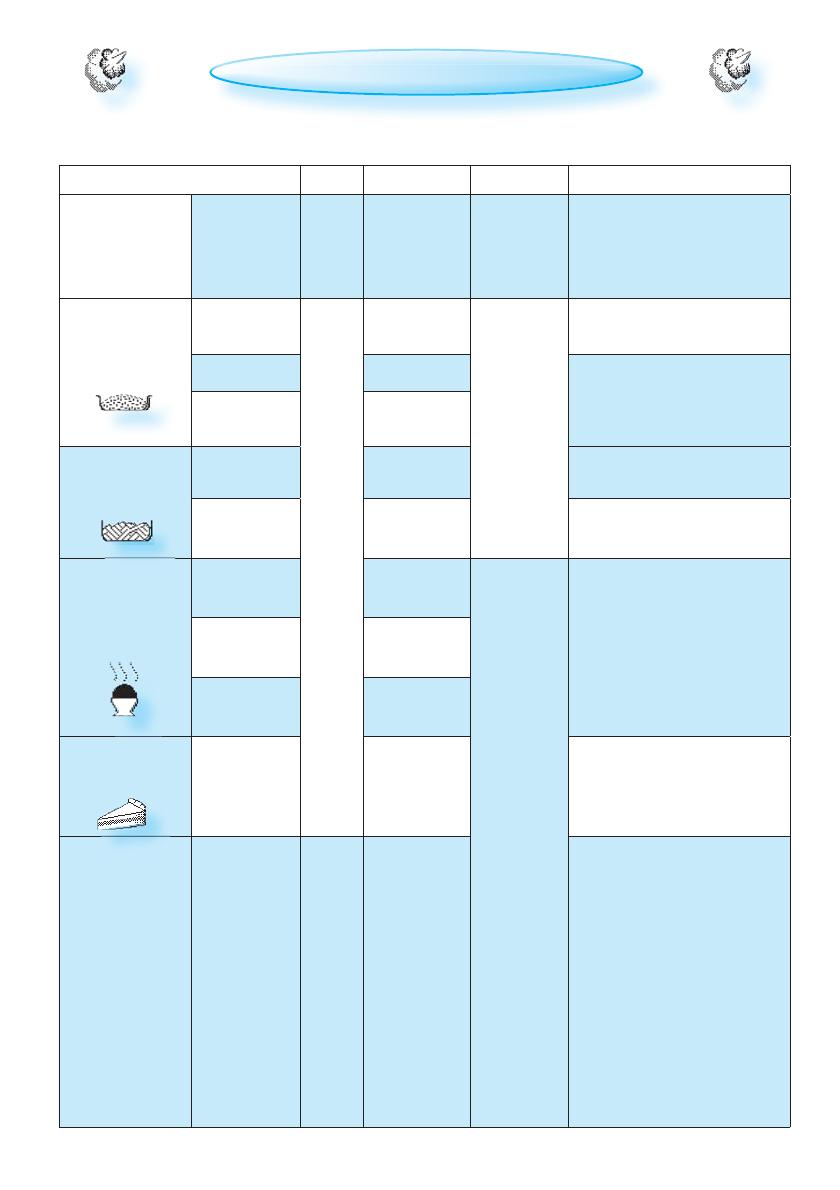
USE THIS FUNC TION TO cook items listed in the table below.
MANUAL STEAM
FOOD TEMP °C COOK TIME ACCESSORIES HINTS
HOT DOG STEAMED 75°C 10 - 15 MIN.
S
TEAM TR AY
on level 3
Drip tray
on level 1
P
LACE the sausages in one
layer
RICE
B
ROWN
100° C
20 - 60 M
IN.
D
RIP TR AY
on level 3
M
IX 300 ml rice and 500 ml
water
B
ASMA TI 25 - 30 M IN.
M
IX 300 ml rice and 450 ml
water
W
HITE - LONG
GRAIN
35 - 40 MIN.
GRAIN
B
ULGU R 10 - 40 MIN.
M
IX 300 ml grain and 600
ml water
C
OUSCOUS 10 - 15 MIN.
M
IX 300 ml grain and 300
ml water
BOILED EGGS
H
ARD 15 - 18 MIN.
S
TEAM TR AY
on level 3
Drip tray
on level 1
I
F THE EGG S will be
eaten cold, rinse them
immediately in cold water
M
EDIUM 12 - 15 MIN.
S
OF T 9 - 12 MIN.
FRUIT
COMPO TE 10 - 20 MIN.CUT FRUIT in pieces
CRÈME BRÛLÉE 90° C 20 - 30 M
IN.
F
OR 4 PO RTION S mix 2 egg
yolks and 2 whole eggs
with 3 tablespoons sugar
and vanilla.
H
EAT UP 100ml cream +
200ml milk and mix into the
eggs. (or use your favourite
recipe)
Pour the mix into portion
dishes and cover the dishes
with plastic foil. Place them
in the Steam tray.
/