Page is loading ...

There are three pre-drilled mounting holes in each strip, six total per rack (WS1x have 2 holes per strip, 4 total).
Appropriate fasteners for your wall surface must be utilized in every mounting hole for proper installation. Fasteners for
drywall or wood wall surfaces are included with your rack. We recommend the following fasteners for these surfaces:
Fasteners:
• Attaching to drywall, use all of the included Spiral Drywall Anchors and corresponding number of Screws along
with 2 Toggle Bolts
• Wood wall surfaces can use the included Screws
• Concrete, Brick or Stucco: 3/16” x 1 ¼” masonry screw or #8 x 1 ¼” screw with appropriate size expanding
concrete anchor - not included
• VintageView® Floor to Ceiling Frame (FCF-HD): Each FCF-HD comes with self-drilling screws to attach WS series
racks to the frames
Before you begin, choose the direction the bottle necks should point
If the bottle necks are to point to the right, the base strip
must be installed to the left of the neck strip.
WS1x, WS2x, WS3x and WS4x Installaon Instrucons
Wine Master Cellars, LLLP • 10645 E 47th Ave, Denver, CO 80239 • phone: 866.650.1500 • fax: 866.650.1501 • VintageView.com
Required tools: Phillips Head Screw Driver
Level
Pencil
Tape Measure
Drill and 13/32 inch (10.3mm) drill bit
Included Parts: 1 Base Strip 4 Spiral Drywall Anchors†
1 Neck Strip 6 Screws†
6 Mounting Hole Caps† 2 Toggle Bolts
2 Plastic Couplers
† WS1x will come with 2 fewer
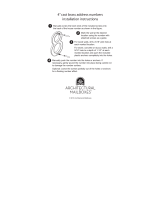
2. Mark the hole locations for the strip - Hold either the neck
or base strip of the rack in place against the wall, centered on the
rstmarktheappropriatedistanceabovetheoor.Ensurethat
the rack is vertical using a level and mark the hole locations with
a pencil (Figure B) then set the strip aside.
>23/4"
If the bottle necks are to point to the left, the base strip
must be installed to the right of the neck strip.
Figure B
1. Lay out the wall - Starting at least 2-3/4 inches (70mm) from
adjacent walls or other obstructions, mark the centerline of the
rststrip.From there,measure 7-1/2 inches(190.5mm) to the
centerline between the neck and base strip and mark the location.
Optional: If installing multiple columns, mark the centerline for
the next strip 5-1/2 inches (139.7mm) from the second mark
andmark again 7-1/2inches(190.5mm) fromthat markfor the
distance between the neck and the base strips of the second
column. To lay out additional columns, mark the wall, alternating
between5-1/2and7-1/2inches(139.7mmand190.5mm).
23/4"
71/2"
51/2"
71/2"
Figure A
Note: If installing rack-
ingfor375mLbottles,
please adjust the
centerline dimension
toapproximately5-1/2
inches(139.7mm)
between the base and
neck strips. Modify this
dimension as appropri-
ate for the actual bottle
size you have to ensure
that less than 1/3 of
the base of the bottle
overhangs the base
strip and the bottle will
not fall between the
rods when the shoul-
der of the bottle rests
against the neck rod.

4. Hang the rst strip - Take a toggle bolt and remove the
expanding nut. Insert the bolt through the top mounting hole
of either the base or neck strip, as it corresponds with the bottle
direction chosen earlier. With the wings of the nut oriented to fold
toward the head of the bolt, thread the expanding nut onto the
bolt so the tip of the bolt starts to protrude from the end of the nut.
Hold the strip so the toggle bolt aligns with the 13/32 inch hole and
gently push the expanding nut through the wall (Figure E). Ensure
that the wings of the expanding nut have fully expanded on the
backsideofthewallandgentlytightenthebolt,veryingthatthe
bottom 2 mounting holes align with the anchors in the wall. Secure
the rest of the strip in place through the bottom two mounting holes
with the provided Screws (Figure F) and fully tighten the toggle bolt.
Note: For ease of removal when stacking racks, it is recommended
that the end plugs are taken out prior to installation.
3. Install the Anchors - For the lower 2 holes only, use a Phillips
head screw driver to screw the Spiral Drywall Anchors into the
wall at the marked hole locations until the head of the anchor is
ushwiththewallsurface(FigureC).FortheTOPmountingpoint,
drill a 13/32 inch (10.3mm) hole for a Toggle Bolt (Figure D).
Note: If a strip location is over a stud, the Toggle Bolt and Drywall
Anchors should not be used. Extra Screws are supplied and can be
used to directly fasten that strip into the stud.
Figure C Figure D
Figure E
5. Hang the second strip - Repeat Steps 2 through 4 with the
second strip, centering it horizontally with the second mark on
your wall from Step 1 and ensuring that the tops of the strips are
even with each other (Figure G).
Figure F
Figure G
6. Finish up - Install the mounting hole caps in the 1/2 inch holes
on the face of the rack by pressing into place (Figure H).
Figure H
Stacking racks - VintageView WS series racks are designed to
stack, one on top of the other. You may remove the pre-installed
plastic end plugs from the appropriate rack ends and use the
supplied couplers to align the two racks when stacking (Figure I).
For product warranty information, please visit: VintageView.com/support/warranty
We’reheretohelp,callusat866-650-1500withanyquestions.
Figure I
/