HP OFFICEJET PRO K550 Owner's manual

Category
Laser/LED printers
Type
Owner's manual

This manual is also suitable for

2
Copyright Information
© 2005 Copyright Hewlett-Packard Development Company, L.P.
Edition 1, 10/2005
Reproduction, adaptation or translation without prior written permission is
prohibited, except as allowed under the copyright laws.
The information contained herein is subject to change without notice.
The only warranties for HP products and services are set forth in the express
warranty statements accompanying such products and services. Nothing
herein should be construed as constituting an additional warranty. HP shall
not be liable for technical or editorial errors or omissions contained herein.
Trademark credits
Microsoft
®
and Windows
®
are U.S. registered trademarks of Microsoft
Corporation. All other products mentioned herein may be trademarks of their
respective companies.
Windows Connect Now™ is a registered trademark of Microsoft Corporation.
Novell
®
and NetWare
®
are registered trademarks of Novell Corporation.
Pentium
®
is a registered trademark of Intel Corporation.
Adobe
®
and Acrobat
®
are registered trademarks of Adobe Systems
Incorporate.
SecureEasySetup™ is a registered trademark of HP, Broadcom and LinkSys.
Informations sur le copyright
© 2005 Copyright Hewlett-Packard Development Company, L.P.
Édition 1, 10/2005
Toute reproduction, adaptation ou traduction sans autorisation écrite
préalable est formellement interdite, sauf si cette opération est effectuée
dans le cadre prévu par la loi sur les droits d’auteur.
Les informations contenues dans ce document peuvent faire l’objet de
modifications sans préavis.
Les seules garanties relatives aux produits et services HP sont exposées dans
les déclarations de garantie expresse qui accompagnent lesdits produits et
services. Aucun élément du présent document ne doit être considéré comme
constituant une garantie supplémentaire. HP ne pourra être tenue
responsable des erreurs techniques ou rédactionnelles ou des omissions
figurant dans le présent document.
Marque
Microsoft
®
et Windows
®
sont des marques déposées de Microsoft
Corporation aux États-Unis. Tous les autres produits mentionnés dans le
présent document sont des marques de leurs sociétés respectives.
Windows Connect Now™ est une marque déposée de Microsoft
Corporation.
Novell
®
et NetWare
®
sont des marques déposées de Novell Corporation.
Pentium
®
est une marque déposée de Intel Corporation.
Adobe
®
et Acrobat
®
sont des marques déposées de Adobe Systems
Incorporate.
SecureEasySetup™ est une marque déposée de HP, Broadcom et LinkSys.
Safety Information
Always follow basic safety precautions when using this product to reduce
risk of injury from fire or electric shock.
1. Read and understand all instructions in the documentation that comes
with the printer.
2. Use only a grounded electrical outlet when connecting this product to a
power source. If you do not know whether the outlet is grounded, check
with a qualified electrician.
3. Observe all warnings and instructions marked on the product.
4. Unplug this product from wall outlets before cleaning.
5. Do not install or use this product near water, or when you are wet.
6. Install the product securely on a stable surface.
7. Install the product in a protected location where no one can step on or
trip over the line cord, and the line cord cannot be damaged.
8. If the product does not operate normally, see “Maintaining and
troubleshooting” in the onscreen user guide on the Starter CD.
9. There are no user-serviceable parts inside. Refer servicing to qualified
service personnel.
4
English
Nederlands
Français
Deutsch
Italiano
Step 1: Check the package contents.
1) Printer, 2) power cord, 3) four ink cartridges (cyan, magenta,
yellow, black), 4) two printheads, 5) Starter CD (software and
onscreen user guide), 6) printed documentation,
7) automatic two-sided printing accessory (duplex unit)
and tray 2 (HP Officejet Pro K550dtn/K550dtwn), and
8) cross cable (HP Officejet Pro K550dtwn).
Schritt 1: Überprüfen des Verpackungsinhalts.
1) Drucker, 2) Netzkabel, 3) vier Tintenpatronen
(Cyan, Magenta, Gelb, Schwarz), 4) zwei Druckköpfe,
5) Starter-CD (Software und Online-Benutzerhandbuch),
6) gedruckte Dokumentation,
7) automatische optionale Duplex-Einheit und Fach 2
(HP Officejet Pro K550dtn/K550dtwn), und
8) Crossover-Kabel (HP Officejet Pro K550dtwn).
Étape 1 : Vérification du contenu du carton.
1) Imprimante ; 2) cordon d’alimentation ; 3) quatre cartouches
d’encre (cyan, magenta, jaune, noir) ; 4) deux têtes d’impression ;
5) CD de démarrage (logiciel et guide de l’utilisateur en ligne) ;
6) documentation imprimée ;
7) accessoire d’impression automatique recto-verso
(unité auto-duplex) et bac 2 (HP Officejet Pro K550dtn/
K550dtwn) ; 8) câble croisé (HP Officejet Pro K550dtwn).
Stap 1: controleer de inhoud van de verpakking.
1) Printer, 2) netsnoer, 3) vier inktpatronen (cyaan, magenta,
geel, zwart), 4) twee printkoppen, 5) Starter-cd (software en
elektronische gebruikershandleiding), 6) gedrukte
documentatie,
7) accessoire voor automatisch dubbelzijdig afdrukken
(duplexeenheid) en lade 2 (HP Officejet Pro K550dtn/
K550dtwn) en 8) cross-kabel (HP Officejet Pro K550dtwn).
1
2
3
4
5
6
7
8
1
Punto 1: Verificare il contenuto dell’imballo.
1) Stampante, 2) cavo di alimentazione, 3) quattro cartucce di
inchiostro (ciano, magenta, giallo, nero), 4) due testine di stampa,
5) CD di avviamento (software e guida in linea),
6) documentazione stampata,
7) accessorio per la stampa fronte/retro automatica (unità
duplex) e vassoio 2 (HP Officejet Pro K550dtn/K550dtwn) e
8) cavo incrociato (HP Officejet Pro K550dtwn).
5
2
Hinweis: Der Drucker unterstützt das folgende Verbrauchsmaterial:
Tintenpatronen: HP 88 Schwarz, HP 88 Cyan, HP 88 Magenta,
HP 88 Gelb, HP 88L Schwarz, HP 88L Cyan, HP 88L Magenta
und HP 88L Gelb
Druckköpfe: HP 88 Schwarz und Gelb, und HP 88 Magenta
und Cyan
Schritt 2: Entfernen der Verpackungsklebestreifen und des
Verpackungsmaterials
1) Stellen Sie den Drucker am ausgewählten Standort ab.
Die Oberfläche muss stabil und eben sein und sich in einem gut
belüfteten Bereich befinden. Um den Drucker herum muss
genügend Platz sein, einschließlich 50 mm für die Belüftung.
2) Entfernen Sie möglicherweise am Drucker vorhandenes
Verpackungsmaterial. Öffnen Sie die obere Abdeckung und
entfernen Sie das Schaumstoff- oder Verpackungsmaterial im
Drucker.
Remarque : l’imprimante prend en charge les consommables
d’impression suivants :
Cartouches d’encre : HP 88 noir, HP 88 cyan, HP 88 magenta,
HP 88 jaune, HP 88L noir, HP 88L cyan, HP 88L magenta et
HP 88L jaune
Têtes d’impression : HP 88 noir et jaune, HP 88 magenta
et cyan
Étape 2 : Retrait des matériaux d’emballage.
1) Déplacez l’imprimante vers l’endroit destiné à la recevoir.
Choisissez une surface robuste, de niveau et située dans une
zone bien ventilée. Laissez un espace libre autour de
l’imprimante, dont 50 mm (2 pouces) pour la ventilation.
2) Retirez tous les rubans adhésifs de l’imprimante.
Ouvrez le capot supérieur et retirez la mousse ou les matériaux
d’emballage présents à l’intérieur de l’imprimante.
Opmerking: met deze printer kunt u de volgende
afdrukbenodigdheden gebruiken:
Inktpatronen: HP 88 zwart, HP 88 cyaan, HP 88 magenta,
HP 88 geel, HP 88L zwart, HP 88L cyaan, HP 88L magenta en
HP 88L geel
Printkoppen: HP 88 zwart en geel en HP 88 magenta en cyaan
Stap 2: verwijder de verpakkingstape en -materialen.
1) Zet de printer op de plaats die u daarvoor hebt voorbereid.
Het oppervlak moet stevig en vlak zijn en de ruimte moet goed
geventileerd zijn. Laat ongeveer 5 centimeter ruimte rond de
printer vrij voor ventilatie. 2) Verwijder alle verpakkingstape
van de printer. Open de bovenklep en verwijder het
schuimrubber of ander verpakkingsmateriaal uit de printer.
Note: The printer supports the following printing supplies:
Ink cartridges: HP 88 Black, HP 88 Cyan, HP 88 Magenta,
HP 88 Yellow, HP 88L Black, HP 88L Cyan, HP 88L Magenta,
and HP 88L Yellow
Printheads: HP 88 Black and Yellow, and HP 88 Magenta
and Cyan
Step 2: Remove the packing tape and materials.
1) Move the printer to the prepared location. The surface must be
sturdy, level, and located in a well-ventilated area. Allow space
around the printer, including 50 mm (2 inches) for ventilation.
2) Remove all packing tape from the printer. Open the top cover
and remove the foam or packing material from the inside of
the printer.
Nota: la stampante supporta i seguenti materiali di consumo:
Cartucce di inchiostro: HP 88 Black, HP 88 Cyan,
HP 88 Magenta, HP 88 Yellow, HP 88L Black, HP 88L Cyan,
HP 88L Magenta e HP 88L Yellow
Testine di stampa: HP 88 Black and Yellow e HP 88 Magenta
and Cyan
Punto 2: Rimuovere il nastro e il materiale di imballo.
1) Collocare la stampante nella posizione predisposta. La superficie
deve essere robusta e in piano e deve trovarsi in un’area ventilata.
Lasciare spazio sufficiente intorno alla stampante, inclusi 5 cm per la
ventilazione. 2) Rimuovere completamente il nastro di imballaggio
dalla stampante. Aprire il coperchio superiore e rimuovere le parti in
polistirolo e il materiale di imballaggio dall’interno della stampante.
6
English
Nederlands Français DeutschItaliano
Schritt 3: Installieren Sie Fach 2 und die Duplex- Einheit
(HP Officejet Pro K550dtn/K550dtwn).
1) Setzen Sie den Drucker auf das Fach 2 auf.
WARNUNG! Klemmen Sie sich nicht Ihre Finger oder Hände
an der Unterseite des Druckers ein.
2) Entfernen Sie die Verpackungsklebestreifen von der
Duplex-Einheit. Setzen Sie die Duplex-Einheit an der
Rückseite des Druckers ein, bis diese einrastet.
Étape 3 : Installez le bac 2 et l’unité auto-duplex
(HP Officejet Pro K550dtn/K550dtwn).
1) Posez l’imprimante sur le bac 2.
ATTENTION ! Veillez à ne pas placer vos doigts ou vos mains
sous l’imprimante.
2) Retirez les rubans d’emballage de l’unité auto-duplex.
A l’arrière de l’imprimante, insérez l’unité auto-duplex jusqu’à
son enclenchement.
Stap 3: installeer lade 2 en de duplexeenheid
(HP Officejet Pro K550dtn/K550dtwn).
1) Plaats de printer op lade 2.
WAARSCHUWING! Houd uw vingers en handen niet onder de
printer.
2) Verwijder de verpakkingstapes van de duplexeenheid.
Schuif de duplexeenheid vanaf de achterkant zover in de printer
dat u een klik hoort.
3
1
2
Step 3: Install tray 2 and the duplex unit
(HP Officejet Pro K550dtn/K550dtwn).
1) Set the printer on top of tray 2.
WARNING! Be careful to keep your fingers and hands clear of the
bottom of the printer.
2) Remove the packing tapes from the duplex unit. On the back
of the printer, insert the duplex unit until it clicks.
Punto 3: Installare il vassoio 2 e l’unità duplex
(HP Officejet Pro K550dtn/K550dtwn).
1) Posizionare la stampante sopra il vassoio 2.
AVVERTENZA! non avvicinare mani e dita alla parte inferiore
della stampante.
2) Rimuovere i nastri di imballaggio dall’unità duplex.
Inserire l’unità duplex sulla parte posteriore della stampante
finché non si posiziona con uno scatto.
7
4
1
2
3
4
Schritt 4: Einsetzen der Tintenpatronen.
1) Öffnen Sie vorsichtig die Tintenpatronenabdeckung.
2) Nehmen Sie die Tintenpatrone aus der Verpackung.
3) Richten Sie die Patronen nacheinander an ihrem farblich
markierten Schacht aus, und setzen Sie sie in den Schacht
ein. Drücken Sie die Patronen fest nach unten, bis sie
einrasten. Nur dann ist der richtige Kontakt gewährleistet.
Hinweis: Alle vier Tintenpatronen müssen richtig eingesetzt
werden, damit Ihr Drucker ordnungsgemäß funktioniert.
4) Schließen Sie die Tintenpatronen- und
Druckkopfabdeckung.
Étape 4 : Installation des cartouches d’encre.
1) Tirez doucement pour ouvrir le capot des cartouches d’encre.
2) Sortez chaque cartouche d’encre de son emballage.
3) Alignez chaque cartouche sur l’emplacement de la couleur
correspondante, puis insérez la cartouche dans son logement.
Pour assurer un bon contact, appuyez fermement sur la cartouche
dans son emplacement, jusqu’à son enclenchement.
Remarque : les quatre cartouches d’encre doivent être mises en
place correctement pour que l’imprimante fonctionne.
4) Fermez le capot des cartouches d’encre.
Stap 4: plaats de inktpatronen.
1) Trek de klep van de inktpatroon voorzichtig naar voren.
2) Haal de inktpatronen uit de verpakking.
3) Houd elke inktpatroon voor de sleuf met de bijbehorende
kleurcode en steek de patroon in de sleuf. Druk de patronen stevig
omlaag tot ze met een klik op hun plaats zitten. Zo weet u zeker
dat ze goed contact maken. Opmerking: de printer werkt alleen
wanneer alle vier de inktpatronen correct zijn geplaatst.
4) Sluit de klep van de inktpatroon.
Step 4: Install the ink cartridges.
1) Gently pull open the ink cartridge cover.
2) Remove each ink cartridge from its package.
3) Align each cartridge with its color-coded slot, and insert the
cartridge into the slot. To ensure proper contact, press down firmly
on the cartridges until they snap into place.
Note: All four ink cartridges must be correctly installed for the
printer to work. 4) Close the ink cartridge cover.
Punto 4: Installare le cartucce di stampa.
1) Estrarre con cautela il coperchio della cartuccia di inchiostro.
2) Rimuovere ciascuna cartuccia di inchiostro dalla relativa
confezione.
3) Allineare ciascuna cartuccia al relativo alloggiamento
codificato in base al colore, quindi inserire la cartuccia
nell’alloggiamento. Per assicurare un corretto contatto, premere
con decisione sulle cartucce finché non si posizionano con uno
scatto. Nota: perché la stampante funzioni, è necessario installare
le quattro cartucce di inchiostro. 4) Chiudere il coperchio delle
cartucce di inchiostro.
8
English
Nederlands Français Deutsch
Italiano
Schritt 5: Einsetzen der Druckköpfe.
1) Öffnen Sie die obere Abdeckung. 2) Heben Sie die
Druckkopfverriegelung an. 3) Bevor Sie einen Druckkopf
auspacken, schütteln Sie ihn sechs Mal gut durch.
4) Nehmen Sie die Druckköpfe aus der Verpackung,
und ziehen Sie die orangefarbenen Schutzabdeckungen
ab. 5) Setzen Sie die Druckköpfe nacheinander in den
passenden farblich markierten Schacht ein. Drücken Sie
die Druckköpfe fest nach unten, um den richtigen Kontakt
sicherzustellen.
Étape 5 : Installation des têtes d’impression.
1) Ouvrez le capot supérieur. 2) Soulevez le loquet des têtes
d’impression. 3) Conservez chaque tête d’impresssion dans son
emballage et secouez-là rapidement, six fois de suite.
4) Sortez chaque tête d’impression de son emballage, puis
retirez le capuchon de protection orange de chacune d’elles.
5) Insérez chaque tête d’impression dans le logement de la
couleur correspondante. Appuyez fermement sur chaque tête
d’impression pour assurer un bon contact.
Stap 5: installeer de printkoppen.
1) Open de bovenklep. 2) Til de printkopgrendel omhoog.
3) Elke printkop eerst zes keer snel schudden voordat u deze uit
de verpakking haalt.
4) Haal de printkoppen uit de verpakking en verwijder de
oranje beschermingskapjes van elke printkop.
5) Plaats elke printkop in de sleuf met de bijbehorende
kleurcode. Druk de printkoppen goed naar beneden, om ervoor
te zorgen dat ze goed contact maken.
5
2
1
3
6x
4
5
Step 5: Install the printheads.
1) Open the top cover. 2) Lift the printhead latch. 3) While each
printhead is still in its packaging, shake each printhead rapidly
six times.
4) Remove each printhead from its packaging, and then remove
the orange protective caps from each printhead. 5) Insert each
printhead into its color-coded slot. Press down firmly on each
printhead to ensure proper contact.
Punto 5: Installare le testine di stampa.
1) Aprire il coperchio superiore. 2) Sollevare il fermo delle testine
di stampa. 3) Mantenendo le testine di stampa nelle relative
confezioni, scuoterle rapidamente sei volte.
4) Rimuovere ciascuna testina di stampa dall’imballaggio
e quindi rimuovere il nastro protettivo da ciascuna testina di
stampa. 5) Inserire ciascuna testina di stampa nel relativo
alloggiamento condificato in base al colore. Premere con
decisione su ciascuna testina di stampa per assicurare il
corretto contatto.
9
6
7
1
6
6) Ziehen Sie die Druckkopfverriegelung ganz nach vorne,
und drücken Sie die Verriegelung vollständig nach unten.
Hinweis: Sie müssen möglicherweise etwas Kraft aufwenden,
um die Verriegelung zu schließen. 7) Schließen Sie die obere
Abdeckung.
Schritt 6: Einlegen von Papier in die Fächer.
1) Ziehen Sie das Fach unten an der Vorderseite aus dem
Drucker heraus.
6) Tirez le loquet des têtes d’impression à fond vers l’avant et
appuyez vers le bas pour vous assurer qu’il est correctement
engagé. Remarque : il est parfois nécessaire d’appliquer une
certaine pression pour engager le loquet. 7) Fermez le capot
supérieur.
Étape 6 : Chargement de papier dans les bacs.
1) Retirez le bac de l’imprimante en le saisissant sous sa
partie avant.
6) Trek de printkopgrendel helemaal naar voren en druk deze
omlaag, zodat de grendel goed vastzit. Opmerking: mogelijk
moet u wat druk uitoefenen om de grendel vast te zetten.
7) Sluit de bovenklep.
Stap 6: plaats papier in de laden.
1) Pak de lade onder aan de voorkant vast en trek de lade uit
de printer.
6) Pull the printhead latch all the way forward and press down to
ensure that the latch is properly engaged. Note: You might have to
apply some pressure to engage the latch. 7) Close the top cover.
Step 6: Load paper in the trays.
1) Pull the tray out of the printer by grasping under the front of
the tray.
6) Tirare completamente il fermo delle testine di stampa e premere
verso il basso per assicurarsi che sia correttamente agganciato.
Nota: per fissare il fermo potrebbe essere necessario applicare
una leggera pressione. 7) Chiudere il coperchio superiore.
Punto 6: Caricare la carta nei vassoi.
1) Estrarre il vassoio della stampante afferrandolo dalla
parte anteriore.
10
English
Nederlands Français DeutschItaliano
2) Bei Papier mit einer Länge von mehr als 279 mm heben Sie
die vordere Abdeckung des Fachs an (in der Abbildung
schattiert dargestellt) und klappen die Vorderseite des Fachs
nach unten.
3) Legen Sie maximal 250 Blatt Papier in Fach 1 oder 350 Blatt
Papier in Fach 2 mit der zu bedruckenden Seite nach unten
rechtsbündig in das Fach ein. Achten Sie darauf, dass der
Papierstapel rechts und hinten am Fach anliegt und nicht über
die Markierung im Fach hinausragt. Hinweis: In Fach 2 darf nur
Normalpapier eingelegt werden. 4) Verschieben Sie die
Papierführungen im Fach, um sie an die von Ihnen eingelegte
Papiergröße anzupassen.
2) Pour les supports dont la longueur dépasse 279 mm,
soulevez le capot avant du bac (partie ombrée sur
l’illustration) et abaissez l’avant du bac.
3) Introduisez jusqu’à 250 feuilles de papier dans le bac 1 ou
350 feuilles dans le bac 2, face à imprimer orientée vers le bas,
le long du côté droit du bac. Vérifiez que la pile de papier est
alignée sur les bords droit et arrière du bac et ne dépasse pas le
marquage sur le bac. Remarque : utilisez uniquement du papier
ordinaire pour charger le bac 2. 4) Faites glisser les guides du
bac pour les régler en fonction de la taille du papier à charger.
2) Voor papier dat langer is dan 279 mm tilt u de voorklep van
de lade op (zie gearceerd gedeelte van de lade) en laat u de
voorkant van de lade zakken.
3) Plaats maximaal 250 vellen papier in lade 1 of maximaal
350 vellen in lade 2. Leg het papier met de afdrukzijde omlaag
en tegen de rechterkant van de lade. Controleer of de stapel
papier goed tegen de rechter- en achterkant van de lade ligt en
niet buiten de lijnmarkering in de lade uitsteekt.
Opmerking: in lade 2 kunt u uitsluitend normaal papier
plaatsen. 4) Stel de papiergeleiders in de lade af op het
papierformaat dat u in de lade plaatst.
2
4
3
2) For paper longer than 11 inches (279 mm), lift the front cover
of the tray (see shaded tray part) and lower the front of the tray.
3) Insert up to 250 sheets of paper into tray 1 or up to 350
sheets in tray 2, print-side down along the right of the tray.
Make sure the stack of paper aligns with the right and back
edges of the tray, and does not exceed the line marking in the
tray. Note: Tray 2 can be loaded only with plain paper. 4) Slide
the paper guides in the tray to adjust them for the size that you
are loading.
2) Con i supporti che superano i 279 mm di lunghezza,
sollevare il coperchio anteriore del vassoio (la parte
ombreggiata del vassoio nell’illustrazione) e abbassare la parte
anteriore del vassoio.
3) Inserire fino a 250 fogli nel vassoio 1 o fino a 350 fogli nel
vassoio 2, con il lato di stampa rivolto verso il basso e allineato
a destra del vassoio. Assicurarsi che la risma di carta sia
allineata al bordo destro e a quello posteriore del vassoio e che
non fuoriesca dalla linea contrassegnata nel vassoio.
Nota: nel vassoio 2 è possibile caricare soltanto carta comune.
4) Far scorrere le guide della carta nel vassoio in modo da
regolarle in base al formato che si sta caricando.
11
5
6
7
1
2
3
5) Setzen Sie das Fach vorsichtig wieder ein. 6) Ziehen Sie die
Verlängerung des Ausgabefachs heraus.
Schritt 7: Anschließen des Netzkabels und Einschalten des Druckers.
1) Schließen Sie das Netzkabel an den Drucker an.
2) Schließen Sie das andere Ende des Netzkabels an eine
Steckdose an. 3) Schaltet sich der Drucker nicht automatisch ein,
drücken Sie die Taste (Netztaste), um das Gerät
einzuschalten.
5) Replacez délicatement le bac. 6) Tirez les extensions du bac
de sortie.
Étape 7 : Branchez le cordon d’alimentation et mettez l’imprimante
sous tension.
1) Reliez le cordon d’alimentation à l’imprimante.
2) Branchez l’autre extrémité du cordon d’alimentation sur une prise
secteur. 3) Si l’imprimante ne se met pas en marche
automatiquement, appuyez sur (bouton Alimentation) pour la
mettre sous tension.
5) Schuif de lade voorzichtig terug. 6) Trek het verlengstuk op de
uitvoerbak uit.
Stap 7: Sluit het netsnoer aan en zet de printer aan.
1) Sluit het netsnoer aan op de printer. 2) Steek het andere eind
van het netsnoer in een stopcontact. 3) Als de printer niet
automatisch wordt ingeschakeld, drukt u op de knop
(Aan/Uit) om de printer in te schakelen.
5) Gently reinsert the tray. 6) Pull out the extension on the
output tray.
Step 7: Connect the power cord and turn on the printer.
1) Connect the power cord to the printer. 2) Connect the other end
of the power cord to an alternating current (AC) power outlet. 3) If
the printer does not turn on automatically, press (Power button) to
turn it on.
5) Reinserire il vassoio con delicatezza. 6) Estrarre l’estensione sul
vassoio di raccolta.
Punto 7: Collegare il cavo di alimentazione e accendere
la stampante.
1) Collegare il cavo di alimentazione alla stampante.
2) Collegare l’altra estremità del cavo di alimentazione a una
presa CA. 3) Se la stampante non si accende automaticamente,
per accenderla premere (pulsante Accensione).
12
English
Nederlands Français DeutschItaliano
Um eine optimale Druckqualität zu gewährleisten, wird der
Drucker initialisiert und die Druckköpfe werden vom Drucker
ausgerichtet. Zu Beginn des Ausrichtungsvorgangs blinkt die
Power-LED und der Drucker druckt eine Informationsseite.
Während des Vorgangs druckt der Drucker die
Ausrichtungsseiten (in Farbe). Dieser Vorgang kann bis zu
8Minuten dauern.
Hinweis: Wenn andere Kontrollleuchten des Druckers während
der Druckkopfausrichtung leuchten, finden Sie weitere
Informationen unter “Bedeutung der LEDs auf dem Bedienfeld”
auf Seite 27. Wenn die Ausrichtungsseiten nicht gedruckt
werden, führen Sie folgende Schritte aus. 1) Vergewissern Sie
sich, dass das Netzkabel richtig angeschlossen ist.
2) Vergewissern Sie sich, dass die Druckköpfe und die
Tintenpatronen richtig installiert sind.
Pour offrir une qualité d’impression optimale, l’imprimante
initialise et aligne les têtes d’impression. Au début de la
procédure, le voyant d’alimentation clignote et l’imprimante
imprime une page d’informations. Durant l’opération,
l’imprimante imprime les pages d’alignement (pages couleurs).
Ce processus dure environ 8 minutes.
Remarque : si d’autres voyants de l’imprimante sont allumés lors
de la procédure d’alignement des têtes d’impression, reportez-
vous à la section « Interprétation des voyants du panneau de
commande », à la page 37.
Si les pages d’alignement ne s’impriment pas, procédez comme
suit. 1) Vérifiez que le cordon d’alimentation est correctement
branché. 2) Vérifiez que les têtes d’impression et les cartouches
d’encre sont installées correctement.
Vervolgens wordt de printer geïnitialiseerd en worden de
printkoppen uitgelijnd om te zorgen voor de best mogelijke
afdrukkwaliteit. Aan het begin van deze procedure knippert
het Aan/Uit-lampje eenmaal en wordt een informatiepagina
afgedrukt. Tijdens deze procedure worden de uitlijnpagina’s
(gekleurde pagina’s) afgedrukt. De procedure duurt ongeveer
8 minuten.
Opmerking: zie “De betekenis van de lampjes van het
bedieningspaneel” op pagina 46 als er tijdens de
uitlijnprocedure van de printkop andere lampjes op de printer
branden. Ga als volgt te werk als de uitlijnpagina’s niet worden
afgedrukt: 1) Controleer of het netsnoer goed is aangesloten.
2) Controleer of de printkoppen en de inktpatronen correct
zijn geïnstalleerd.
2
1
To ensure the best possible print quality, the printer initializes
and aligns the printheads. At the beginning of the process, the
Power light blinks and the printer prints an information page.
During the process, the printer prints the alignment pages
(colored pages). This process takes approximately 8 minutes.
Note: If other printer lights are lit during the printhead
alignment process, see “Interpreting control panel lights” on
page 18. If the alignment pages do not print, follow these
steps. 1) Check that the power cord is connected firmly.
2) Check that the printheads and ink cartridges are properly
installed.
Per assicurare la migliore qualità di stampa, la stampante
esegue l’inizializzazione e l’allineamento delle testine. All’inizio
di tale processo, la spia Accensione lampeggia e viene
stampata una pagina informativa. Durante tale processo,
vengono stampate le pagine di allineamento (pagine colorate).
Questo processo richiede circa 8 minuti.
Nota: se durante l’allineamento delle testine di stampa restano
accese altre spie della stampante, vedere “Significato delle spie
del pannello di controllo“ a pagina 55. Se le pagine di
allineamento non vengono stampate, attenersi alla seguente
procedura.
1) Verificare che il cavo di alimentazione sia collegato
saldamente. 2) Verificare che le cartucce e le testine di stampa
siano installate correttamente.
13
3
4
8
3) Achten Sie darauf, dass die hintere Abdeckung (HP Officejet
Pro K550) bzw. die Duplex-Einheit (HP Officejet Pro K550dtn/
K550dtwn) eingerastet ist. 4) Schalten Sie den Drucker aus und
dann wieder ein. Wenn die Ausrichtungsseiten immer noch nicht
gedruckt werden, lesen Sie den Abschnitt “Probleme beim
Drucken einer Ausrichtungsseite” auf Seite 29.
Schritt 8: Anschließen des Druckers.
Folgen Sie den Anweisungen für Ihren Anschlusstyp
(USB oder kabelgebundenes Netzwerk).
Informationen zum Einrichten einer drahtlosen Kommunikation für
den HP Drucker Officejet Pro K550dtwn finden Sie unter
“Einrichten des Druckers für drahtlose Kommunikation
(HP Officejet Pro K550dtwn)” auf Seite 31.
3) Assurez-vous que le panneau d’accès arrière
(HP Officejet Pro K550) ou l’unité recto verso
(HP Officejet Pro K550dtn/K550dtwn) est installé(e).
4) Mettez l’imprimante hors tension, puis à nouveau sous tension.
Si les pages d’alignement ne s’impriment toujours pas,
reportez-vous à la section « Problèmes d’impression d’une
page d’alignement », à la page 39.
Étape 8 : Connexion de l’imprimante.
Consultez les instructions correspondant à votre type de connexion
(USB ou réseau câblé).
Pour configurer la communication sans fil pour l’imprimante
HP Officejet Pro K550dtwn, reportez-vous à la section
« Configuration de l’imprimante pour la fonction de
communication sans fil (HP Officejet Pro K550dtwn) », à la
page 41.
3) Controleer of het toegangspaneel aan de achterzijde
(HP Officejet Pro K550) of de duplex-eenheid
(HP Officejet Pro K550dtn/K550dtwn) is geïnstalleerd.
4) Schakel de printer uit en weer in. Zie “Problemen bij het
afdrukken van een uitlijnpagina” op pagina 48 als de
uitlijnpagina’s ook dan niet worden afgedrukt.
Stap 8: sluit de printer aan.
Zie de aanwijzingen verderop voor uw verbindingstype
(USB of bedraad netwerk).
Zie “De printer instellen voor draadloze communicatie
(HP Officejet Pro K550dtwn)” op pagina 50 als u draadloze
communicatie wilt instellen voor de HP Officejet Pro K550dtwn-
printer.
3) Make sure the rear access panel (HP Officejet Pro K550) or
duplex unit (HP Officejet Pro K550dtn/K550dtwn) is installed.
4) Turn off the printer, and then turn it on again. If the alignment
pages still do not print, see “Problems printing an
alignment page” on page 20.
Step 8: Connect the printer.
See the following instructions for your connection type (USB or wired
network).
To set up wireless communication for HP Officejet Pro K550dtwn
printer, see “Setting up the printer for wireless communication
(HP Officejet Pro K550dtwn)” on page 22.
3) Assicurarsi che il pannello di accesso posteriore (HP Officejet
Pro K550) o l’unità duplex (HP Officejet Pro K550dtn/K550dtwn)
sia installato. 4) Spegnere e riaccendere la stampante. Se il
problema persiste, vedere “Problemi durante la stampa di una
pagina di allineamento“ a pagina 57.
Punto 8: Collegare la stampante.
Vedere le istruzioni riportate di seguito relative al tipo di
collegamento (USB o rete cablata).
Per impostare la comunicazione wireless per la stampante
HP Officejet Pro K550dtwn, vedere “Impostazione della stampante
per la comunicazione wireless (HP Officejet Pro K550dtwn)“ a
pagina 59.
14
English
Nederlands Français DeutschItaliano
USB-Verbindung: 1) Schließen Sie alle laufenden
Anwendungen und legen Sie die Starter-CD in das
CD-Laufwerk ein. Wenn das CD-Menü nicht automatisch
aufgerufen wird, doppelklicken Sie auf das Installationssymbol
der Starter-CD.
2) Klicken Sie im CD-Menü auf Installieren (Windows) oder
Treiber installieren (Mac OS), und folgen Sie den Anleitungen auf
dem Bildschirm, um die Installation der Software abzuschließen.
Schließen Sie das USB-Kabel nach Aufforderung an.
Weitere Informationen zum Installieren der Software finden Sie
im Online-Benutzerhandbuch auf der Starter-CD.
Connexion USB : 1) Fermez toutes les applications ouvertes puis
insérez le CD de démarrage dans le lecteur de CD-ROM. Si le
menu du CD ne démarre pas automatiquement, double-cliquez
sur l’icône d’installation sur le CD de démarrage.
2) Dans le menu du CD, cliquez sur Installer (Windows) ou
Installer le pilote (Mac OS), puis suivez les instructions qui
apparaissent à l’écran pour effectuer l’installation du logiciel.
Connectez le câble USB lorsqu’un message vous y invite.
Pour plus d’informations sur l’installation de logiciels, reportez-
vous au guide de l’utilisateur en ligne, disponible sur le CD de
démarrage.
USB-verbinding: 1) Sluit alle actieve toepassingen en plaats de
Starter-cd in het cd-romstation. Als het cd-menu niet automatisch
wordt geopend, dubbelklikt u op het installatiepictogram op de
Starter-cd.
2) Klik in het cd-menu op Installeren (Windows) of
Stuurprogramma installeren (Mac OS) en volg de aanwijzingen
op het scherm om de software te installeren. Sluit de USB-kabel
aan wanneer hierom wordt gevraagd.
Zie de elektronische gebruikershandleiding op de Starter-cd
voor meer informatie over de installatie van de software.
USB connection: 1) Close any running applications and insert the
Starter CD into the CD drive. If the CD menu does not start
automatically, double-click the setup icon on the Starter CD.
2) On the CD menu, click Install (Windows) or Install Driver
(Mac OS), and follow the onscreen instructions to complete the
software installation. Connect the USB cable when prompted.
For more information about installing the software, see the
onscreen user guide on the Starter CD.
2
1
Connessione USB: 1) Chiudere tutte le applicazioni in
esecuzione e inserire il CD di avviamento nell’apposita unità.
Se il menu del CD non si avvia automaticamente, fare doppio
clic sull’icona di installazione del CD di avviamento.
2) Dal menu del CD, scegliere Installa (Windows) o Installa
driver (Mac OS) e seguire le istruzioni visualizzate per
completare l’installazione del software. Quando viene richiesto,
collegare il cavo USB.
Per ulteriori informazioni sull’installazione del software, consultare
la Guida in linea sul CD di avviamento.
15
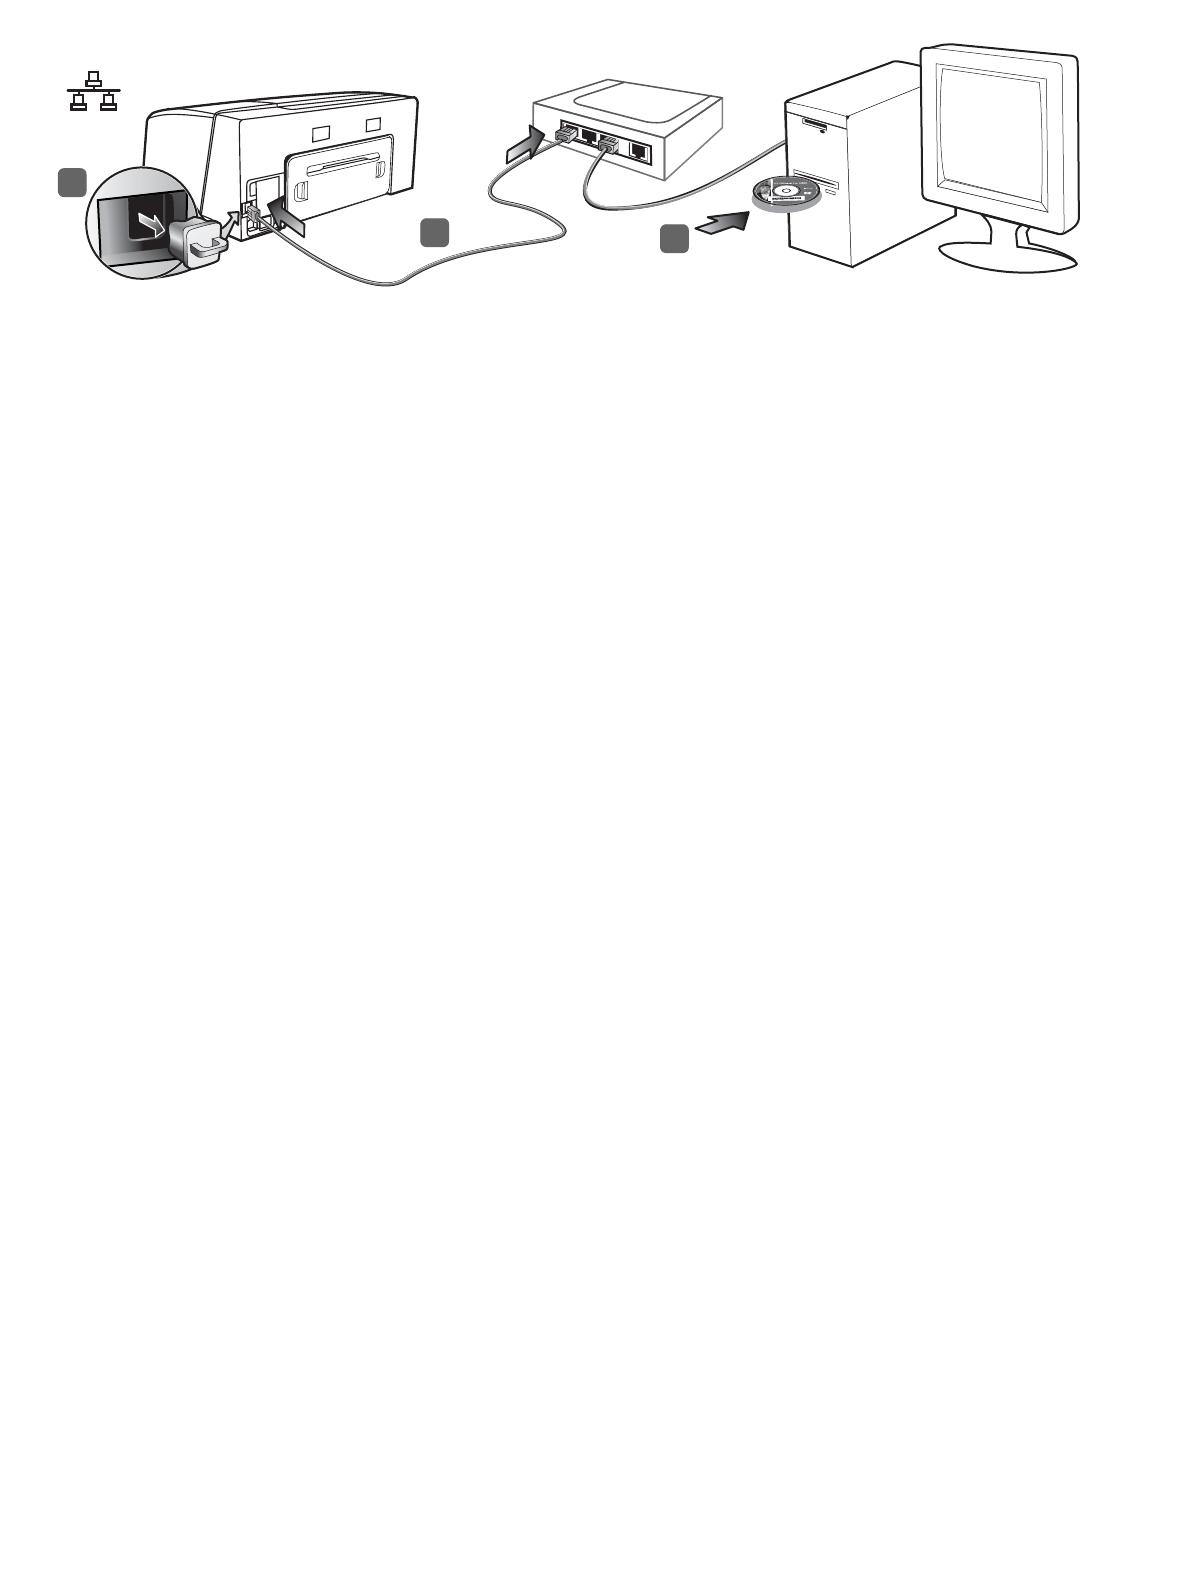
Kabelgebundenes Netzwerk: 1) Entfernen Sie die
Schutzabdeckung vom Netzwerkanschluss des Druckers.
2) Schließen Sie das Netzwerkkabel an den zugehörigen
Druckeranschluss sowie an einen freien Anschluss des
Netzwerkgeräts (Hub, Switch oder Router) an.
ACHTUNG: Stecken Sie das Netzwerkkabel nicht in einen mit
“WAN”, “Uplink” oder “Internetbeschrifteten Anschluss des
Netzwerkgeräts. Stecken Sie das Crossover-Kabel (im
Lieferumfang des HP Officejet Pro K550dtwn enthalten) nicht in
das Netzwerkgerät (Hub, Switch oder Router).
Hinweis: Es wird empfohlen, den Drucker und die Computer,
die diesen Drucker verwenden, demselben Subnetz zuzuweisen.
Wiederholen Sie die Schritte, wenn die Verbindungs-LED des
Netzwerkanschlusses nicht aufleuchtet. Siehe unter “Probleme mit
der Netzwerkverbindung” im Online-Benutzer handbuch.
3) Legen Sie die Starter-CD in das CD-Laufwerk ein. Wenn das
CD-Menü nicht automatisch aufgerufen wird, doppelklicken Sie
auf das Installationssymbol der Starter-CD.
Réseau câblé : 1) Retirez le capot de protection du connecteur
réseau de l’imprimante. 2) Branchez le câble réseau au connecteur
et à un port disponible sur le concentrateur de réseau, le
commutateur ou le routeur. ATTENTION : ne branchez pas le câble
réseau sur un port appelé WAN, Uplink ou Internet sur le
concentrateur, le commutateur ou le routeur. Ne connectez pas le
câble croisé (fourni avec l’imprimante HP Officejet Pro K550dtwn)
dans le concentrateur de réseau, le commutateur ou le routeur.
Remarque : il est recommandé de disposer l’imprimante et les
périphériques qui l’utilisent sur le même sous-réseau. Répétez cette
étape si le voyant Liaison du connecteur réseau ne s’allume pas.
Reportez-vous à la section « Problèmes de connexion à un réseau »
dans le guide de l’utilisateur en ligne.
3) Introduisez le CD de démarrage dans le lecteur de CD-ROM.
Si le menu du CD ne démarre pas automatiquement, double-
cliquez sur l’icône d’installation sur le CD de démarrage.
Bedraad netwerk: 1) Verwijder de beschermklep van de
netwerkaansluiting van de printer. 2) Sluit de netwerkkabel aan
op deze aansluiting en op een vrije poort op de hub, switch of
router van het netwerk. VOORZICHTIG: sluit de netwerkkabel niet
aan op een poort met de aanduiding WAN, Uplink of Internet in
de hub, switch of router. Steek de cross-kabel (meegeleverd met de
HP Officejet Pro K550dtwn) niet in de hub, switch of router van het
netwerk.
Opmerking: u wordt aangeraden ervoor te zorgen dat de printer
en de computers die de printer gebruiken, zich alle in hetzelfde
subnet bevinden. Herhaal de stap als het verbindingslampje van
de netwerkaansluiting niet gaat branden. Zie “Problemen met
aansluiten op een netwerk” in de elektronische
gebruikershandleiding.
3) Plaats de Starter-cd in het cd-romstation. Als het cd-menu
niet automatisch wordt geopend, dubbelklikt u op het
installatiepictogram op de Starter-cd.
Wired network: 1) Remove the protective cover from the printer’s
network connector. 2) Connect the network cable to the connector
and to an available port on the network hub, switch, or router.
CAUTION: Do not plug the network cable into a port labeled
WAN, Uplink, or Internet in the hub, switch, or router. Do not plug
the cross cable (provided with HP Officejet Pro K550dtwn) into the
network hub, switch, or router.
Note: It is recommended that the printer and the computers that use
it be on the same subnet. Repeat the step if the network connector’s
Link light does not turn on. See “Problems connecting to a network
in the onscreen user guide.
3) Insert the Starter CD into the CD drive. If the CD menu does not
start automatically, double-click the setup icon on the Starter CD.
2
1
3
Reti cablate: 1) Rimuovere il coperchio di protezione dal
connettore di rete della stampante. 2) Collegare il cavo di rete al
connettore e a una porta disponibile dell’hub di rete, del
commutatore o del router. ATTENZIONE: non collegare il cavo di
rete a una porta etichettata WAN, Uplink o Internet all’hub,
al commutatore o al router. Non collegare il cavo incrociato
(fornito con la stampante HP Officejet Pro K550dtwn) all’hub di
rete, al commutatore o al router.
Nota: si consiglia di posizionare la stampante e i computer che la
utilizzano nella stessa sottorete. Ripetere il punto se la spia
Collegamento del connettore di rete non si accende. Nella Guida in
linea, vedere “Problemi di collegamento alla rete”.
3) Inserire il CD di avviamento nell’apposita unità. Se il menu del
CD non si avvia automaticamente, fare doppio clic sull’icona di
installazione del CD di avviamento.
16
English
Nederlands Français DeutschItaliano
9
4) Drucken Sie die Konfigurationsseite, indem Sie die Taste
/(Konfigurationsseite drücken). 5) Klicken Sie im
CD-Menü auf Installieren (Windows) oder Treiber installieren
(Mac OS), und folgen Sie den Anleitungen auf dem Bildschirm
zur Installation der Software. Verwenden Sie dabei die
Informationen auf der Konfigurationsseite (z. B. die IP-Adresse).
Weitere Informationen zur Installation der Software oder zur
Freigabe des Druckers im Netzwerk finden Sie im Online-
Benutzerhandbuch.
Schritt 9: Testen der Softwareinstallation.
Nachdem Sie die Installation der Software ausgeführt und den
Drucker an den Computer angeschlossen haben, drucken Sie
ein Dokument aus einer Anwendung, die Sie häufig
verwenden. Wenn das Dokument nicht gedruckt wird, lesen
Sie den Abschnitt “Fehlerbehebung und Konfigurationstools
auf Seite 30.
4) Imprimez la page de configuration en
appuyant sur / (bouton Page de configuration).
5) Sur le menu du CD, cliquez sur Installer (Windows) ou
Installer le pilote (Mac OS), et suivez les instructions qui
s’affichent à l’écran pour installer le logiciel, en utilisant les
informations de la page de configuration (telle que l’adresse IP,
par exemple). Pour plus d’informations sur l’installation du
logiciel ou le partage de l’imprimante en réseau, reportez-vous
au guide de l’utilisateur en ligne.
Étape 9 : Test de l’installation du logiciel de l’imprimante.
Après avoir terminé l’installation du logiciel et connec
l’imprimante à l’ordinateur, imprimez un document à partir d’une
application que vous utilisez régulièrement pour vous assurer que
le logiciel est bien installé. Si le document ne s’imprime pas,
reportez-vous à la section « Outils de dépannage et de
configuration », à la page 40.
4) Druk de configuratiepagina af door op de knop /
(Configuratiepagina) te drukken. 5) Klik in het cd-menu op
Installeren (Windows) of Stuurprogramma installeren (Mac OS)
en volg de aanwijzingen op het scherm op om de software te
installeren aan de hand van de informatie op de
configuratiepagina (zoals het IP-adres). Zie de elektronische
gebruikershandleiding voor meer informatie over het installeren
van de software of het delen van de printer in een netwerk.
Stap 9: test de installatie van de printersoftware.
Als u de software hebt geïnstalleerd en de printer hebt
aangesloten op de computer, drukt u een document af vanuit
een toepassing die u regelmatig gebruikt, om te controleren of
de software correct is geïnstalleerd. Zie “Hulpmiddelen voor
het oplossen van problemen en voor de configuratie” op
pagina 49 als het document niet wordt afgedrukt.
4) Print the configuration page by pressing /
(Configuration Page button). 5) On the CD menu,
click Install (Windows) or Install Driver (Mac OS),
and follow the onscreen instructions to install the software,
using information from the configuration page (such as the IP
address). For more information about installing the software or
sharing the printer on a network, see the onscreen user guide.
Step 9: Test the printer software installation.
After you complete the software installation and connect the
printer to the computer, print a document from an application
that you use frequently to ensure that the software is installed
correctly. If the document does not print, see “Troubleshooting
and configuration tools” on page 21.
4) Stampare la pagina di configurazione premendo /
(pulsante Pagina di configurazione). 5) Dal menu del CD,
scegliere Installa (Windows) o Installa driver (Mac OS) e seguire le
istruzioni visualizzate per installare il software utilizzando le
informazioni fornite dalla pagina di configurazione (ad esempio
l’indirizzo IP). Per ulteriori informazioni sull’installazione del
software o la condivisione della stampante su una rete, consultare
la Guida in linea.
Punto 9: Verificare l’installazione del software della stampante.
Al termine dell’installazione del software e dopo avere collegato
la stampante al computer, stampare un documento da
un’applicazione utilizzata frequentemente per assicurarsi che
l’installazione sia stata eseguita correttamente. Se il documento
non viene stampato, vedere “Risoluzione dei problemi e strumenti
di configurazione“ a pagina 58.
17
Schritt 10: Registrieren des Druckers
Registrieren Sie den Drucker, damit Sie nützliche
Kundenunterstützung und wichtige technische Informationen
erhalten. Wenn Sie den Drucker nicht während der Installation
der Software registrieren, können Sie dies später unter
www.register.hp.com tun
.
Weitere Informationsquellen
Ihr Drucker ist betriebsbereit. Weitere Informationen zur
Verwendung und Fehlerbehebung des Druckers sowie zur
Gewährleistung finden Sie in folgenden Quellen:
Online-Benutzerhandbuch und Readme-Datei auf der Starter-CD
HP Instant Support und integrierter Web-Server
(siehe das Online-Benutzerhandbuch)
Website für Produktunterstützung unter
www.hp.com/support/officejetprok550
.
Étape 10 : Enregistrement de l’imprimante.
Enregistrez l’imprimante afin d’obtenir de l’aide et des
informations techniques importantes. Si vous n’avez pas
enregistré votre imprimante au cours de l’installation du
logiciel, vous pourrez le faire ultérieurement à l’adresse
www.register.hp.com
.
Pour obtenir davantage d’informations.
Votre imprimante est prête à l’emploi. Pour plus d’informations sur
l’utilisation de l’imprimante, les instructions de dépannage et la
garantie, reportez-vous aux références suivantes :
guide de l’utilisateur en ligne et au fichier Lisezmoi disponibles
sur le CD de démarrage ;
HP Instant Support et serveur Web intégré
(voir le guide de l’utilisateur en ligne) ;
site Web d’assistance produit à l’adresse
www.hp.com/support/officejetprok550
.
Stap 10: registreer de printer.
Registreer de printer zodat u belangrijke informatie over
ondersteuning en technische informatie ontvangt. Als u de printer
niet hebt geregistreerd tijdens de installatie van de software,
kunt u de printer later registreren via www.register.hp.com
.
Meer informatie zoeken.
De printer is klaar voor gebruik. Voor meer informatie over het
gebruik van de printer en het oplossen van problemen, alsmede
informatie over de garantie, kunt u de volgende bronnen raadplegen:
Elektronische gebruikershandleiding en het Leesmij-bestand op
de Starter-cd.
HP Instant Support en de ingebouwde webserver
(zie de elektronische gebruikershandleiding)
Site voor productondersteuning op
www.hp.com/support/officejetprok550
.
10
Step 10: Register the printer.
Register the printer to receive important support and
technical information. If you did not register your printer
while installing the software, you can register later at
www.register.hp.com
.
Finding more information.
Your printer is ready to use. For information about using the printer
and troubleshooting, as well as warranty information, see the
following resources:
Onscreen user guide and readme file on the Starter CD
HP Instant Support and embedded Web server
(see the onscreen user guide)
Product support site at www.hp.com/support/officejetprok550
Punto 10: Registrare la stampante.
Per ricevere importanti informazioni tecniche e sull’assistenza,
è necessario effettuare la registrazione della stampante. Se la
registrazione non viene effettuata durante l’installazione del
software, sarà possibile registrarla successivamente all’indirizzo
www.register.hp.com
.
Ulteriori informazioni.
La stampante è pronta per l’uso. Per informazioni sull’utilizzo della
stampante e sulla risoluzione dei problemi, nonché sulle garanzie,
fare riferimento alle risorse seguenti:
Guida in linea e file Readme nel CD di avviamento.
HP Instant Support e server Web incorporato
(vedere la Guida in linea)
Sito dell’assistenza prodotti all’indirizzo
www.hp.com/support/officejetprok550
.
.
.
English
18
Interpreting control panel lights
For more information, visit the product support website at www.hp.com/support/officejetprok550.
1) Power button and light
2) Configuration Page button
HP Officejet Pro K550dtn
HP Officejet Pro K550dtwn
3) Cancel button
4) Resume button and light
5) Printhead lights
6) Ink cartridge lights
6
2
4
1
5
3
Control panel light pattern Explanation and recommended action
The Power light and the Resume
light blink.
Print media is jammed in the printer.
Remove all media from the output tray. Locate and clear the jam. See “Clearing jams
in the onscreen user guide.
The printer carriage has stalled.
Open the top cover and remove any obstructions (such as jammed media).
Press (Resume button) to continue printing.
If the error persists, turn the printer off, and then on again.
The Power light is on and the
Resume light blinks.
The printer is out of paper.
Load paper and press (Resume button).
The Power light and the Resume
light are on.
A cover is not closed completely.
Make sure all covers are completely closed.
The rear access panel or duplex unit is missing, or is not inserted completely.
Make sure the rear access panel (HP Officejet Pro K550) or the duplex unit
(HP Officejet Pro K550dtn/K550dtwn) is inserted completely at the back of the printer.
The Power light is on, and one or
more of the printhead lights blinks.
One or more of the printheads are missing.
Install the printhead indicated, and then try to print.
If the error persists, replace the printhead indicated.
The Power light, and one or more of
the printhead lights blink.
One or more of the printheads are faulty or need attention.
Ensure the printhead indicated is properly installed, and then try to print.
If the error persists, replace the printhead indicated.
English
19
The Power light is on, and one or
more of the ink cartridge lights
blink.
One or more of the ink cartridges are missing.
Install the ink cartridge indicated, and then try to print.
If the error persists, replace the ink cartridge indicated.
One or more of the ink cartridges are out of ink and must be replaced before you can
continue printing.
Replace the ink cartridge indicated.
The Power light, and one or more of
the ink cartridge lights blink.
One or more of the ink cartridges are faulty or need attention.
Ensure the ink cartridge indicated is properly installed, and then try to print.
If the error persists, replace the ink cartridge indicated.
The Power light is on, and one or
more of the ink cartridge lights
are on.
The Power light blinks, and one or
more of the ink cartridge lights
are on.
One or more of the ink cartridges are low on ink and will need to be replaced soon.
No action is required.
The Configuration Page light blinks.
(HP Officejet Pro K550dtwn)
One of the following processes is taking place:
The printer is initializing for wireless communication.
If you are using SecureEasySetup (SES) to set up the printer, the printer might be trying
to connect to the wireless network.
If you are using Windows Connect Now™ to set up the printer, the printer is receiving
wireless information from the USB flash drive.
Each of the above processes takes less than 2 minutes.
No action is required.
The Configuration Page light is on.
(HP Officejet Pro K550dtwn)
The printer is in wireless communication mode.
No action is required.
All lights are on. A non-recoverable error has occurred.
Disconnect all cables (such as power cord, network cable, and USB cable),
wait about 20 seconds, and reconnect the cables. If the problem persists,
visit HP website (www.hp.com/support/officejetprok550
) for the latest troubleshooting
information, or product fixes and updates.
English
20
Troubleshooting
This section provides troubleshooting suggestions for some of the most common issues associated with hardware and
software installation.
For late-breaking information, see the readme file and release notes, or visit the product support website at
www.hp.com/support/officejetprok550
.
Problems printing an alignment page
Check the printer to ensure the following:
Power light is on and not blinking. When the printer
is first turned on, it takes approximately 45 seconds
to warm up.
The printer is in the Ready state, and no other lights
on the control panel are lit or blinking. If lights are lit
or blinking, see “Interpreting control panel lights” on
page 18.
Ensure power cord and other cables are working,
and are firmly connected to the printer.
All packing tapes and materials are removed from
the printer.
Rear access panel (HP Officejet Pro K550) or duplex
unit (HP Officejet Pro K550dtn/K550dtwn) is locked
into place.
Paper is loaded correctly in the tray, and is not
jammed in the printer.
Ensure the orange protective caps have been
removed from each printhead.
Printheads and ink cartridges are properly installed
in their correct color-coded slots. Press down firmly
on each one to ensure
proper contact.
Printhead latch and all covers are closed.
Problems installing software
Check or perform the following:
Make sure the computer meets the system
requirements. See the onscreen user guide on the
Starter CD.
Before installing software on a Windows computer,
ensure all other programs are closed.
If the computer does not recognize the path to the
CD drive that you typed, ensure you are specifying
the correct drive letter.
If the computer cannot recognize the Starter CD in
the CD drive, inspect the CD for damage.
You can download the printer driver from
www.hp.com/support/officejetprok550
.
In the Windows device manager, make sure that the
USB drivers have not been disabled.
If you are using Windows and the computer cannot
detect the printer, run the uninstallation utility
(Util\Scrubber\Uninstall.exe on the Starter CD) to
perform a clean uninstallation of the printer driver.
Restart your computer, and reinstall the printer driver.
Problems connecting to a network
Note: After correcting any of the following, run the
installation program again.
General network troubleshooting
If you are unable to install the printer software,
verify that:
All cable connections to the computer and the
printer are secure.
The network is operational and the network hub
is turned on.
All applications, including virus protection
programs and personal firewalls, are closed
or disabled.
Make sure the printer is installed on the same
subnet as the computers that will be using
the printer.
If the installation program cannot discover
the printer, print the configuration page
(see “To print a configuration page” on
page 21), and enter the IP address manually
in the installation program.
If you are using a computer running Windows,
make sure that the network ports created in the
printer driver match the printer IP address:
1) Print the printer’s configuration page.
2) From the Windows desktop, click Start, point
to Settings, and then click Printers or Printers
and Faxes.
3) Right-click the printer icon, click Properties,
and then click the Ports tab.
4) Select the TCP/IP port for the printer, and then
click Configure Port.
5) Compare the IP address listed in the dialog
box and make sure it matches the IP address
listed on the configuration page. If the IP
addresses are different, change the IP address in
the dialog box to match the address on the
configuration page.
6) Click OK twice to save the settings and close
the dialog boxes.
Problems connecting to a wired network
If the Link light on the network connector does not
turn on, make sure that all of the “General network
troubleshooting” conditions listed above are met.
Though it is not recommended that you assign the
printer with a static IP address, you might resolve
some installation problems (such as a conflict with a
personal firewall) by doing so. For more information,
see the onscreen user guide.
English
21
Troubleshooting and configuration tools
The following tools are available for troubleshooting or configuring the printer. For more information about these tools,
see the onscreen user guide on the Starter CD.
Configuration page
Use the configuration page to view current printer
settings, to help troubleshoot printer problems, and to
verify installation of optional accessories, such as the
duplex unit. The configuration page also contains a log
of recent events. If the printer is connected to a network,
an additional network configuration page prints;
this page shows the network settings for the printer.
If you need to call HP, print the configuration page of the
printer before calling.
To print a configuration page
HP Officejet Pro K550: Press and hold (Power
button), press (Cancel button) once, and release
(Power button).
HP Officejet Pro K550dtn/K550dtwn: Press /
(Configuration Page button).
Embedded Web server
When the printer is connected to a network, you can use
the printer’s embedded Web server to view status
information, change settings, and manage the printer at
your computer.
To open the embedded Web server
In a supported Web browser on your computer, type the
IP address that has been assigned to the printer.
For example, if the IP address is 123.123.123.123,
type the following address into the Web browser:
http://123.123.123.123
The IP address for the printer is listed on the
configuration page.
After you open the embedded Web server, you can
bookmark it so that you can return to it quickly in
the future.
English
22
Setting up the printer for wireless communication
(HP Officejet Pro K550dtwn)
You may set up the printer for wireless communication using one of the following ways:
Using a cross cable or network cable
See “To set up the printer for wireless communication” on page 23.
Using SecureEasySetup (SES)
See “To set up wireless communication using SecureEasySetup (SES)” on page 23.
Using Windows Connect Now
See “To set up wireless communication for multiple printers (Windows only)” on page 24.
Note:
If you encounter problems, see “Troubleshooting
problems for wireless communication” on page 24.
To use the printer with any wireless connection,
you must run the installation program at least once
from the Starter CD and create a wireless
connection.
Make sure the printer is not connected to the
network using a network cable.
The sending device must have built-in 802.11
capabilities or an 802.11 wireless card installed.
It is recommended that the printer and the computers
that use the printer be on the same subnet.
Before installing the printer software, you may wish to
find out the settings of your network. Obtain the
information from your system administrators, or complete
the following tasks:
Obtain the network name (SSID) and communication
mode (infrastructure or ad hoc) from the
configuration utility for the network’s wireless access
point (WAP) or the computer’s network card.
Find out the type of encryption your network uses,
such as Wired Equivalent Privacy (WEP) or Wi-Fi
®
Protected Access (WPA).
Find out the security password or encryption key of
the wireless device.
Understanding 802.11 wireless
network settings
Network name (SSID)
By default, the printer looks for the wireless network
name or Service Set Identifier (SSID) named “hpsetup.
Your network may have a different SSID.
Communication mode
There are two communication mode options:
Ad hoc: On an ad hoc network, the printer is set to ad
hoc communication mode, and communicates directly
with other wireless devices without the use of a wireless
access point (WAP):
All devices on the ad hoc network must:
Be 802.11 compatible
Have ad hoc as the communication mode
Have the same network name (SSID)
Be on the same subnet and same channel
Have the same 802.11 security settings
Infrastructure (recommended): On an infrastructure
network, the printer is set to infrastructure communication
mode, and communicates with other devices on the
network, whether the devices are wired or wireless,
through a WAP. WAPs commonly act as routers or
gateways on small networks.
Security Settings
For the available settings for the printer, see the network
configuration page under “Understanding the
configuration page” in the onscreen user guide.
For more information on wireless security,
visit www.weca.net/opensection/pdf/
whitepaper_wifi_security4-29-03.pdf.
1 / 1

HP OFFICEJET PRO K550 Owner's manual

Category
Laser/LED printers
Type
Owner's manual
This manual is also suitable for

Ask a question and I''ll find the answer in the document

Finding information in a document is now easier with AI

Ask the document