


2
I. PREFACE
Thank you very much for your choice of this product designed by
our company!
The policies and procedures outlined in this user manual will be
applied at the discretion of O+ reserves the right to deviate from the
policies, procedures, benets, and working conditions described in
this user manual. Furthermore, the Company reserves the right to
withdraw or change the policies, procedures, benets, and working
conditions described in this user manual at any time, for any reason,
and without prior notice.
II. SAFETY AND PRECAUTIONS
To use your Music 5.3 mobile phone safely and effectively, please
read the following information before use:
Please turn off your phone when you are near a chemical plant, a
gas station, an oil depot or other explosives.
To ensure safety, please use earphone while driving. DO NOT use
the phone during driving at high speed.
Do not use your cell phone while in a plane. Please check whether
Flight mode is set or not before boarding.
Do not use your cell phone in a hospital to avoid interference with
the normal operation of medical equipment which may result in
a medical accident. If the cell phone is used near a pacemaker,
audiphones and some medical electronic equipment, you should
be extra careful as the cell phone may interfere with these devices.
Auxiliaries and accessories not provided by O+ are excluded from
the guarantee.
Do not dismantle your cell phone by yourself. In case of problems,
please contact or bring your mobile phone to the nearest service
center. Only qualied person may install or repair this product.
The phone should be charged in the environment which is well-
ventilated, and should be kept away from inammable substances
and explosives. Please be sure the phone isn’t exposed to any liquid.

3
In Case this situation occurs, please remove the battery and contact
the authorized service centers.
Do not use liquid or wet cloth with strong detergent to clean your
phone.
All wireless devices may be susceptible to interference, which could
affect performance.
About SAR
Use of wireless hands-free system (headphone, headset) with a low
power Bluetooth emitter.
Make sure the cell phone has a low SAR. This model’s SAR level to
be (SAR:0.56173).
Keep your calls short or send a text message (SMS) instead. This
advice applies especially to children, adolescents and pregnant
women. Use cell phone when the signal quality is good. People
having active medical implants should preferably keep the cell
phone at least 15 cm away from the implant.
III. MOBILE PHONE OUTLINE:
The following is the view of your mobile phone:

4
IV. GETTING STARTED
1. Installation of the SIM card
Dual-SIM operation allows the use of two services without the
need to carry two phones at the same time.
For example, the same handset can be used for business and
private use with separate numbers and bills; or for travel.
With these two SIM cards, you can use various functions of
the Music 5.3 mobile phone. Many parameters required for
communications are stored in the SIM cards. Personal data,
including the PIN (personal identication number) phonebook,
SMS and other extra system services can also be stored in the
SIM cards.
Warning: DO NOT twist or scratch the SIM card and expose it to
static electricity, dust or water. If you lose your SIM card, please
contact your network operator for help. To install your SIM cards,
please turn off your Music 5.3 mobile phone rst, remove the
back cover, and insert the SIM cards into the SIM card slots at
the back of the phone.
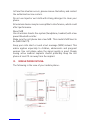
2. Please install the SIM card as shown below
Backview of Music 5.3
SIM 1
SIM 2

5
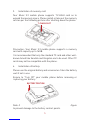
3. Installation of memory card
Your Music 5.3 mobile phone supports T-FLASH card as to
expand the memory space. Please install or take out the memory
card as per the following picture after shutting down the phone.
Precaution: Your Music 5.3 mobile phone supports a memory
card with capacity up to 16GB.
It is recommended that only the standard TF card and other well-
known brand like Sandisk and Kingston are to be used. Other TF
cards may not be compatible with the phone.
4. Installation of battery:
Please use the original battery and accessories. Store the battery
well if not in use.
Ensure to “Turn Off” your mobile phone before removing or
replacing your battery.
Note: Please follow the correct procedures as shown in the gure
to prevent damage to the battery contact points.
T-FLASH SLOT
BATTERY POSITION

6
5. Charge the battery:
The new battery must be fully charged and discharged for several
times to reach its best performance. Charge as soon as possible
when the power is used up as over-discharge will damage your
battery. Do not charge your phone without battery. Please turn
off your phone before removing the battery; otherwise, the phone
memory may be damaged.
To optimize the performance of the battery, please do as follows:
New battery or a battery left unused for a long duration will be
charged for a longer time.
If the call time becomes too short, you may need to buy a new
battery produced by our company. Faulty battery or accessories
may damage your O+ phone and cause danger.
If the battery is left unused for a long time or the power is too low,
it may require longer time for the charging interface to appear.
Warning: Explosion, re or injury may be caused by any type of
battery short-circuit.
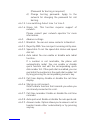
6. PIN
PIN1 code: Personal identication code is used to enter SIM
card and to prevent others to use the SIM card without your
permission. If PIN1 code safeguard function of your cell phone
has already been started, the system will display “Enter SIM card
1/2 PIN” when switching on the phone. You can get PIN1 from
your network operator together with the SIM card.
PIN2 code: The personal identication number is used for special
functions such as charging function provided by the network.
PUK and PUK2 (8 digits) A PUK is required to change the PIN. To
change the PIN2, you need to use PUK2. If PUK is not provided
together with the SIM card, please ask your network operator.
Warning: If the wrong PIN code is entered continuously three
times, the SIM card will be locked. Please consult the network
operator immediately to unlock the SIM card.

7
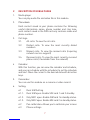
V. DESCRIPTION OF MOBILE PHONE
1. Media player
You can play audio le and video le in this module.
2. Phonebook:
Each contact saved in your phone contains the following
useful information: name, phone number and ring tone;
each contact saved in the SIM card only contains name and
phone number.
3. Call logs:
3.1. All calls: To view the all calls.
3.2. Dialled calls: To view the most recently dialed
numbers.
3.3. Missed calls: To view the missed calls (requiring
network service support)
3.4. Received calls: To view the most recently received
phone calls (if available from the network)
4 Calendar:
With this function, you can view the calendar and schedule,
and you can schedule with the scheduler to set the schedule
and alert. Move the cursor to the desired date with direction
keys.
5. Camcorder:
You can use this module as a camera or video record.
6. Setting:
6.1 Dual SIM Setting
6.1.1. Dual SIM open: Enable SIM card 1 and 2 standby.
6.1.2. Only SIM 1 open: Enable SIM card 1in standby status.
6.1.3. Only SIM 2 open: Enable SIM card 2 in standby status.
6.2 Pen calibration: Allows you to calibrate your screen
6.3 Phone settings

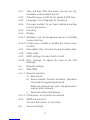
8
6.3.1. Time and date: With this menu, you can set city,
time/date, and time/date format.
6.3.2. Schedule power on/off: To set phone On/Off time.
6.3.3. Language: To set language for the phone.
6.3.4. Pre-input method: To set input method according
to one’s preference.
6.3.5. Encoding
6.3.6. Display:
6.3.6.1. Wallpaper: Set the background picture in standby
screen interface.
6.3.6.2. Screen saver: Enable or disable the screen saver
function.
6.3.7. Auto update time: To select the way to update time.
6.3.8. Flight mode
6.3.9. UART settings: To select sim1 or sim2.
6.3.10. Misc. settings: To adjust the level of the LCD
backlight.
6.4. Network settings
6.4.1 SIM1/SIM2
6.4.1.1. Network selection
a) New search
b) Select network: To select a network. The phone
only loads the appointing network.
When the network can’t work, the phone won’t
register other network.
c) Selection mode: Auto/Manual.
6.4.1.2. Preferences: To set preferred network.
6.4.2. GPRS transfer pref.:
To select Data prefer or call prefer.
6.5. Security settings

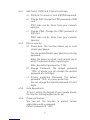
9
6.5.1. SIM Card 1 / SIM Card 2 Security settings:
a) PIN lock: To unlock or lock SIM (PIN required).
b) Change PIN: Change the PIN1 password of SIM
card.
PIN1 code can be taken from your network
operator.
c) Change PIN2: Change the PIN2 password of
SIM card.
PIN2 code can be taken from your network
operator.
6.5.2. Phone security:
a) Phone lock: This function allows you to lock/
unlock your phone.
You can enable/disable your phone by entering
password.
When the phone is locked, it will require you to
enter the password when switching on.
Note: the default password is “1234”.
b) Change Password: The default password
“1234” of phone, you can change the desired
password of 4 to 8 digits.
c) Privacy protection Password: The default
password “1234” of privacy protection.
You can change the desired password of 4 to 8
digits.
6.5.3. Auto Keypad lock
To lock / unlock the keypad of your mobile phone,
the time for locking keypad can be set.
6.5.4. Privacy protection
You can set this function to protect certain
applications with a password.
Default password is “1234”

10
6.6. Call settings
6.6.1. SIM Card 1 / SIM Card 2 Call settings
6.6.1.1. Caller ID: Includes-- default, hide number and
show number.
a) Set by network: The number of the phone will
be sent as per the default mode when a call is
initiated.
Note: This function requires network support. For
details, please contact the network operator.
6.6.1.2. Call waiting: To be able to receive another call
during an existing call, please activate call waiting.
This requires network support.
6.6.1.3. Call divert: It is a network function that needs to be
activated.
This allows you to divert calls to another number so
as not to miss any calls.
6.6.1.4. Call Barring:
a) Outgoing calls:
- All calls: To restrict all outgoing calls
- International calls: To restrict international
outgoing calls.
- International Calls Except to Home PLMN:
While you are abroad, you can only call the
numbers of the country (where you are) and
your home country (at which your service
supplier is located)
b) Incoming calls:
- All calls: To restrict all incoming calls.
- When roaming: To restrict all incoming calls
except the numbers from your local service
area.
c) Cancel all: For canceling call barring.

11
(Password for barring is required.)
d) Change barring password: Apply to the
network for changing the password for call
barring.
6.6.1.5. Line switching: Select Line 1 or Line 2.
6.6.1.6. Group list: This function requires support of
network.
Please consult your network operator for more
information.
6.6.2. Advance settings
6.6.2.1. Blacklist: You can set some contacts to blacklist.
6.6.2.2. Reject by SMS: You can reject incoming call by sms.
6.6.2.3. Speed dial: To set the speed dial status and speed
dial list.
6.6.2.4. Auto redial: You can enable or disable auto redial
function.
If a number is not reachable, the phone will
automatically redial .You can enable or disable
quick function and edit the corresponding quick
dial number list. If the quick dial is enabled, you can
quick dial the numbers in the quick dial number list
by long pressing the corresponding numeric key.
6.6.2.5. Call time display: Enable or disable the call time
display.
6.6.2.6. Vibrate on call connect:
On/off vibrate function that reminds you when you
are already connected to a call.
6.6.2.7. Call time reminder: Enable or disable the call time
reminder.
6.6.2.8. Auto quick end: Enable or disable the auto quick end.
6.6.2.9. Answer mode: Option allows you to answer a call in
headset mode either automatically or by pressing
any key.

12
6.6.3 Restore Factory Settings:
You can reset the phone to factory settings. To
restore the factory settings, enter the password.
The default password is “1234”.
7. Alarm
You can set up to 5 alarms. Alarm is active even when the
device off. In the list of Alarm, select alarm you want to
activate. You can edit the following settings per alarm:
Status, Time, Alert type, Snooze etc.
8. Browser:
This function allows you to browse internet websites.
9. Image viewer:
10. Calculator:
10.1. Eight operators, i.e. “+”, “-”, “×”, “÷”, “M+”, “M-”,
“MC”, and “MR”, are provided.
10.2. Choose the Clear or press the right soft key to clear
items entered.
Long press the Clear or long press the right soft
key to clear all content.
Press the “Ok” to show the result of calculation.
11. File manager:
This menu enables you to access the folders or les in the
memory card.
12. Sound recorder:
12.1. New record: To start sound recorder.
12.2. Play: To play a recorded le.
12.3. Append: Overwrite a record to a designated le in
the upper directory.
(You can only append a record le in .AMR format)
12.4. Rename: To rename the selected record le.
12.5. Delete: To delete the selected record le.

13
12.6. List: To list all record les.
12.7. Settings: You can set storage (Phone or Memory
card) and Audio quality (Low or High)
12.8. Use as: To set a recorded le as incoming call/
message tone.
12.9. Send: Send the recorded le by MMS or Bluetooth.
13. Connectivity
Data service: Turns this item On / Off.
14. Tasks:
Function allows you to create reminders.
If a reminder is set, the cell phone may alarm and alert you.
It will also display the contents of the reminder.
15. FM radio:
Device is equipped with a wireless FM. The FM reception
depends on the internal antenna.
16. World clock
This allows you to view corresponding time of countries
around the world.
17. SIM toolkit:
This supports service function of the SIM card.
SIM Toolkit will be automatically be added to the phone
menu when supported by network and SIM card.
18. Flash Light
Turns torch On / Off
19. Bluetooth:
19.1. Power: Activates/deactivates Bluetooth.
19.2. Visibility: Allows Bluetooth device to be detected by
others

14
19.3. My device
a) Search new device
b) Also display the devices that your already
connected or paired
19.4. Search audio device: Search for other Bluetooth
devices.
19.5. My name: Display device name.
19.6. Advanced: Setting the parameters when Bluetooth
is connecting.
20. Currency Converter:
You can use this function to convert currencies of various
regions.
21. Ebook reader:
E-book application can help you to read a le in .txt format.
22. Health:
It is a body mass index calculator. You can enter your height
and weight then press OK key to check your BMI. The health
result will indicate whether you are: Thin, Normal or Fat .
23. Java settings:
To launch Java games or Java applications
24. User prole:
Your phone provides different proles for you to customize.
NOTE: In power saver prole, Wap /camera/video /audio/
FM/Bluetooth cannot be used.
In each prole, you can set one of the following options:
24.1. Alert type: Ring only, Vibrate only, Vibrate and Ring,
and Vibrate then Ring.
24.2. Ring type: Beep once, Repeat and Ascending.
24.3. SIM 1/2 incoming call: Set the tone for incoming
calls of SIM 1/2.

15
24.4. Ringtone volume: Set the volume of ring tone.
24.5. SIM 1/2 message: Set the tone for message of SIM 1/2.
24.6. Message volume: Set the volume of message.
24.7. Keypad: Set keypad type.
24.8. Keytone volume: Set the volume of key tone.
24.9. System alert: Sets system alert on/off.
After personalizing, choose “Activate” to conrm
the settings. The corresponding prole will be
activated.
Note: Long press the “#” key when the phone is
in the standby state to switch the phone to the
Silent mode. Long press it again will restore to the
previous mode.
VI. OPERATING INSTRUCTIONS OF ENGLISH EDITOR
Your phone provides you with different input methods.
You can enter texts by keypad wherever texts are required.
Enter function Settings > Phone setting > Input method to choose a
default input method.
Input interface key function:
Press corresponding key under input interface, for example of
writing message.
Numeric 1 to 9 is used to edit text contents.
Direction keys: Control the movement of cursor.
# Key: Switch the input method.
* Key: Enter the symbol interface.
Hang-up key: Retreat from the edit interface.
Smart English input:
Press the numeric keys 2 to 9, the letters contained in the number
and the corresponding number will appear on the screen.

16
Enter a word: Under smart English input method, continuously
press 2 to 9 keys for twice or more, the corresponding word will
appear on the screen.
Capitalized, small English letters and numbers:
To select “ABC or abc or 123” input method, you can input
capitalized, small English letters or numbers. One key is used
for inputting more than one letters. Press the key quickly and
repeatedly until the letter you want shows. Wait until the cursor
moves forward before inputting the next letter.
Punctuation Input:
Enter the “*” key to switch to the punctuation input. Press the up,
down, left or right key to select the desired one, and press the left
selection key to choose and press the corresponding number key
to enter.
VII. APPLICATION OF USB STORAGE FUNCTION
Precautions before using:
a) Please do not use windows format command to format mobile
disk of your mobile phone otherwise, the cell phone will be
permanently damaged.
b) USB operation environment:
- Windows2000 / XP.
- Other operating systems may require the installation of
USB driver before successfully creating the connection of
PC and mobile phone.
Note: The phone can use USB function (like charging) under
switched off mode.

17
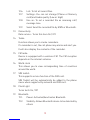
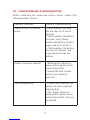
VIII. COMMON PROBLEMS & TROUBLESHOOTING
Before contacting the authorized service center, conduct the
following simple checks
Common Problems Cause & Troubleshooting
Unable to start the mobile
phone
- Check whether you hold
the start key for at least 3
seconds.
- Check whether the battery
is in poor state. Please
remove the battery, install it
again, and try to restart it.
- Check whether the battery
has run out of power, and
if yes, please charge the
battery.
Unable to connect network - Weak signals. Move to a
place where signals can be
easily transmitted.
- Invalid SIM card. Please
contact your network
operator.
Poor calling quality - Please check whether the
volume has been adjusted
appropriately.
- Poor Signal. Move to a
place where signals can be
easily transmitted. lines are
congested

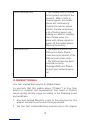
18
Short standby time - The standby time is related
to the system settings of the
network.. When it fails to
receive signals, the mobile
phone will continuously
transmit to look for a base
station, thereby consuming
a lot of battery power and
leading to a shorter standby
time. Please move to a
place with strong signals or
power off the mobile phone.
Replace the battery.
SIM card error - The metal surface of the
SIM card is dusty. Please
clean the metal contact of the
SIM card with clean cloth.
- The SIM card has not been
inserted correctly.
Damaged SIM card. Please
contact your network opera-
tor.
IX. WARRANTY MANUAL
One-Year Limited Warranty for O+ Mobile Phone
O+ warrants that this mobile phone (‘Product”) is free from
defects in material and workmanship that result in Product
failure during normal usage, according to the following terms
and conditions:
1. One-Year Limited Warranty is give to the consumer for this
product and starts on the date it was purchased.
2. The One-Year Limited Warranty extends only to the original
Page is loading ...
Page is loading ...
Page is loading ...
Page is loading ...
-
 1
1
-
 2
2
-
 3
3
-
 4
4
-
 5
5
-
 6
6
-
 7
7
-
 8
8
-
 9
9
-
 10
10
-
 11
11
-
 12
12
-
 13
13
-
 14
14
-
 15
15
-
 16
16
-
 17
17
-
 18
18
-
 19
19
-
 20
20
-
 21
21
-
 22
22
-
 23
23
-
 24
24


Ask a question and I''ll find the answer in the document
Finding information in a document is now easier with AI
Other documents
-
PLum Mobile A202 User manual
-
ITT Out Limits LX Operating instructions
-
ITTM Out Limits K2 User manual
-
ITTM Dual 23 Owner's manual
-
ITTM Dual77 User manual
-
Pantech C3b User manual
-
-
DORLAND DORLAND TEV8 Explosion-Proof Mobile Phone,Rugged Smartphone, Intrinsically Safe for Oil & Gas Industry and Hazardous Areas, Dual Mode(GSM+GSM)(Yellow) User manual
-
BENQ-SIEMENS Q-fi EF71 User manual
-
Videocon V1517 User manual