Page is loading ...

IAN 271694
20 W LED SPOTLIGHT
20 W LED SPOTLIGHT
Assembly, operating and safety instructions
LED-V ALAISIN 20 W
Asennus-, käyttö- ja turvallisuusohjeet
LED-STRÅLKAST ARE 20 W
Monterings-, bruks- och säkerhetsanvisningar
REFLEKTOR LEDOWY 20 W
Wskazówki montażu, obsługi i bezpieczeństwa
LED-STRAHLER 20 W
Montage-, Bedienungs- und Sicherheitshinweise
LED SPINDULIUOTUVAS 20 W
Nurodymai dėl montavimo, naudojimo ir saugumo

GB Assembly, operating and safety instructions Page 5
FI Asennus-, käyttö- ja turvallisuusohjeet Sivu 15
SE Monterings-, bruks- och säkerhetsanvisningar Sidan 24
PL Wskazówki montażu, obsługi i bezpieczeństwa Strona 33
LT Nurodymai dėl montavimo, naudojimo ir saugumo Puslapis 43
DE / AT / CH Montage-, Bedienungs- und Sicherheitshinweise Seite 53
REFLEKTOR LEDOWY 20 W
Wskazówki montażu, obsługi i bezpieczeństwa

A
5
6
11
10
8
4
23
1
B
6
9
7
12

E
13
C
D
18
18
14
20

F
G
19

16 15 17
H
10m
0m1m 1m
I
max. 10 m
J

5 GB
Introduction ............................................................................. Page 6
Intended use ..................................................................................Page 6
Parts description ............................................................................Page 6
Technical data ............................................................................... Page 6
Scope of delivery ..........................................................................Page 7
General safety instructions ........................................Page 7
Before installation .............................................................Page 9
Installation ...............................................................................Page 9
Connecting the lamp .....................................................................Page 10
Wall Mounting ..............................................................................Page 10
Mounting with ground stake ........................................................Page 11
Start-up .......................................................................................Page 11
Adjusting the motion detector.......................................................Page 11
Setting the lighting duration ..........................................................Page 11
Adjusting the sensitivity of the sensor ........................................... Page 12
Setting the daylight level ..............................................................Page 12
Aligning the motion detector ........................................................Page 12
Cleaning and Care .............................................................Page 13
Disposal ......................................................................................Page 13
Warranty ................................................................................... Page 13

6 GB
20 W LED spotlight
Introduction
We congratulate you on the pur-
chase of your new product. You
have chosen a high quality product.
The instructions for use are part of
the product. They contain important
information concerning safety, use
and disposal. Before using the
product, please familiarise yourself
with all of the safety information
and instructions for use. Only use
the unit as described and for the
specified applications. If you pass
the product on to anyone else, please
ensure that you also pass on all the
documentation with it.
Intended use
The LED spotlight with motion
detector is intended for automatic
lighting in outdoor areas. This de-
vice is solely intended for private use.
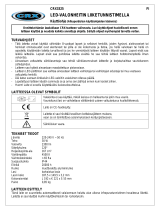
Parts description
1 Wall plug
2 Washers
3 Screws
4 Spotlight
5 Mounting bracket
6 Connection box
7 Locking screw (mounting
bracket)
8 Locking screw (motion detector)
9 Motion detector
10 Ground stake
11 Knurled screw
12 Fixing screws (connection box)
13 Terminal block
14 Cable gland
15 SENS rotary control
16 TIME rotary control
17 LUX rotary control
18 Cord anchorage
19 Protection plastic cover
20 Insulation strip
Technical data
Operating
voltage: 230 V∼ 50 Hz
Total power
consumption: 20 W

7 GB
Illuminant: COB-LED,
19 W (non-re-
placeable)
Twilight-
switch: adjustable be-
tween 20 lx –
20,000 lx
Lighting duration: adjustable be-
tween approx.
5 s–7½ min
Coverage angle
of motion detector: approx.180°
horizontal
Reach of the
motion detector: maximum 10 m
(adjustable)
Protection class: I
Protection type: IP65 (dust /
splash-proof)
Weight (without
ground stake): approx. 965 g
Dimension (without
ground stake): approx.
18 x 19 x 10 cm
TÜV / GS tested.
Scope of delivery
1 LED spotlight with motion
detector
2 Wall plugs (Ø 8 mm)
2 Washers (Ø 20 mm)
2 Screws (Ø 6 mm x 50 mm)
1 Ground stake
1 Cord anchorage
1 Protection plastic cover
1 Set of mounting and operating
instructions
General safety
instructions
Before using the product, please
familiarise yourself with all of the
safety information and instructions
for use! When passing this product
on to others, please also include
all the documents!
DANGER TO LIFE
AND ACCIDENT
HAZARD FOR
TODDLERS AND SMALL
CHILDREN! Never leave chil-
dren unattended with the pack-
aging material. The packaging
material represents a danger of
suffocation. Children frequently
underestimate the dangers.
Please keep the product out of

8 GB
the reach of children at all
times.
This device may be used by
children age 8 years and up,
as well as by persons with
reduced physical, sensory or
mental capacities, or lacking
experience and/or knowledge,
so long as they are supervised
or instructed in the safe use of
the device and understand the
associated risks. Children
should not be allowed to play
with the device. Cleaning and
user maintenance should not
be performed by children
without supervision.
Danger to life by
electric shock
Always check the light for
damage before connecting it
to the mains. Never use the
light if it shows any signs of
damage.
Prior to installation, verify that
the mains voltage on site corre-
sponds with the operating
voltage required for the light
(230 V∼ 50 Hz). Otherwise do
not install the light.
CAUTION! DANGER OF
BURN INJURIES! To pre-
vent burns, verify the light is
switched off and has cooled
down for at least 15 min be-
fore touching it. Lamps can
become very hot.
1 .0 m
FIRE HAZARD!
Fit the light so that it
is at least 1.0 m
away from the material to be
illuminated. Excessive heat can
result in a fire.
CAUTION! RISK
OF INJURY! Bro-
ken lamp glass must
be replaced before any further
use is made of the lamp.
The spotlight is only suited for
use with the built-in LED control
gear.
The product continues to draw
a small amount of power even
if the lamp is off as long as
product is connected to supply
mains. To switch the device off
completely, the mains switch
should be switched off.

9 GB
The illuminant is not replace-
able.
If the illuminant fails at the end
of its life, the entire light must
be replaced.
Before installation
Important: The electrical con-
nection must be established by a
qualified electrician or a person
trained to perform electrical instal-
lations. This person must be famil-
iar with the properties of the light
and the connection regulations.
Before installation ensure that
the circuit, to which the light
will be connected, is not ener-
gised. To do so, remove the fuse
or switch off the circuit breaker
in the fuse box (0 position).
Use the voltage tester to verify
the de-energised status.
The included mounting material
(screws 3 and wall plugs 1)
is suitable for ordinary solid con-
crete or masonry construction.
Check which mounting material
is suitable for your chosen
mounting surface. If necessary,
seek expert advice.
The included ground stake 10
is suitable for mounting in soil
(e.g. lawn or flower bed). The
soil must be soft enough to push
the ground stake in without
applying force (e.g. hammer
strike), but must be firm enough
at the same time to ensure the
lamp is securely fixed.
Installation
When selecting the mounting loca-
tion, pay attention to the following:
Make sure that the spotlight 4
illuminates the desired area.
You can move the spotlight
vertically.
Make sure the motion detector
9 covers the desired area.
The motion detector has a
maximum coverage range of
10 m, with a coverage angle
of about 180° (depending on
the mounting height – a height
of 1.80–2.50 m is ideal).
Make sure the motion detector
is not illuminated at night by

10 GB
street lighting. This can influence
its functioning.
Connecting the lamp
Open the connection box 6
by using a crosshead screw
driver to loosen the fixing
screws 12 of the connection
box (Fig. B).
Run the flexible supply line,
type H05RN-F 3G 1.0 mm2 ,
through the cable gland 14
and into the connection box.
The length for the flexible
supply line should not exceed
2.5 m. Open the terminal block
13 by using a cross-head screw
driver to loosen the fixing screws.
Fix the connection cable by
turning the nut of the cable
gland (Fig. E).
Attach ferrules to the wires of
the supply line. Also attach the
cord anchorage 18 to the
supply line and use pliers to
tighten it on the supply line
(Fig. D). Connect them with the
terminal block 13 in the con-
nection box. Pay attention to
the markings on the terminal
block (L for live, N for neutral
and for the earth wire)
(Fig. E). Close the terminal block
again by fastening the fixing
screws.
Place the protection plastic
cover 19 on the terminal block
(Fig. F).
Close the connection box
again by fastening the fixing
screws (Fig. G).
Wall Mounting
Place the mounting bracket 5
on the wall and mark the fas-
tening holes for the mounting
bracket.
Now drill the fastening holes
(Ø 8 mm) and push the wall
plugs 1 into the drill holes.
Insert the included screws 3
into the washers 2 (Ø 20 mm).
Fix the mounting bracket on the
wall using the screws provided.
Align the spotlight 4 into the
desired direction. For this, you
may need to slacken the lock-
ing screws 7 of the hinge joint.

11 GB
After alignment, tighten the
locking screws of the hinge
joint again, to ensure a secure
hold (Fig. J).
Mounting with
ground stake
Loosen the knurled screws 11
of the ground stake 10 and
secure the ground stake, using
the knurled screw, onto the
middle hole of the mounting
bracket 5.
Insert the LED spotlight with the
ground stake far enough into
the ground so it is firmly seated.
Make sure it is firmly placed.
Do not use excessive force,
e.g. strike with a hammer. This
could damage the product.
Align the spotlight into the
desired direction. For this, you
may need to slacken the lock-
ing screws 7 of the hinge
joint. After alignment, tighten
the locking screws of the hinge
joint again, to ensure a secure
hold.
After the fuse has been inserted
or the fuse panel is switched
on again, your lamp is ready
for use.
Start-up
Adjusting the
motion detector
Depending on the pre-adjustments
of the motion detector 9, the spot-
light 4 will switch itself on for a
certain period of time as soon as
the motion detector detects move-
ment. These pre-adjustments are
made using the three controllers
on the underside of the motion
detector (Fig. H).
Setting the lighting
duration
Turn the TIME rotary control 16
on the bottom of the motion de-
tector 9 clockwise to increase
the duration of illumination. The
lighting duration can be ad
justed

12 GB
within a time window of approx.
5 seconds to 7½ minutes.
Adjusting the sensi-
tivity of the sensor
Turn the SENS rotary control 15
on the bottom of the motion
detector 9 clockwise to in-
crease the sensitivity of the
sensor.
Note: The motion detector
responds to heat radiation.
When outdoor temperatures
are low, it is more sensitive to
body heat than when outdoor
temperatures are warm. Be
sure to regulate the sensitivity
of the sensor over the course
of the year.
Note: Please observe that the
motion detector primarily
detects movements transverse
to the motion detector. If you
move directly towards the mo-
tion detector, it cannot detect
this movement.
Setting the
daylight level
Turn the LUX rotary control 17
on the bottom side of the mo-
tion detector 9 clockwise to
increase the daylight level: In
the position, the motion de-
tector only reacts at night (at
approx. 20 lx). In the posi-
tion, the motion detector also
responds at daylight levels, as
long as about 20,000lx are
not exceeded.
Aligning the
motion detector
Note: Perform this adjustment at
twilight.
Loosen the locking screw
(motion detector) 8.
Turn the LUX rotary control 17
to position .
Align the motion detector 9
into the central region of the
desired coverage area.
Move about through the cover-
age area until you are satisfied

13 GB
with the response characteristics
of the motion detector. To find
the proper orientation, change
the position of the SENS rotary
control 15 or the orientation of
the motion detector.
When you have aligned the
motion detector satisfactorily,
re-tighten the locking screws to
fix the adjustment.
Cleaning and Care
Before cleaning, remove the
fuse or switch off the circuit
breaker at the fuse box.
Never immerse the product in
water or other liquids. Other-
wise the product can be
damaged.
Clean the spotlight with a lint-
free, slightly moist cloth and
mild cleaning agent.
Disposal
The packaging is made of
environmentally friendly
materials, which may be
disposed of through your
local recycling facilities.
Please contact your
local municipality or
city administration for
information on how to
dispose of the worn out
product.
Warranty
The device has been manufactured
to strict quality guidelines and me-
ticulously examined before delivery.
In the event of product defects you
have legal rights against the retailer
of this product. Your legal rights
are not limited in any way by our
warranty detailed below.
The warranty for this device is 3
years from the date of purchase.
Should this device show any fault
in materials or manufacture within
3 years from the date of purchase,
we will repair or replace it – at our
choice – free of charge to you.

14 GB
The warranty period begins on the
date of purchase. Please keep the
original sales receipt in a safe loca-
tion. This document is required as
your proof of purchase. This war-
ranty becomes void if the device
has been damaged or improperly
used or maintained.
The warranty applies to faults in
material or manufacture. This war-
ranty does not cover product parts
subject to normal wear, thus possi-
bly considered consumables (e.g.
batteries) or for damage to fragile
parts, e.g. switches, rechargeable
batteries or glass parts.

15 FI
Yleistä ............................................................................................Sivu 16
Määräystenmukainen käyttö .........................................................Sivu 16
Osien kuvaus ..................................................................................Sivu 16
Tekniset tiedot .................................................................................Sivu 16
Toimituksen sisältö ..........................................................................Sivu 17
Yleiset turvallisuusohjeet .............................................Sivu 17
Ennen asennusta .................................................................. Sivu 19
Asennus .......................................................................................Sivu 19
Valaisimen liittäminen ....................................................................Sivu 20
Seinään asennus ............................................................................ Sivu 20
Asennus maapiikin avulla ..............................................................Sivu 20
Käyttöönotto ........................................................................... Sivu 21
Liiketunnistimen säätäminen...........................................................Sivu 21
Valaisuajan säätäminen ................................................................Sivu 21
Anturin herkkyyden säätäminen ....................................................Sivu 21
Päivänvalon määrän säätäminen..................................................Sivu 22
Liiketunnistimen kohdistaminen ......................................................Sivu 22
Puhdistus ja hoito ................................................................Sivu 22
Hävittäminen .......................................................................... Sivu 22
Takuu .............................................................................................Sivu 23

16 FI
LED-Valaisin 20 W
Yleistä
Onnittelemme sinua uuden tuotteen
hankinnasta. Valitsit erittäin korkea-
laatuisen tuotteen. Käyttöohje on osa
tätä tuotetta. Se sisältää tärkeitä
turvallisuusohjeita sekä käyttöä ja
hävitystä koskevia ohjeita. Tutustu
ennen tuotteen käyttöä huolellisesti
kaikkiin käyttöja turvallisuusohjeisiin.
Käytä tuotetta ainoastaan ohjeen
mukaan ja siinä mainittuihin tarkoi-
tuksiin. Anna kaikki ohjeet mukaan,
jos luovutat tuotteen edelleen.
Määräystenmukai-
nen käyttö
Liiketunnistimella varustettu LED-
valaisin on tarkoitettu ulkotilojen au-
tomaattiseen valaisuun. Tuote on tar-
koitettu ainoastaan yksityiskäyttöön.
Osien kuvaus
1 Tulppa
2 Aluslevyt
3 Ruuvit
4 Kohdelamppu
5 Asennuskannake
6 Liitäntärasia
7 Kiinnitysruuvi (asennuskannake)
8 Kiinnitysruuvi (liiketunnistin)
9 Liiketunnistin
10 Maapiikki
11 Pyälletty ruuvi
12 Kiinnitysruuvit (liitäntärasia)
13 Sokeripalaliitin
14 Kaapelin ruuvikiinnitys
15 SENS-kääntösäädin
16 TIME-kääntösäädin
17 LUX-kääntösäädin
18 Kaapelin ankkurointi
19 Suojus
20 Eristysliuskan
Tekniset tiedot
Käyttöjännite: 230 V∼ 50 Hz
Tehon otto: 20 W
Lamppu: COB-LED, 19 W
(ei vaihdetta-
vissa)

17 FI
Himmennyskytkin: säätöalue
20 lx –20.000 lx
Valaisuaika: säädettävissä
n. 5 s–
7½
min
Liiketunnistimen
tunnistuskulma: n.180 ° vaaka-
suorassa
Liiketunnistimen
kantama:
korkeintaan 1
0 m
(säädettävissä)
Suojausluokka: I
Suojaustyyppi: IP65 (pölytiivis /
vesiruiskun kes-
tävä)
Paino (ilman
maapiikkiä): n. 965 g
Mitat (ilman
maapiikkiä):
n.
18 x 19
x
10 cm
TÜV- / GS-testattu
Toimituksen sisältö
1 LED-valaisin liiketunnistimella
2 tulppaa (Ø 8 mm)
2 aluslevyä (Ø 20 mm)
2 ruuvia (6 mm x 50 mm)
1 maapiikki
1 kaapelin ankkurointi
1 suojus
1 asennus- ja käyttöohje
Yleiset turvalli-
suusohjeet
Tutustu ennen tuotteen käyttöä
huolellisesti kaikkiin käyttö- ja tur-
vallisuusohjeisiin! Anna kaikki ohjeet
tuotteen mukana mahdolliselle uu-
delle omistajalle!
HENGEN-JA
TAPATURMAN-
VAARA LAPSILLE!
Älä koskaan jätä lapsia yksin
pakkausmateriaalin kanssa.
Pakkausmateriaali voi aiheuttaa
tukehtumisen. Lapset aliarvioi-
vat useimmiten vaaratilanteet.
Pidä tuote aina lasten ulottu-
mattomissa.
Laitetta voivat käyttää 8 vuotta
täyttäneet lapset sekä henkilöt,
jotka ovat fyysisiltä tai psyykki-
siltä kyvyiltään tai aisteiltaan
rajoittuneita tai joilla ei ole ko-
kemusta tai tietoa laitteen käy-
töstä, jos he käyttävät laitetta
valvonnan alaisina tai heitä on

18 FI
opastettu laitteen turvallisessa
käytössä ja he ovat tietoisia
laitteeseen liittyvistä vaaroista.
Lapset eivät saa leikkiä laitteella.
Lapset eivät saa puhdistaa tai
huoltaa laitetta ilman valvontaa.
Hengenvaara säh-
köiskun vuoksi
Tarkista aina ennen sähköverk-
koon liittämistä, ettei tuotteessa
ole vaurioita. Älä koskaan
käytä
valaisinta, jos olet havainnut
siinä jotain vikaa.
Varmista ennen asennusta, että
käytettävissä oleva verkkojän-
nite on yhdenmukainen valaisi-
men käyttöjännitteen kanssa
(230 V∼ 50 Hz). Ellei näin ole,
älä asenna valaisinta.
VARO! PALOVAMMAN
VAARA! Varmista, että valai-
sin on sammutettu ja jäähtynyt
vähintään 15 minuuttia ennen
kuin kosketat sitä. Lamput voivat
tulla erittäin kuumiksi käytön ai-
kana.
1 ,0 m
TULIPALON
VAARA! Asenna
valaisin vähintään
1,0 metrin etäisyydelle materi-
aaleista, joihin säteily kohdistuu.
Liiallinen lämmönkehitys voi
sytyttää tulipalon.
VARO! LOUK-
KAANTUMIS-
VAARA! Rikkoutunut
lampunlasi on uusittava ennen
kuin valaisinta saadaan käyttää
edelleen.
LED-valaisinta tulee käyttää vain
valaisimeen asennetulla liitän-
tälaitteella.
Valaisin kuluttaa hieman virtaa
ollessaan kytkettynä pistorasi-
aan – myös silloin kun se on
kytketty pois päältä. Valaisin kyt-
ketään kokonaan pois päältä
kytkemällä verkkolaite pois
päältä.
Valonlähdettä ei voi vaihtaa
uuteen.
Kun lamppu on tullut elinkaa-
rensa päähän, valaisin täytyy
vaihtaa uuteen.
/