Page is loading ...

Installation Instructions
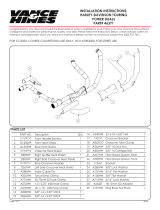
Patriot Series Black Ceramic Cat-Back Stainless Split Rear Exhaust
Jeep JL Wrangler 3.6L ,V6 4wd
Part #70-0002
E
A
C C
ITEM
PART
QUANTITY
DESCRIPTION
A
999700998S-B
1
CFT Muffler Assembly
B
5762
2
2.5” Clamp
C
71-1010
2
4.0” Black Ceramic Tip
D
999700996S
1
Xtreme Terrain Tip
E
999700995S
1
Head pipe
Thank you for purchasing our Gibson Exhaust System for your vehicle.
If you need further assistance, please do not hesitate to call our technical department at
(800) 528 -3044 Monday through Friday, 8am to 5 pm.
D
B

1.Be sure to check all parts
are correct and match the
Manual. Loosen the factory
OEM clamp located just in
front of the muffler above
the factory axle. This will
require a 15MM.
5. Slide the second supplied
2.5” band clamp over the
headpipe then slip your new
Gibson muffler onto the
headpipe, tighten aluminum
hangers into their locations
with the 4 factory bolts.
2.Remove the factory
exhaust hangers from the
using a 13 mm removing the
two bolts. These hangers
will remain attached to
factory muffler when being
removed.
6. Slide the 2.5” band clamp
over the expanded part of
the muffler and make clamp
snug but not tight. Install
the Gibson provided tips.
Check for exhaust clearance
before tightening.
3. Once you have removed
the OEM exhaust install
Item# E onto the factory
oem pipe. Use clamp # b to
secure. Be sure notch is
lined up and do no tighten
clamp.
7. Adjust the tips to your
preference. Make sure
everything is clear of frame
rails and parts and re tighten
the system starting from the
front clamp. Check
everything after each clamp
is tightened.
4. Remove hangers from
OEM exhaust using removal
pliers or large channel pliers
and re-install them on the
Gibson as shown. Using a
lubricant can aid in the
removal.
8. To install your XT Tip
simply remove the exhaust
from the Gibson head pipe
and re install the tip using
the same clamp and driver
side only hanger. Protect
your tips when in storage.
We do not want any dings
or dents.
When installing this exhaust system make sure to use proper safety precautions. Use jack stands when working under the
vehicle, set parking brake, block tires and use safety glasses and gloves. Allow exhaust to cool before attempting
installation. Severe injury or burns could occur if safety measures are not taken. Disconnect the negative battery terminal
before removal of the OEM Exhaust
SUGGESTED TOOLS: 3/8” Drive Socket Wrench, ½” Deep Socket, 15 mm Deep Socket, Short 3/8” Drive Extension,
1/2“Wrench, Exhaust Hanger Removal Pliers or Large Channel Lock Pliers, Rubber Dead-blow Hammer, Anti-seize, Jack, and
Jack Stands
Installation Instructions #70-0002
GIBSON EXHAUST systems are designed on a factory stock vehicle.Any aftermarket products used in addition to our system could change
performance and sound levels of the exhaust. Make sure there is a 1” clearance from ALL rubber brake lines, shock boots, lines, tires, etc.
to prevent heat related damage or fire.
/