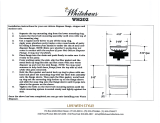
Installation instructions for your new deluxe disposer flange, stopper and strainer unit.
1. Separate the top mounting ring from the lower mounting ring.
2. Loosen the three bolt mounting assembly until even with top of the
mounting ring.
3. Use a regular screw driver to pry off the snap ring.
4. Apply some plumbers putty (make a nice round snake of putty by rolling
it between your hands) to under the rim of your new disposer flange.
NOTE: Make sure plumber’s putty does not come in contact with the surface
of your New Deluxe Disposer Flange. It may mar the finish.
5. Place flange into the drain and push firmly to make sure it sits evenly in
the putty.
6. From working under the sink, slip the fiber gasket and the metal back up
ring (flat side up) that came with your waste disposer up and over the
sink flange. NOTE: You may need someone to help hold down flange from
the top side of sink while this gets connected.
7. Hold the fiber gasket and metal back up ring in place with one hand and
place the mounting ring with the three bolt assembly onto the flange
sleeve. Then push the fiber gasket, metal back up ring and the mounting
ring further up on the flange sleeve and slide the snap ring onto the
flange sleeve until it pops into place in the groove on the sleeve.
8. Tighten the bolts on the three bolt mounting system until the whole
mounting system is seated evenly and tightly against the sink.
Once the above has been completed you can go onto installing your Waste Disposer.