Christie D16HD-HS Installation Information

Type
Installation Information

This manual is also suitable for

Installing the ultra short
throw lens
The ultr
a short throw (UST) lens allows you to position your projector as close as possible to the
screen.
Affected products
The following products are affected:
D13HD2-HS
D13WU2-HS
D16HD-HS
D16WU-HS
D20HD-HS
D20WU-HS
Christie 4K7-HS
Christie 4K10-HS
Required components
The following components are required.
UST lens bracket kit (P/N: 003-006916-XX)
3 mm Allen key
5 mm Allen key
6 mm Allen key
Mounting the lens support bracket
The lens holders are replaceable parts marked with an A for the HS Series 2K models and T for the
4K7-HS and 4K10-HS models.
1. Before mounting the bracket, align the mark lines as shown below.
Installing the Ultra Short Throw Lens Instruction Sheet 1
020-103312-01 R
ev. 1 (03-2020)
Copyright
©
2020 Christie Digital Systems USA, Inc. All rights reserved.
2. If the two highlighted M4 x L22 screws have tightened, loosen the screws by one turn.
3. Turn on the projector, perform a lens calibration.
4.
Turn off the power to the projector.
5. Remove the lens.
6. Flip the projector onto its top side.
7. Secure the support base (without lens bracket attached) to the projector.
For HS Series 2K, fasten two M8 x 16 screws and washers. For the front screw, slide to
hook the projector front cover and then secure the screw.
Installing the ultra short throw lens
Installing the Ultra Short Throw Lens Instruction Sheet 2
020-103312-01 R
ev. 1 (03-2020)
Copyright
©
2020 Christie Digital Systems USA, Inc. All rights reserved.
For 4K7-HS and 4K10-HS, secure at the front position and fasten four M8 x 16 screws and
w
ashers.
8. Flip the projector over.
9.
Install the ultra short throw lens.
10. Attach the lens bracket to the support base using the location hole (A) and pin (B).
For HS Series 2K, make sure to use the lens bracket marked with an A.
Installing the ultra short throw lens
Installing the Ultra Short Throw Lens Instruction Sheet 3
020-103312-01 R
ev. 1 (03-2020)
Copyright
©
2020 Christie Digital Systems USA, Inc. All rights reserved.
For 4K7-HS and 4K10-HS, make sure to use the lens bracket marked with a T.
11. Lock the M4 x L10 screws (A for HS Series 2K and T for 4K7-HS and 4K10-HS) until tight and
then loosen the screws b
y one turn.
Installing the ultra short throw lens
Installing the Ultra Short Throw Lens Instruction Sheet 4
020-103312-01 R
ev. 1 (03-2020)
Copyright
©
2020 Christie Digital Systems USA, Inc. All rights reserved.
12. Shift the lens bracket to fit the L-UST lens neck.
Mak
e sure the lens bracket plate (A) does not tilt with the lens holder (B).
13. Use two M4 x L10 screws to secure the lens fixture to the lens bracket.
Installing the ultra short throw lens
Installing the Ultra Short Throw Lens Instruction Sheet 5
020-103312-01 R
ev. 1 (03-2020)
Copyright
©
2020 Christie Digital Systems USA, Inc. All rights reserved.
14. Tighten the two M4 x L10 screws from step 11.
15. Tighten the two M4 x L22 screws from step 2.
Adjusting the ultra short throw lens
After mounting the lens support br
acket, adjust the ultra short throw lens.
1. Turn on power to the projector.
Installing the ultra short throw lens
Installing the Ultra Short Throw Lens Instruction Sheet 6
020-103312-01 R
ev. 1 (03-2020)
Copyright
©
2020 Christie Digital Systems USA, Inc. All rights reserved.
2. Loosen by one turn the two M4 x L22 screws shown below.
3. Perform a lens calibration.
4. To adjust the image position, use the Lens Shift function.
Do not use the Lens Shift function when the two M4 x L22 screws are locked.
5. Tighten the two M4 x L22 screws from step 2.
If the tilt of the lens is too significant to fine-tune, gently lift up the lens to reduce the image
offset before locking the screws.
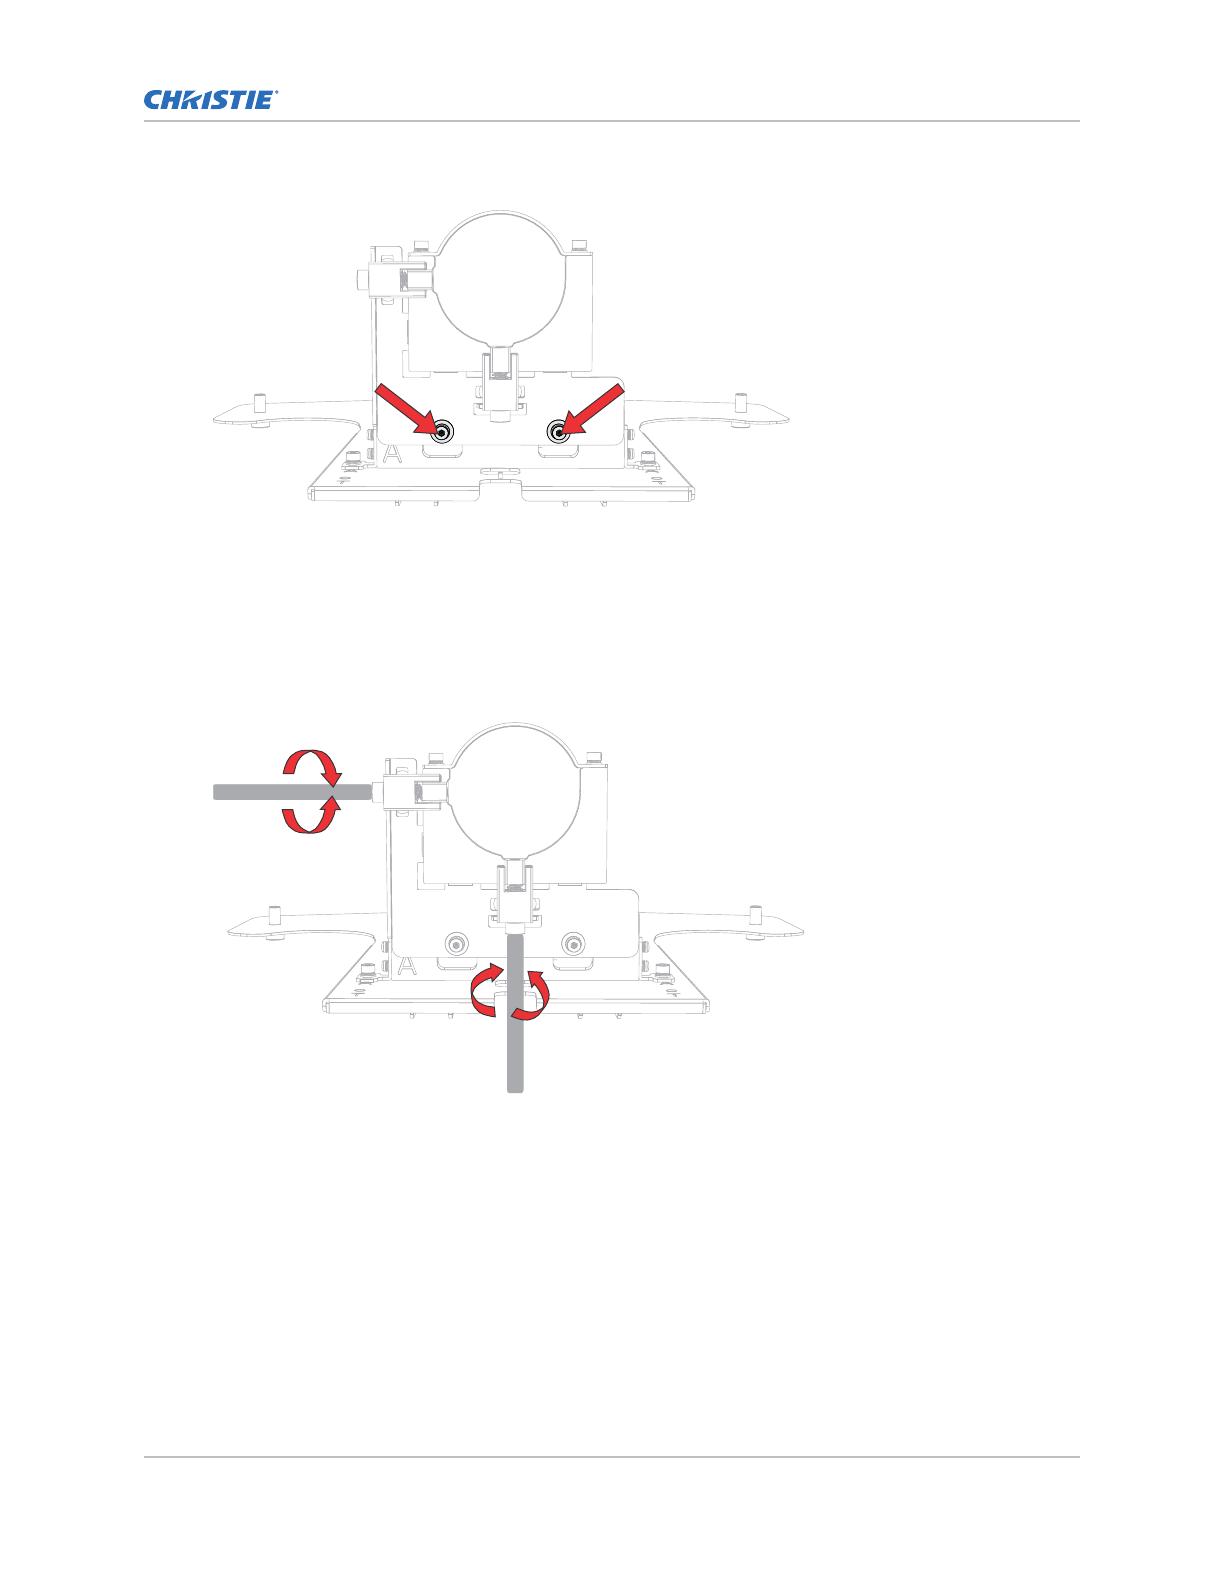
6. Adjust the two M6 screws to fine-tune image position.
7. Loosen by one turn the two M4 screws on the lens supporter, shown below.
Installing the ultra short throw lens
Installing the Ultra Short Throw Lens Instruction Sheet 7
020-103312-01 R
ev. 1 (03-2020)
Copyright
©
2020 Christie Digital Systems USA, Inc. All rights reserved.
8. Adjust the boresight.
For information on how to adjust boresight, refer to the product Installation and Setup guide.
9. Tighten the two screws from step 5.
Technical support
Technical support for Christie products is available at:
North and South America: +1-800-221-8025 or [email protected]
Europe, Middle East, and Africa: +44 (0) 1189 778111 or [email protected]
Asia Pacific: +65 6877-8737 or [email protected]
Installing the ultra short throw lens
Installing the Ultra Short Throw Lens Instruction Sheet 8
020-103312-01 R
ev. 1 (03-2020)
Copyright
©
2020 Christie Digital Systems USA, Inc. All rights reserved.
  • Page 1 1
  • Page 2 2
  • Page 3 3
  • Page 4 4
  • Page 5 5
  • Page 6 6
  • Page 7 7
  • Page 8 8

Christie D16HD-HS Installation Information

Type
Installation Information
This manual is also suitable for

Ask a question and I''ll find the answer in the document

Finding information in a document is now easier with AI