Nikon 25476 User manual

Category
Bridge cameras
Type
User manual
No reproduction in any form of this manual, in whole or in part (except for brief
quotation in critical articles or reviews), may be made without written authorization
from NIKON CORPORATION.
Printed in Thailand
6MB11511-01
DIGITAL CAMERA
En
User's Manual
En
Product Documentation
Thank you for your purchase of a Nikon single-lens reflex (SLR) digital camera.
The
documentation for this product consists of a Users Manual (this booklet) and a
Reference Manual (pdf).
To get the most from your camera, please be sure to read all
instructions thoroughly and keep them where they will be read by all those who use
the product.
The Reference Manual can be viewed using Adobe Reader or Adobe Acrobat Reader
5.0 or later, available for free download from the Adobe website.
1 Start the computer and insert the reference CD.
2 Double-click the CD (Nikon D5100) icon in Computer or My Computer (Windows)
or on the desktop (Macintosh).
3 Double-click the INDEX.pdf icon to display a language selection screen and click a
language to display the Reference Manual.
Additional information on camera menus and other topics can be found using the
cameras on-board help system as described on page 8 of this guide.
Symbols and Conventions
To make it easier to find the information you need, the following symbols and conventions are
used:
Digitutor
“Digitutor, a series of “watch and learn” manuals in movie form, is available from the following
website: http://www.nikondigitutor.com/index_eng.html
A For Your Safety
Before using the camera for the first time, read the safety instructions in “For Your Safety”
(0 ii–vi).
For information on basic
camera operations, see the
User’s Manual (this
booklet).
For complete product
information, see the
Reference Manual
(available on the
supplied reference CD).
D
This icon marks cautions; information that should be read before use to prevent
damage to the camera.
A
This icon marks notes; information that should be read before using the camera.
0
This icon marks references to other pages in this manual.
DIGITAL CAMERA
En
User's Manual
En
i
For Your Safety .............................................................................................................................................ii
Notices ...........................................................................................................................................................iii
X
Introduction
0 1
Package Contents ...................................................................................................................................... 1
Getting to Know the Camera................................................................................................................. 2
Camera Menus ............................................................................................................................................ 8
First Steps.................................................................................................................................................... 12
s
Basic Photography and Playback
0 17
Battery Level and Card Capacity......................................................................................................... 17
Taking Photographs................................................................................................................................ 18
Creative Photography (Scene Modes)..............................................................................................21
Basic Playback ........................................................................................................................................... 26
z
More on Photography
0 28
Release Mode ............................................................................................................................................ 28
Focus............................................................................................................................................................. 32
Image Quality and Size .......................................................................................................................... 35
Using the Built-in Flash .......................................................................................................................... 37
ISO Sensitivity............................................................................................................................................ 40
Interval Timer Photography ................................................................................................................. 41
P, S, A, and M Modes................................................................................................................................ 43
x
Live View/Movies
0 44
Framing Photographs in the Monitor............................................................................................... 44
Recording Movies .................................................................................................................................... 51
Viewing Movies......................................................................................................................................... 54
%
Special Effects
0 55
Shooting with Special Effects .............................................................................................................. 55
Q
ViewNX 2
0 61
Installing ViewNX 2.................................................................................................................................. 61
Using ViewNX 2......................................................................................................................................... 63
n
Technical Notes
0 65
Compatible CPU Lenses......................................................................................................................... 65
Other Accessories..................................................................................................................................... 66
Caring for the Camera ............................................................................................................................ 68
Error Messages .......................................................................................................................................... 72
Specifications............................................................................................................................................. 75
ii
For Your Safety
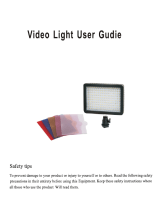
To prevent damage to your Nikon product or injury to yourself or to others, read the following safety
precautions in their entirety before using this equipment.
Keep these safety instructions where all those
who use the product will read them.
The consequences that could result from failure to observe the precautions listed in this section are
indicated by the following symbol:
❚❚ WARNINGS
AKeep the sun out of the frame
Keep the sun well out of the frame when shooting
backlit subjects.
Sunlight focused into the camera when
the sun is in or close to the frame could cause a fire.
ADo not look at the sun through the viewfinder
Viewing the sun or other strong light source through the
viewfinder could cause permanent visual impairment.
AUsing the viewfinder diopter control
When operating the viewfinder diopter control with
your eye to the viewfinder, care should be taken not to
put your finger in your eye accidentally.
ATurn off immediately in the event of malfunction
Should you notice smoke or an unusual smell coming
from the equipment or AC adapter (available
separately), unplug the AC adapter and remove the
battery immediately, taking care to avoid burns.
Continued operation could result in injury.
After
removing the battery, take the equipment to a Nikon-
authorized service center for inspection.
ADo not use in the presence of flammable gas
Do not use electronic equipment in the presence of
flammable gas, as this could result in explosion or fire.
AKeep out of reach of children
Failure to observe this precaution could result in injury.
ADo not disassemble
Touching the product’s internal parts could result in
injury.
In the event of malfunction, the product should
be repaired only by a qualified technician.
Should the
product break open as the result of a fall or other
accident, remove the battery and/or AC adapter and
then take the product to a Nikon-authorized service
center for inspection.
ADo not place the strap around the neck of an infant or child
Placing the camera strap around the neck of an infant or
child could result in strangulation.
AObserve caution when using the flash
Using the camera with the flash in close contact with
the skin or other objects could cause burns.
Using the flash close to the subjects eyes could cause
temporary visual impairment.
Particular care should
be observed when photographing infants, when the
flash should be no less than one meter (39 in.) from the
subject.
AAvoid contact with liquid crystal
Should the monitor break, care should be taken to avoid
injury due to broken glass and to prevent the liquid
crystal from the monitor touching the skin or entering
the eyes or mouth.
AObserve proper precautions when handling batteries
Batteries may leak or explode if improperly handled.
Observe the following precautions when handling
batteries for use in this product:
Use only batteries approved for use in this equipment.
Do not short or disassemble the battery.
Be sure the product is off before replacing the battery.
If you are using an AC adapter, be sure it is unplugged.
Do not attempt to insert the battery upside down or
backwards.
Do not expose the battery to flame or to excessive
heat.
Do not immerse in or expose to water.
Replace the terminal cover when transporting the
battery.
Do not transport or store the battery with
metal objects such as necklaces or hairpins.
Batteries are prone to leakage when fully discharged.
To avoid damage to the product, be sure to remove the
battery when no charge remains.
When the battery is not in use, attach the terminal
cover and store in a cool, dry place.
The battery may be hot immediately after use or when
the product has been used on battery power for an
extended period.
Before removing the battery turn
the camera off and allow the battery to cool.
Discontinue use immediately should you notice any
changes in the battery, such as discoloration or
deformation.
AUse appropriate cables
When connecting cables to the input and output jacks,
use only the cables provided or sold by Nikon for the
purpose to maintain compliance with product
regulations.
ACD-ROMs
CD-ROMs containing software or manuals should not be
played back on audio CD equipment.
Playing CD-ROMs
on an audio CD player could cause hearing loss or
damage the equipment.
A
This icon marks warnings.
To prevent possible injury, read all warnings before using this Nikon
product.
iii
AObserve proper precautions when handling the charger
Keep dry.
Failure to observe this precaution could
result in fire or electric shock.
Do not short the charger terminals.
Failure to observe
this precaution could result in overheating and
damage to the charger.
Dust on or near the metal parts of the plug should be
removed with a dry cloth.
Continued use could result
in fire.
Do not go near the charger during thunderstorms.
Failure to observe this precaution could result in
electric shock.
Do not handle the plug or charger with wet hands.
Failure to observe this precaution could result in
electric shock.
Do not use with travel converters or adapters designed
to convert from one voltage to another or with DC-to-
AC inverters.
Failure to observe this precaution could
damage the product or cause overheating or fire.
No part of the manuals included with this product may be
reproduced, transmitted, transcribed, stored in a retrieval
system, or translated into any language in any form, by
any means, without Nikons prior written permission.
Nikon reserves the right to change the specifications of
the hardware and software described in these manuals at
any time and without prior notice.
Nikon will not be held liable for any damages resulting
from the use of this product.
While every effort has been made to ensure that the
information in these manuals is accurate and complete,
we would appreciate it were you to bring any errors or
omissions to the attention of the Nikon representative in
your area (address provided separately).
Notices for Customers in the U.S.A.
Federal Communications Commission (FCC) Radio Frequency Interference Statement
This equipment has been tested and found to comply with
the limits for a Class B digital device, pursuant to Part 15 of
the FCC rules.
These limits are designed to provide
reasonable protection against harmful interference in a
residential installation.
This equipment generates, uses,
and can radiate radio frequency energy and, if not installed
and used in accordance with the instructions, may cause
harmful interference to radio communications.
However,
there is no guarantee that interference will not occur in a
particular installation.
If this equipment does cause
harmful interference to radio or television reception, which
can be determined by turning the equipment off and on,
the user is encouraged to try to correct the interference by
one or more of the following measures:
Reorient or relocate the receiving antenna.
Increase the separation between the equipment and
receiver.
Connect the equipment into an outlet on a circuit
different from that to which the receiver is connected.
Consult the dealer or an experienced radio/television
technician for help.
CAUTIONS
Modifications
The FCC requires the user be notified that any changes or
modifications made to this device that are not expressly
approved by Nikon Corporation may void the user’s
authority to operate the equipment.
Interface Cables
Use the interface cables sold or provided by Nikon for your
equipment.
Using other interface cables may exceed the
limits of Class B Part 15 of the FCC rules.
Notice for Customers in the State of California
WARNING: Handling the cord on this product may expose you
to lead, a chemical known to the State of California to cause
birth defects or other reproductive harm.
Wash hands after
handling.
Nikon Inc., 1300 Walt Whitman Road, Melville, New York
11747-3064, U.S.A.
Tel.: 631-547-4200
Notices
The Battery Charger
IMPORTANT SAFETY INSTRUCTIONS—SAVE THESE INSTRUCTIONS
DANGERTO REDUCE THE RISK OF FIRE OR ELECTRIC SHOCK, CAREFULLY
FOLLOW THESE INSTRUCTIONS
For connection to a supply not in the U.S.A., use an attachment plug adapter of the proper configuration for the power
outlet if needed. This power unit is intended to be correctly oriented in a vertical or floor mount position.
D5100
iv
Notice for Customers in Canada
CAUTION
This Class B digital apparatus complies with
Canadian ICES-003.
ATTE NTIO N
Cet appareil numérique de la classe B est conforme
à la norme NMB-003 du Canada.
Notices for Customers in Europe
This symbol indicates that this product is
to be collected separately.
The following apply only to users in
European countries:
This product is designated for separate
collection at an appropriate collection point. Do
not dispose of as household waste.
For more information, contact the retailer or the
local authorities in charge of waste management.
This symbol on the battery indicates that
the battery is to be collected separately.
The following apply only to users in
European countries:
All batteries, whether marked with this symbol or
not, are designated for separate collection at an
appropriate collection point.
Do not dispose of as
household waste.
For more information, contact the retailer or the
local authorities in charge of waste management.
Disposing of Data Storage Devices
Please note that deleting images or formatting memory cards or other data storage devices does not
completely erase the original image data.
Deleted files can sometimes be recovered from discarded
storage devices using commercially available software, potentially resulting in the malicious use of
personal image data.
Ensuring the privacy of such data is the user’s responsibility.
Before discarding a data storage device or transferring ownership to another person, erase all data using
commercial deletion software, or format the device and then completely refill it with images containing no
private information (for example, pictures of empty sky).
Be sure to also replace any pictures selected for
preset manual white balance.
Care should be taken to avoid injury when physically destroying data
storage devices.
AVC Patent Portfolio License
T
HIS PRODUCT IS LICENSED UNDER THE AVC PATENT PORTFOLIO LICENSE FOR THE PERSONAL AND NON-COMMERCIAL USE OF
A CONSUMER TO (i) ENCODE VIDEO IN COMPLIANCE WITH THE AVC STANDARD (“AVC VIDEO”) AND/OR (ii) DECODE AVC VIDEO
THAT WAS ENCODED BY A CONSUMER ENGAGED IN A PERSONAL AND NON-COMMERCIAL ACTIVITY AND/OR WAS OBTAINED
FROM A VIDEO PROVIDER LICENSED TO PROVIDE AVC VIDEO.
NO LICENSE IS GRANTED OR SHALL BE IMPLIED FOR ANY OTHER
USE.
ADDITIONAL INFORMATION MAY BE OBTAINED FROM MPEG LA, L.L.C.
SEE http://www.mpegla.com
CAUTION
RISK OF EXPLOSION IF BATTERY IS REPLACED BY AN INCORRECT TYPE. DISPOSE OF USED BATTERIES ACCORDING TO
THE INSTRUCTIONS.
v
Use Only Nikon Brand Electronic Accessories
Nikon cameras are designed to the highest standards and include complex electronic circuitry.
Only Nikon
brand electronic accessories (including chargers, batteries, AC adapters, and flash accessories) certified by
Nikon specifically for use with this Nikon digital camera are engineered and proven to operate within the
operational and safety requirements of this electronic circuitry.
The use of non-Nikon electronic accessories could damage the camera and may void your
Nikon warranty.
The use of third-party rechargeable Li-ion batteries not bearing the Nikon
holographic seal shown at right could interfere with normal operation of the camera or
result in the batteries overheating, igniting, rupturing, or leaking.
For more information about Nikon brand accessories, contact a local authorized Nikon dealer.
Notice Concerning Prohibition of Copying or Reproduction
Note that simply being in possession of material that has been digitally copied or reproduced by means of
a scanner, digital camera, or other device may be punishable by law.
Items prohibited by law from being copied or reproduced
Do not copy or reproduce paper money, coins, securities, government bonds, or local government
bonds, even if such copies or reproductions are stamped “Sample.
The copying or reproduction of paper money, coins, or securities which are circulated in a foreign country
is prohibited.
Unless the prior permission of the government has been obtained, the copying or reproduction of
unused postage stamps or post cards issued by the government is prohibited.
The copying or reproduction of stamps issued by the government and of certified documents stipulated
by law is prohibited.
Cautions on certain copies and reproductions
The government has issued cautions on copies or reproductions of securities issued by private
companies (shares, bills, checks, gift certificates, etc.), commuter passes, or coupon tickets, except when
a minimum of necessary copies are to be provided for business use by a company.
Also, do not copy or
reproduce passports issued by the government, licenses issued by public agencies and private groups, ID
cards, and tickets, such as passes and meal coupons.
Comply with copyright notices
The copying or reproduction of copyrighted creative works such as books, music, paintings, woodcuts,
prints, maps, drawings, movies, and photographs is governed by national and international copyright
laws.
Do not use this product for the purpose of making illegal copies or to infringe copyright laws.
vi
D Use Only Nikon Brand Accessories
Only Nikon brand accessories certified by Nikon specifically for use with your Nikon digital
camera are engineered and proven to operate within its operational and safety
requirements.
THE USE OF NON-NIKON ACCESSORIES COULD DAMAGE YOUR CAMERA AND MAY VOID YOUR
NIKON WARRANTY.
A Servicing the Camera and Accessories
The camera is a precision device and requires regular servicing.
Nikon recommends that the
camera be inspected by the original retailer or a Nikon-authorized service representative
once every one to two years, and that it be serviced once every three to five years (note that
fees apply to these services).
Frequent inspection and servicing are particularly
recommended if the camera is used professionally.
Any accessories regularly used with the
camera, such as lenses or optional flash units, should be included when the camera is
inspected or serviced.
A Before Taking Important Pictures
Before taking pictures on important occasions (such as at weddings or before taking the
camera on a trip), take a test shot to ensure that the camera is functioning normally.
Nikon
will not be held liable for damages or lost profits that may result from product malfunction.
A Camera Settings
The explanations in this manual assume that default settings are used.
A Life-Long Learning
As part of Nikon’s “Life-Long Learningcommitment to ongoing product support and
education, continually-updated information is available on-line at the following sites:
For users in the U.S.A.: http://www.nikonusa.com/
For users in Europe and Africa: http://www.europe-nikon.com/support/
For users in Asia, Oceania, and the Middle East: http://www.nikon-asia.com/
Visit these sites to keep up-to-date with the latest product information, tips, answers to
frequently-asked questions (FAQs), and general advice on digital imaging and photography.
Additional information may be available from the Nikon representative in your area.
See the
following URL for contact information: http://imaging.nikon.com/
1
X
X
Introduction
Confirm that the package contains the following items:
Purchasers of the lens kit option should confirm that the package also includes a lens.
Memory cards are sold separately.
Package Contents
BS-1 accessory
shoe cover
DK-5
eyepiece
cap
DK-20 rubber
eyecup
AN-DC3
strap
BF-1B body cap
UC-E6
USB cable
D5100 digital camera
EN-EL14 rechargeable Li-ion
battery (with terminal cover)
MH-24 battery charger (plug
adapter supplied in countries or
regions where required; shape
depends on country of sale)
EG-CP14 audio/video (A/V)
cable
ViewNX 2 CD
Users Manual (this booklet)
Quick Start Guide
Reference CD
Warranty
A Attaching the Strap
Attach the strap securely to the two eyelets on the camera body.
2
X
Getting to Know the Camera
Take a few moments to familiarize yourself with camera controls and displays.
You
may find it helpful to bookmark this section and refer to it as you read through the
rest of the manual.
The Camera Body
12
13
14
16
15
1
18
17
21
19
20
22
23
3
4
7
10
8
2
5
6
9
11
24
25
26
27
28
29
1 Mode dial...................................4
2 Live view switch ..............44, 51
3 R
(information) button
.... 6, 48
4 Movie-record button............ 51
5 E (exposure compensation)
button
N (aperture) button............. 43
Flash compensation button
6
Shutter-release button
... 18–19
7 Power switch.............................3
8 AF-assist illuminator
Self-timer lamp...................... 30
Red-eye reduction lamp ..... 39
9 Infrared receiver (front)....... 30
10 Body cap..............................1, 16
11 CPU contacts...........................65
12 Built-in flash..................... 20, 37
13 M (flash mode) button..........39
Y (flash compensation)
button
14 Speaker
15 Focal plane mark (E)
16 Eyelet for camera strap .......... 1
17 Microphone ..................... 51, 53
18 Connector cover
19 E (self-timer) button............31
Fn (function) button
20 Mounting mark......................13
21 Lens release button.............. 16
22 Mirror
23 Lens mount
24 Accessory shoe cover
25 Accessory shoe (for optional
flash units)
26 Accessory terminal ............... 67
27 USB and A/V connector
28
HDMI mini-pin connector
29
Connector for external
microphone
.......................... 67
3
X
The Camera Body (Continued)
1
7
8
9
10
13
17
16
15
12
11
14
20
21
19
22
18
3
4
5
6
2
1 Viewfinder eyepiece..............31
2 Rubber eyecup .......................31
3 G (menu) button ................8
Two-button reset button
4 Infrared receiver (rear)..........30
5 Monitor ............................... 5, 14
Viewing settings...................6
Live view...............................48
Full-frame playback ...........26
6 Tripod socket
7 Diopter adjustment
control...................................15
8 P (information edit)
button .....................................6
Two-button reset button
9 A (AE-L/AF-L) button .......... 51
L (protect) button
10 Command dial ..........23, 43, 55
11 K (playback) button ........... 26
12 Memory card slot cover....... 13
13 Multi selector ............................8
14 J (OK) button..........................8
15 X (playback zoom in)
button................................... 27
16 Memory card access lamp
...................................13, 19, 44
17 O (delete) button
Deleting pictures during
playback............................... 27
18 Power connector cover for
optional power connector
19 Battery-chamber cover latch
20 Battery-chamber cover
21 W (thumbnail/playback
zoom out) button............... 27
Q (help) button ........................ 8
22 Battery latch .................... 12, 15
A The Power Switch
Rotate the power switch as shown to turn
the camera on.
Rotate the power switch as shown to turn
the camera off.
X
4
The Mode Dial
The camera offers a choice of the following shooting modes:
P, S, A, and M Modes (0 43)
Select these modes for full control over
camera settings.
PProgrammed auto
SShutter-priority auto
AAperture-priority auto
M—Manual
Auto Modes (0 18)
Select these modes for simple, point-
and-shoot photography.
i Auto
j Auto (flash off)
Special Effects Modes
Use special effects during shooting.
% Night vision (0 56)
g Color sketch
(0 56, 58)
( Miniature effect
(0 56, 58)
3 Selective color
(0 57, 59)
1 Silhouette (0 57)
2 High key (0 57)
3 Low key (0 57)
Scene Modes
The camera automatically optimizes settings to suit the scene selected with the mode dial.
Match your selection to the scene being photographed.
k Portrait (0 21)
l Landscape (0 21)
p Child (0 22)
m Sports (0 22)
n Close up (0 22)
h
:Other scenes (0 23)
A Scene Auto Selector (Live View)
Selecting live view in i or j mode enables automatic scene selection (“scene auto
selector”; 0 49) when autofocus is used.
5
X
The Monitor
The monitor can be angled and rotated as shown below.
Normal use
Fold the monitor against the camera face out.
This position is recommended for normal
photography.
Low-angle shots
Frame live view shots with the camera close to
the ground.
High-angle shots
Frame live view shots while holding the camera
over your head.
Self-portraits
Use for self-portraits in live view.
The monitor
shows a mirror image of what will appear in the
final picture.
D Using the Monitor
Rotate the monitor gently within the limits shown.
Do not use force.
Failure to observe these
precautions could damage the connection between the monitor and the camera body.
To
protect the monitor when the camera is not in use, fold it back face down against the camera
body.
A See Also
See “Framing Photographs in the Monitor” for information on framing photographs in the
monitor (0 44).
90°
180°
180°
X
6
The Information Display
Camera settings can be viewed and adjusted in the information
display.
Press the P button once to view settings, and again to
make changes to settings.
Highlight items using the multi
selector and press J to view options for the highlighted item.
P button
19
1487 9 10 11 12 13
16 18 20
4
6
5
1
3
15
2
17
27
26
28
29
30
31
32
33
34
25
23 242221
1 Shooting mode
i auto/
j auto (flash off) .............. 18
Scene modes ...................... 21
P, S, A, and M modes........... 43
Special effects mode......... 55
2 Aperture (f-number) ............ 43
3 Shutter speed ........................ 43
4 Shutter-speed display
5 Aperture display
6 Auto-area AF indicator ........ 34
3D-tracking indicator........... 34
Focus point
7 Manual flash indicator
Flash compensation indicator
for optional flash units
8 Print date indicator
9 Auto ISO sensitivity indicator
10 Multiple exposure indicator
11 HDR indicator
12 “Beep” indicator
13 Battery indicator....................17
14
GPS connection indicator
15 Eye-Fi connection indicator
16 Help icon..................................72
17 ADL bracketing amount
18 Exposure indicator
Exposure compensation
indicator
Bracketing progress indicator
19 Number of exposures
remaining ............................17
White balance recording
indicator
Capture mode indicator
20 “K” (appears when memory
remains for over 1,000
exposures)............................17
21 Flash mode ............................. 38
22 Flash compensation
23 Exposure compensation
24 Picture Control
25 Image quality......................... 35
26 Image size............................... 36
27 White balance
28 ISO sensitivity......................... 40
29 Release mode......................... 28
30 Focus mode......................32, 45
31 AF-area mode ..................34, 46
32 Metering
33
Active D-Lighting
34 Bracketing increment
7
X
The Viewfinder
1
2 3
1210
13
1614
6 7 84
11 15
59
1 Focus points
2 Focus indicator.........................................................19
3 Autoexposure (AE) lock indicator
4 Shutter speed ...........................................................43
5 Aperture (f-number)...............................................43
6 Battery indicator ......................................................17
7 Bracketing indicator
8 “K” (appears when memory remains for over
1,000 exposures)...................................................17
9 Flash-ready indicator ..............................................20
10 Flexible program indicator
11 Exposure indicator
Exposure compensation display
Electronic rangefinder
12 Flash compensation indicator
13 Exposure compensation indicator
14 Auto ISO sensitivity indicator
15 Number of exposures remaining ........................17
Number of shots remaining before memory
buffer fills................................................................29
White balance recording indicator
Exposure compensation value
Flash compensation value
Capture mode indicator
ISO sensitivity............................................................40
16 Warning indicator ....................................................72
D The Viewfinder
The response time and brightness of the viewfinder display may vary with temperature.
8
X
Camera Menus
Most shooting, playback, and setup options can
be accessed from the camera menus.
To view the
menus, press the G button.
Using Camera Menus
The multi selector and J button are used to navigate the camera menus.
Ta bs
Choose from the following menus:
D: Playback (0 10)
C: Shooting (0 10)
A: Custom Settings (0 11)
B: Setup (0 11)
N: Retouch (0 11)
m/O: Recent settings or My Menu (0 11)
d
If a d icon is displayed at the bottom left corner of the
monitor, help can be displayed by pressing the Q (W )
button.
Press 1 or 3 to scroll through the display.
Press
Q (W) again to return to the menus.
Move cursor up
Cancel and return to previous menu
J button: select highlighted item
Select highlighted item or display sub-
menu
Move cursor down
G button
Slider shows position in current menu.
Current settings are shown by icons.
Menu options
Options in current menu.
Q (W) button
9
X
Follow the steps below to navigate the menus.
1 Display the menus.
Press the G button to display the menus.
2 Highlight the icon for the current menu.
Press 4 to highlight the icon for the current
menu.
3 Select a menu.
Press 1 or 3 to select the desired menu.
4 Position the cursor in the selected menu.
Press 2 to position the cursor in the selected
menu.
5 Highlight a menu item.
Press 1 or 3 to highlight a menu item.
G button
X
10
6 Display options.
Press 2 to display options for the selected menu
item.
7 Highlight an option.
Press 1 or 3 to highlight an option.
8 Select the highlighted item.
Press J to select the highlighted item.
To exit
without making a selection, press the G
button.
Note the following:
Menu items that are displayed in gray are not currently available.
While pressing 2 generally has the same effect as pressing J, there are some
cases in which selection can only be made by pressing J.
To exit the menus and return to shooting mode, press the shutter-release button
halfway (0 19).
❚❚ D Playback Menu Options
❚❚ C Shooting Menu Options
Delete
Playback folder
Playback display options
Image review
Rotate tall
Slide show
DPOF print order
Reset shooting menu
Storage folder
Image quality
Image size
White balance
Set Picture Control
Manage Picture Control
Auto distortion control
Color space
Active D-Lighting
HDR (high dynamic range)
Long exposure NR
High ISO NR
ISO sensitivity settings
Release mode
Multiple exposure
Movie settings
Interval timer shooting
11
X
❚❚ A Custom Settings
❚❚ B Setup Menu Options
* Only available when
compatible Eye-Fi memory
card is inserted.
❚❚ N Retouch Menu Options
❚❚ m Recent Settings/O My Menu (Defaults to m Recent Settings)
Reset custom settings
Autofocus
a1: AF-C priority selection
a2: Built-in AF-assist illuminator
a3: Rangefinder
Exposure
b1: EV steps for exposure cntrl.
Timers/AE lock
c1: Shutter-release button AE-L
c2: Auto off timers
c3: Self-timer
c4: Remote on duration
Shooting/display
d1: Beep
d2: ISO display
d3: File number sequence
d4: Exposure delay mode
d5: Print date
Bracketing/flash
e1: Flash cntrl for built-in flash
e2: Auto bracketing set
Controls
f1: Assign E/Fn button
f2: Assign AE-L/AF-L button
f3: Reverse dial rotation
f4: Slot empty release lock
f5: Reverse indicators
Format memory card
Monitor brightness
Info display format
Auto info display
Clean image sensor
Lock mirror up for cleaning
Video mode
HDMI
Flicker reduction
Time zone and date
Language
Image comment
Auto image rotation
Image Dust Off ref photo
GPS
Eye-Fi upload
*
Firmware version
D-Lighting
Red-eye correction
Trim
Monochrome
Filter effects
Color balance
Image overlay
NEF (RAW) processing
Resize
Quick retouch
Straighten
Distortion control
Fisheye
Color outline
Color sketch
Perspective control
Miniature effect
Selective color
Edit movie
A For More Information
Information on individual menu options is available using the camera’s on-board help (0 8)
and in the Reference Manual on the supplied reference CD (for information on viewing the
Reference Manual, see the inside front cover of this booklet).
12
X
First Steps
Always turn the camera off before inserting or removing batteries or memory cards.
1 Charge the battery.
If a plug adapter is supplied, raise the wall plug and connect the plug adapter
as shown below at left, making sure the plug is fully inserted.
Insert the battery
and plug the charger in.
An exhausted battery will fully charge in about an hour
and thirty minutes.
2 Insert the battery.
Check to be sure the battery is in the correct orientation.
Battery
charging
Charging
complete
D Charging the Battery
Read and follow the warnings and cautions on pages ii–iii and 69–71 of this manual.
Charge the battery indoors at ambient temperatures of 5–35 °C (41–95 °F).
Do not use
the battery at ambient temperatures below 0 °C/32 °F or above 40 °C/104 °F; failure to
observe this precaution could damage the battery or impair its performance.
Capacity
may be reduced and charging times may increase at battery temperatures from 0 °C/
32 °F to 15 °C/59 °F and from 45 °C/113 °F to 60 °C/140 °F.
The battery will not charge
if its temperature is below 0 °C (32 °F) or above 60 °C (140 °F). If the CHARGE lamp flickers
during charging, confirm that the temperature is in the correct range and then unplug
the charger and remove and reinsert the battery.
If the problem persists, cease use
immediately and take battery and charger to your retailer or a Nikon-authorized
service representative.
Use battery to press
orange battery
latch to one side.
Latch clicks into
place when battery
is fully inserted.
  • Page 1 1
  • Page 2 2
  • Page 3 3
  • Page 4 4
  • Page 5 5
  • Page 6 6
  • Page 7 7
  • Page 8 8
  • Page 9 9
  • Page 10 10
  • Page 11 11
  • Page 12 12
  • Page 13 13
  • Page 14 14
  • Page 15 15
  • Page 16 16
  • Page 17 17
  • Page 18 18
  • Page 19 19
  • Page 20 20
  • Page 21 21
  • Page 22 22
  • Page 23 23
  • Page 24 24
  • Page 25 25
  • Page 26 26
  • Page 27 27
  • Page 28 28
  • Page 29 29
  • Page 30 30
  • Page 31 31
  • Page 32 32
  • Page 33 33
  • Page 34 34
  • Page 35 35
  • Page 36 36
  • Page 37 37
  • Page 38 38
  • Page 39 39
  • Page 40 40
  • Page 41 41
  • Page 42 42
  • Page 43 43
  • Page 44 44
  • Page 45 45
  • Page 46 46
  • Page 47 47
  • Page 48 48
  • Page 49 49
  • Page 50 50
  • Page 51 51
  • Page 52 52
  • Page 53 53
  • Page 54 54
  • Page 55 55
  • Page 56 56
  • Page 57 57
  • Page 58 58
  • Page 59 59
  • Page 60 60
  • Page 61 61
  • Page 62 62
  • Page 63 63
  • Page 64 64
  • Page 65 65
  • Page 66 66
  • Page 67 67
  • Page 68 68
  • Page 69 69
  • Page 70 70
  • Page 71 71
  • Page 72 72
  • Page 73 73
  • Page 74 74
  • Page 75 75
  • Page 76 76
  • Page 77 77
  • Page 78 78
  • Page 79 79
  • Page 80 80
  • Page 81 81
  • Page 82 82
  • Page 83 83
  • Page 84 84
  • Page 85 85
  • Page 86 86
  • Page 87 87
  • Page 88 88
  • Page 89 89
  • Page 90 90
  • Page 91 91
  • Page 92 92

Nikon 25476 User manual

Category
Bridge cameras
Type
User manual

Ask a question and I''ll find the answer in the document

Finding information in a document is now easier with AI