Introduction- 3 -
English
1. Introduction
1.1. Features
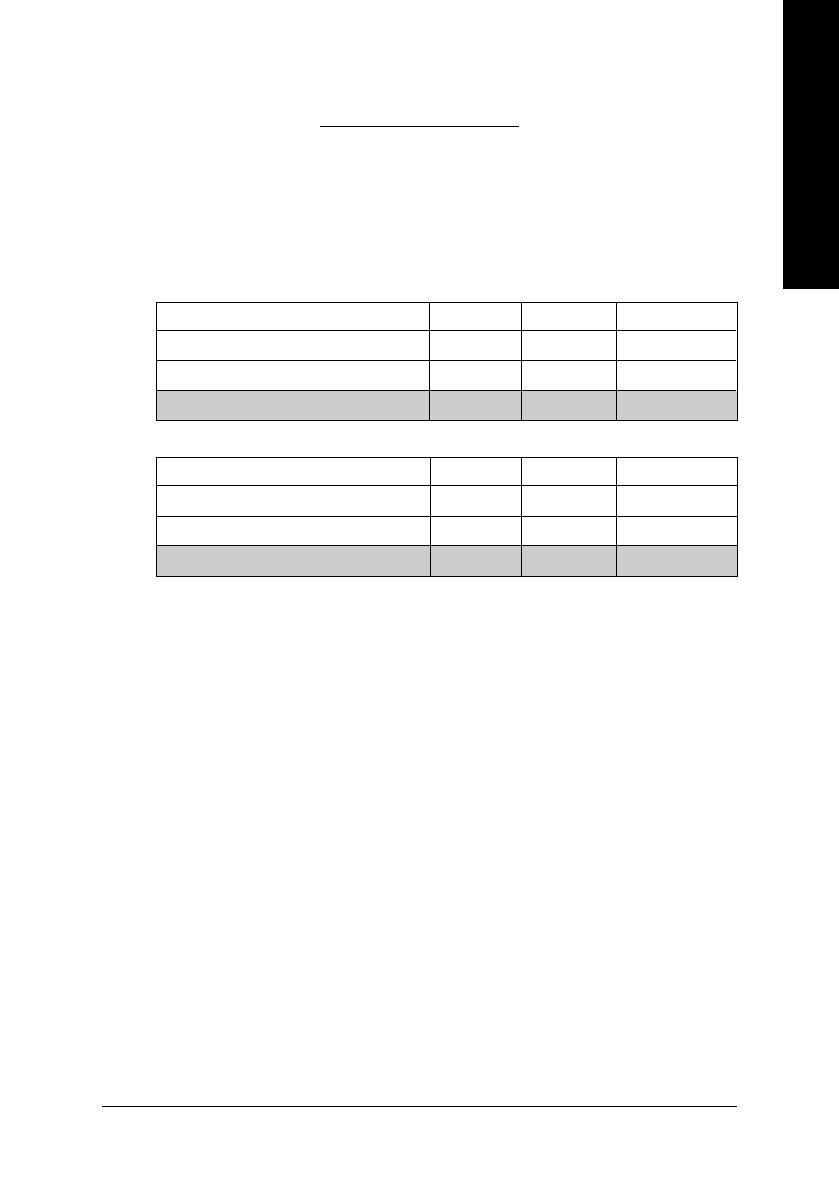
• The graphics card supports NVIDIA TurboCache technology, which enhances graphics card
performance by allowing the graphics processing unit (GPU) to dynamically share the
available system memory. The total effective VGA memory differs depending on system
memory. See the following tables for details:
• Powered by NVIDIA
®
GeForce
™
7200 GS Graphics Processing Unit (GPU)
• Supports the newest PCI Express x16
• Integrated with 128 MB DDRII memory (For GV-NX72G128D/GV-NX72G512P1 only)
• Integrated with 256 MB DDRII memory (For GV-NX72G512P2 only)
• Supports DirectX 9.0c
• Supports NVIDIA
®
SLI
TM
(Scalable Link Interface) technology via the PCI Express bus
(Note)
• Supports AV / S-Video and HDTV output
• Provides D-Sub and DVI-I connectors
1.2. Minimum System Requirement
• Intel
®
Pentium
®
4 or AMD Athlon
TM
or higher
• One PCI Express x16 slot
• Operating Systems Windows
®
2000 / Windows
®
XP/ Windows
®
Vista
• 512 MB of system memory
• 200 MB of available disk space for full installation
• CD-ROM or DVD-ROM drive
(Note): SLI technology requires a PCI Express motherboard with two x16 physical
connectors. Graphics cards working in an SLI configuration must be of the same model and
from the same vendor.
Available Graphics Memory Calculation for the GV-NX72G128D/GV-NX72G512P1
System Memory 256 MB 512 MB 1 GB or above
Onboard Graphics Memory (a) 128 MB 128 MB 128 MB
Allocated System Memory (b) 0 MB 128 MB 384 MB
Total Effective Graphics Memory (a)+(b) 128 MB 256 MB 512 MB
Available Graphics Memory Calculation for the GV-NX72G512P2
System Memory 256 MB 512 MB 1 GB or above
Onboard Graphics Memory (a) 256 MB 256 MB 256 MB
Allocated System Memory (b) 0 MB 0 MB 256MB
Total Effective Graphics Memory (a)+(b) 256 MB 256 MB 512 MB


