Milwaukee M18 HCC75R User manual
- Category
- Power tools
- Type
- User manual
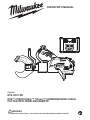
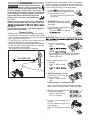
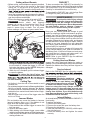
Milwaukee M18 HCC75R is a 75mm (3") underground cable cutter with a wireless remote, designed for cutting copper and aluminum cables. It features a powerful motor that can cut through cables up to 75mm in diameter, and a compact, lightweight design that makes it easy to use in confined spaces. The wireless remote allows for safe and convenient operation, and the LED light helps illuminate the work area. The M18 HCC75R is also compatible with ONE-KEY, allowing users to track the tool's location and manage its usage.
Milwaukee M18 HCC75R is a 75mm (3") underground cable cutter with a wireless remote, designed for cutting copper and aluminum cables. It features a powerful motor that can cut through cables up to 75mm in diameter, and a compact, lightweight design that makes it easy to use in confined spaces. The wireless remote allows for safe and convenient operation, and the LED light helps illuminate the work area. The M18 HCC75R is also compatible with ONE-KEY, allowing users to track the tool's location and manage its usage.


-
 1
1
-
 2
2
-
 3
3
-
 4
4
-
 5
5
-
 6
6
-
 7
7
-
 8
8


Milwaukee M18 HCC75R User manual
- Category
- Power tools
- Type
- User manual
Milwaukee M18 HCC75R is a 75mm (3") underground cable cutter with a wireless remote, designed for cutting copper and aluminum cables. It features a powerful motor that can cut through cables up to 75mm in diameter, and a compact, lightweight design that makes it easy to use in confined spaces. The wireless remote allows for safe and convenient operation, and the LED light helps illuminate the work area. The M18 HCC75R is also compatible with ONE-KEY, allowing users to track the tool's location and manage its usage.
Ask a question and I''ll find the answer in the document
Finding information in a document is now easier with AI
Related papers
-
Milwaukee M18 BLTRC User manual
-
-
Milwaukee 6502962 User manual
-
Milwaukee M18 FBJS User manual
-
-
-
-
Milwaukee M18 CHT User manual
-
Milwaukee M18 TAL User manual
-