Electrolux EW30ES65GWG User manual
- Category
- Cookers
- Type
- User manual

EN ELECTRIC SLIDE-IN RANGE USE AND CARE GUIDE
318205832 rev. B (13/04)

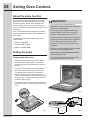
Finding Information
©2011 Electrolux Home Products, Inc. All rights reserved. Printed in Canada.
Table of contents
Thank you for choosing Electrolux, the new
premium brand in home appliances. This Use &
Care Guide is part of our commitment to customer
satisfaction and product quality throughout the
service life of your new appliance.
We view your purchase as the beginning of a
relationship. To ensure our ability to continue
serving you, please use this page to record
important product information.
Keep a record for quick
reference
Please read & save this guide
Questions?
Serial plate location
For toll-free telephone support in the U.S. and
Canada:
1-877-4ELECTROLUX (1-877-435-3287)
NOTE
Registering your product with Electrolux enhances
our ability to serve you. You can register online
at www.electroluxappliances.com or by dropping
your Product Registration Card in the mail.
Finding information ..............................................2
Important Safety Instructions .......................... 3-6
Features........................................................... 7-12
Getting Started .............................................. 13-14
Surface Cooking ........................................... 15-16
Setting Surface Controls ...................................17
Setting Oven Controls .................................. 18-39
• Rapidpreheat ................................................18
• Bake ...............................................................19
• Usingcooktime .............................................20
• Usingcooktimewithendtime .....................21
• BroilorConvectionbroil ........................... 22-23
• Convectionbake ............................................24
• Usingconvectionconvert ...............................25
• Convectionroast ...................................... 26-27
• Probe ....................................................... 28-29
• Keepwarm .....................................................30
• Slowcook .......................................................31
• PerfectTurkey™ ............................................32
• Defrost ...........................................................33
• Dehydrate ................................................ 33-34
• Breadproof ....................................................34
• Saving&recallingmyfavoriterecipes ...........35
• Multistagecooking .................................. 36-37
• SettingSabbathmode ............................. 38-39
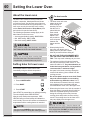
Setting the Lower Oven .....................................40
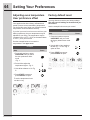
Setting Your Preferences ............................. 41-44
• Settingclock ...................................................41
• Settingclockdisplay(CLO) ............................41
• Setting12or24hourmode(CLO) .................42
• ChangingbetweenFºorCº(F-C) ..................42
• Setting12hrenergysavingmode(ES) ..........43
• Settingaudiomode(AUD) .............................43
• Adjustingoventemperature(UPO) ................44
• Factorydefaultreset(RST) ............................44
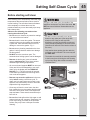
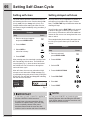
Setting Self-Clean Cycle .............................. 45-46
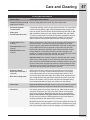
Care & Cleaning ............................................ 47-51
• Cleaningrecommendations ...........................47
• Specialdoorcareinstructions ........................48
• Changingovenlights .....................................48
• TheovendoorwithLuxury-Hold™hinges .....49
• Cooktopcleaningandmaintenance ...............50
• Recommendationsforceramicglass ....... 50-51
• Broilerpancleaningtips .................................51
Solutions to Common Problems ................. 52-54
Warranty ..............................................................55
Purchase date
Electrolux model number
Electrolux serial number
For online support and Internet production information
visit http://www.electroluxappliances.com
2

What you need to know about safety instructions
Warning and Important Instructions appearing in this guide are not meant to cover all possible conditions
and situations that may occur. Common sense, caution and care must be exercised when installing,
maintaining or operating a microwave.
ALWAYS contact your dealer, distributor, service agent or manufacturer about problems or conditions
you do not understand.
WARNING — Hazards or unsafe practices
which COULD result in severe personal injury
or death.
CAUTION — Hazards or unsafe practices which
COULDresultinminorpersonalinjury.
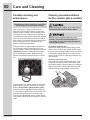
Recognize Safety Symbols, Words, Labels
3
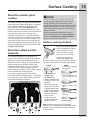
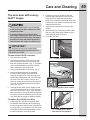
Tip Over Hazard
A child or adult can tip the •
range and be killed.
Verify the anti-tip device has •
beeninstalledtooororwall.
Ensuretheanti-tipdeviceisre-engagedtooor•
or wall when the range is moved.
Donotoperatetherangewithouttheanti-tip•
device in place and engaged.
Failure to follow these instructions can result in •
death or serious burns to children and adults.
To check if the anti-tip bracket is
installed properly, use both arms
and grasp the rear edge of range
back. Carefully attempt to tilt range
forward. When properly installed,
the range should not tilt forward.
Refer to the anti-tip bracket installation
instructions supplied with your range for proper
installation.
• Removealltapeandpackagingwrapbefore
using the appliance. Destroy the carton and
plastic bags after unpacking the appliance.
Never allow children to play with packaging
material.
• ProperInstallation-Besureyourappliance
is properly installed and grounded by a
qualiedtechnicianinaccordanceinUnited
States with the National Fuel Gas Code
ANSI Z223.1 latest edition, and National
Electrical Code ANSI/NFPA No. 70 latest
edition, and local code requirements, and in
Canada with Canadian Standards CAN/CGA
B149.1,andCAN/CGAB149.2andCanadian
Electrical Code, CSA C22.1 part 1, and local
requirements. Install only per installation
instructions provided in the literature package for
this range.
Askyourdealertorecommendaqualied
technician and an authorized repair service.
Knowhowtodisconnecttheelectricalpowerto
the range at the circuit breaker or fuse box in
case of an emergency.
• Stepping,leaningorsittingonthedoor
or drawer of this appliance can result
in serious injuries and may also cause
damage to the appliance. Donotallow
children to climb or play around the appliance.
The weight of a child on an open door may
cause the appliance to tip, resulting in serious
burnsorotherinjury.Anopendrawer,when
hot, may cause burns.
• Donotusetheovenorwarmerdrawer(if
equipped) for storage.
• NEVER use this appliance as a space
heater to heat or warm the room. Doingso
may result in carbon monoxide poisoning and
overheating of the oven.
Important Safety Instructions

4
• UserServicing—Donotrepairorreplace
anypartoftheapplianceunlessspecically
recommended in the manuals. All other
servicingshouldbedoneonlybyaqualied
techniciantoreducetheriskofpersonalinjury
and damage to the appliance.
• Nevermodifyoraltertheconstructionof
a range by removing leveling legs, panels,
wire covers, anti-tip brackets/screws, or any
other part of the product.
• WearProperApparel—Loose-ttingor
hanging garments should never be worn
while using the appliance. Donotletclothing
orotherammablematerialscontacthot
surfaces.
• StorageinoronAppliance—Flammable
materials should not be stored in an oven,
nearsurfaceunitsorinthedrawer(if
equipped). This includes paper, plastic and
cloth items, such as cookbooks, plasticware
andtowels,aswellasammableliquids.Donot
store explosives, such as aerosol cans, on or
near the appliance. Flammable materials may
explodeandresultinreorpropertydamage.
• Donotleavechildrenalone.Childrenshould
not be left alone or unattended in the area
where an appliance is in use. They should
never be allowed to sit or stand on any part of
the appliance.
• DONOTTOUCHSURFACEUNITS,AREAS
NEAR THESE UNITS, OVEN HEATING
ELEMENTS OR INTERIOR SURFACES OF
THEOVENSORWARMERDRAWER(if
equipped). Bothsurfaceunitsandovenheating
elements may be hot even though they are
dark in color. Areas near surface units may
becomehotenoughtocauseburns.Duringand
after use, do not touch, or let clothing or other
ammablematerialstouchtheseareasuntil
theyhavehadsufcienttimetocool.Among
these areas are the cooktop, surfaces facing the
cooktop, the oven vent openings and surfaces
near these openings, oven door and window.
to cool. Among these areas are the cooktop,
surfaces facing the cooktop, the oven vent
openings and surfaces near these openings,
oven door and window.
• Neveruseyourapplianceforwarmingor
heating the room.
•
Incaseofreorgasleak,besuretoturnoff
the main gas shutoff valve.
• DoNotUseWaterorFlouronGrease
Fires—Smothertherewithapanlid,oruse
baking soda, a dry chemical or foam-type
extinguisher.
• Whenheatingfatorgrease,watchitclosely.
Fatorgreasemaycatchreifallowedto
become too hot.
• UseOnlyDryPotholders—Moistordamp
potholders on hot surfaces may result in
burns from steam. Donotletthepotholders
touch hot heating surface units or interior oven
elements.Donotuseatowelorotherbulky
cloth instead of a potholder.
• DoNotHeatUnopenedFoodContainers—
Buildupofpressuremaycausethe
container to burst and result in injury.
• Remove the oven door from any unused
appliance if it is to be stored or discarded.
• Remove the oven door from any unused
appliance if it is to be stored or discarded.
• IMPORTANT—Donotattempttooperatethe
oven during a power failure. If the power
fails, always turn the oven off. If the oven
is not turned off and the power resumes, the
oven may begin to operate again. Food left
unattendedcouldcatchreorspoil.
Important Safety Instructions
Do not store items of interest to children in
the cabinets above the appliance. Children
climbing on the range to reach items could be
seriouslyinjured.
Electronic controllers can be damaged by cold
temperatures. When you use your appliance
forthersttime,orifithasnotbeenusedfora
long period of time, make sure that it has been
exposed to a temperature above 0°C/32°F for at
least 3 hours before connecting it to the power
supply.

5
IMPORTANT INSTRUCTIONS
FOR USING YOUR COOKTOP
• Knowwhichknobcontrolseachsurface
heating unit.
• UseProperPanSize—This appliance is
equipped with one or more surface units of
differentsizes.Selectutensilshavingat
bottoms large enough to cover the surface unit.
The use of undersized utensils will expose
a portion of the surface heating unit to direct
contact and may result in ignition of clothing.
Proper relationship of utensil to the surface unit
willalsoimproveefciency.
• UtensilHandlesShouldBeTurnedInward
and Should Not Extend Over Adjacent
Surface Units—To reduce the risk of burns,
ignitionofammablematerials,andspillage
due to unintentional contact with the utensil.
The handle of the utensil should be positioned
so that it is turned inward, and does not extend
overadjacentsurfaceunit.
• Never Leave Surface Units Unattended—
Boiloverscausesmokingandgreasyspillovers
that may ignite, or a pan that has boiled dry may
melt.
• Protectiveliners—Donotusealuminum
foil to line oven bottom or any other part of
the appliance. Only use aluminum foil as
recommended for baking if used as a cover
placed on the food. Any other used of protective
liners or aluminum foil may result in a risk of
electricshockorreorashortcircuit.
• GlazedCookingUtensils—Only certain types
of glass, glass/ceramic, ceramic, earthenware,
or other glazed utensils are suitable for
cooktop service without breaking due to the
sudden change in temperature. Check the
manufacturer’s recommendations for cooktop
use.
• DoNotUseDecorativeSurfaceElement
Covers— If an element is accidentally turned
on, the decorative cover will become hot and
possiblymelt.Burnswilloccurifthehotcovers
aretouched.Damagemayalsobedonetothe
cooktop.
• DoNotCleanorOperateaBrokenCooktop
—If cooktop should break, cleaning solutions
and spillovers may penetrate the broken
cooktop and create a risk of electric shock.
Contactaqualiedtechnicianimmediately.
• Avoidscratchingthecooktopglasswith
sharp objects.
IMPORTANT INSTRUCTIONS
FOR USING YOUR OVEN
• UseCareWhenOpeningDoororDrawer—
Stand to the side of the appliance when opening
the door of a hot oven. Let hot air or steam
escape before you remove or replace food in
the oven/warmer drawer.
• KeepOvenVentDuctsUnobstructed.The
oven is vented at the front above the oven door
or through the rear of cooktop. Touching the
surfaces in this area when the oven is operating
may cause severe burns. Also, do not place
plastic or heat-sensitive items on or near the
oven vent. These items could melt or ignite.
• PlacementofOven/WarmerDrawer(if
equipped) Racks. Always place oven racks in
desired location while oven/drawer (if equipped)
is cool. Remove all utensils from the rack
before removing rack. If rack must be moved
while oven is hot, use extreme caution. Use
potholders and grasp the rack with both hands
toreposition.Donotletpotholderscontactthe
hot oven element or interior of the oven/warmer
drawer (if equipped).
• Donotuseabroilerpanwithoutitsinsert.
The broiler pan and grid allow dripping fat to
drain and be kept away from the high heat of the
broiler.
• Do not cover your broiler or warmer drawer
(ifequipped)gridwithaluminumfoil.
Exposed fat and grease could ignite.
• Donottouchahotlightbulbwithadamp
cloth.Doingsocouldcausethebulbtobreak.
Disconnecttheapplianceorturnoffthepower
to the appliance before removing and replacing
light bulb.
Important Safety Instructions

6
IMPORTANT INSTRUCTIONS
FOR CLEANING YOUR
RANGE
• Cleantherangeregularlytokeepallparts
freeofgreasethatcouldcatchre.Exhaust
fanventilationhoodsandgreaselters
shouldbekeptclean.Donotallowgreaseto
accumulate. Greasy deposits in the fan could
catchre.Refertothehoodmanufacturer’s
instructions for cleaning.
• Cleaners/aerosols—Always follow the
manufacturer’s recommended directions for use.
Beawarethatexcessresiduefromcleaners
and aerosols may ignite causing damage and/or
injury.
SELF-CLEANING OVENS
• Cleanintheself-cleaningcycleonlythe
parts of the oven listed in this owner’s guide.
Beforeself-cleaningtheoven,removeallutensils
stored in the oven.
• Donotcleantheovendoorgasket.The door
gasket is essential for a good seal. Care should
be taken not to rub, damage or move the gasket.
• Donotuseovencleaners.No oven cleaner or
oven liner protective coating of any kind should
be used in or around any part of the oven.
• Removeovenracks.Oven racks will be
damaged if left in the oven during a self-cleaning
cycle.
Important safety notice
TheCaliforniaSafeDrinkingWaterandToxic
Enforcement Act requires the Governor of
California to publish a list of substances known to
the state to cause cancer, birth defects or other
reproductive harm, and requires businesses to
warn customers of potential exposure to such
substances.
SAVE THESE INSTRUCTIONS FOR
FUTURE REFERENCES
The health of some birds is extremely sensitive
to the fumes given off during the self-clean
cycle of any range. Move birds to another well
ventilated room.
Important Safety Instructions

7
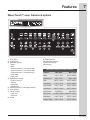
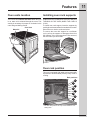
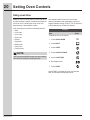
Features
7
1
3
2
4
5 6
8 9 10 11
12
Wave-Touch™ oven features & options
Minimum & maximum control settings
Feature Min. temp Max. temp
Bake 170°F / 76°C 550°F / 288°C
BreadProof 85°F / 30°C 100°F / 38°C
Broil 300°F / 148°C 550°F / 288°C
ConvBake 170°F / 76°C 550°F / 288°C
Conv Roast 170°F / 76°C 550°F / 288°C
ConvBroil 300°F / 148°C 550°F / 288°C
KeepWarm 150°F/66°C 190°F/88°C
Slow Cook Lo (225°F /108°C) Hi (275°F / 135°C)
Dehydrate 100°F / 38°C 225°F / 108°C
Perfect Turkey 170°F / 76°C 550°F / 288°C
9. Rapid preheat
10. Convection convert
11. Favorite settings
12. Cleaning
1. Oven light
2. Control lock
3. Standard cooking
•Bake
•Broil
•Perfect-Convect
3
™convectionbake
•Perfect-Convect
3
™convectionroast
•Perfect-Convect
3
™convectionbroil
•Keepwarm
•Slowcook
4. Specialized cooking
•PerfectTurkey™
•Defrost
•Dehydrate
•Breadproof
5. PerfectProgram™multistagecooking
6. Cook options
7. Timed cooking
•Cooktime
•Endtime
8. Probe

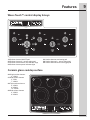
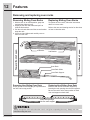
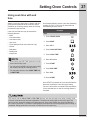
8
13
15
14
16
18
17
Wave-Touch™ control display & keys
13. Perfect-Pair™ovenkeypads
•Upperoven
•Loweroven
14. Oven display
15. User preferences
The following options are available under User
Preferences:
•Clocksetting
•Clockdisplaysetting
•12hr/24hr
•Fahrenheit/Celsius
•12Hrenergysavemodeon/off
•Audiomode
•Temperatureadjustment(UPOoffset)
•Factorydefaultreset
16.Cancel&Startkeypads
17. Timers
18. Numeric key pads
Minimum & maximum time settings
Feature Min. time Max. time
Timer 1 1 min 11 hr 59 min
Timer 2 1 min 11 hr 59 min
Clock 12 hr 1:00 hr 12 hr 59 min
Clock 24 hr 0:00 hr 23 hr 59 min
Cook time 12 hr 1 min 11 hr 59 min
Cook time 24 hr 1 min 11 hr 59 min
End time 12 hr 1:00 hr 12 hr 59 min
End time 24 hr 0:00 hr 23 hr 59 min
Clean duration Lite (2 hr) Heavy (4 hr)
Features

9
19
20
21
22
24
25
26
26
27
28
29
23
Wave-Touch™ control display & keys
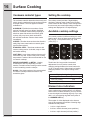
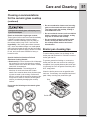
Ceramic glass cooktop surface
19. Surface element ON/OFF pad
20. Surface element hi + power setting pad
21. Surface element burner size indicator rings
22. Surface element power indicator digits
26. Single surface element
6” 1200W
27.Dualsurfaceelement
5” 750W
7” 1800W
28. Triple surface element
6” 1000W
9” 2000W
12” 2700W
29.Dualsurfaceelement
6” 1600W
9” 3000W
Features
23. Surface element med setting pad
24. Surface element lo - power setting pad
25. Surface element burner size toggle pad

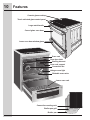
10
Broilerpan
Broilerpangrid
Convection roasting rack
Broilingelement
Oven rack support
Halogen oven light
Convection fan
Oven door latch
Slideable oven racks
Oven vent
Lower oven rack
Ceramic glass cooktop
Touch activated glass control panel
Large metal handle
Curved glass oven door
Lower oven door window glass
Features

11
Rack positions
This oven is equipped with ladder rack supports with
8 positions to accommodate precisely every mode of
cooking.
*
Therstrackpositioncanonlyaccommodatea“non-
sliding rack”.
*
Oven vents location
Oven rack position
Installing oven rack supports
ALWAYS INSTALL OVEN RACK SUPPORT BEFORE
TURNING ON THE OVEN (WHEN THE OVEN IS
COOL).
To install oven rack support, insert the supports by
pushing them downward into the two brackets on each
side of the oven interior, as shown below.
To remove the oven rack support for a self-clean
cycle, pull up the support to disengage them from
the brackets. If the rack supports are not removed,
the self-clean cycle won’t start.
The oven is vented above each door. When the oven
is on, warm air is released through the vents. This
venting is necessary for proper air circulation in the
oven and good baking results.
Oven Vent
Warm Air
1
2
3
4
5
6
7
8
Features

12
Removing and replacing oven racks
Removing Sliding Oven Racks
1. With the rack in its closed position; grasp the
rack and the sliders at once.
2. Slightly lift the rack and sliders and pull it to
cleartherstbracket.
3. Pull the rack and sliders until the second bracket
stops the rack.
4. Lift the rack and sliders and carefully remove
them from the oven.
Replacing Sliding Oven Racks
To replace the oven racks, follow the instructions
above in reverse order.
Refer to the care and cleaning section for directions
on how to clean the racks.
Oven Rack
Oven Rack Slider
Oven Rack Support
Toward front of oven
Toward back of oven
1stBracket
2ndBracket
Removing Non-Sliding Oven Rack
Simply pull the rack and slightly tilt it upward when
the rack hits its stop position.
Replacing Non-Sliding Oven Rack
Insert the rack into the oven rack supports by
inserting the rack openings into the rack supports.
Besuretherackisatthesamepositiononeach
oven rack support on both sides.
Insert the openings
into the rack support
Always arrange the oven racks when the oven is cool (prior to operating the oven). Always use oven
mitts when using the oven.
Features

13
Timers
Getting Started
Setting clock at power up
You will be prompted to enter the time of day in the
eventofapowerfailureorwhenyourstprovide
electric power to your appliance.
• Whenyourapplianceisrstpoweredup,12:00
willashinthedisplay.
• Enterthetimeofdayusingthenumerickeypads
and press START to set.
If an invalid time of day is entered, the control will
triple beep. Re-enter a valid time of day and press
START. If CANCEL is pressed your clock will start
with the time set for 12:00.
Select the user pref key to modify the time of day
during other situations such as day light savings.
See example below to set the timer for 5 minutes:
Sleep mode
Your control will remain in a sleep mode when not
in use. Only the clock will display during this mode.
You will need to wake the control to begin any
function - Fig. 1.
Awake mode
To awake the control touch within the display panel.
If the control panel is not touched again within 2
minutes, the control will return to the sleep mode.
To start cooking you must select either the upper
oven or the warmer oven. User preferences will be
available during the awake mode as well as timers,
oven light and the control lock - Fig. 2.
Sleep mode Fig.1
Awake mode Fig.2
The two timers provided with the oven control
serve as extra reminders in the kitchen. When a
timer reaches less than 1 hour, the display will start
to count down in minutes and seconds. When the
timerunsouttheactivetimerwillbeep,“0:00” will
ash.
The following time settings apply to the timers:
• Min.time:1minute
• Max.time:11hours59minutes
Tocancelaftersettingthetimer,presstheTIMER
key again.
Wave-Touch™ display modes
Example
Step Press
1. Press TIMER
2. Enter 5 minutes
3. Press TIMER
NOTE
The timer(s) will not affect the cooking process.

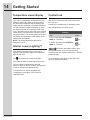
14
Temperature visual display
Getting Started
Your oven is equipped with a temperature visual
display for each oven. When a cooking mode is
set, the actual temperature will be shown in the
display and will rise as the unit preheat. When the
unit has reached its target temperature, a chime
will sound to remind you to place the food in the
oven. This feature will be active with some cooking
modes; bake, convection bake, convection roast
and perfect turkey. The cooking modes which does
not feature the temperature visual display will be
noted in their descriptions.
NOTE: The lowest temperature that can be
displayed is 100°F.
Control lock
The control lock will lock both oven controls and
the oven door.
Control lock is available only in the awake mode.
See example below to lock the ovens.
willashinthedisplayuntilthedoor
hasnishedlocking. Once the door has been
lockedthedoorlockindicatorwillturnon.LOCKED
will then display.
Donotattempttoopentheovendoorwhilethe
doorlockindicatorisashing.
Example
Step Press
To lock, press and hold CONTROL
LOCK for 3 seconds.
3sec
To unlock, press and hold CONTROL
LOCK for 3 seconds.
3sec
Interior Luxury-Lighting™
Your appliance includes interior oven Luxury-
Lighting™thatgraduallybrightensanddimsthe
lights for the oven.
The
key controls the interior oven lights.
This model includes 2 halogen lights in the oven.
The oven lights will automatically turn ON
whenever the oven door is opened. The lights will
remain on until the door has been shut.
To replace the over interior light bulbs see
“Changingtheovenlights”intheCareand
Cleaning section.

15
The ceramic cooktop has radiant surface elements
located below the surface of the glass. The design
of the ceramic cooktop outlines the area of the
surface element underneath. Make sure the
diameter of the pan matches the diameter of the
element outline on the cooktop. Heat is transferred
up through the surface of the cooktop to the
cookware.Onlyat-bottomcookwareshouldbe
used. The type and size of cookware, the number
of surface elements in use and the settings, are all
factors that will affect the amount of heat that will
spread to areas beyond the surface elements. The
areas surrounding the elements may become hot
enough to cause burns.
The element temperature rises gradually and
evenly. As the temperature rises, the element will
glow red. To maintain the selected setting, the
element will cycle on and off. The heating element
retains enough heat to provide a uniform and
consistentheatduringtheoffcycle.Forefcient
cooking, turn off the element several minutes
before cooking is complete. This will allow residual
heat to complete the cooking process.
Your range is equipped with radiant surface
burners with different wattage ratings. The ability to
heat food quicker and in larger volumes increases
as the element wattage increases.
Surface Cooking
About the ceramic glass
cooktop
About the radiant surface
elements
NOTE
Radiant elements have a limiter that allows the
element to cycle ON and OFF, even at the HI
setting. This helps to prevent damage to the
ceramic glass cooktop. Cycling at the HI setting is
normal and can also occur if the cookware is too
small for the radiant element or if the cookware
bottomisnotat.
Please read detailed instructions for ceramic
glass cooktop cleaning in the Care & Cleaning
section and Solutions to Common Problems
section of this Use and Care Guide.
Surface cooking utensils
Note: Always use a utensil for its intended
purpose. Follow manufacturer’s instructions. Some
utensils were not made to be used in the oven or
on the cooktop.
*GOOD
• Flatbottom and
straight sides.
• Tightttinglids.
• Weightofhandledoes
not tilt pan. Pan is well
balanced.
• Pansizesmatchthe
amount of food to be
prepared and the size
of the surface element.
• Madeofmaterialthat
conducts heat well.
• Easytoclean.
• Alwaysmatchpot
diameter to element
surface diameter.
POOR
• Curved and warped
pan bottoms.
• Pan overhangs unit
by more than 2.5 cm
(1”).
• Heavy handle tilts
pan.
• Pan is smaller than
element.
Pansshouldhaveatbottoms.
Checkforatnessbyrotating
a ruler across the bottom.
There should be no gaps
between the pan and ruler.
* Specialty pans such as
lobster pots, griddles and
pressure cookers may be used but must conform to
the above recommended cookware requirements.

16
Surface Cooking
Cookware material types Setting the cooktop
Available cooktop settings
Element size indicators
The cookware material determines how evenly and
quickly heat is transferred from the surface element
to the pan bottom. The most popular materials
available are:
ALUMINUM - Excellent heat conductor. Some
types of food will cause it to darken (Anodized
aluminumcookwareresistsstaining&pitting).If
aluminum pans slide across the ceramic glass
cooktop, they may leave metal marks which
will resemble scratches. Remove these marks
immediately.
COPPER - Excellent heat conductor but discolors
easily.Mayleavemetalmarksonceramicglass
(see Aluminum above).
STAINLESS STEEL - Slow heat conductor with
uneven cooking results. Is durable, easy to clean
and resists staining.
CAST IRON - A poor heat conductor however will
retain heat very well. Cooks evenly once cooking
temperature is reached. Not recommended for use
on ceramic cooktops.
PORCELAIN-ENAMEL on METAL - Heating
characteristics will vary depending on base
material. Porcelain-enamel coating must be smooth
to avoid scratching ceramic cooktops.
GLASS - Slow heat conductor. Not recommended
for ceramic cooktop surfaces because it may
scratch the glass.
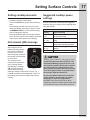
The cooktop control provides 5 digital display
windows to help set power levels for the heating
zones located on the cooktop. These settings work
the same way as normal knob settings except the
settingsaredisplayedinLCDstyledisplays.
Your control provides 25 different settings for each
heating zone. Some of these power levels include
Lo (1%) Fig. 1, 5.0 (medium 50%) Fig. 2, Hi
(100%) Fig. 3.
Fig. 1 Fig. 2 Fig. 3
Some cooktop zone positions offer 2 or 3 different
element sizes. At these locations, you may choose
to use the single inner heating ring only or you may
add 1 or 2 more heating rings with each press of
the BURNERSIZE key.
The number of circles displayed at the element
zoneLCDrepresentsthenumberofheatingrings
available for that position.
The hi+ and lo- keys provide incremental
adjustmentsformoreprecisecontrolwhen
changing settings between the lower heat levels
(Lo to 3.0 power levels). Higher heat level setting
changes (between 3.0 to HI) will change much
faster.
Display Setting Changes
Setting / Power Incremental change
Lo to 3.0 (1-30%) 0.2
3.0 to HI (30-100%) 0.5
• 1circle=singleelement
• 2circles=doubleelement(somepositions)
• 3circles=tripleelement(leftfrontposition)

17
Setting Surface Controls
• Ifneeded,wakethecontrolpanel.
• Touchthe ON OFF key for the desired heating
zone.
• Iftheheatingzonehasmorethanoneburner
ring size available, press and continue to press
the BURNERSIZE key for the desired heating
zone to change the ring size.
• Pressthedesiredpowerlevelkey(hi+, med or
lo-) or for more precise level settings use the hi+
or lo-keystomakespeciclevelchanges.
Use the chart below to determine the suggested
setting for the type of food you are preparing when
using the cooktop.
Recommended surface setting chart
Setting Type of Cooking
High
(Hi)
Start most foods; bring water to a
boil and pan broiling.
Mediumhigh
(8 - 9.5)
Continue a rapid boil; frying, deep fat
frying.
Medium
(6)
Maintainaslowboil;thickensauces
and gravies; steaming vegetables.
MediumLow
(4 - 5)
Keepfoodscooking;poachingand
stewing.
Low (Lo - 3) Keepwarm,meltingandsimmering.
Setting cooktop elements Suggested cooktop power
settings
Hotelement(HE)message
After using any of the
radiant element positions
the ceramic cooktop will
become very hot. Even
after turning the control off,
the cooktop will remain hot
for some time.
The cooktop control
monitors the temperature
of the cooktop surface
and displays a message
“HE” (hot element) and
ashestheburnerrings
when the cooktop is still too hot to touch -Fig. 1-.
If the HEmessageremainsdisplayedintheLCD,
the heating zone may be set again and used for
cooking.
Fig. 1
Radiant surface elements may appear to have
cooled after they have been turned off. The
Hot Element Message Light will turn on and
will continue to glow until the glass cooktop
has cooled down to a moderate level. The
glass surface may still be hot and burns may
occur if the glass surface is touched before
the indicator light has turned OFF.
Do not place plastic items such as salt and
pepper shakers, spoon holders or plastic
wrappings on top of the range when it
is in use. These items could melt or ignite.
Potholders, towels or wooden spoons could catch
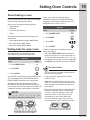
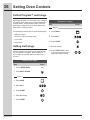
reifplacedtooclosetothesurfaceelements.

18
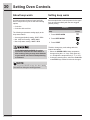
Setting Oven Controls
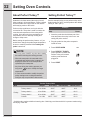
About rapid preheat
Use the rapid preheat option on single rack
baking to quickly bring the upper oven to baking
temperature.
The rapid preheat option may be set with the
following cooking features:
• Bake
• Convbake
The following temperature settings apply to the
rapid preheat feature:
• Auto-suggest(default)setting: 350°F/176°C
• Min.rapidpreheatsetting: 170°F / 76°C
• Max.rapidpreheatsetting: 550°F / 288°C
Setting rapid preheat
See example below to set a rapid preheat
with bake to start immediately using default
temperature.
When START is pressed the oven will preheat
quickly. The control will display PRE-HEATING
during this time. While PREHEATING the
Convection fan may operate.
After a few minutes a beep will sound and PRE-
HEATING will no longer display. Place prepared
food on a single oven rack. The oven will continue
to bake at the set temperature until bake is
canceled.
• Single oven rack cooking ONLY.
• Useinovenrackpositions2or3.
For best results
To add or change any cook settings after this
feature has started:
• SelecttheUPPERoven.Maketemperature
changes using the + or - keys. Each press of +
or -willadjustthetemperatureby5°F(or2°C).
• Ifchangingcookingtimes,selectthecook time
or end time keys needed to make the changes.
Example
Step Press
1. Press UPPER OVEN
UPPER
OVEN
2. Press BAKE
3. Press COOK OPTIONS
4. Press RAPID PREHEAT
5. Press START
NOTE
You may press CANCEL at any time when setting
the control or during the cooking process.

19
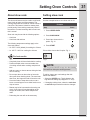
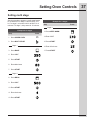
Setting Oven Controls
See example below to set a bake to start
immediately using the default temperature.
Once START is pressed the oven will begin heating.
The oven display shows PRE-HEATING. While
PREHEATING the Convection fan may operate.
After the oven reaches set temperature, PRE-
HEATING will turn off and a beep will indicate the
oven is ready. The oven will continue to maintain this
temperature until the cooking feature is canceled.
If your recipe requires a different baking
temperature than the auto-suggested (default)
temperature (example below shows lower oven
temperature set for 425°F/ 218°C ) :
Setting bake for upper oven
Use the bake feature to cook most food items that
require normal cooking temperatures.
Bakemaybesetwiththefollowingoptions:
• Rapidpreheat
• Cooktime
• Cooktimewithendtime
• Probe
The following temperature settings apply to the
bake feature:
• Auto-suggest(default)setting: 350°F/176°C
• Min.bakesetting: 170°F / 76°C
• Max.bakesetting: 550°F / 288°C
• Useonlyonerackatposition5andcenterthe
pans as much as possible.
• Ifusingtworacks,placetheovenracksin
position 3 and 7.
• Whenplacingmultiplefooditemsintheoven
allow 2-4” (5-10cm) of space between the food
itemsforproperaircirculation(seeguresfor
more details).
• Darkordullpansabsorbmoreheatthanshiny
bakeware resulting in dark or overbrowning
of foods. It may be necessary to reduce the
oven temperature or cook time to prevent
overbrowningofsomefoods.Darkpans
are recommended for pies. Shiny pans are
recommendedforcakes,cookiesandmufns.
For best results
About baking in oven
To add or change any cook settings after this
feature has started:
• SelecttheUPPER OVEN.Maketemperature
changes using the + or - keys. Each press of +
or -willadjustthetemperatureby5°F(or2°C).
• Ifchangingcookingtimes,selectthecook time
or end time keys needed to make the changes.
Example
Step Press
1. Press UPPER OVEN
UPPER
OVEN
2. Press BAKE
3. Press START
Example
Step Press
1. Press UPPER OVEN
UPPER
OVEN
2. Press BAKE
3. Enter 425°F
4. Press START
Pan position for two rack baking.
Pan position for one rack baking.
NOTE
You may press CANCEL at any time when setting
the control or during the cooking process.

20
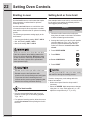
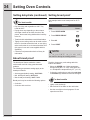
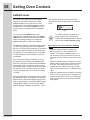
Setting Oven Controls
Using cook time
Addingacooktimewhenbakingisbenecialwhen
areciperequiresaspecictemperatureandperiod
of time to cook. Following the recipe cook time
helps insure the best possible results.
Cook time may be set with the following features:
• Bake
• Convbake
• Convroast
• Slowcook
• Defrost
• Dehydrate
• Breadproof
• Keepwarm
• Perfectturkey
See example below to set the oven for bake,
starting immediately with preheating to the auto-
suggest (default) setting of 350°F (176°C) and then
to automatically turn off after 30 minutes:
Once START is pressed the oven will cook and
after 30 minutes automatically shut-off.
Example
Step Press
Preheat the oven if necessary
1. Press UPPER OVEN
UPPER
OVEN
2. Press BAKE
3. Press START
4. Press COOK OPTIONS
5. Press COOK TIME
6. Enter 30 minutes
7. Press START
NOTE
You may press CANCEL at any time when setting
the control or during the cooking process.
Page is loading ...
Page is loading ...
Page is loading ...
Page is loading ...
Page is loading ...
Page is loading ...
Page is loading ...
Page is loading ...
Page is loading ...
Page is loading ...
Page is loading ...
Page is loading ...
Page is loading ...
Page is loading ...
Page is loading ...
Page is loading ...
Page is loading ...
Page is loading ...
Page is loading ...
Page is loading ...
Page is loading ...
Page is loading ...
Page is loading ...
Page is loading ...
Page is loading ...
Page is loading ...
Page is loading ...
Page is loading ...
Page is loading ...
Page is loading ...
Page is loading ...
Page is loading ...
Page is loading ...
Page is loading ...
Page is loading ...
Page is loading ...
-
 1
1
-
 2
2
-
 3
3
-
 4
4
-
 5
5
-
 6
6
-
 7
7
-
 8
8
-
 9
9
-
 10
10
-
 11
11
-
 12
12
-
 13
13
-
 14
14
-
 15
15
-
 16
16
-
 17
17
-
 18
18
-
 19
19
-
 20
20
-
 21
21
-
 22
22
-
 23
23
-
 24
24
-
 25
25
-
 26
26
-
 27
27
-
 28
28
-
 29
29
-
 30
30
-
 31
31
-
 32
32
-
 33
33
-
 34
34
-
 35
35
-
 36
36
-
 37
37
-
 38
38
-
 39
39
-
 40
40
-
 41
41
-
 42
42
-
 43
43
-
 44
44
-
 45
45
-
 46
46
-
 47
47
-
 48
48
-
 49
49
-
 50
50
-
 51
51
-
 52
52
-
 53
53
-
 54
54
-
 55
55
-
 56
56


Electrolux EW30ES65GWG User manual
- Category
- Cookers
- Type
- User manual
Ask a question and I''ll find the answer in the document
Finding information in a document is now easier with AI
Related papers
-
Electrolux EI30ES55LBA Owner's manual
-
Electrolux E30EW75GPS2 Owner's manual
-
Electrolux E30EW85GPS User manual
-
-
Electrolux EW30EW55GS8 Owner's manual
-
Frigidaire EW30EW55GW1 Owner's manual
-
-
-
Electrolux EW30GS75KSC Owner's manual
-
Electrolux EW30DS75KS User guide
Other documents
-
Bosch HBL33 User manual
-
Sears 93331 User manual
-
Kenmore 47129 Owner's manual
-
Frigidaire 318200407 User manual
-
LG Electronics LWD3063BD User guide
-
Siemens HB30D51UC/01 User manual
-
Frigidaire PLEB30T9DC Timer Guide
-
Tappan 37 series Owner's manual
-
-
Frigidaire FGEF3059TD Owner's manual