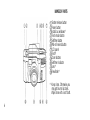
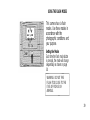
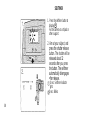
Olympus Accura View Zoom 90 User guide
- Category
- Film cameras
- Type
- User guide
This manual is also suitable for

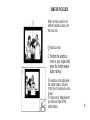
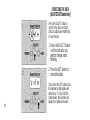
INSTRUCTIONS
Read this manual carefully before using your
camera.

Indicates
circumstances under
which mishandling
resulting from ignoring
this symbol could result
in personal injury or
property damage.
KEEP THE BATTERIES AWAY
FROM FIRE. NEVER TRY TO
DISASSEMBLE, RECHARGE, OR
SHORT-CIRCUIT BATTERIES.
KEEP THE BATTERY OUT OF
THE REACH OF CHILDREN. IF
A CHILD SWALLOWS A
BATTERY, CONTACT A
DOCTOR IMMEDIATELY.
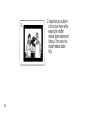
WARNING
2

NEVER ATTEMPT TO
DISASSEMBLE THE CAMERA; IT
CONTAINS A HIGH-VOLTAGE
CIRCUIT. IF THE INTERNAL
PARTS OF THE CAMERA ARE
EXPOSED DUE TO DROPPING
OR DAMAGE, REMOVE THE
BATTERIES IMMEDIATELY TO
PREVENT FURTHER USAGE.
IN CASE OF MALFUNCTION,
CONSULT YOUR NEAREST
OLYMPUS DEALER OR
OLYMPUS SERVICE CENTER.
3

Names of parts ......................... 6
Viewfinder display/LCD panel .... 8
Diopter adjustment ................. 11
Using the strap ........................ 11
Loading the battery................. 12
Checking the battery .............. 14
Proper shutter release ............ 15
Loading the film ...................... 16
Taking pictures ....................... 19
Using the focus lock ............... 25
After shooting.......................... 27
Unloading the film ................... 28
Using the flash modes ............ 29
Selftimer.................................. 38
4

Printing the date and time* ..... 40
Correcting the data* ...............
42
Replacing the date unit's
battery* ................................... 44
Care and storage .................... 46
Troubleshooting ...................... 51
Specifications ......................... 64
Specifications for date unit*.... 70
* QUARTZDATE model only.
5

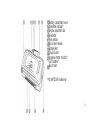
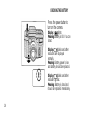
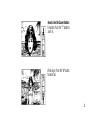
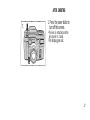
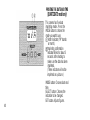
NAMES OF PARTS
Shutter release button
Power button
Autofocus windows*
Flash mode button
Selftimer button
Mid-roll rewind button
LCD panel
Flash*
Zoom buttons
Selftimer indicator
Lens*
Viewfinder*
* Keep clean. Otherwise you
may get blurred pictures.
Wipe clean with a soft cloth.
6

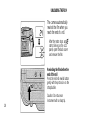
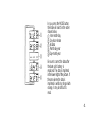
Battery compartment cover
Date/time indicator"
Diopter adjustment dial
Viewfinder
Film window
Back cover release
Strap eyelet
Tripod socket
Date/time MODE /SELECT/
SET
buttons"
Back cover
** QUARTZDATE model only.
7

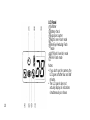
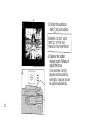
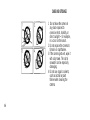
Viewfinder Display
Flash indicator (orange)
Lights: Flash is ready.
Blinks: Flash is recharging.
• Lights when the shutter
release button is pressed
halfway.
Autofocus mark (red)
If this starts blinking after the
shutter release button is
pressed halfway, it means that
the subject is out of focus.
Close-up correction mark
(orange)
The area inside this mark
(which lights) when the shutter
release button is pressed
halfway is the picture area.
VIEW/FINDER DISPLAY/
LCD PANEL
8

Shutter release indicator
(green)
Lights when the camera starts
releasing the shutter. Goes out
when the camera finishes
releasing the shutter.
When the camera is turned on,
only the autofocus mark (red)
will light. When the camera is
turned off, all the indicators will
go
out.
9

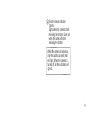
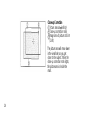
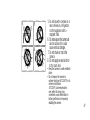
Selftimer
Battery check
Exposure counter
Night Scene Flash mode
Red-Eye Reducing Flash
mode
Off (Flash Override) mode
Fill-In Flash mode
LCD Panel
Notes:
• If you don't use the camera, the
LCD goes off after four and half
minutes.
• The LCD panel does not
actually display all indications
simultaneously as shown.
10

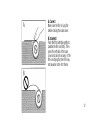
Press the power button to
turn on the camera. Then
turn the diopter adjustment
dial until the autofocus mark
is clear.
Turn to the right if you are
farsighted. Turn to the left if you
are nearsighted.
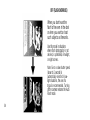
USING THE STRAP
Attach the strap as shown.
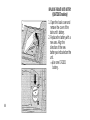
DIOPTER ADJUSTMENT
11

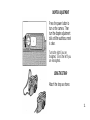
1. Press the power button to
turn off the camera. Push
OPEN to open the
battery compartment
cover
2. Insert the new battery
correctly. (One 3V lithium
battery. CR123A or
DL123A)
Notes:
• Dispose of used batteries in the
battery recycling boxes at
stores selling batteries.
• If lithium batteries are not fully
discharged, protect against
short-circuit (e.g. by taping the
contacts) before disposing.
LOADING THE BATTERY
12

Notes:
• About 15 rolls of 24-exposure
film can be used with one new
battery. (Flash use 50%)
• Keep a spare battery on hand
when going on a long trip or to
a cold area.
• Sweat, oil, and so on can
prevent a battery's terminals
from making electrical contact.
To avoid this, wipe both
terminals before loading the
battery.
13

Press the power button to
turn on the camera.
Display: lights
Meaning: Battery is OK. You can
shoot.
Display: blinks and other
indicators are displayed
normally.
Meaning: Battery power is low
and battery should be replaced.
Display: blinks and other
indicators go out.
Meaning: Battery is dead and
should be replaced immediately.
CHECKING THE BATTERY
14

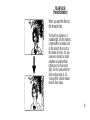
Practice before loading the
film.
1. Depress the shutter release
button halfway to lock the
focus.
• The shutter won't release
when the autofocus and/or
flash mark inside the
viewfinder is blinking.
2. Depress the shutter release
button fully to release the
shutter and take the picture.
Cautions:
• Press the shutter release button
gently.
• Avoid shaking the camera
when pressing the shutter
release button to prevent blurry
pictures.
PROPER SHUTTER RELEASE
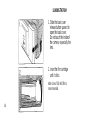
15

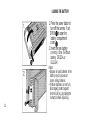
1. Slide the back cover
release button upward to
open the back cover.
Do not touch the inside of
the camera, especially the
lens.
2. Insert the film cartridge
until it clicks.
Note: Use of ISO 400 film is
recommended.
LOADING THE FILM
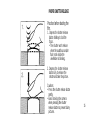
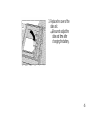
16

A. Correct
Make sure the film is lying flat
before closing the back cover.
B. Incorrect
Push the film cartridge gently to
position the film correctly. Then
press the left side of the back
cover and close it securely. If the
film is not lying flat, the film may
not advance to the first frame.
17

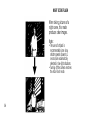
3. Pull the film leader so that it is
positioned about 10 mm (0.4
in.) from the tip of the arrow of
[ FILM TIP], and close the
back cover.
The film automatically
advances to the first frame.
Make sure that the film is
positioned between the
positioning guides (A) before
closing the back cover.
4. Press the power button to turn
on the camera.
The exposure counter on the
LCD panel reads .
Note: If blinks in the exposure
counter, the film is improperly
loaded. Reload the film.
18

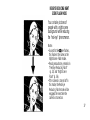
1. Press the power button to
turn on the camera.
The lens protector opens, the
lens extends slightly, and the
autofocus mark in the
viewfinder lights.
TAKING PICTURES
19

2. Aim the camera at your
subject. Use the zoom
buttons for telephoto or
wide-angle photography.
Note: Keep your hair, hands,
strap etc. away from the
autofocus windows, lens, light
sensor and flash.
20
Page is loading ...
Page is loading ...
Page is loading ...
Page is loading ...
Page is loading ...
Page is loading ...
Page is loading ...
Page is loading ...
Page is loading ...
Page is loading ...
Page is loading ...
Page is loading ...
Page is loading ...
Page is loading ...
Page is loading ...
Page is loading ...
Page is loading ...
Page is loading ...
Page is loading ...
Page is loading ...
Page is loading ...
Page is loading ...
Page is loading ...
Page is loading ...
Page is loading ...
Page is loading ...
Page is loading ...
Page is loading ...
Page is loading ...
Page is loading ...
Page is loading ...
Page is loading ...
Page is loading ...
Page is loading ...
Page is loading ...
Page is loading ...
Page is loading ...
Page is loading ...
Page is loading ...
Page is loading ...
Page is loading ...
Page is loading ...
Page is loading ...
Page is loading ...
Page is loading ...
Page is loading ...
Page is loading ...
Page is loading ...
Page is loading ...
Page is loading ...
Page is loading ...
-
 1
1
-
 2
2
-
 3
3
-
 4
4
-
 5
5
-
 6
6
-
 7
7
-
 8
8
-
 9
9
-
 10
10
-
 11
11
-
 12
12
-
 13
13
-
 14
14
-
 15
15
-
 16
16
-
 17
17
-
 18
18
-
 19
19
-
 20
20
-
 21
21
-
 22
22
-
 23
23
-
 24
24
-
 25
25
-
 26
26
-
 27
27
-
 28
28
-
 29
29
-
 30
30
-
 31
31
-
 32
32
-
 33
33
-
 34
34
-
 35
35
-
 36
36
-
 37
37
-
 38
38
-
 39
39
-
 40
40
-
 41
41
-
 42
42
-
 43
43
-
 44
44
-
 45
45
-
 46
46
-
 47
47
-
 48
48
-
 49
49
-
 50
50
-
 51
51
-
 52
52
-
 53
53
-
 54
54
-
 55
55
-
 56
56
-
 57
57
-
 58
58
-
 59
59
-
 60
60
-
 61
61
-
 62
62
-
 63
63
-
 64
64
-
 65
65
-
 66
66
-
 67
67
-
 68
68
-
 69
69
-
 70
70
-
 71
71


Olympus Accura View Zoom 90 User guide
- Category
- Film cameras
- Type
- User guide
- This manual is also suitable for
Ask a question and I''ll find the answer in the document
Finding information in a document is now easier with AI
Related papers
-
Olympus Stylus Zoom 130 Operating instructions
-
-
-
-
-
-
-
-
-
Other documents
-
Pentax IQZoom 135M Quartz Date Operating instructions
-
Asahi Pentax IQZoom135M Owner's manual
-
-
 Pentax ist 57233 User manual
-
-
 Pentax ZX ZX7 User manual
-
-
-
-
 Kamera Werk Dresden Pro 175 User manual


