Tripp Lite B004-DUA4-HR-K Owner's manual
- Category
- KVM switches
- Type
- Owner's manual
This manual is also suitable for

1
Owner’s Manual
DVI Dual Link/USB
KVM Switch with Audio and
Peripheral Sharing
Models: B004-DUA2-HR-K, B004-DUA4-HR-K
1111 W. 35th Street, Chicago, IL 60609 USA • www.tripplite.com/support
Copyright © 2014 Tripp Lite. All rights reserved.
Table of Contents
Package Contents 2
Optional Accessories 2
Console Requirements 2
Computer Requirements 2
Features 3
Safety Instructions 6
Installation 7
Basic Operation 8
Firmware Upgrade Utility 15
Factory Default Settings 16
Specications 17
Warranty & Warranty Registration 18
14-03-189-93334F.indd 1 4/18/2014 4:43:56 PM

2
Package Contents
Optional Accessories
Console Requirements
Computer Requirements
• B004-DUA2-HR-KorB004-DUA4-HR-KKVMSwitch
• (x2)6ft.USBKVMCableKits(B004-DUA2-HR-Konly)
• (x2)6ft.7.1SurroundSoundCables(B004-DUA2-HR-Konly)
• (x4)6ft.USBKVMCableKits(B004-DUA4-HR-Konly)
• ExternalPowerSupply(Input:100-240V,50/60Hz,0.5AOutput:5.3V,2.4A)
• Owner’sManual
• P312-SeriesMiniStereoAudioCables
• P556-SeriesDVItoVGAAdapterCables
• P560-SeriesDVI-DDualLinkCables
• P561-SeriesDVI-DSingleLinkCables
•P569-SeriesDVI-D/USB/AudioKVMCableKits
• U022-SeriesUSB2.0A/BDeviceCables
• ADVIorVGA*monitorcapableofsupportingthehighestresolutionoutofanycomputerinthe
installation
• USBkeyboardandmouse
• Microphoneandspeakerswith3.5mmMiniStereoconnectors(Ifusingtheaudiofeature)
*Requires an adapter, such as Tripp Lite’s P556-Series DVI to VGA adapter cables. Computers that support analog
audio (via either VGA or DVI-I ports) must be connected to the KVM for video to be displayed on a VGA monitor.
• DVIorVGA*port
• AUSBport
• 3.5mmMiniStereomicrophoneandspeakerjacks(Ifusingtheaudiofeature)
*Requires an adapter, such as Tripp Lite’s P556-Series DVI to VGA adapter cables. Note that the included DVI
cables and cable kits are DVI-D only, and cannot be converted to VGA using an adapter. Video from a VGA
computer will only display if a VGA monitor is connected.
Supported Operating Systems:
OS Version
Windows 2000andhigher
Mac OS9.0andhigher
LinuxKernel 2.6andhigher
LinuxRedHat 9.0andhigher
LinuxSuSE 10/11.1andhigher
LinuxDebian 3.1/4.0
LinuxUbuntu 7.04/7.10
UNIXAIX 4.3andhigher
UNIXFreeBSD 5.5andhigher
UNIXSun Solaris8andhigher
NovellNetware 6.0andhigher
14-03-189-93334F.indd 2 4/18/2014 4:43:57 PM

3
Features
• 2-PortDVIDualLink/USBKVMswitchwith7.1channelsurround-soundaudioandUSB2.0
peripheralsharing(B004-DUA2-HR-K)
• 4-PortDVIDualLink/USBKVMswitchwith2.1channelsurround-soundaudioandUSB2.0
peripheralsharing(B004-DUA4-HR-K)
• Built-in2-PortUSB2.0huballowsUSBdevicestobesharedamongstcomputersconnectedto
theKVMswitch
• 3.5mmMiniStereoSpeakerandMicrophonejacksallowasinglemicrophonetoprovide
audioinputtoeachoftheconnectedcomputers,andletyoulistentotheaudiooutputofeach
computeronasinglesetofspeakers
• B004-DUA2-HR-Kfeaturesadditionalaudiojacksforusewith7.1channelsurround-sound
• AnadditionalsetofconsoleaudiojacksareconvenientlylocatedonthefrontpaneloftheKVM
switch,makingthemidealforusewithIPphones
• TheKVM,USBandAudiocanbeswitchedindependentlyofeachother
• Featuresmouseportswitchingfunctionality*,whichallowsusersaccessingtheKVMswitchwitha
scrollmousetoswitchbetweenportsbydouble-clickingthemouse’sscrollwheel
• Switchbetweenconnectedcomputersviafrontpanelpushbuttons,keyboardhotkeys,andthe
mouseswitchingfunction*
• AutoScanmodeallowsyoutoscantheconnectedcomputerswithouthavingtomanuallyswitch
betweenthem
• Supportsbothanaloganddigitalvideosignals,allowingfortheconnectionofaVGAcomputer
and/ormonitorwithaDVItoVGAadapter
• Supportsdigitalvideoresolutionsupto2560x1600andanalogvideoresolutionsupto2048x
1536
• Multi-platformsupport–CompatiblewithWindows,Mac,SunandLinux
• Supportshot-plugging–Computersanddevicescanbeunpluggedandre-pluggedwithouthaving
toshutdowntheKVMswitch
• TheKVMswitchstoresthemonitor’sEDID(ExtendedDisplayIdenticationData)tooptimize
displayresolution
• LEDsprovideforeasymonitoringofconnectedcomputers
• Power-On-Detectionrecognizeswhenaconnectedcomputerhasbeenpowered-offand
automaticallyswitchestothenextpowered-oncomputer
• HDCPcompliant
• Consolemouseportemulation/bypassfeaturesupportsmostmousedriversandmultifunction
mice
• Consolekeyboardportemulation/bypassfeaturesupportsmostgaming/multimediakeyboards
• Completekeyboardemulationforerror-freebooting
• Multilingualkeyboardmapping–supportsEnglish,Japanese,andFrenchkeyboards
• Quickinstallationwithouttheneedforsoftware
• Sun/Mackeyboardsupportandemulation**
• Firmwareupgradeable
*The mouse switching function is disabled by default, and needs to be turned on via keyboard hotkey command. It
is only available when using a mouse with a scroll wheel.
**PC keyboard combinations emulate Sun/Mac keyboards. Sun/Mac keyboards only work with their own
computers.
14-03-189-93334F.indd 3 4/18/2014 4:43:57 PM

4
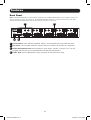
Features
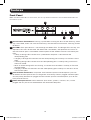
1
Port Selection Pushbuttons: PressingapushbuttonwillbringthefocusoftheKVM only, Audio
only,ortheKVM, Audio and USB simultaneously.SeetheManual Pushbutton Switchingsection
fordetails.
2
Port LEDs:EachportcontainsasetofOrangeandGreenLEDs.TheOrangeLEDisontop,and
representsthestatusoftheKVM.TheGreenLEDisonbottom,andrepresentsthestatusof
theUSB2.0hubports.Listedbelowaredescriptionsofthedifferentstatusesindicatedbythe
LEDs.
• AdimlylitOrangeLEDindicatesthatapowered-oncomputerisconnectedtothe
correspondingport.
• AbrightlylitOrangeLEDindicatesthatthecorrespondingportcurrentlyhasthefocusofthe
KVM.
• AashingOrangeLEDindicatesthatthecorrespondingportiscurrentlybeingaccessedin
AutoScanmode.
• WhenalloftheOrangeLEDsareashing,itindicatesthattheKVMiscurrentlyinFirmware
Upgrademode.
• AbrightlylitGreenLEDindicatesthatthecorrespondingportcurrentlyhasthefocusofthe
USB2.0hubports.
3
Console Audio Connectors:AseparatesetofConsoleSpeakerandMicrophonejacksare
locatedonthefrontpaneloftheunitforgreateraccessibility.Devicespluggedintotheseports
willtakepriorityoverdevicespluggedintotheConsoleSpeakerandMicrophonejacksonthe
backpaneloftheunit.
4
USB 2.0 Peripheral Port:USB2.0devices(ashdrives,printers,scanners,etc.)canbe
pluggedintothisportandsharedbetweentheconnectedcomputers.
1
2 43
Front Panel
Note: The B004-DUA4-HR-K is shown below, but the only difference between it and the B004-DUA2-HR-K are
the number of ports.
14-03-189-93334F.indd 4 4/18/2014 4:43:57 PM

5
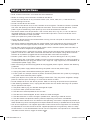
Features
1
Console Ports: Yourmonitor,keyboard,mouse,andaudiodevicesplugintotheseports.
2
CPU Ports:Theincludedcablekitsconnectfromanavailablesetofportstoacomputer.
3
USB 2.0 Peripheral Port:USB2.0devices(ashdrives,printers,scanners,etc.)canbe
pluggedintothisportandsharedbetweentheconnectedcomputers.
4
Power Jack:TheincludedpowersupplyconnectstotheKVMswitchhere.
1 2
4 3
Back Panel
Note: The B004-DUA4-HR-K is shown below. It differs from the B004-DUA2-HR-K in the number of CPU ports,
and the number of audio jacks per port. The B004-DUA2-HR-K supports 7.1 channel surround-sound audio,
whereas the B004-DUA4-HR-K supports 2.1 channel surround-sound audio.
14-03-189-93334F.indd 5 4/18/2014 4:43:58 PM

6
Safety Instructions
• Readalltheseinstructions.Savethemforfuturereference.
• Followallwarningsandinstructionsmarkedonthedevice.
• Donotplacethedeviceonanyunstablesurface(cart,stand,table,etc.).Ifthedevicefalls,
seriousdamagewillresult.
• Donotusethedevicenearwater.
• Donotplacethedevicenear,orover,radiatorsorheatregisters.Thedevicecabinetisprovided
withslotsandopeningstoallowforadequateventilation.Toensurereliableoperation,andto
protectagainstoverheating,theseopeningsmustneverbeblockedorcovered.
• Thedeviceshouldneverbeplacedonasoftsurface(bed,sofa,rug,etc.)asthiswillblockits
ventilationopenings.Likewise,thedeviceshouldnotbeplacedinabuilt-inenclosureunless
adequateventilationhasbeenprovided.
• Neverspillliquidofanykindonthedevice.
• Unplugthedevicefromthewalloutletbeforecleaning.Donotuseliquidoraerosolcleaners.Use
adampclothforcleaning.
• Thedeviceshouldbeoperatedfromthetypeofpowersourceindicatedonthemarkinglabel.If
youarenotsureofthetypeofpoweravailable,consultyourdealerorlocalpowercompany.
• Donotallowanythingtorestonthepowercordorcables.Routethepowercordandcablesso
thattheycannotbesteppedonortrippedover.
• Ifanextensioncordisusedwiththisdevice,makesurethatthetotaloftheampereratingsofall
productsusedonthiscorddoesnotexceedtheextensioncordampererating.Makesurethat
thetotalofallproductspluggedintothewalloutletdoesnotexceed15amperes.
• Positionsystemcablesandpowercablescarefully;besurethatnothingrestsonanycables.
• Tohelpprotectyoursystemfromsuddentransientincreasesanddecreasesinelectricalpower,it
isrecommendedthatyouplugyourdevicesintoaTrippLitesurgesuppressor,lineconditioner,or
uninterruptiblepowersupply(UPS).
• Whenconnectingordisconnectingpowertohot-pluggablepowersupplies,observethefollowing
guidelines:
o Installthepowersupplybeforeconnectingthepowercabletothepowersupply.
o Unplugthepowercablebeforeremovingthepowersupply.
o Ifthesystemhasmultiplesourcesofpower,disconnectpowerfromthesystembyunplugging
allpowercablesfromthepowersupplies.
• Neverpushobjectsofanykindintoorthroughcabinetslots.Theymaytouchdangerousvoltage
pointsorshortoutpartsresultinginariskofreorelectricalshock.
• Donotattempttoservicethedeviceyourself.Referallservicingtoqualiedservicepersonnel.
• Ifthefollowingconditionsoccur,unplugthedevicefromthewalloutletandbringittoqualied
servicepersonnelforrepair:
o Thepowercordorplughasbecomedamagedorfrayed.
o Liquidhasbeenspilledintothedevice.
o Thedevicehasbeenexposedtorainorwater.
o Thedevicehasbeendropped,orthecabinethasbeendamaged.
o Thedeviceexhibitsadistinctchangeinperformance,indicatinganeedforservice.
o Thedevicedoesnotoperatenormallywhentheoperatinginstructionsarefollowed.
• Onlyadjustthosecontrolsthatarecoveredintheoperatinginstructions.Improperadjustmentof
othercontrolsmayresultindamagethatwillrequireextensiveworkbyaqualiedtechniciantorepair.
• Useofthisequipmentinlifesupportapplicationswherefailureofthisequipmentcanreasonably
beexpectedtocausethefailureofthelifesupportequipmentortosignicantlyaffectitssafety
oreffectivenessisnotrecommended.Donotusethisequipmentinthepresenceofaammable
anestheticmixturewithair,oxygenornitrousoxide.
14-03-189-93334F.indd 6 4/18/2014 4:43:58 PM

7
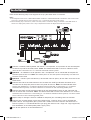
Installation
RefertothefollowingstepsanddiagramtosetupyourKVMswitchinstallation.
Note:
1. The diagram below shows a B004-DUA4-HR-K installation. A B004-DUA2-HR-K installation will contain fewer
CPU ports, and will allow for the connection of a 7.1 channel surround-sound system.
2. Before making any connections, make sure that power to all devices being connected to the KVM switch is
turned off. Unplug the power cords of any computers that have the Keyboard Power On function.
1
Connectamonitor,USBkeyboardandmouse,amicrophone,andspeakerstotheconsoleports
onthebackpaneloftheKVMswitch.Note: The B004-DUA2-HR-K contains additional audio
jacks for the connection of a 7.1 channel surround-sound system.
2
Optional–Anadditionalsetofspeakersandamicrophonecanbeconnectedtotheportson
thefrontpaneloftheunit.Note: The audio ports on the front panel have priority over those on
the back of the KVM.
3
Optional –ConnectyourUSBdevice(s)totheUSB2.0hubport(s)onthefrontandbackofthe
KVMswitch.
4
ConnecttheendoftheKVMCableKitthatincludestheUSBTypeBMaleconnectortoan
availablesetofcomputerportsonthebackpaneloftheunit.Note: The B004-DUA2-HR-K
comes with additional 7.1 channel surround-sound cable kits. If connecting a 7.1 channel
surround-sound system, use these cable kits to connect to the remaining audio jacks.
5
ConnecttheotherendoftheKVMCableKittothecorrespondingportsonthecomputeryou
wishtoaddtotheinstallation.Note: The B004-DUA2-HR-K comes with additional 7.1 channel
surround-sound cable kits. If connecting a 7.1 channel surround-sound system, use these cable
kits to connect to the remaining audio jacks.
6
Repeatsteps4through5foreachadditionalcomputeryouareaddingtotheinstallation.
7
ConnecttheincludedpowersupplytotheKVMswitch,andthenplugitintoanappropriate
powersource.Tohelpprotectyoursystemfromsuddentransientincreasesanddecreasesin
electricalpower,itisrecommendedthatyouplugyourdevicesintoaTrippLitesurgesuppressor,
lineconditioner,oruninterruptiblepowersupply(UPS).
8
Turnonthepowertoallconnecteddevices.
1
3
7
2
3
4 5 6
14-03-189-93334F.indd 7 4/18/2014 4:43:59 PM

8
Basic Operation
Powering Off and Restarting
IntheeventthatyouneedtopowerofftheKVMswitch,youmustfollowthestepsbelow:
1. ShutdownallcomputersconnectedtotheKVMswitch
2. UnplugthepowersupplyfromtheKVMswitch
3. Wait10secondsandthenplugthepowersupplybackintotheKVMswitch
4. Poweronalloftheconnectedcomputers
Port Switching
TherearethreewaysofaccessingcomputersanddevicesconnectedtotheKVMswitch:
• ManualPushbuttons
• MousePortSwitchingFunctionality
• HotkeyCommands
Manual Pushbuttons
Pressingapushbuttonwillbringthefocusofoneofthefollowingtothecorrespondingport;KVM
only, Audio only,orKVM, Audio and USB focus simultaneously.Therearetwosetsofpushbutton
commands,DefaultandAlternative,whichcanbetoggledbetweenviahotkeycommand(Seethe
Alternative Pushbutton Commandsectionofthemanualfordetails).
Default Pushbutton Commands
• PressandholdapushbuttonformorethantwosecondstobringonlythefocusoftheKVMtothe
correspondingport.ThefocusoftheAudioandUSBwillremainontheporttheywereconnectedto.
• PressandreleaseapushbuttontobringthefocusoftheKVM, AudioandUSB to the
correspondingportallatthesametime.
• PressandreleaseapushbuttontwiceinarowtobringonlythefocusoftheAudio to the
correspondingport.ThefocusoftheKVMandUSBwillremainontheporttheywereconnectedto.
• Pressandholdbothpushbuttons1and2formorethantwosecondstoinitiateanAuto Scan
(SeetheAuto Scansectioninthismanualfordetails).WheninAuto Scanmode,pressand
releaseapushbuttontostopscanning;theKVMfocuswillgototheportcorrespondingtothe
pushbuttonyoupressed.
Alternative Pushbutton Commands
• PressandholdapushbuttonformorethantwosecondstobringthefocusoftheKVM,Audioand
USBtothecorrespondingportallatthesametime.
• PressandreleaseapushbuttontobringonlythefocusoftheKVMtothecorrespondingport.The
focusoftheAudioandUSBwillremainontheporttheywereconnectedto.
• PressandreleaseapushbuttontwiceinarowtobringonlythefocusoftheAudio to the
correspondingport.ThefocusoftheKVMandUSBwillremainontheporttheywereconnectedto.
• Pressandholdbothpushbuttons1and2formorethantwosecondstoinitiateanAuto Scan
(SeetheAuto Scansectioninthismanualfordetails).WheninAuto Scanmode,pressand
releaseapushbuttontostopscanning;theKVMfocuswillgototheportcorrespondingtothe
pushbuttonyoupressed.
Mouse Port Switching Functionality
Note:
1. This function is disabled by default, so you have to enable it via hotkey command (See the Mouse Port
Switching Hotkey Command section of the manual for details).
2. Mouse Emulation, which is enabled by default, must be turned on for Mouse Port Switching to work (See the
Mouse Emulation Hotkey Command section of the manual for details).
3. Mouse Port Switching is supported by 3-button scroll wheel mice only.
14-03-189-93334F.indd 8 4/18/2014 4:43:59 PM

9
Basic Operation
Whenenabled,theMouse Port Switching Functionalityallowsuserswithscroll-wheelmiceto
simultaneouslyswitchthefocusoftheKVM, AudioandUSB betweenportsbydouble-clickingthe
scrollwheelontheirmouse.Whenused,portswillbeaccessedinsequentialorder(e.g.port1will
switchtoport2;port2toport3,andsoon).
Hotkey Commands
KeyboardhotkeycommandsallowyoutoswitchtheKVMfunctionalitybetweenportsusingonly
thekeyboard.YoucanswitchtheKVM, AudioandUSBallatthesametime,oreachonecanbe
switchedindividually.YoucanthereforehavetheKVM focusononecomputer,whiletheUSB Hub
portsarebeingaccessedbyasecondcomputer,andAudiofromathirdcomputerisplaying.
Inaddition,therearekeyboardhotkeycommandsthatcanbeusedtochangesettingsonthe
KVMswitch,suchasenabling/disablingtheAlternative Pushbutton Commands,initiatingFirmware
Upgrade Mode,etc.
ThefollowingsectionsdescribethehotkeyfunctionalityavailablefortheB004-DUA2-HR-Kand
B004-DUA4-HR-K.
Port Switching Hotkeys
Toswitchfunctionalitybetweenports,akeyboardhotkeycommandisenteredthatdetermineswhat
portisaccessedandwhichfunctionalityisassignedtoit.Thiscommandstartsbypressing[Scroll
Lock][ScrollLock]or[Ctrl][Ctrl].[ScrollLock][ScrollLock]isusedbydefault.Totogglebetween
thesetwo,seetheAlternate Port Switching Hotkey Commandsectionofthismanual.
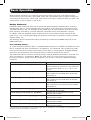
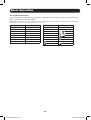
ThetablebelowcontainsthePort Switching Hotkeysusedtodeterminewhatportisaccessedand
whichfunctionalityisassignedtoit.Note: The table below uses the [Scroll Lock] [Scroll Lock]
preceding sequence. Simply substitute [Ctrl][Ctrl] if you decide to change theHotkeyPreceding
Sequence.
Hotkey Command Action
[Scroll Lock] [Scroll Lock] [Enter]
SwitchesfocusoftheKVM, AudioandUSB
fromtheportthatcurrentlyhastheKVMfocus
totheportthatfollowsit.(e.g.1to2,2to
3,etc.)
[Scroll Lock] [Scroll Lock] [K] [Enter]
SwitchesfocusoftheKVM onlyfromtheport
thatcurrentlyhastheKVMfocustotheport
thatfollowsit.
[Scroll Lock] [Scroll Lock] [U] [Enter]
SwitchesfocusoftheUSB onlyfromtheport
thatcurrentlyhastheUSBfocustotheport
thatfollowsit.
[Scroll Lock] [Scroll Lock] [S] [Enter]
SwitchesfocusoftheAudio onlyfromtheport
thatcurrentlyhastheAudiofocustotheport
thatfollowsit.
[Scroll Lock] [Scroll Lock] [n]* [Enter]
SwitchesfocusoftheKVM, AudioandUSB to
theselectedportnumber.
[Scroll Lock] [Scroll Lock] [n]* [K] [Enter]
SwitchesfocusoftheKVM only to the
selectedportnumber.
[Scroll Lock] [Scroll Lock] [n]* [U] [Enter]
SwitchesfocusoftheUSB only to the
selectedportnumber.
[Scroll Lock] [Scroll Lock] [n]* [S] [Enter]
SwitchesfocusoftheAudio only to the
selectedportnumber.
[Scroll Lock] [Scroll Lock] [n]* [K] [U] [Enter]
SwitchesfocusoftheKVM and USB to the
selectedportnumber.
* [n] stands for the port number of the computer that you are switching to, or the number of seconds (from 1 to
99) that an Auto Scan remains on each port.
14-03-189-93334F.indd 9 4/18/2014 4:43:59 PM

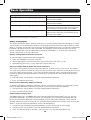
10
Hotkey Command Action
[Scroll Lock] [Scroll Lock] [n]* [K] [S] [Enter]
SwitchesfocusoftheKVM and Audio to the
selectedportnumber.
[Scroll Lock] [Scroll Lock] [n]* [U] [S] [Enter]
SwitchesfocusoftheUSB and Audio to the
selectedportnumber.
[Scroll Lock] [Scroll Lock] [A] [Enter]
InitiatesAuto Scanmodeatthedefault
intervalof5secondsperport.Pressthe[Esc]
or[Spacebar]keytoexitAuto Scanmode.
[Scroll Lock] [Scroll Lock] [A] [n]* [Enter]
InitiatesAuto Scanmodeattheselectedtime
interval.Pressthe[Esc]or[Spacebar]keyto
exitAuto Scanmode.
* [n] stands for the port number of the computer that you are switching to, or the number of seconds (from 1 to
99) that an Auto Scan remains on each port.
Hotkey Setting Mode
AllcongurationoftheKVM’ssettingstakesplaceinHotkey Settingmode.AllcommandsinHotkey
SettingmodestartbyenteringtheHotkey Setting Mode Activation Command.WhenHotkey Setting
Mode isactivated,the[ScrollLock]and[CapsLock]keyboardLEDsashinsuccessionandordinary
keyboardandmousefunctionsaresuspended.Thefollowingsectiondescribeshowtoactivate
Hotkey Settingmode,andthecommandsthatcanbeperformedinit.Atableattheendofthis
sectionsummarizesallofthecommands.
Hotkey Setting Mode Activation Command
ToactivateHotkeySettingmode,dothefollowing:
1. Pressandholddownthe[NumLock]key
2. Whileholdingdownthe[NumLock]key,pressandreleasetheminus[-]key
3. Afterreleasingtheminus[-]key,releasethe[NumLock]key
Alternate Hotkey Setting Mode Activation Command
The Hotkey Setting Mode Activation Commanddefaultsat[NumLock][-],butcanbeswitchedto
use[Ctrl][F12].Whenswitchedto[Ctrl][F12],the[Ctrl]keytakestheplaceofthe[NumLock]key,
and[F12]takestheplaceofthe[-]key.ToactivatetheAlternate Hotkey Setting Mode Activation
Command,performthefollowingsteps(Torevertbacktothepreviouscommand,performthese
stepsagain):
1. ActivateHotkey Setting Modeusingtheaforementionedcommand
2. Pressandreleasethe[H]key
Alternate Port Switching Hotkey Command
Bydefault,thehotkeyproceedingsequenceusedinPort Switching Hotkeysis[ScrollLock][Scroll
Lock].Totogglebetween[ScrollLock][ScrollLock]and[Ctrl][Ctrl],dothefollowing:
1. ActivateHotkey Setting Modeusingtheaforementionedcommand
2. Pressandreleasethe[T]key
Keyboard Operating System
TheB004-DUA2-HR-KandB004-DUA4-HR-KdefaultkeyboardcongurationisforusewithPC
compatiblekeyboards.IfyouhaveaMacorSuncomputer,youcanenabletheKVMtoemulate
MacorSunkeyboardcommands.Whenenabled,yourPCcompatiblekeyboardcanbeusedto
performcommandsspecictoMacorSun(SeetheKeyboard Emulationsectioninthismanualfor
details).TosettheKeyboard Operating System,dothefollowing:
1. NavigatetotheportwhoseKeyboard Operating Systemsettingyouwishtochange
2. ActivateHotkey Setting Modeusingtheaforementionedcommand
3. Pressandreleasethe[F2](forMac),[F3](forSun),or[F10](forAuto-Detect)key
Basic Operation
14-03-189-93334F.indd 10 4/18/2014 4:43:59 PM

11
Basic Operation
WhenenabledforAuto-Detect,apass-throughkeyboardmodeisenabledinwhichkeystrokesare
sentdirectlytothecomputerwithoutrstgoingthroughtheMacorSunemulator.
List KVM Settings
ThisfunctionallowsyoutodisplayalistofthecurrentKVMsettings;Hotkeys, Keyboard OS,
Keyboard Emulation, Mouse Emulation, Mouse Port Switching, Power on detectionandKeyboard
Language.Toperformthisfunction,dothefollowing:
1. OpenupaWord,Wordpad,NotepadorExcelle
2. ActivateHotkey Setting Modeusingtheaforementionedcommand
3. Pressandreleasethe[F4]key
USB Keyboard/Mouse Reset
Intheeventthatthekeyboardandmousearenotoperatingcorrectly,aresetmaybeneeded.To
performaUSBkeyboard/mousereset,dothefollowing:
1. ActivateHotkey Setting Modeusingtheaforementionedcommand
2. Pressandreleasethe[F5]key
Keyboard Language
Bydefault,thekeyboardlanguageissettoEnglish,butitcanbechangedtoeitherFrenchor
Japanese.Tochangethekeyboardlanguage,dothefollowing:
1. ActivateHotkey Setting Modeusingtheaforementionedcommand
2. Pressthe[F6],[nn]*and[Enter]keysinsuccession.
*nn represents a two-digit keyboard language code. 33 is for US English, 08 for French, and 15 for Japanese.
Hotkey Beeper Control
Whenperformingakeyboardhotkeycommand,abeepersoundstoindicatethatthecommandis
takingplace.Thisbeepersoundcanbetoggledon/offbyperformingthefollowingcommand:
1. ActivateHotkey Setting Modeusingtheaforementionedcommand
2. Pressandreleasethe[B]key
Disable Port Switching Hotkeys
Bydefault,PortSwitchingHotkeysareavailablethatallowyoutoswitchbetweenports.Todisable
thePortSwitchingHotkeysandrequirethefrontpanelpushbuttonstobeusedforswitching
functions,dothefollowing:
1. ActivateHotkey Setting Modeusingtheaforementionedcommand
2. Pressandreleasethe[x]keyandthenpressandreleasethe[Enter]key
Firmware Upgrade Mode
TheB004-DUA2-HR-KandB004-DUA4-HR-Krmwarecanbeupgradedasupdatesbecome
availableonTrippLite’swebsite(SeetheFirmware Upgradesectioninthismanualfordetails).In
ordertoperformarmwareupgrade,Firmware Upgrade Modemustrstbeinitiated.Toinitiate
Firmware Upgrade Mode,dothefollowing:
1. ActivateHotkey Setting Modeusingtheaforementionedcommand
2. Keyinthetextupgrade
3. Pressandreleasethe[Enter]key
TheLEDsonthefrontoftheKVMashtoindicatethatFirmware Upgrade Modehasbeeninitiated.
Restore Default Settings
TorestoretheKVMtoitsfactorydefaultsettings,dothefollowing:
1. ActivateHotkey Setting Modeusingtheaforementionedcommand
2. Pressandreleasethe[R]key,andthenpressandreleasethe[Enter]key
14-03-189-93334F.indd 11 4/18/2014 4:43:59 PM

12
Video Sync
Video SyncallowstheKVMtostorethemonitor’sEDID(ExtendedDisplayIdenticationData),which
helpstoensurethattheoptimalvideosettingsarebeingused.ToinitiateaVideo Sync,dothe
following:
1. ActivateHotkey Setting Modeusingtheaforementionedcommand
2. Pressandreleasethe[D]key
Alternative Pushbutton Command
PressingoneofthepushbuttonsonthefrontoftheKVMwillbringthefocusofoneofthefollowing
tothecorrespondingport;KVM only, Audio only,orKVM, Audio and USB focus simultaneously.
Therearetwosetsofpushbuttoncommands,DefaultandAlternative(SeetheManual Pushbuttons
sectionofthemanualfordetails).Totogglebetweenthesetwo,dothefollowing:
1. ActivateHotkey Setting Modeusingtheaforementionedcommand
2. Pressandreleasethe[S]key
Mouse Emulation
Bydefault,Mouse Emulationisenabled.Totogglemouseemulationon/off,dothefollowing:
1. ActivateHotkey Setting Modeusingtheaforementionedcommand
2. Pressandreleasethe[M]key
Mouse Port Switching
Whenenabled,theMouse Port Switching Functionalityallowsuserswithscroll-wheelmiceto
simultaneouslyswitchthefocusoftheKVM, AudioandUSBbetweenportsbydouble-clickingthe
scrollwheelontheirmouse(SeetheMouse Port Switching Functionalitysectionofthemanualfor
details).Bydefault,Mouse Port Switching Functionalityisdisabled.Totogglethisfeatureon/off,do
thefollowing:
1. ActivateHotkey Setting Modeusingtheaforementionedcommand
2. Pressandreleasethe[W]key
Keyboard Emulation
Bydefault,Keyboard Emulationisenabled.Totogglekeyboardemulationon/off,dothefollowing:
1. ActivateHotkey Setting Modeusingtheaforementionedcommand
2. Pressandreleasethe[N]key
SPC Mode
Thekeyboard/mousecanbesettoworkunderspecialoperatingsystemsasastandard(104key)
keyboard/mouse.ToturnSPC Modeon/off,dothefollowing:
1. ActivateHotkey Setting Modeusingtheaforementionedcommand
2. Pressandreleasethe[F1]key
Power on Detection
Bydefault,theKVMissettorecognizewhenaconnectedcomputerispoweredoff,atwhichtime
itautomaticallyswitchestothenextpoweredonport.ToturnPower on Detectionon/off,dothe
following:
1. ActivateHotkey Setting Modeusingtheaforementionedcommand
2. Pressandreleasethe[E]key
Basic Operation
14-03-189-93334F.indd 12 4/18/2014 4:43:59 PM

13
Basic Operation
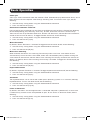
Hotkey Setting Mode Command Summary Table
Action Hotkey Command
ActivateHotkey Setting Mode Pressandholdthe[NumLock]key,pressand
releasetheminus[-]key,releasethe[Num
Lock]key.
ChangeHotkey Setting Modeactivation
commandto[Ctrl][F12]
ActivateHotkey Setting Mode,[H]
ChangethePort Switching Hotkey Command
to[Ctrl][Ctrl]
ActivateHotkey Setting Mode,[T]
ChangetheKeyboard Operating System ActivateHotkey Setting Mode,[F2](forMac),
[F3](forSun),or[F10](forAuto-Detect)
ListKVMSettings OpenaWord,Wordpad,NotepadorExcelle,
ActivateHotkey Setting Mode,[F4]
USBKeyboard/MouseReset ActivateHotkey Setting Mode,[F5]
Changethekeyboardlanguage ActivateHotkey Setting Mode,[F6],[33]forUS
English,[08]forFrench,[15]forJapanese.
HotkeyBeeperControl ActivateHotkey Setting Mode,[B]
DisablePortSwitchingHotkeys ActivateHotkey Setting Mode,[X],[Enter]
FirmwareUpgradeMode ActivateHotkey Setting Mode, upgrade,[Enter]
RestoreDefaultSettings ActivateHotkey Setting Mode,[R],[Enter]
VideoSync ActivateHotkey Setting Mode,[D]
PoweronDetection ActivateHotkey Setting Mode,[E]
ChangetheManualPushbuttonCommand
functionality
ActivateHotkey Setting Mode,[S]
KeyboardEmulation ActivateHotkey Setting Mode,[N]
MouseEmulation ActivateHotkey Setting Mode,[M]
MousePortSwitching ActivateHotkey Setting Mode,[W]
SPCMode ActivateHotkey Setting Mode,[F1]
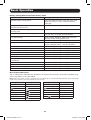
Mac Keyboard Emulation
ThePCcompatible(101/104key)keyboardcanemulatethefunctionsoftheMackeyboardusing
thePCkeystrokesinthetablebelow.
Note: When more than one key is required on the PC Keyboard to emulate the Mac keyboard, press and release
the first key, and then press and release the second key.
PC Keyboard Mac Keyboard
[Shift] [Shift]
[Ctrl] [Ctrl]
[Ctrl],[1]
[Ctrl],[2]
[Ctrl],[3]
[Ctrl],[4]
[Alt] [Alt]
PC Keyboard Mac Keyboard
[PrintScreen] [F13]
[ScrollLock] [F14]
[=]
[Enter] [Return]
[Backspace] [Delete]
[Insert] [Help]
[Ctrl],
[F15]
14-03-189-93334F.indd 13 4/18/2014 4:43:59 PM

14
Sun Keyboard Emulation
ThePCcompatible(101/104key)keyboardcanemulatethefunctionsoftheSunkeyboardusing
thePCkeystrokesinthetablebelow.
Note: When more than one key is required on the PC Keyboard to emulate the Sun keyboard, press and release
the first key, and then press and release the second key.
Basic Operation
PC Keyboard Sun Keyboard
[Ctrl],[T] [Stop]
[Ctrl],[F2] [Again]
[Ctrl],[F3]
[Props]
[Ctrl],[F4] [Undo]
[Ctrl],[F5] [Front]
[Ctrl],[F6] [Copy]
[Ctrl],[F7] [Open]
[Ctrl],[F8] [Paste]
PC Keyboard Sun Keyboard
[Ctrl],[F9] [Find]
[Ctrl],[F10] [Cut]
[Ctrl],[1]
[Ctrl],[2]
[Ctrl],[3]
[Ctrl],[4]
[Ctrl],[H] [Help]
[Compose]
14-03-189-93334F.indd 14 4/18/2014 4:44:00 PM

15
Firmware Upgrade Utility
Asrmwareupgradesbecomeavailable,theycanbefoundatwww.tripplite.com/support.The
Firmware Upgrade Utilitycomeswiththermwareupgradele.ToupgradethermwareofyourKVM
switch,followthestepsbelow:
1. FromacomputerthatisnotconnectedtoyourKVMswitch,gotowww.tripplite.com/supportto
obtainthermwareupgradeforyourKVMswitch,andsaveittoyourcomputer.
2. ShutdownallofthecomputersconnectedtotheKVMswitch.
3. ConnecttheUSBTypeAconnectorononeoftheKVMcablekitstoaUSBportonthecomputer
youdownloadedthermwareupgradeto.ConnecttheTypeBconnectorontheKVMcablekit
totheUSBportonCPUport1oftheKVMswitch.
4. UsingthekeyboardconnectedtotheKVMswitch,invokeFirmware Upgrade Modeviathe
Firmware Upgradehotkeycommand(SeeFirmware Upgrade ModeintheHotkey Setting Mode
sectionofthemanualfordetails).
5. Onthecomputerthermwareupgradeleissavedto,runtheFirmware Upgrade Utilityleby
double-clickingonitorbyopeningupacommandlineandtypinginthepathtoit.
6. Afterreadingthelicenseagreement,clickontheI AgreeoptionandclickNext. The Firmware
Upgrade UtilitymainscreenappearsanddisplaystheKVMswitchintheDevice Listontheleft
sideofthescreen.
7. HighlighttheKVMswitchintheDevice Listbyclickingonitwiththemouse.Ifyouwantthe
Firmware Upgrade UtilitytochecktheKVM’srmwareversiontoseeifitisolder/newerthanthe
rmwareupgradele,checktheCheck Firmware Versionboxinthelower-leftofthescreen.If
youwanttheFirmware Upgrade Utilitytouploadthermwareupgradelewithoutcheckingthe
KVMsrmwareversion,leavethisboxunchecked.ClickNext.
8. IftheCheck Firmware Versionboxischecked,andthe Firmware Upgrade UtilityndstheKVM’s
rmwareisnewerthanthatofthermwareupgradele,youwillbepromptedtocontinueor
cancel.Oncethermwareupgradestarts,statusmessagesappearintheStatus Messagepanel
andprogresstowardscompletionisshownintheProgress Bar.Whentheupgradeiscomplete,
the Status Messagepanelwillinformyouthatthermwareupgradewasok.Atthispoint,click
Finishtocompletethermwareupgrade.
Firmware Upgrade Failure
Ifyouarenotnotiedofasuccessfulrmwareupgrade,itmeansthatthermwareupgradefailedto
installproperly.Inthiscase,dothefollowing:
1. PowerofftheKVMswitchbydisconnectingtheexternalpowersupply.
2. Pressandholdtheport1pushbuttonwhileconnectingtheexternalpowersupplytorestore
powertotheKVMswitch.ThefrontpanelLEDswillbegintoashtoindicatethattheKVMisin
rmwareupgrademode.
3. Performthermwareupgradeagain.
14-03-189-93334F.indd 15 4/18/2014 4:44:00 PM

16
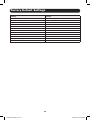
Factory Default Settings
Setting Default
PortSwitchingHotkeyCommand [ScrollLock],[ScrollLock]
HotkeySettingModeActivationCommand [NumLock],[-]
KeyboardOperatingSystem Auto-Detect
HotkeyBeeper On
PortSwitchingHotkeys Enabled
KeyboardEmulation Enabled
MouseEmulation Enabled
MouseSwitchingFunction Disabled
PoweronDetection Enabled
SPCMode Disabled
KeyboardLanguage English
AutoScanInterval 5Seconds
14-03-189-93334F.indd 16 4/18/2014 4:44:00 PM

17
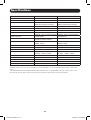
Specifications
Feature B004-DUA2-HR-K B004-DUA4-HR-K
#ofComputerPorts 2 4
FormFactor Desktop Desktop
PortSelection Hotkeys,Pushbuttons,
MouseSwitchingFunction*
Hotkeys,Pushbuttons,
MouseSwitchingFunction*
ConsoleKeyboard/MousePorts (x2)USBAFemale (x2)USBAFemale
ConsoleVideoPort DVI-IFemale DVI-IFemale
ConsoleSpeaker/MicPorts (x8)3.5mmFemale** (x4)3.5mmFemale**
ComputerPorts (x2)DVI-IFemale,(x2)USBB
Female,(x12)3.5mmFemale
(x4)DVI-IFemale,(x4)USBB
Female,(x8)3.5mmFemale
KVMCableKits P759-Series P759-Series
IncludedKVMCableKits (x2)P759-006,(x2)7.1
SurroundSoundCables
(x4)P759-006
PowerJack DCPowerJackforExternal
PowerSupply
DCPowerJackforExternal
PowerSupply
PowerConsumption 5.3V,9W 5.3V,10W
USB2.0HubPorts (x2)USBAFemale (x2)USBAFemale
Keyboard/MouseEmulation USB USB
MaxVideoResolution Digital–2560x1600,
Analog–2048x1536
Digital–2560x1600,
Analog–2048x1536
OperatingTemperature 32to122F(0to50C) 32to122F(0to50C)
StorageTemperature -4to140F(-20to60C) -4to140F(-20to60C)
Humidity 0to80%RH,Non-Condensing 0to80%RH,Non-Condensing
UnitDimensions(HxWxD,In) 2.2x10.6x3.5 2.2x10.6x3.5
UnitWeight(lbs) 2 2.1
*The mouse switching function is disabled by default, and needs to be turned on via hotkey command. For mouse
switching function to work, mouse emulation must be enabled. It is only compatible with 3-button scroll wheel
mice.
**The B004-DUA2-HR-K and B004-DUA4-HR-K include 2 sets of Speaker/Mic ports; (2) 3.5mm jacks on the
front and (2) 3.5mm jacks on the back. The front panel ports take priority over the back panel.
14-03-189-93334F.indd 17 4/18/2014 4:44:00 PM

18
Warranty & Warranty Registration
1-YEAR LIMITED WARRANTY
TRIPPLITEwarrantsitsproductstobefreefromdefectsinmaterialsandworkmanshipforaperiodofone(1)yearfromthedateof
initialpurchase.TRIPPLITE’sobligationunderthiswarrantyislimitedtorepairingorreplacing(atitssoleoption)anysuchdefective
products.Toobtainserviceunderthiswarranty,youmustobtainaReturnedMaterialAuthorization(RMA)numberfromTRIPPLITE
oranauthorizedTRIPPLITEservicecenter.ProductsmustbereturnedtoTRIPPLITEoranauthorizedTRIPPLITEservicecenterwith
transportationchargesprepaidandmustbeaccompaniedbyabriefdescriptionoftheproblemencounteredandproofofdateand
placeofpurchase.Thiswarrantydoesnotapplytoequipment,whichhasbeendamagedbyaccident,negligenceormisapplicationor
hasbeenalteredormodiedinanyway.
EXCEPTASPROVIDEDHEREIN,TRIPPLITEMAKESNOWARRANTIES,EXPRESSORIMPLIED,INCLUDINGWARRANTIESOF
MERCHANTABILITYANDFITNESSFORAPARTICULARPURPOSE.
Somestatesdonotpermitlimitationorexclusionofimpliedwarranties;therefore,theaforesaidlimitation(s)orexclusion(s)maynot
applytothepurchaser.
EXCEPTASPROVIDEDABOVE,INNOEVENTWILLTRIPPLITEBELIABLEFORDIRECT,INDIRECT,SPECIAL,INCIDENTALOR
CONSEQUENTIALDAMAGESARISINGOUTOFTHEUSEOFTHISPRODUCT,EVENIFADVISEDOFTHEPOSSIBILITYOFSUCH
DAMAGE.Specically,TRIPPLITEisnotliableforanycosts,suchaslostprotsorrevenue,lossofequipment,lossofuseof
equipment,lossofsoftware,lossofdata,costsofsubstitutes,claimsbythirdparties,orotherwise.
WARRANTY REGISTRATION
Visitwww.tripplite.com/warrantytodaytoregisterthewarrantyforyournewTrippLiteproduct.You’llbeautomaticallyenteredintoa
drawingforachancetowinaFREETrippLiteproduct!*
*Nopurchasenecessary.Voidwhereprohibited.Somerestrictionsapply.Seewebsitefordetails.
FCC Notice, Class B
Thisdevicecomplieswithpart15oftheFCCRules.Operationissubjecttothefollowingtwoconditions:(1)Thisdevicemaynot
causeharmfulinterference,and(2)thisdevicemustacceptanyinterferencereceived,includinginterferencethatmaycause
undesiredoperation.
Note:ThisequipmenthasbeentestedandfoundtocomplywiththelimitsforaClassBdigitaldevice,pursuanttopart15ofthe
FCCRules.Theselimitsaredesignedtoprovidereasonableprotectionagainstharmfulinterferenceinaresidentialinstallation.This
equipmentgenerates,usesandcanradiateradiofrequencyenergyand,ifnotinstalledandusedinaccordancewiththeinstructions,
maycauseharmfulinterferencetoradiocommunications.However,thereisnoguaranteethatinterferencewillnotoccurina
particularinstallation.Ifthisequipmentdoescauseharmfulinterferencetoradioortelevisionreception,whichcanbedeterminedby
turningtheequipmentoffandon,theuserisencouragedtotrytocorrecttheinterferencebyoneormoreofthefollowingmeasures:
•Reorientorrelocatethereceivingantenna.
•Increasetheseparationbetweentheequipmentandreceiver.
•Connecttheequipmentintoanoutletonacircuitdifferentfromthattowhichthereceiverisconnected.
•Consultthedealeroranexperiencedradio/TVtechnicianforhelp.
AnychangesormodicationstothisequipmentnotexpresslyapprovedbyTrippLitecouldvoidtheuser’sauthoritytooperatethis
equipment.
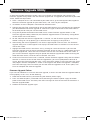
WEEE Compliance Information for Tripp Lite Customers and Recyclers (European Union)
UndertheWasteElectricalandElectronicEquipment(WEEE)Directiveandimplementingregulations,whencustomers
buynewelectricalandelectronicequipmentfromTrippLitetheyareentitledto:
•Sendoldequipmentforrecyclingonaone-for-one,like-for-likebasis(thisvariesdependingonthecountry)
•Sendthenewequipmentbackforrecyclingwhenthisultimatelybecomeswaste
TrippLitefollowsapolicyofcontinuousimprovement.Productspecicationsaresubjecttochangewithoutnotice.
14-03-189-93334F.indd 18 4/18/2014 4:44:00 PM

19
Notes
14-03-189-93334F.indd 19 4/18/2014 4:44:00 PM

20
1111 W. 35th Street, Chicago, IL 60609 USA • www.tripplite.com/support
14-03-189•93-334F_revA
14-03-189-93334F.indd 20 4/18/2014 4:44:00 PM
-
 1
1
-
 2
2
-
 3
3
-
 4
4
-
 5
5
-
 6
6
-
 7
7
-
 8
8
-
 9
9
-
 10
10
-
 11
11
-
 12
12
-
 13
13
-
 14
14
-
 15
15
-
 16
16
-
 17
17
-
 18
18
-
 19
19
-
 20
20


Tripp Lite B004-DUA4-HR-K Owner's manual
- Category
- KVM switches
- Type
- Owner's manual
- This manual is also suitable for
Ask a question and I''ll find the answer in the document
Finding information in a document is now easier with AI
Related papers
-
Tripp Lite B015-000 Datasheet
-
-
-
-
-
-
Tripp Lite B004-HUA4-K Owner's manual
-
-
-
Other documents
-
 Cables Direct KVM-507 Datasheet
-
Digitus DC-11802 Datasheet
-
Trendnet TK-204UK Reference guide
-
Equip 128542-V1 Datasheet
-
 TESmart HKS0201A1U User manual
-
TESmart HKS0401A1U-Red User manual
-
 Cables Direct KVM-629A Datasheet
-
Cables Direct KVM-525AUD Datasheet
-
Encore ENKVM-USB Datasheet
-
 Cables Direct KVM-668 Datasheet


