Page is loading ...

Pinnacle Studio 11 Plus
Including Studio, Studio Plus and Studio Ultimate
Easy, MORE Powerful,
MORE Creative Video Editing

ii Pinnacle Studio 11 Plus
Special thanks to Travis White, Richard Edgley, Kenn LeGault, Jan Piros,
Jörg Weselmann, Mikel Zwissler and Sulekha Somasekhar.
Documentation: Nick Sullivan
Copyright © 1996-2007 Pinnacle Systems, Inc. and its licensors and/or
affiliates. All rights reserved. You agree not to remove any product
identification or notices of the property restrictions from Pinnacle Systems’
products or manuals. Pinnacle Systems, Pinnacle Studio, Scorefitter and the
Pinnacle Pinwheel logo are registered trademarks and/or trademarks of
Pinnacle Systems, Inc. and its affiliates in the United States and other
countries.
Manufactured under license from Dolby Laboratories. © 1992-2003 Dolby
Laboratories. All rights reserved. Dolby and the double-D symbols are
trademarks of Dolby Laboratories. mpegable DS 2.2 © 2004 Dicas Digital
Image Coding GmbH. Intel, Pentium, Centrino, the Intel Centrino logo and
the Intel Inside logo are trademarks or registered trademarks of Intel
Corporation or its subsidiaries in the United States and other countries.
QDesign MPEG-1 Layer 2 Fast Encoder/Decoder © 1996-2002 by
QDesign Corporation. AVCHD is a trademark of Matsushita Electric
Industrial Co., Ltd. And Sony Corporation. The RealProducer is included
under license from RealNetworks,Inc. Real Producer version 8.0. copyright
1995-2002, RealNetworks Inc. “RealProducer,” “RealVideo,”
“RealServer,” and “Real” logo are trademarks or registered trademarks of
RealNetworks, Inc. All rights reserved.
Windows Media and Windows Vista are either registered trademarks or
trademarks of Microsoft Corporation in the United States and/or other
countries. SoundSoap™ is a registered trademark of Berkley Integrated
Audio Software, Incorporated (BIAS, Inc.). StageTools © 1999-2007
StageTools, LLC. All rights reserved. proDAD © 2007 proDAD GmbH.
All other trademarks are the property of their respective owners.
No part of this manual may be copied or distributed, transmitted,
transcribed, stored in a retrieval system, or translated into any human or
computer language, in any form by any means, electronic, mechanical,
magnetic, manual, or otherwise, without the express written permission of
Pinnacle Systems, Inc.
Pinnacle Systems, Inc.
280 North Bernardo Avenue
Mountain View, CA 94943
Printed in the USA.

Table of contents iii
Table of contents
BEFORE YOU START..................................................XI
Equipment requirements.........................................................................xi
Abbreviations and conventions.............................................................xiv
On-line help..........................................................................................xvi
CHAPTER 1: USING STUDIO.......................................1
Undo, Redo, Help, Support and Premium...............................................2
Setting options.........................................................................................3
Edit mode....................................................................................................4
The Player................................................................................................5
Playback controls.....................................................................................7
Further editing topics.............................................................................11
Expanding Studio ..................................................................................11
CHAPTER 2: CAPTURING VIDEO.............................. 17
The Capture mode interface....................................................................18
The Diskometer.....................................................................................20
The Camcorder Controller.....................................................................22
The capture process..................................................................................22
Capture hardware...................................................................................23
Capture step-by-step..............................................................................24
Scene detection......................................................................................26
Digital capture..........................................................................................28
Audio and video levels – digital............................................................29

iv Pinnacle Studio 11 Plus
Analog capture..........................................................................................30
Capture quality options..........................................................................31
Audio and video levels – analog............................................................31
Importing video from DVD.....................................................................32
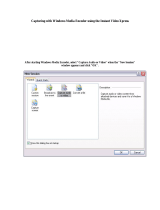
Importing media from external devices..................................................34
CHAPTER 3: THE ALBUM.......................................... 37
The Video Scenes section.........................................................................40
Opening a captured video file................................................................44
Viewing captured video.........................................................................47
Selecting scenes and files......................................................................48
Displaying scene and file information...................................................50
Comment view.......................................................................................50
Combining and subdividing scenes.......................................................52
Redetecting scenes.................................................................................54
The Transitions section............................................................................55
The Titles section......................................................................................57
The Still Images section ...........................................................................58
The Disc Menus section............................................................................59
The Sound Effects section........................................................................61
The Music section.....................................................................................62
CHAPTER 4: THE MOVIE WINDOW........................... 65
Movie Window views................................................................................68
Storyboard view.....................................................................................68
Timeline view........................................................................................69
Text view...............................................................................................73
The toolboxes............................................................................................73
The Video toolbox.................................................................................75
The Audio toolbox.................................................................................77

Table of contents v
CHAPTER 5: VIDEO CLIPS ........................................79
Video clip basics .......................................................................................80
Adding video clips to your movie .........................................................80
Working with multiple capture files......................................................82
The project video format .......................................................................83
Interface features ...................................................................................85
Trimming video clips................................................................................87
Trimming on the Timeline using handles..............................................87
Clip-trimming tips.................................................................................91
Trimming with the Clip properties tool.................................................92
Resetting trimmed clips.........................................................................94
Splitting and combining clips..................................................................95
Advanced Timeline editing......................................................................96
Insert editing..........................................................................................98
Split editing .........................................................................................100
Using video effects..................................................................................104
Working with the effects list................................................................105
Changing effect parameters.................................................................107
Keyframing..........................................................................................109
Using keyframing................................................................................112
Previewing and rendering....................................................................115
Video effects library...............................................................................115
Standard effects......................................................................................117
Auto color correction...........................................................................118
Noise reduction....................................................................................118
Stabilize...............................................................................................119
Speed...................................................................................................120
Plus effects...............................................................................................120
Blur......................................................................................................121
Emboss ................................................................................................121
Old film ...............................................................................................122
Soften...................................................................................................122
Stained glass........................................................................................122
Luma key.............................................................................................123
2D Editor.............................................................................................123
Earthquake...........................................................................................123
Lens flare.............................................................................................124

vi Pinnacle Studio 11 Plus
Magnify...............................................................................................124
Motion blur..........................................................................................124
Water drop...........................................................................................125
Water wave..........................................................................................125
Black and white...................................................................................125
Color correction...................................................................................125
Color map............................................................................................126
Invert ...................................................................................................126
Lighting...............................................................................................127
Posterize ..............................................................................................127
RGB color balance...............................................................................128
Sepia....................................................................................................128
White balance......................................................................................129
The SmartMovie music video tool.........................................................129
CHAPTER 6:
TWO-TRACK EDITING WITH STUDIO PLUS.... 133
Introducing the overlay track...............................................................133
A/B editing ..........................................................................................135
The Picture-in-picture tool...................................................................136
The Chroma key tool...........................................................................141
Selecting colors ...................................................................................148
CHAPTER 7: TRANSITIONS..................................... 151
Transition types and their uses ............................................................152
Previewing transitions in your movie..................................................156
Audio transitions .................................................................................156
The Ripple Transition command.........................................................157
Trimming transitions.............................................................................158
Trimming with the Clip properties tool...............................................159
CHAPTER 8: STILL IMAGES.................................... 161
Editing still images.................................................................................164
Editing image clip properties...............................................................164
The Frame Grabber...............................................................................171
The Frame grabber tool.......................................................................172

Table of contents vii
CHAPTER 9: DISC MENUS.......................................175
Disc authoring in Studio......................................................................177
Using menus from the Album..............................................................178
The DVD Player Control.....................................................................180
Editing menus on the Timeline............................................................182
Editing with the Clip properties tool...................................................184
The Disc menu tool..............................................................................189
CHAPTER 10: THE TITLE EDITOR .......................... 191
Launching the Title Editor...................................................................192
The Title Editor controls .......................................................................193
Title-type buttons.................................................................................193
Object toolbox.....................................................................................194
Editing-mode selection buttons ...........................................................197
Object layout buttons...........................................................................199
Clipboard and delete buttons...............................................................201
Text-styling controls............................................................................201
The Title Editor Album .........................................................................203
The Looks Browser .............................................................................203
The Backgrounds section.....................................................................205
The Pictures section.............................................................................207
The Buttons section.............................................................................208
CHAPTER 11: SOUND EFFECTS AND MUSIC........211
The Timeline audio tracks...................................................................213
The CD audio tool...............................................................................215
The Background music tool.................................................................216
The Voice-over tool.............................................................................218
Trimming audio clips.............................................................................221
Trimming with the Clip properties tool...............................................221
Audio volume and mixing......................................................................223
Anatomy of an audio clip....................................................................224
Adjusting audio on the Timeline .........................................................226
The Volume and balance tool..............................................................228
Audio effects............................................................................................234
Noise reduction....................................................................................235

viii Pinnacle Studio 11 Plus
Plus effects...............................................................................................237
ChannelTool........................................................................................237
Chorus .................................................................................................237
DeEsser................................................................................................238
Equalizer..............................................................................................238
Grungelizer..........................................................................................239
Leveler.................................................................................................239
Reverb .................................................................................................240
Stereo Echo..........................................................................................240
Stereo Spread.......................................................................................240
CHAPTER 12: MAKING YOUR MOVIE..................... 241
Output to disc media..............................................................................243
Output to file...........................................................................................247
Output to tape.........................................................................................253
Configuring the camera or video recorder...........................................253
Output your movie to videotape..........................................................254
Output to the web...................................................................................255
APPENDIX A: SETUP OPTIONS .............................. 259
Capture source settings........................................................................260
Capture format settings........................................................................263
Project preferences ..............................................................................267
Video and audio preferences ...............................................................270
Make Disc settings ..............................................................................275
Make File settings................................................................................279
Make Real Media file settings.............................................................283
Make Windows Media file settings.....................................................286
Make tape settings...............................................................................288
APPENDIX B: TIPS AND TRICKS ............................ 291
Hardware.............................................................................................291
Software...............................................................................................293
Increasing the frame rate .....................................................................294
Studio and computer animation...........................................................295

Table of contents ix
APPENDIX C: TROUBLESHOOTING....................... 297
Technical help on-line............................................................................298
Studio crashes in Edit mode ................................................................301
Capture error occurs on starting capture..............................................306
Studio hangs when rendering...............................................................308
CD or DVD burner is not detected ......................................................312
Studio hangs on launch or does not launch..........................................313
“Cannot initialize the DV capture device” error appears in Capture mode
.............................................................................................................314
Installation problems .............................................................................317
Operation problems ...............................................................................318
APPENDIX D: VIDEOGRAPHY TIPS........................ 325
Creating a shooting plan......................................................................326
Editing.................................................................................................327
Rules of thumb for video editing.........................................................330
Soundtrack production.........................................................................332
Title .....................................................................................................334
APPENDIX E: GLOSSARY........................................335
APPENDIX F: LICENSE AGREEMENT ....................353
APPENDIX G: KEYBOARD SHORTCUTS................ 357
INDEX ........................................................................361


Before you start xi
Before you start
Thank you for purchasing Pinnacle Studio. We hope
you enjoy using the software.
This manual covers all versions of Studio, including
Studio Plus. Differences between versions will be noted
as applicable. Most of the time, the word “Studio” will
be used generically to refer to all versions.
If you have not used Studio before, we recommend that
you keep the manual handy for reference even if you
don’t actually read it all the way through.
In order to ensure that your Studio experience gets off
on the right foot, please review the three topics below
before continuing to Chapter 1: Using Studio.
Equipment requirements
In addition to your Studio software, an efficient Studio
editing system requires certain levels of hardware
performance as noted in this section. Remember too
that while specifications are important, they do not tell

xii Pinnacle Studio 11 Plus
the whole story: the proper functioning of hardware
devices can also depend on manufacturer-supplied
driver software. Checking the maker’s web-site for
driver updates and support information can often be
helpful in solving problems with graphics cards, sounds
cards and other devices.
Note: Some features mentioned here require free or
paid “activation” via the Internet, depending on your
version of Studio.
Computer
• Intel Pentium or AMD Athlon 1.4 GHz or higher
(2.4 GHz or higher recommended). Intel Pentium HT
or AMD Athlon 2.4 GHz or 1.6 GHz Dual core
required for Windows Vista.
• 512 MB of RAM (1 GB recommended). 1 GB
required for HD and/or Vista (2 GB recommended).
1.5 GB required for AVCHD (2 GB required on
Vista).
• Windows XP with SP2, or Vista.
• DirectX 9 or higher compatible graphics card with
64 MB (128 MB recommended); 128 MB required
for use with Vitascene filters; 128 MB required for
Vista (256 MB ATI Radeon 9600+ or NVIDIA
GeForce 6 recommended); 256 MB required for HD
and AVCHD editing (ATI Radeon 9600+ or
NVIDIA GeForce 6 recommended).
• DirectX 9 or higher or compatible sound card.
• 1 GB of disk space to install software and 3+ GB to
install bonus content.
• DVD-ROM drive to install software.

Before you start xiii
The following items are optional:
• CD-R(W) burner for creating VideoCDs (VCDs) or
Super VideoCDs (SVCDs).
• DVD-/+R(W) burner for creating DVD, HD DVD
and AVCHD discs.
• Blu-ray burner for creating Blu-ray discs (BDs).
• Sound card with surround-sound output for preview
of surround-sound mixes.
• A microphone, if you want to record voice-overs
The hard drive
Your hard drive must be capable of sustained reading
and writing at 4 MB/sec. Most drives are capable of
this. The first time you capture, Studio will test your
drive to make sure it is fast enough. Video in the DV
format occupies 3.6 MB of hard drive space per
second, so just four and a half minutes of DV video
will consume a full gigabyte on the drive.
Tip: We recommend using a separate hard drive
dedicated to video capture. This avoids competition
between Studio and other software, including
Windows, for use of the drive during capture.
Video capture hardware
Studio can capture video from a variety of digital and
analog sources. See “Capture hardware” on page 23.
Video output hardware
Studio can output video to:
• Any HDV, DV or Digital8 camcorder or VCR. This
requires an OHCI-compliant IEEE-1394 (FireWire)

xiv Pinnacle Studio 11 Plus
port (as provided by Pinnacle Studio DV). The
camcorder must be set up to record from DV Input.
• Any analog (8mm, Hi8, VHS, SVHS, VHS-C or
SVHS-C) camcorder or VCR. This requires Pinnacle
Studio USB-700, PCI-500, PCI-700, or another
Pinnacle device with analog outputs. Output to
analog camcorders or VCRs is also possible using a
Pinnacle Studio DV or other OHCI-compliant 1394
port if your DV or Digital8 camcorder or VCR can
pass a DV signal through to its analog outputs (see
your camcorder manual and Chapter 12: Making
your movie, for more information).
Abbreviations and conventions
This guide uses the following conventions to help
organize the material.
Terminology
Studio: “Studio” and “Studio Plus” refer to the editing
software.
DV: The term “DV” refers to DV and Digital8
camcorders, VCRs and tapes.
HDV: A “high-definition video” format that allows
video in frame sizes of 1280x720 or 1440x1080 to be
recorded in MPEG-2 format on DV media.
1394: The term “1394” refers to OHCI-compliant
IEEE-1394, FireWire, DV or i.LINK interfaces, ports
and cables.

Before you start xv
Analog: The term “analog” refers to 8mm, Hi8, VHS,
SVHS, VHS-C or SVHS-C camcorders, VCRs and
tapes, and to Composite/RCA and S-Video cables and
connectors.
Buttons, menus, dialog boxes and windows
Names of buttons, menus and related items are written
in italics to distinguish them from the surrounding text,
whereas window and dialog names are written with
initial capital letters. For example:
Click the Edit menu button to open your menu in the
Title Editor.
Choosing menu commands
The right arrowhead symbol (¾) denotes the path for
hierarchical menu items. For example:
Select Toolbox ¾ Generate Background Music.
Keyboard conventions
Key names are spelled with an initial capital and are
underlined. A plus sign denotes a key combination. For
example:
Press Ctrl+A to select all the clips on the Timeline.
Mouse clicks
When a mouse click is required, the default is always a
left-click unless otherwise specified:
Right-click and select Go to Title/Menu Editor.

xvi Pinnacle Studio 11 Plus
On-line help
Two kinds of immediate help are always available
while you are working in Studio:
• Help file: Click the help button in the Studio
main menu bar, or select the Help ¾ Help topics
menu, or press F1
to open Studio’s help file.
• Tool tips: To find out what a button or other Studio
control does, pause your mouse pointer over it. A
“tool tip” appears explaining its function.

Chapter 1: Using Studio 1
CHAPTER 1:
Using Studio
Creating movies with Studio is a three-step process:
1. Capture: Import source video material – your “raw
footage” – to your PC hard drive. Possible sources
include analog videotape (8mm, VHS etc.), digital
videotape (HDV, DV, Digital8), and live video from a
video camera, camcorder or webcam.
Capture mode is covered in Chapter 2: Capturing
video.
Availability: HDV capture is supported in Studio Plus only.
2. Edit: Arrange your video material as desired by
reordering scenes and discarding unwanted footage.
Add visuals, such as transitions, titles and graphics, and
supplementary audio, such as sound effects and
background music. For DVD and VCD authoring,
create interactive menus that give your audience a
customized viewing experience.
Edit mode is the arena for most of your work in Studio.
See “Edit mode” later in this chapter (page 4) for a
fuller introduction.
3. Make movie: When your project is complete,
generate a finished movie in your choice of format and

2 Pinnacle Studio 11 Plus
storage medium: tape, VCD, S-VCD, DVD, AVI,
MPEG, RealVideo or Windows Media.
Make Movie mode is covered in Chapter 12: Making
your movie.
Setting the mode
Select which step of the movie-making process you
want to work on by clicking one of the three mode
buttons at the top left of the Studio window:
When you switch modes, the Studio screen changes to
display the controls needed for the new mode.
Undo, Redo, Help, Support and Premium
The Undo, Redo, Help,
Support and Premium
buttons are always to be found in the top right corner
of the Studio window, no matter which of the three
modes you are currently working in.
• Undo allows you to back out of any changes you
have made to your project during the current session,
one step at a time.
• Redo reinstates the changes one by one if you undo
too far.
• The Help button launches Studio’s built-in help
system.
• The Support button opens Studio’s technical support
site in your web browser.

Chapter 1: Using Studio 3
• The Premium button lets you expand Studio by
purchasing and installing premium content. (See
page 11 for details.)
All other controls on the Studio screen are dedicated
to tasks within the current mode.
Setting options
Most options in Studio are set using two tabbed dialog
boxes.
The first lets you control options related to Capture
mode and Edit mode. It has four tabs:
The other dialog box is concerned with options relating
to Make Movie mode. It has three tabs, one for each of
the three movie output types:
Each panel of both dialog boxes can be opened
individually with a corresponding command on the
Setup menu (e.g. Setup ¾ Capture Source). Once either
dialog box is open, however, all of its panels are
available through the tabs. We generally refer to the
different options panels independently, as in “the
Capture source options panel”.
Detailed explanations of the options in both dialog
boxes are contained in Appendix A: Setup Options.

4 Pinnacle Studio 11 Plus
EDIT MODE
Studio opens in Edit mode each time it is launched,
because that is the mode you use most often. The Edit
mode display includes three main areas.
The Album stores resources you will use in your
movies, including your captured video scenes.
The Movie Window is where you create your edited
movie by arranging video and sound clips, and by
applying transitions and effects.
The Player provides playback and previewing for
whichever item is currently selected in Studio. That
may be an Album resource – such as a video scene, title
or sound effect – or your edited movie, complete with
transitions, titles, effects and several audio tracks. The
Player is covered below.
See Chapter 3: The Album and Chapter 4: The Movie
Window for detailed information on those topics.
/