iON OMNI SCAN Quick start guide

Type
Quick start guide
3
MAINTENANCE & CARE
We recommend cleaning your film before inserting it into the
scanner so dust or dirt does not mar the image. If you do not
have the materials to do this properly, consult a professional
film store.
We recommend using a clean, dry cotton swab to clean the
glass surface inside the FILM HOLDER SLOT periodically.
When OMNI SCAN is left unused for a long period of time,
disconnect the USB cable.
When connecting OMNI SCAN to your computer, try
connecting it to a USB port on your computer's rear panel.
If you have too many other USB devices connected to your
computer (or if OMNI SCAN is connected to a USB hub), there may not be enough power for OMNI SCAN
to operate properly.
OVERVIEW
1. POWER button
2. ENTER button
3. UP/MIRROR button
4. DOWN/FLIP button
5. SCAN/HOME button
6. Film Feeder Wheel
7. Film Holder Slot
8. Display
9. USB Port
10. SD Card Slot
Note: Insert your SD card with the label facing down into the SD CARD SLOT. To eject your SD card from the
SD CARD SLOT, push it in first, then pull it out of the slot.
THIS DEVICE COMPLIES WITH PART 15 OF THE FCC RULES. OPERATION IS SUBJECT TO THE FOLLOWING
TWO CONDITIONS: (1) THIS DEVICE MAY NOT CAUSE HARMFUL INTERFERENCE, AND (2) THIS DEVICE
MUST ACCEPT ANY INTERFERENCE RECEIVED, INCLUDING INTERFERENCE THAT MAY CAUSE
UNDESIRED OPERATION.
BOX CONTENTS:
OMNI SCAN
Single Frame Holder
Strip Film Guide
Film Retrieval Strip
USB Cable
USB Power Adapter
Quickstart Guide
Safety Information & Warranty
Booklet
4
QUICKSTART
1. Connect OMNI SCAN to your computer’s USB port or to a power outlet
with the included power adapter.
2. Turn on the OMNI SCAN with the POWER button.
3. Press ENTER to select Capture Mode.
4. Insert your SD card (not included) with the label facing down into the SD
CARD SLOT. When you save your scanned images, they will be stored
on the SD card. If you do not have an SD card, you can save scanned
images to the device's internal memory (16 MB).
5. Insert your appropriate holder and film.
a. If you are scanning a slide, insert it into the FILM HOLDER SLOT
on the top of the device.
b. If you are scanning a strip of negatives, insert the included strip film
guide into the FILM HOLDER SLOT on the top of the device. Then
insert one end of the negative strip into the FILM HOLDER SLOT
on the right side of the device. Turn the FILM FEEDER WHEEL
counterclockwise while gently "feeding" the negative into the slot.
(If you want to go back to a previous frame or if the negative strip is
getting jammed, turn the FILM FEEDER WHEEL clockwise while
gently pulling the negative from the slot.)
Note: The negative strip itself must be at least three frames long.
Otherwise, it may get stuck in the device. If a negative strip
becomes jammed in the device, you can loosen it by inserting the
included film retrieval strip into the FILM HOLDER SLOT.
c. If you are scanning a single negative frame, insert it into the included single frame holder and
insert it into the FILM HOLDER SLOT on the top of the device.
6. The current image will be shown on the display. Before capturing your image, you can:
a. re-orient it by pressing the UP/MIRROR or DOWN/FLIP buttons
b. toggle through three different color settings (color, negative, and black/white) by pressing the
ENTER button
7. Capture your image by pressing the SCAN/HOME button. A "disk" icon will appear to confirm the image
is being saved.
5
To transfer your images from the SD card to your computer:
1. On the Main Menu, use the UP/MIRROR and DOWN/FLIP buttons to
select USB Connect Mode, then press the ENTER button.
Note: While OMNI SCAN is in USB Connect Mode, you will not be able to
scan other pictures. To enable scanning again, press SCAN/HOME then
enter Capture Mode.
2. OMNI SCAN will appear as a removable drive in My Computer
(Windows) or on your Desktop (Mac). Open it, then click and drag the
files of your pictures onto your computer's hard drive.
3. When you are finished, press OMNI SCAN's power button to turn it off.
To remove the SD card to view your images elsewhere:
1. Turn OMNI SCAN off by pressing the power button.
2. Eject your SD card by pushing it in first, then pulling it out of the slot.
3. To view your pictures, insert the SD card into an SD-compatible device,
such as a digital picture frame, computer, or television.
OPERATION & FEATURES
When viewing any menus with multiple options, you can use the UP / MIRROR and DOWN / FLIP buttons to
move through them and press the ENTER button to select one.
MAIN MENU
1. Capture Mode: Allows you to capture images. OMNI SCAN
will enter Capture Mode automatically if no buttons are
pressed for five seconds.
2. Playback Mode: Allows you to view your images.
3. USB Connect Mode: Allows you to transfer your images to a
connected computer via USB. Once your images are on your
computer, you can view and edit them as you wish.
4. Setup Mode: Allows you to select various settings for the
device, such as image resolution, language, etc.
If there is no SD card in the SD Card Slot, "No Card" will appear on
the screen and scanned images will be stored in the device's internal memory (16 MB).
1
2
3
4
6
Capture Mode
In Capture Mode, simply press the SCAN/HOME
button to scan your image. You can change the
orientation of your image by pressing the
UP/MIRROR or DOWN/FLIP buttons before
scanning it.
Before capturing your image, you can:
a. re-orient it by pressing the
UP/MIRROR or DOWN/FLIP buttons
b. toggle through three different color settings (color, negative, and
black/white) by pressing the ENTER button
c. change the exposure by holding the ENTER button for 2 seconds,
using the UP/MIRROR or DOWN/FLIP buttons to select a new
exposure setting
Capture your image by pressing the SCAN/HOME button. A "disk" icon will
appear to confirm the image is being saved.
Playback Mode
When you enter Playback Mode, your captured images will be displayed in a
slideshow, allowing you to preview and/or edit them. To stop the slideshow,
press the ENTER button.
With the slideshow stopped, you can use the UP / MIRROR and DOWN / FLIP
buttons to move through your saved images one by one. Press the ENTER
button to select one to edit.
In Playback Mode, you will see the following menu options.
1. Rotate Left: Rotates the image counterclockwise by 90°.
2. Rotate Right: Rotates the image clockwise by 90°.
3. Delete: Deletes the image from the SD card or from the device's
internal memory.
Use the UP / MIRROR and DOWN / FLIP buttons to select one of the menu
options. Press ENTER to confirm your choice or press SCAN/HOME to return to
the slideshow.
7
USB Connect Mode
USB Connect Mode allows you to transfer images from your SD card directly to
your computer. While in USB Connect Mode, OMNI SCAN becomes an SD card
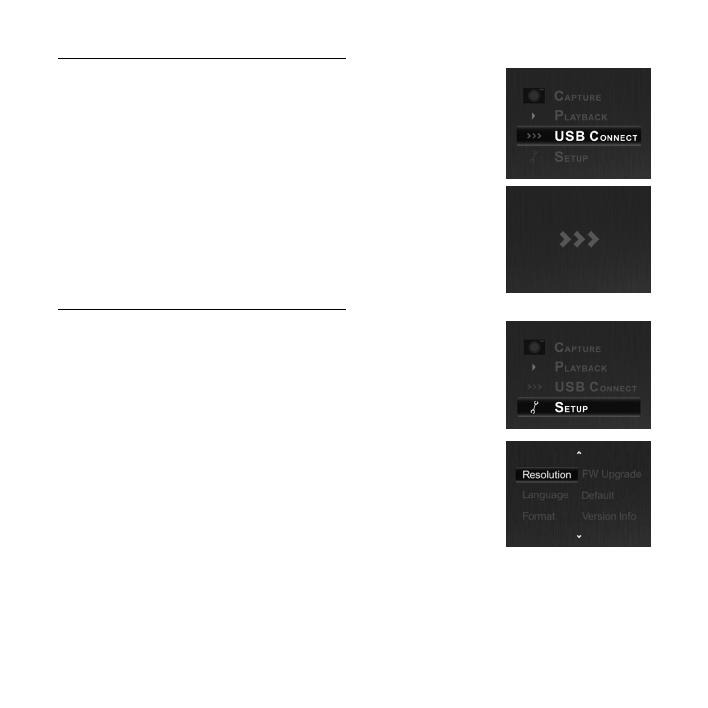
reader for your computer. To enter USB Connect Mode, connect OMNI SCAN to
your computer’s USB port with the included USB cable. Then, select the USB
icon from OMNI SCAN’s Main Menu. A USB symbol should appear on the
DISPLAY, signifying that the connection has been established. OMNI SCAN will
appear as a removable device in "My Computer" (Windows) or on your Desktop
(Mac).
Note: While OMNI SCAN is in USB Connect Mode, you will not be able to scan
other pictures. To enable scanning again, press SCAN/HOME then enter
Capture Mode.
Setup Mode
In Setup Mode, you can adjust the following settings of OMNI SCAN. Use the
UP/MIRROR and DOWN/FLIP buttons to select any options and press the
ENTER button to confirm your choice:
Resolution: Choose between 5-megapixel or 10-megapixel
interpolation resolution.
Language: Choose between English, French, German, Italian,
Spanish, Traditional Chinese, Simplified Chinese, and Japanese.
Format: This option will format an inserted SD card (or the internal
memory, if no SD card is inserted), which will delete all its contents.
Select "Yes" to confirm or "No" to cancel.
FW Upgrade: If an inserted SD card contains an updated firmware
file for OMNI SCAN, this option will allow OMNI SCAN to upload
that firmware. Select "Yes" to confirm or No" to cancel.
Default: This option will return OMNI SCAN to its original factory
settings. Select "Yes" to confirm or "No" to cancel.
Version Info: This option will display the model, version, and firmware of the unit. Press ENTER
to return to the Setup Mode screen.
When you are finished, press SCAN/HOME to return to the Main Menu.
SPECIFICATIONS
Lens: F/3.6, f=4.83
Sensor: 5.1 mega pixels CMOS sensor
Focus Range: 54 mm (2.13")
LCD: 2.36" LTPS
External memory: SD/MMC card
Exposure: Auto
Color balance: Auto
Scan high resolution: 10-megapixel interpolation resolution
Data conversion: 12 bits per color channel
Scan method: Single pass
Light source: Backlight (3 white LED)
Power: Powered from USB / 5V adapter
Interface: USB 2.0
Dimensions: 121 x 96 x 55 mm (4.76" x 3.78" x 2.17")
Weight: 214 g (0.47 lbs.)
Language: English , French, German, Italian, Spanish, Traditional Chinese,
Simplified Chinese, or Japanese.
www.ionaudio.com/omniscan
ION Audio, LLC
Tel: (U.S.) 401.658.3743
Web: www.ionaudio.com/supporthome
www.ionaudio.com
Made in China
MANUAL VERSION 1.3
  • Page 1 1
  • Page 2 2
  • Page 3 3
  • Page 4 4
  • Page 5 5
  • Page 6 6
  • Page 7 7
  • Page 8 8
  • Page 9 9
  • Page 10 10
  • Page 11 11
  • Page 12 12
  • Page 13 13
  • Page 14 14
  • Page 15 15
  • Page 16 16
  • Page 17 17
  • Page 18 18
  • Page 19 19
  • Page 20 20
  • Page 21 21
  • Page 22 22
  • Page 23 23
  • Page 24 24
  • Page 25 25
  • Page 26 26
  • Page 27 27
  • Page 28 28
  • Page 29 29
  • Page 30 30
  • Page 31 31
  • Page 32 32
  • Page 33 33
  • Page 34 34
  • Page 35 35
  • Page 36 36

iON OMNI SCAN Quick start guide

Type
Quick start guide

Ask a question and I''ll find the answer in the document

Finding information in a document is now easier with AI