Page is loading ...

Power
Cool
On
High
Med
Low
Off
Fan
Mode
Temp
Delay
Hrs
4
On
Cool
Delay Hrs Temp
Off
On
Mode
Power
On/Off
Off
Reset
Filter
Fan
Hi
Med
Low
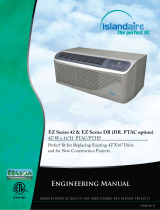
Air Conditioner Controls
Power On/Off
Turns air conditioner on and off.
Display
Displays the temperature setting. Displays
hours when setting the timer.
Mode
On the remote control, use to set the air
conditioner to Cool or Fan mode.
On the air conditioner controls, use to set
Cool or Fan mode at High, Med or Low fan
speed. Indicator lights on the air conditioner
controls will show the mode and fan speed
selected.
Temp Increase + /Decrease – Pads
Use to set temperature when in COOL mode.
Fan Speeds
Use to set the fan speed at Low, Med or
High.
Delay Hrs
2Q³When the air conditioner is off, it can
be set to automatically turn on in half an
hour to 24 hours at its previous setting. Each
touch will set the time in half hours up to 10
and then in hours up to 24.
To cancel the Delay Timer, press the On pad until
“CL” appears. Then wait until the display turns off.
2II³When the air conditioner is on, it can be set to
automatically turn off in half an hour to 24 hours.
Each touch will set the time in half hours up to 10
and then in hours up to 24.
To cancel the Delay Timer, press the Off pad until
“CL” appears and wait for the set temperature to
be displayed. The unit will now resume normal
operation.
Reset Filter
LED will turn on when fan has accumulated 250
hours of run time as a reminder to clean filter.
Press Reset Filter to turn off the LED and reset the
accumulated run time.
Remote Control Signal Receiver
NOTE: When the air conditioner is turned on, it will
automatically start in the setting last used.
To ensure proper operation, aim the remote
control at the signal receiver on the air
conditioner.
The remote control signal has a range of up to
21 feet.
Make sure nothing is between the air conditioner
and the remote control that could block the
signal.
Make sure batteries are fresh and installed
FRUUHFWO\³VHHWKH&DUHDQG&OHDQLQJVHFWLRQ
Remote Control
$ERXWWKHFRQWUROVRQWKHDLUFRQGLWLRQHU³&RRO2QO\0RGHOV
Appearance may vary.
Remote Control
Lights beside the touch pads on the air conditioner
control panel indicate the selected settings.
Controls

5
GEAppliances.com
Cool Mode
Remote Control
1. Press Cool pad.
2. Press Low, Med or High pads to set desired fan speed.
3. Press the Increase +/ Decrease –pads to set
the desired temperature 60°F to 85°F in 1°F
increments.
Control Panel
1. Press the Mode pad until the Cool indicator light is lit
and the Low, Med or High indicator light is lit for the
desired fan speed.
2. Press the Increase + / Decrease – pads to set the
desired temperature 60°F to 85°F in 1°F increments.
A thermostat is used to maintain the room temperature.
The compressor will cycle on and off to keep the room
at the set level of comfort. Set the thermostat at a lower
number and the indoor air will become cooler.
Set the thermostat at a higher number and the indoor air
will become warmer.
NOTE: If the air conditioner is off and is then turned on
while set to Cool, it will take approximately 3 minutes
for the compressor to start and cooling to begin.
Cooling Descriptions
)RU1RUPDO&RROLQJ³Select the Cool mode and High or
Med fan with a middle set temperature.
)RU0D[LPXP&RROLQJ³Select the Cool mode
and HIGH fan with a lower set temperature.
)RU4XLHWHUDQG1LJKWWLPH&RROLQJ³Select the Cool
mode and Low fan with a middle set temperature.
NOTE: If you switch from a Cool setting to Off or to
a fan setting, wait at least 3 minutes before switching
back to a Cool setting.
FAN MODE
Use the Fan mode to provide air circulation and filtering
without cooling. Since fan-only settings do not provide
cooling, a temperature setting will not be displayed.
Remote Control
Press Fan pad. Press Low, Med or High pads to set
desired fan speed.
Control Panel
Press the Mode pad until the Fan indicator light is lit
and the Low, Med or High indicator light is lit for the
desired fan speed.

On
Cool
Timer Temp
Off
On
Mode
Power
On/Off
Off
Fan
Fan
Hi
Heat
Low
Air Conditioner Controls
ON/OFF
Turns air conditioner on and off.
Display
Displays the temperature setting. Displays
hours when setting the timer.
MODE
On the air conditioner controls, use to set
COOL, HEAT or FAN mode. Indicator lights
on the air conditioner controls will show the
mode selected.
TEMP Increase + /Decrease – Pads
Use to set temperature when in COOL
or HEAT mode.
FAN Speeds
Use to set the fan speed at LOW or HIGH.
Indicator lights will show the speed selected.
TIMER
21³When the air conditioner is off, it
can be set to automatically turn on in
half an hour to 24 hours at its previous
setting.
Each touch will set the time in half hours
up to 10 and then in hours up to 24.
To cancel the On Timer, press the ON
pad until “CL” appears. Then wait until
the display turns off.
2))³When the air conditioner is on, it
can be set to automatically turn off in
half an hour to 24 hours. Each touch will
set the time in half hours up to 10 and
then in hours up to 24.
To cancel the Off Timer, press the OFF
pad until “CL” appears and wait for the
set temperature to be displayed. The unit
will now resume normal operation.
Remote Control Signal Receiver
NOTE: When the air conditioner is turned on,
it will automatically start in the setting last used.
To ensure proper operation, aim the
remote control at the signal receiver
on the air conditioner.
The remote control signal has a range
of up to 21 feet.
Make sure nothing is between the air conditioner
and the remote control that could block the
signal.
Make sure batteries are fresh and installed
FRUUHFWO\³VHHWKH&DUHDQG&OHDQLQJVHFWLRQ
Remote Control
$ERXWWKHFRQWUROVRQWKHDLUFRQGLWLRQHU³+HDW&RRO0RGHOV
Appearance may vary.
Remote Control
Lights beside the touch pads on the air conditioner
control panel indicate the selected settings.
Controls
6

GEAppliances.com
COOL MODE
Remote Control
1. Press COOL pad.
2. Press LOW or HIGH pads to set desired fan speed.
3. Press the ,1&5($6('(&5($6(²pads to set the desired
temperature 60°F to 85°F in 1°F increments.
Control Panel
1. Press the MODE pad until the COOL indicator light is lit.
2. Press the FAN pad until HIGH or LOW indicator light
is lit for desired fan speed.
3. Press the,1&5($6('(&5($6(²pads to set the desired
temperature 60°F to 85°F in 1°F increments.
A thermostat is used to maintain the room temperature. The
compressor will cycle on and off to keep the room
at the set level of comfort. Set the thermostat at a lower
number and the indoor air will become cooler.
Set the thermostat at a higher number and the indoor air will
become warmer.
NOTE: If the air conditioner is off and is then turned on while set
to COOL, it will take approximately 3 minutes
for the compressor to start and cooling to begin.
Cooling Descriptions
)RU1RUPDO&RROLQJ³Select the COOL mode and HIGH fan
with a middle set temperature.
)RU0D[LPXP&RROLQJ³Select the COOL mode
and HIGH fan with a lower set temperature.
)RU4XLHWHUDQG1LJKWWLPH&RROLQJ³Select the COOL mode
and LOW fan with a middle set temperature.
NOTE: There will be a 3-minute delay between setting
changes such as COOL to OFF and back to COOL.
FAN
Use the FAN to provide air circulation and filtering without
cooling or heating. Since fan only settings do not provide
cooling or heating, a temperature setting will not be displayed.
Remote Control
Press FAN pad. Press LOW or HIGH pads to set desired fan
speed.
Control Panel
Press the MODE pad until the FAN indicator light is lit
and the LOW or HIGH indicator light is lit for the desired fan
speed.
HEAT MODE
Remote Control
1. Press HEAT pad.
2. Press LOW or HIGH pads to set desired fan speed.
3. Press the ,1&5($6('(&5($6(²pads to set the desired
temperature 60°F to 85°F in 1°F increments.
Control Panel
1. Press the MODE pad until the HEAT indicator light is lit.
2. Press the FAN pad until HIGH or LOW indicator light
is lit for desired fan speed.
3. Press the ,1&5($6('(&5($6(²pads to set the
desired temperature 60°F to 85°F in 1°F increments.
A thermostat is used to maintain the room temperature. The
heater will cycle on and off to keep the room
at the set level of comfort. Set the thermostat at a higher
number and the indoor air will become warmer.
Set the thermostat at a lower number and the indoor air will
become cooler.
NOTE: If the air conditioner is off and is then turned on while set
to HEAT, it will take approximately 1 minute
for the heater to start and heating to begin.
Heating Descriptions
)RU1RUPDO+HDWLQJ³Select the Heat mode and HIGH fan
with a middle set temperature.
)RU0D[LPXP+HDWLQJ³Select the HEAT mode
and HIGH fan with a higher set temperature.
)RU4XLHWHUDQG1LJKWWLPH+HDWLQJ³Select the HEAT mode
and LOW fan with a middle set temperature.
7

About the controls on the air conditioner
Vent Control
The vent control is located behind the front grille on the right
side of the air discharge area. When CLOSED, only the air
inside the room will be circulated and conditioned. When
OPEN, the vent allows outdoor fresh air exchange.
To open or close the vent:
1. Remove the front grille.
2. Remove the vent card screw.
3. Remove vent card, turn it over and replace it by locating
rear hole in card over locating pin inside air discharge and
reattaching screw at front.
Horizontal louvers
on the front grille let you
control the air direction
up and down.
Remove the front grille to adjust
the vertical louvers side-to-side
to direct the air left
or right.
Air Direction
Locating hole
Screw hole
OPEN position
(Mesh end toward back)
CLOSE position
(Mesh end toward front)
Locating hole
Screw hole
The unit leaves the factory set at the CLOSE position.
No function (reserved
for future use)
Auxiliary Controls – Dip Switches (location varies by model)
The auxiliary dip switch controls are
ORFDWHGEHKLQGWKHURRPFDELQHW³DV
shown in this figure.
The owner is responsible for checking
switches and ensuring they are in the
desired position.
Fan Cycle/Continuous - Cool
Fan Cycle/
Continuous - Heat
Class 2
ON
ON
OFF
ON
ON
COOL
FAN
HIGH
MED
OFF
OFF
SLEEP
MODE
TIMER TEMP
+
-
Filter Reminder
Function
Auxiliary Controls – Dip Switches (location varies by model)
The auxiliary dip switch controls are located
EHKLQGWKHURRPFDELQHW³DVVKRZQLQWKLVILJXUH
The owner is responsible for checking switches
and ensuring they are in the desired position.
Fan Cycle/Continuous - Cool
Fan Cycle/Continuous - Cool
Filter Reminder Funtion
When this switch is enabled (RIGHT), it allows the indoor
fan to cycle on/off with the compressor. When this
switch is disabled (LEFT), it allows the indoor fan to run
continuously. The default setting is right (fan cycle).
When this switch is enabled (RIGHT), an LED will light
up the user interface after 250 of accumulated fan run
time. It serves as a reminder to clean the filter. When
this switch is disabled (LEFT), the function is disabled.
The default setting is right (enabled).
ON
ON
Fan Cycle/Continuous - Cool
Filter Reminder Function
Cool Only Models
Heat/Cool Models
8

GEAppliances.com
When connected, the unit will be controlled
by a remote thermostat.
NOTE: The number 3 dip switch must be in
the enabled (UP) position to activate the remote
thermostat. (See the installation instructions
supplied with the remote thermostat.)
IMPORTANT:
The thermostat connections provide 24 V AC only.
If using a digital/electronic wall thermostat,
ensure it is compatible with 24 VAC signal. See
the Installation Instructions for the wall thermostat.
NOTICE:
Damage to a wall thermostat or to the electronics
can result from improper connections. Special
care must be used in connecting the wires. No line
voltage connections should be made to any circuit.
Isolate all wires in building from line voltage.
Terminal Connections Remote Thermostat - Class 2 (on some models)
The controls are located under a plastic cover
behind the front grille.
1
Remove the front grille. See the Front Grille
section of Care and Cleaning.
2
Remove the screws securing the plastic cover
over the wiring connections. Set aside screws
and plastic cover.
3
To make wiring connections, insert the wires
into the bottom of the terminals and tighten
screws securely.
4
After all desired connections have been made,
replace the plastic cover and front grille.
The owner is responsible for making all
connections and setting the appropriate dip
switches.
Terminal
connections
location
under front
grille
Fan Cycle/Continuous - Cool
When this switch is enabled (UP), it allows the indoor
fan to cycle on/off with the compressor. When this
switch is disabled (DOWN), it allows the indoor fan to run
continuously. The default setting is DOWN (continuous).
Fan Cycle/Continuous - Heat
When this switch is enabled (UP), it allows the indoor
fan to cycle on/off with the heater operation. When this
switch is disabled (DOWN), it allows the indoor fan to run
continuously. The default setting is UP (cyclic).
Class 2 - Remote Thermostat
When this switch is enabled (UP), it allows the unit
to operate with a Class 2 Remote Control Wall
Thermostat. The unit controls are disabled.
The default setting is DOWN (disabled).
Fan Cycle/Continuous - Cool
Fan Cycle/Continuous - Heat
Class 2
9
Red - 24 V AC only
Green - Low Speed Fan
Green - High Speed Fan
Yellow - Compressor
White - Heater
Common - Ground
No Function
(reserved for furture use)
No Function
(reserved for furture use)

10
Care and cleaning of the air conditioner.
The front grille can be removed for more thorough
cleaning and to locate the model and serial numbers
on the front of the base pan.
To remove:
1. Pull the filter out.
2. Remove the two grille screws.
3. Pull the grille out from the bottom and lift up
from the tabs on the top of the case.
To replace:
Hook the tabs on the front grille even with the tabs on
the case and snap into place.
Replace the screws and filter.
Front Grille
Outdoor Coils
The coils on the outdoor side of the air conditioner
should be checked regularly.
If they are clogged with dirt or soot they may be
professionally steam cleaned, a service available
through your GE service outlet.
Grille and Case
Turn the air conditioner off and remove the plug
from the wall outlet before cleaning.
To clean, use water and a mild detergent.
Do not use bleach or abrasives.
Grille
Tab
On some models
On some models
Grille
Tab
/