Page is loading ...

The specifications of this product may vary from this photo and are subject to change without notice.
IRONMAN, IRONMAN TRIATHLON and M-DOT are registered trademarks of World Triathlon Corporation.
This product is licensed by the World Triathlon Corporation.
Model 6200
OWNER’S MANUAL
H-Class 510
Indoor Training Cycle

6200.2-101615

SERVICE -----------------------------------------------------------------------4
LABEL PLACEMENT --------------------------------------------------------5
PRODUCT SAFETY ---------------------------------------------------------6
OVERVIEW DRAWING -----------------------------------------------------7
PART LIST ---------------------------------------------------------------------8
HARDWARE AND TOOLS ---- -------------------------------------------9
ASSEMBLY----------------------------------------------------------------------10
ADJUSTMENT
------------------------------------------------------------------17
COMPUTER --------------------------------------------------------------------19
TROUBLESHOOT & MAINTENANCE -----------------------------------22
WARM UP -----------------------------------------------------------------------23
WARRANTY --------------------------------------------------------------------24
FAX FORM ----------------------------------------------------------------------25
TABLE OF CONTENTS
3

IMPORTANT: FOR NORTH AMERICA ONLY
For best product service, please
e-mail: [email protected]
Reponse Time: 1-2 Business Days.
Or call 1-844-641-7922
Daily, 8:00 AM-5:00 PM Pacific Standard Time.
Please have the following information ready when requesting service:
Your name
Phone number
Model number
Serial number
Part number
Proof of Purchase
Before returning this product to the store please
contact customer service.
Paradigm Health & Wellness, Inc.
1189 Jellick Ave
City of Industry, CA 91748 USA
www.paradigmhw.com
SERVICE
4

LABEL PLACEMENT
5

Basic precautions should always be followed, including the following
safety instructions when using this equipment. Read all instructions
before using this equipment.
1. Read all the instructions in this manual and do warm up exercises before using
this equipment.
2.
Before exercise, in order to avoid injuring your muscles, warm-up exercise
for every muscle group is highly recommended. Please refer to the Warm
Up pages for pre and post workout.
3. Please make sure all components are not damaged and in working order before
use. This equipment should be placed on a flat surface while in use. Using a
mat or other material on the ground is recommended.
4. Please wear proper clothes and shoes when using this equipment; do not wear
clothes that get caught in any part of the equipment.
5. Do not attempt any maintenance or adjustments other than those described in
this manual. Should any problems arise, discontinue use and consult an
Authorized Service Representative.
6.
Keep Dry - do not operate in wet or moist condition.
7. Always hold on to the handlebar while using the training bike.
8. To dismount, reduce pedaling speed gradually before you stop.
9. Do not use the equipment outdoors.
10. This equipment is for household use only.
11. Only one person should be on the equipment while in use.
12.
Keep children and pets away from the product while in use. This machine
is designed for adults only. This product requires a minimum of 6 feet of
space for safe operation.
13. If you feel any chest pains, nausea, dizziness, or shortness of breath, you should
stop exercising immediately and consult your physician before continuing.
14. The maximum weight capacity for this product is 275 lbs/125 kgs.
WARNING: Before beginning any exercise program consult your
physician. This is especially important for the people who are over 35 years
old or who have pre-existing health problems. Read all instructions befo
re
using any fitness equipment.
CAUTION: Read all instructions carefully before operating this
product. Retain this Owner’s Manual for future reference.
PRODUCT SAFETY

OVERVIEW DRAWING
7
33
43
45

No Description Qty No Description Qty
1 2
2 Bearing 608ZZ 8 4
23 Seat 6801 1
3 Wheel 71* 19*24 2
25
Sensor
1
4 Bolt M6*12*S5 2
26
Bolt M5*1
* 8.5
2
5
Hexagon Socket Pan Head
Cap Bolt
M10x25xS6
4
27 Bottle holder 1
6 Washer d10* 20*2.0 8
28 Bolt M10*16*S6 4
7 Foot pad M10*30* 52*49 4
29 Front
1
8 Nut M10*H7*S17 4
30 Rear
1
9 Front stabilizer 1
31
Multi Hex Tool with Phillips
Screwdriver S13-14-15
1
10 Rear stabilizer 1 32 Allen Wrench S6 1
11 Computer ST 6504-71 1 33
11a Computer Wire 1 34 Main frame 1
12 Handlebar 1 35L/R Crank 2
13
1
36 Sensor Wire 1
14 2 36a Sensor Wire 1
15 Handlebar Post 1 37 Pulse Sensor 2
16
Bushing PT100*40*J50*20*188
PP
3 gulP 83 2
17 Knob 58*97*M16*1.5*42 2 39 Pulse Sensor wire 1
18L/R Pedal JD-308 9/16 2 40 Washer d6* 12*1 2
19 Knob 58*44*M8*18 1 41
Pan Head Phillips Self Tapping
Screw ST14*19* 7
2
20
Pan Head Cap
4 42 Washer d5* 13*1 2
21 Seat Post 1
8
PART LIST
43
1
4
45
2
Hexagon Head Screw
4
1
tekcarB taeS22 1
Brake Pad
Cardboard
Handlebar Knob
Washer

(6) WasherG Φ
4PCS
(5) Hexagon Socket Pan
Head Cap Bolt
M10*25*S6 4PCS
(32) Allen Wrench S6 1PC
(31) Multi Hex Tool with Phillips
Screwdriver S13, S14, S15 1PC
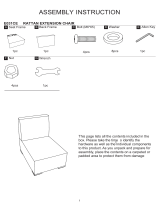
HARDWARE AND TOOLS
(14) Handlebar Knob 1PC
(13) Flat Washer
d10*Φ40*4 1PC

1. Remove Front and Rear 3URWHFWLRQ%DU
Loosen the Bolt (28) and Washer (6) with Allen Wrench S6 (32) provided, and remove the
Front Protection Bar (29) from the Main Frame (34). Repeat the same procedure for
removal of Rear Protection Bar.
Note: These bars are used to protect the brackets from deformation during
shipping. These Bars, Bolts and Washers will not be installed onto the bike and can be
discarded.
.
(32) Allen Wrench S6
1PCS
ASSEMBLY
Hardware Pack:

2. Front and Rear Stabilizers Installation
Insert the Front Stabilizer (9) into the front bracket of the Main Frame (34) and align the
bolt holes. Install the Front Stabilizer with two Hexagon Socket Pan Head Cap Bolt (5)
and two Washers (6). Tighten the bolts with the Allen Wrench S6 (32) provided.
Repeat the above instructions for installation of the Rear Stabilizer (10).
(32) Allen Wrench
S6 1PC
(6) :asherG Φ
4PCS
(5) Hexagon
Socket Pan Head
Cap Bolt
M10*25*S6
4PCS
ASSEMBLY
Hardware Pack:

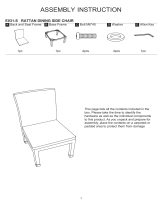
3. Water Bottle Holder Installation
Remove the 2 pre-installed Bolts (26) and two Washers (42) from the frame
and use them to attach the Water Bottle Holder (27) onto the Main Frame (34).
4. Foot Pedal Installation
The Cranks and Foot Pedals are marked “R” for Right and “L for Left.
Insert the Left Foot Pedal (18L) into the Left Crank (35L)
Turn the LEFT pedal shaft by hand COUNTER-clockwise until snug.
Tighten the pedal shaft with the Multi Hex Tool (31) provided.
DO NOT turn the OHIWpedal shaft in the clockwise direction, doing so will strip the
threads.
Insert the RIGHT Foot Pedal (18R) into the Right Crank (35R) and tighten in a CLOCK-WISE
direction.
(31) Multi Hex Tool with Phillips
Screwdriver
(31) Multi Hex Tool with Phillips
Screwdriver
(26) Bolt 06×
2PCS
(42) Washer
d5[13x1
2PCS
ASSEMBLY
Tool:

Put the Seat (23) onto the Seat Bracket
(22) Tighten the Seat using the Multi Hex
Tool (31).
(31) Multi Hex Tool with
Phillips Screwdriver
5. Seat Installation
Turn the Round Knob (17) on the Main Frame (34) inD counter-clockwise direction until it can
bepulled out. Pull the Round Knob as you insert the Seat Post (21).
Release the Round Knob and slide the Seat Post up or down until the Round Knob popsinto
one of the adjustment holes. Tighten the Round Knob in a clockwise direction to lock.
&DXWLRQ'RQRWUDLVHWKH6HDW3RVWKLJKHUWKDQWKH0$;/,1(LQGLFDWRU
ASSEMBLY
34

6. Handlebar Post Installation
Turn the Round Knob (17) on the Main Frame (34) in D
counter-clockwise direction until it can be
pulled out. Pull the Round Knob as you insert the
Handlebar Post (15).6lide the Handlebar Post
up or down until the Round Knob “pops”
into the hole. Tighten the Round Knob in the clockwise
direction to lock the Handlebar Post (15) in place.
&DXWLRQ'R127UDLVHWKH+DQGOHEDU3RVW
DERYHWKH0$;/,1(LQGLFDWRU
7. Handlebar Installation
ASSEMBLY
Hardware Pack:
Handlebar
Knob (14)
1PC
Align the Handlebar (12) with the grooves on the Handlebar Post (15). Place the Washer (13) onto the
threads of the Handlebar Knob(14) and install it into the hole on the underside of the Handlebar (12).
Tighten the knob. Connect speed sensor wires (25, 36).
(13) Flat Washer
d10*Φ40*4 1PC
*CAUTION: ALWAYS make sure the handlebar is secured tightly before use.

(20) Phillips Pan Head Cap Screw
4 PCS
8. Computer Installation
Remove the 4 pre-installed screws (20) from the back of
the Computer (11). Use them to attach the Computer
onto the metal plate.Connect Sensor Wires (11a, 36a).
Plug the Pulse Sensor Wire (39) into the side of the
Computer.
(31) Multi Hex Tool with Phillips Screwdriver
ASSEMBLY
36a
39

9. Remove the cardboard
Loosen the Brake Knob (33) to remove the Cardboard (44) between
the flywheel and Brake Pad (43), then turn the Knob to the desired
tension before exercise.
16
ASSEMBLY
33

Adjusting the Brake Knob
Turn the Brake Knob (33) clockwise to increase
tension, counter-clockwise to decrease tension.
(PHUJHQF\6WRSPress downRQ the Brake Knob to stop
the flywheel
Handlebar Height Adjustment
Turn the Round Knob (17) counter-clockwise to
loosen. Pull and hold the Knob as you raise or
lower the handlebar.
Release the Round Knob (17) and allow it to SRS into
the hole. Tighten the Round Knob by turning
clockwise
ADJUSTMENT
Round Knob
(17)
7
&DXWLRQ'R127UDLVHWKH+DQGOHEDU3RVW
DERYHWKH0$;/,1(LQGLFDWRU
Brake Knob
(33)

Seat Height Adjustment
Turn WKHRound Knob (17) counter-clockwise to
loosen. Pull and hold WKHRound Knob as you raise
or lower theseat.
Release the Round Knob and allow it to SRS into the
hole. Tighten the Round Knob by turning clockwise
Seat Slide Adjustment
Turn WKHRound Knob (19) counter-clockwise to
loosen. Slide the seat to Dsuitable position, turn the
Round Knobclockwise to lock
ADJUSTMENT
Round Knob
(17)
Round Knob
(19)
18
&DXWLRQ'R127UDLVHWKH6HDW3RVW
DERYHWKH0$;/,1(LQGLFDWRU

FUNCTIONS
BUTTONS
SCAN: Displays all function TIME, DISTANCE, CALORIES, PULSE and
RPM/SPEED
RPM: Displays the pedaling Rotation Per Minute. The RPM and SPEED will
switch to another display in every 6 seconds after exercise starts.
SPEED: 'LVSOD\VWKHXVHU¶VH[HUFLVHVSHHG
TIME: 1.YoXFDQSUHVV³6(7´EXWWRQWRVHWWDUJHWWLPHEHWZHHQ0:00 to 99:00 for
count down function.
2. It can be set up by the user or accumulated automatically for count up
function.
DISTANCE: <RXFDQSUHVV³6(7´EXWWRQWRVHW target distance between 0
DQG
2. It can be set up by the user or accumulated automatically for count up
function.
CALORIES: <RXFDQSUHVVWKH³6(7´EXWWRQWRVHWWDUJHWFDORULHVEHWZHHQWR
IRUWKHcount down function.
2. It can be set up by the user or accumulated automatically for count up
function
PULSE:
Displays the user's pulse when holding the Pulse sensors. You can set a
target pulse using the SET button and confirming it using MODE. Once you reach
your target pulse the computer will beep to indicate you have reached the target.
MODE To confirm all settings.
SET To set up the value of TIME, DISTANCE, CALORIES and PULSE.
You can hold the button to increase the value fast. (The computer
has to be in stop condition.)
RESET
Press and hold RESET key 2 seconds to reset all the values.
RECOVERY To test heart rate recovery status
COMPUTER
19

OPERATION PROCEDURE
1. Install 2 pcs of 1.5V ³AAA´batteries
2.
3.
:KHQSHGDOLQJ, the value of TIME, DISTANCE,CALORIES startV to count up
DXWRPDWLFDOO\+RZHYHULI\RXKDYHHQWHUHGD presettarget (,(TIMEDISTANCE or
CALORIES), the function will FRXQWGRZQIURP\RXUWDUJHWYDOXHXQWLOLWUHDFKHV.
Once the target is achievedDW, the monitor ZLOOEHHSIRU8 seconds
4.
,Q6&$1PRGHYDOXHVRITIME/DISTANCE/CALORIES/PULSE/
SPEED/RPM ZLOO display for 6 seconds
COMPUTER
20
In setup mode, you can set target values for TIME/DISTANCE/CALORIES and
PULSE. press the MODE button to choose the function to set and change the value
with the SET button.
/