TIMELESS NICKEL GAP SHIPLAP
INSTALLATION INSTRUCTIONS
Allow the wood to acclimate for several
days prior to installation in the room
in which it will be installed. Variances in
temperature and moisture between the
storage and application areas have
a negative effect on the finished
appearance if the product doesn’t
adjust to room conditions prior to
installation. As wood dries a slight joint
may open up. It is recommended to paint
the surface behind the wood a dark color
and paint any cut ends with touch up paint.
Fasten directly to the wall framing when
installing in a horizontal orientation. For
applications where vertical orientation is
desired, full-length furring strips must be
installed 24 inches on center when
fastening shiplap. Fasten shiplap using
standard or painted trim nails (15 or
16 gauge). Fastener length should be
long enough for 1 1/4”-1 1/2” of
penetration into solid wood.
On prefinished boards, apply a bead of
high initial grab adhesive to the bottom
of the board. Drive fastener into the top
flange on each stud to secure. This will
minimize the number of nail holes that
need to be filled.
When installing shiplap over plaster
or hardboard, the walls need to be in
moderately good condition. Construction
adhesive is usually the easiest and
fastest way to install wood shiplap
over drywall, plaster, hardboard and even
old shiplap. When applying adhesive, be
sure to follow the manufacturers
instructions. To make sure you have a
tight joint when applying adhesive, use
trim nails nails to tack up and hold the
shiplap in place on the drywall or plaster
while the adhesive sets. Apply tack nails
in the shiplap tongue every 24 inches.
To clean use mild soap and water. For
touch up paint information and supplies,
visit ufpEDGE.com/timeless.
DO NOT NAIL THROUGH
OVERLAPPING PIECES
Install shiplap horizontally or vertically.
For horizontal applications, start with the
bottom course and work up with overlap pointing
downward. Do not nail through overlaps. Shiplap
siding is tight-fitting, so butt the courses up close.
THIS BROCHURE IS FOR ILLUSTRATION PURPOSES ONLY. USE OF THIS PRODUCT
MUST BE IN ACCORDANCE WITH ALL LOCAL ZONING AND/OR BUILDING CODES.
CONSUMER ASSUMES ALL RISKS AND LIABILITY ASSOCIATED WITH THE USE
OF THIS PRODUCT. WARRANTOR DOES NOT PROVIDE ANY WARRANTY, EITHER
EXPRESS OR IMPLIED, AND SHALL NOT BE LIABLE FOR ANY DAMAGES, INCLUDING
CONSEQUENTIAL DAMAGES.
2801 East Beltline NE
Grand Rapids, MI 49525
800.598.9663
UFPI.com
9850 9/18
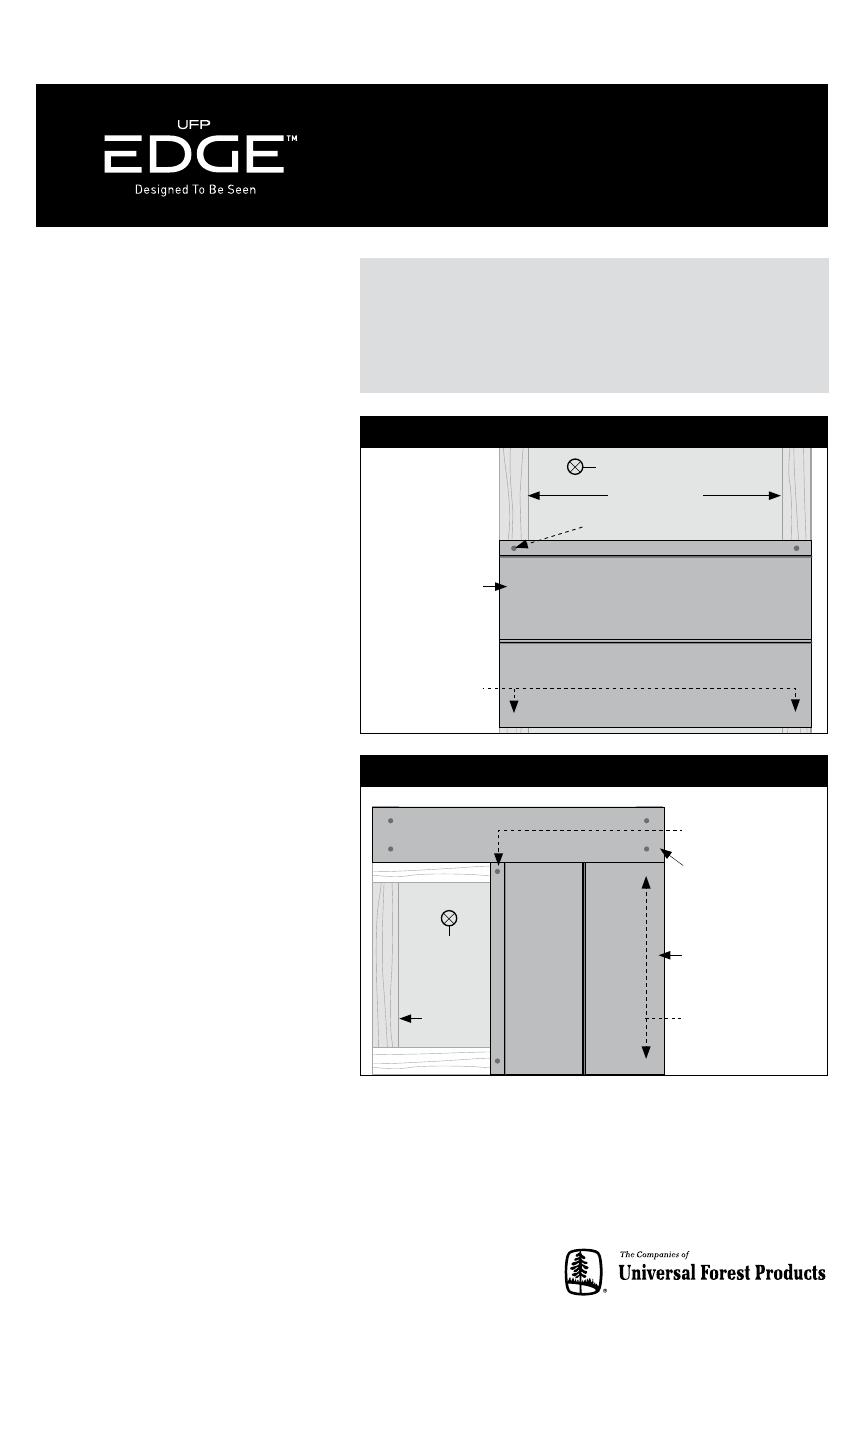
Apply adhesive
1" from bottom
of shiplap board
15- or 16-gauge trim nails on flange
Shiplap boards
Framing studs
Drywall over studs
Horizontal Installation
Apply adhesive
1" from side of
shiplap board
15- or 16-gauge
trim nails on flange
Framing
stud
Drywall
over studs
Vertical Installation
Furring strip
Shiplap boards
Trim (install with
15- or 16-gauge
trim nails prior
to or following
shiplap)
Furring strip