Page is loading ...

FAQs can be found at www.convection-works.com
Email us for any unanswered questions: [email protected]
FOR PRODUCT REGISTRATION, PLEASE VISIT WWW.CONVECTION-WORKS.COM

2

Thank you for buying the ConvectionWorks HI-Q Intelligent Oven,
the oven does everything a standard oven does and more!
The intelligent oven has been designed to make your life in the kitchen easier. It features 10
specic cooking functions that automatically preset times and temperatures for the perfect
cook every time.
Use presets or adjust manually to your desired time and temperature. Once you have made your
decision, you can activate the CONVECTION or ROTISSERIE functions with the click of a button.
For detailed instructions by mode please view our step by step manual in the pages that follow.
Happy cooking!
3

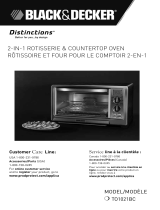
BAMBOO
CUTTING
BOARD
ROTISSERIE
SPIT & RODS
CRUMB
TRAY
WIRE RACK
HANDLE
WIRE RACK
SQUARE
BAKING
TRAY
1500W XL
CONVECTION
OVEN WITH
36L CAPACITY
2 SILICONE
POTHOLDERS
WHAT YOU CAN MAKE WITH YOUR OVEN
MUFFINS & CUPCAKES
12’ PIZZA
TOAST
DEFROSTING
AND MORE!
ROTISSERIE CHICKEN
BROILED STEAK
4

WARNING
NEVER PLACE ANY FLAMMABLE MATERIALS IN THE OVEN, INCLUDING CARDBOARD, PLASTIC & PAPER.
NEVER WRAP ANY OF THE INNER SURFACES OF THE OVEN WITH TIN OR ALUMINIUM FOIL TO AVOID ANY
ACCIDENTS.
ENSURE ALL PANS OR DISHES ARE OVEN-SAFE BEFORE USING IN THE OVEN. AVOID PUTTING OVERSIZED
FOOD OR METAL UTENSILS IN THE OVEN TO PREVENT RISK OF FIRE OR ELECTRIC SHOCK.
USING YOUR MACHINE FOR THE FIRST TIME
1. Unpack the appliance and place all the parts on a horizontal surface that is stable, level, heat-resistant and free of clutter.
2. Place the convection oven on a table with good ventilation, and not anywhere close to a wall or curtains. Avoid using surfaces
with table cloth or other ammable materials and appliances such as electric burners.
3. Use a damp cloth to wipe the interior of the oven. Ensure that the oven is dry before use.
4. Immerse the bake pan and racks in warm soapy water, rinse them then dry. Never immerse convection oven or its power cord
in water for cleaning to prevent the risk of electric shock.
5. Ensure that there is at least 4” (10cm) of clearance on all sides of the oven and at least 6” (15cm) from the top of the oven.
6. Start unwinding the power cord completely and insert the power plug in a grounded power outlet. The oven will proceed to
sound an alert while the display on the LED screen will lit. By default, the SELECT function will indicate the TOAST setting.
NOTE:
- Ensure that any food has at least 3cm / 1 inch of clearance space between the upper panel of the convection oven to get an
even toasting effect.
- Before using the convection oven, place crumb tray in its intended position.
- The oven includes three levels of rack slots for a versatile cooking experience. For the optimal slot height, refer to the oven
door sticker for the best avor.
5

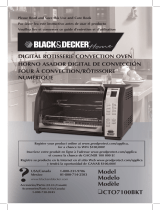
CONVECTION
BUTTON
TIME / TEMP DIAL
(PRESS AND HOLD DOWN
TO ENABLE OVEN &
LED DISPLAY LIGHT)
HI-Q INTELLIGENT OVEN
BEFORE YOU BEGIN USING YOUR OVEN
HOLD TO
CANCEL
SELECT
PUSH TO
SELECT
LIGHTER DARKER
TIME
TEMP
CONVECTION
PRESS TO
START/PAUSE
ROTISSERIE
16:00
400
F
HI-Q INTELLIGENT
LARGE BACKLIT LED
SCREEN
ROTISSERIE
BUTTON
SELECT
DIAL
START/PAUSE
BUTTON
CONVECTION button: Press before the start of a
program to enable the convection function when
applicable.
ROTISSERIE button: Press before the start of a
program to enable the rotisserie function when
applicable.
START/PAUSE button: Press to begin a function,
or any time during cooking to pause. Press and
hold during cooking to cancel any ongoing cooking.
SELECT dial: Select from 10 of the built-in
intelligent cooking presets of the oven by scrolling
through the menu on the LED screen with this dial.
TIME / TEMP dial: Turn the dial counter-
clockwise to decrease cooking time, and turn
the dial clockwise to increase cooking time when
applicable. To adjust temperature, press down on
the dial once and turn it counter-clockwise to
decrease the tempterature, or turn it clockwise to
increase the temperature. Press and hold down on
the dial to enable the oven light and LED display
light any time during cooking.
LEGEND:
- While cooking, condensation may form on the oven door and may evaporate aftert a short amount of time. Rest assured that
this is a standard occurance and no precaution should be taken.
- Defrosted food needs to be baked immediately after defrost. Frozen food should be placed in the middle of the cooking pan.
- While the oven is cooking, avoid opening the oven door frequently to prevent the escape of heat. Opening the oven door
while cooking drops the temperature signicantly and increases the cooking time.
- When toasting frozen bread or a large number of slices of bread, set the TOAST darkness on a higher setting.
- Should there be a lot of smoke during cooking, reduce extra fat from the ingredients to prevent further smoke emissions from
the oven.
6
Please refer to pages 8 to 17 for a more
comprehensive step-by-step guide on how to create
the perfect meal with your convection oven.

HI-Q INTELLIGENT OVEN FUNCTIONS
Functions Rack
Placement
Default
Times
(min)
Default
Temperatures
(°f / °c)
Convection
Rotisserie
Time
(min)
Temp
(°f / °c)
Toast Middle &
Bottom
1. 2:00
2. 4:30
3. 5:00
4. 5:55
5. 6:50
6. 9:10
7. 9:40
NA NA NA NA NA
Bagel Middle &
Bottom
1. 5:00
2. 5:50
3. 6:10
4. 6:30
5. 6:50
6. 7:10
7. 7:40
NA NA NA NA NA
Pizza Middle &
Bottom
16:00 400°f
204°c
Yes NA 1-60min 350-450°f
177-232°c
Bake Bottom 30:00 325°f
163°c
Yes Yes 1min-2hr 150-450°f
66-232°c
Broil Top 10:00 450°f
232°c
NA Yes 1-60min 400-450°f
204-232°c
Cookies Middle &
Bottom
11:00 350°f
177°c
Yes NA 1-60min 150-450°f
66-232°c
Roast Bottom 45.00 350°f
177°c
Yes Yes 1min-2hr 150-450°f
66-232°c
Warm Bottom 60:00 150°f
66°c
Yes NA 1-60min 150-200°f
66-93°c
Defrost Bottom 16:00 200°f
93°c
Yes NA 1-60min 150-250°f
66-121°c
Reheat Bottom 15:00 325°f
163°c
Yes NA 1-60min 150-450°f
66-232°c
TIME / TEMP
Dial
7

000
F
00:00
USING YOUR OVEN
TOAST function
1. Insert the wire rack into the oven, in the middle or bottom
rack placement. Please ensure that the spokes of the wire rack
are facing upwards.
2. Place up to 9 slices of toast on the center of the wire rack.
3. Close the oven door and ensure it is fully closed.
4. Turn the SELECT dial until the TOAST function is
selected.
5. To adjust the darkness of your toast, turn the
TIME / TEMP dial. Turn the dial counter-clockwise for
a lighter toast setting, or turn the dial clockwise for a darker
toast.
6. Press the START/PAUSE button once to commence the
TOAST function. The oven alert will sound once, while the LED
Backlit screen and START/PAUSE button will both illuminate
blue.
7. To pause the function, press the START/PAUSE button once.
The oven alert will sound once, while the LED backlit screen
and START/PAUSE button will both illuminate blue.
8. At any time of the function, press down on the
TIME / TEMP dial to illuminate both the LED backlit
screen and the oven.
9. The function can be cancelled anytime by pressing and
holding down the START/PAUSE button. The oven alert will
sound for 2 seconds, indicating that the function has been
cancelled.
10. Once the TOAST function has concluded, the oven alert
will sound once, the LED backlit screen will illuminate blue
while the START/PAUSE button backlight will go out.
The TOAST function allows you to make soft bread on the
inside while having a great golden brown texture on the
outside. Ideal for many things stated here.
Rack Placement Middle & Bottom
Cooking Surface Wire Rack
CONVECTION function - Not Available -
ROTISSERIE function - Not Available -
TIME function - Not Available -
TEMP function - Not Available -
Toast Color Setting
Light 1 or 2
Medium 3, 4 or 5
Dark 6 or 7
WARNING:
PLEASE EXERCISE CAUTION BY GIVING YOUR OVEN ABOUT 20 SECONDS
TO COOL DOWN BEFORE OPENING THE OVEN DOOR.
Toast Color Setting
Light 1 or 2
Medium 3, 4 or 5
Dark 6 or 7
8

000
F
00:00
USING YOUR OVEN
BAGEL function
1. Insert the wire rack into the oven, in the middle or bottom
rack placement. Please ensure that the spokes of the wire rack
are facing upwards.
2. Place up to 6 bagel halves on the center of the wire rack.
3. Close the oven door and ensure it is fully closed.
4. Turn the SELECT dial until the BAGEL function is
selected.
5. To adjust the darkness of your bagel halves, turn the
TIME / TEMP dial. Turn the dial counter-clockwise for
a lighter toast setting, or turn the dial clockwise for a darker
toast.
The BAGEL function toasts your cut bagel lightly on the
outside while crisps the inside. This function is not limited to
just bagels, breads that only require one side to be toasted
would be perfect too.
Rack Placement Middle & Bottom
Cooking Surface Wire Rack
CONVECTION function - Not Available -
ROTISSERIE function - Not Available -
TIME function - Not Available -
TEMP function - Not Available -
WARNING:
PLEASE EXERCISE CAUTION BY GIVING YOUR OVEN ABOUT 20 SECONDS
TO COOL DOWN BEFORE OPENING THE OVEN DOOR.
6. Press the START/PAUSE button once to commence the
TOAST function. The oven alert will sound once, while the LED
Backlit screen and START/PAUSE button will both illuminate
blue.
7. To pause the function, press the START/PAUSE button once.
The oven alert will sound once, while the LED backlit screen
and START/PAUSE button will both illuminate blue.
8. At any time of the function, press down on the
TIME / TEMP dial to illuminate both the LED backlit
screen and the oven.
9. The function can be cancelled anytime by pressing and
holding down the START/PAUSE button. The oven alert will
sound for 2 seconds, indicating that the function has been
cancelled.
10. Once the BAGEL function has concluded, the oven alert
will sound once, the LED backlit screen will illuminate blue
while the START/PAUSE button backlight will go out.
Bagel Color Setting
Light 1 or 2
Medium 3, 4 or 5
Dark 6 or 7
9

16:00
400
F
USING YOUR OVEN
PIZZA function
1. Place your pizza, up to 12” diameter, on the cooking pan.
2. Insert the cooking pan into the oven, in the middle or
bottom rack placement.
3. Close the oven door and ensure it is fully closed.
4. Turn the SELECT dial until the PIZZA function is
selected. The default settings for the PIZZA function is 16
minutes cook time at 400ºF temperature.
5. To adjust the default settings of the PIZZA function, turn the
TIME / TEMP dial counter-clockwise to decrease the
cook time, or turn it clockwise to increase it. Press on the dial
once to adjust the temperature setting by turning the
TIME / TEMP dial counter-clockwise to decrease the
temperature or turn it clockwise to increase it.
6. Press the START/PAUSE button once to commence the
PIZZA function. The oven alert will sound once, while the LED
Backlit screen and START/PAUSE button will both illuminate
blue.
7. To pause the function, press the START/PAUSE button once.
The oven alert will sound once, while the LED backlit screen
and START/PAUSE button will both illuminate blue.
8. At any time of the function, press down on the
TIME / TEMP dial to illuminate both the LED backlit
screen and the oven.
9. The function can be cancelled anytime by pressing and
holding down the START/PAUSE button. The oven alert will
sound for 2 seconds, indicating that the function has been
cancelled.
10. Once the PIZZA function has concluded, the oven alert will
sound once, the LED backlit screen will illuminate blue while
the START/PAUSE button backlight will go out.
The PIZZA function creates the perfect slice of pie with a crisp
texture crust, melted cheese and well-cooked toppings.
Rack Placement Middle & Bottom
Cooking Surface Cooking Pan
CONVECTION function Yes
ROTISSERIE function - Not Available -
TIME function 1 - 60 mins
TEMP function
350-450ºf / 177-232ºc
WARNING:
PLEASE EXERCISE CAUTION BY GIVING YOUR OVEN ABOUT 20 SECONDS
TO COOL DOWN BEFORE OPENING THE OVEN DOOR.
10

30:00
F
325
USING YOUR OVEN
BAKE function
1. Place your bake mix on the cooking pan. Should you choose
to use your own oven-ready dish or pot, be sure to place it on
the wire rack at the bottom rack placement.
WARNING: Never place anything directly on the heating
elements.
2. Insert the cooking pan into the oven in the bottom rack
placement.
3. Close the oven door and ensure it is fully closed.
4. Turn the SELECT dial until the BAKE function is selected.
The default settings for the BAKE function is 30 minutes cook
time at 325ºF temperature.
5. To adjust the default settings of the BAKE function, turn the
TIME / TEMP dial counter-clockwise to decrease the
cook time, or turn it clockwise to increase it. Press on the dial
once to adjust the temperature setting by turning the
TIME / TEMP dial counter-clockwise to decrease the
temperature or turn it clockwise to increase it.
6. Press the START/PAUSE button once to commence the
BAKE function. The oven alert will sound once, while the LED
Backlit screen and START/PAUSE button will both illuminate
blue.
7. To pause the function, press the START/PAUSE button once.
The oven alert will sound once, while the LED backlit screen
and START/PAUSE button will both illuminate blue.
8. At any time of the function, press down on the
TIME / TEMP dial to illuminate both the LED backlit
screen and the oven.
9. The function can be cancelled anytime by pressing and
holding down the START/PAUSE button. The oven alert will
sound for 2 seconds, indicating that the function has been
cancelled.
10. Once the BAKE function has concluded, the oven alert will
sound once, the LED backlit screen will illuminate blue while
the START/PAUSE button backlight will go out.
The BAKE function helps create an evenly-cooked dish
everytime. Ideal for cakes, pastries and brownies, the BAKE
function is also versatile for cooking pre-frozen meals such as
chicken pot pies and beef lasagne.
Rack Placement Bottom
Cooking Surface Cooking Pan
CONVECTION function Yes
ROTISSERIE function Yes
TIME function 1 min - 2 hr
TEMP function
150-450ºf / 66-232ºc
WARNING:
PLEASE EXERCISE CAUTION BY GIVING YOUR OVEN ABOUT 20 SECONDS
TO COOL DOWN BEFORE OPENING THE OVEN DOOR.
11

10:00
450
F
USING YOUR OVEN
BROIL function
1. Place your food in the center of the cooking pan.
2. Insert the cooking pan into the oven, in the top rack
placement.
3. Close the oven door and ensure it is fully closed.
4. Turn the SELECT dial until the BROIL function is
selected. The default settings for the BROIL function is 10
minutes cook time at 450ºF temperature.
5. To adjust the default settings of the BROIL function, turn the
TIME / TEMP dial counter-clockwise to decrease the
cook time, or turn it clockwise to increase it. Press on the dial
once to adjust the temperature setting by turning the
TIME / TEMP dial counter-clockwise to decrease the
temperature or turn it clockwise to increase it.
6. Press the START/PAUSE button once to commence the
BROIL function. The oven alert will sound once, while the LED
Backlit screen and START/PAUSE button will both illuminate
blue.
7. To pause the function, press the START/PAUSE button once.
The oven alert will sound once, while the LED backlit screen
and START/PAUSE button will both illuminate blue.
8. At any time of the function, press down on the
TIME / TEMP dial to illuminate both the LED backlit
screen and the oven.
9. The function can be cancelled anytime by pressing and
holding down the START/PAUSE button. The oven alert will
sound for 2 seconds, indicating that the function has been
cancelled.
10. Once the BROIL function has concluded, the oven alert will
sound once, the LED backlit screen will illuminate blue while
the START/PAUSE button backlight will go out.
The BROIL function allows a hassle-free cook for the most
staple recipes such as chicken nuggets, pork sausages,
sandwiches and vegetables. Also good for browning the tops
of pot pies and potato gratins.
Rack Placement Top
Cooking Surface Cooking Pan
CONVECTION function - Not Available -
ROTISSERIE function Yes
TIME function 1 - 60 mins
TEMP function
350-450ºf / 177-232ºc
WARNING:
PLEASE EXERCISE CAUTION BY GIVING YOUR OVEN ABOUT 20 SECONDS
TO COOL DOWN BEFORE OPENING THE OVEN DOOR.
12

11:00
F
350
USING YOUR OVEN
COOKIES function
1. Place your bake mix on the cooking pan. Should you choose
to use your own oven-ready cake rings or tart pans, be sure to
place it on the wire rack at the bottom rack placement.
WARNING: Never place anything directly on the heating
elements.
2. Insert the cooking pan into the oven, in the top rack
placement.
3. Close the oven door and ensure it is fully closed.
4. Turn the SELECT dial until the COOKIES function is
selected. The default settings for the COOKIES function is 11
minutes cook time at 350ºF temperature.
5. To adjust the default settings of the COOKIES function, turn
the TIME / TEMP dial counter-clockwise to decrease
the cook time, or turn it clockwise to increase it. Press on the
dial once to adjust the temperature setting by turning the
TIME / TEMP dial counter-clockwise to decrease the
temperature or turn it clockwise to increase it.
6. Press the START/PAUSE button once to commence the
COOKIES function. The oven alert will sound once, while
the LED Backlit screen and START/PAUSE button will both
illuminate blue.
7. To pause the function, press the START/PAUSE button once.
The oven alert will sound once, while the LED backlit screen
and START/PAUSE button will both illuminate blue.
8. At any time of the function, press down on the
TIME / TEMP dial to illuminate both the LED backlit
screen and the oven.
9. The function can be cancelled anytime by pressing and
holding down the START/PAUSE button. The oven alert will
sound for 2 seconds, indicating that the function has been
cancelled.
10. Once the COOKIES function has concluded, the oven alert
will sound once, the LED backlit screen will illuminate blue
while the START/PAUSE button backlight will go out.
The COOKIES function is perfect for cookies of any recipe,
whether with homemade or premade ingredients. The
COOKIES function is also great for cinnamon rolls, apple
strudels and dinner rolls.
Rack Placement Middle & Bottom
Cooking Surface Cooking Pan
CONVECTION function Yes
ROTISSERIE function - Not Available -
TIME function 1 - 60 mins
TEMP function
150-450ºf / 66-232ºc
WARNING:
PLEASE EXERCISE CAUTION BY GIVING YOUR OVEN ABOUT 20 SECONDS
TO COOL DOWN BEFORE OPENING THE OVEN DOOR.
13

45:00
F
350
USING YOUR OVEN
ROAST function
1. Place your food in the center of the cooking pan.
2. Insert the cooking pan into the oven, in the top rack
placement.
3. Close the oven door and ensure it is fully closed.
4. Turn the SELECT dial until the ROAST function is
selected. The default settings for the ROAST function is 45
minutes cook time at 350ºF temperature.
5. To adjust the default settings of the ROAST function, turn
the TIME / TEMP dial counter-clockwise to decrease the
cook time, or turn it clockwise to increase it. Press on the dial
once to adjust the temperature setting by turning the
TIME / TEMP dial counter-clockwise to decrease the
temperature or turn it clockwise to increase it.
6. Press the START/PAUSE button once to commence the
ROAST function. The oven alert will sound once, while the LED
Backlit screen and START/PAUSE button will both illuminate
blue.
7. To pause the function, press the START/PAUSE button once.
The oven alert will sound once, while the LED backlit screen
and START/PAUSE button will both illuminate blue.
8. At any time of the function, press down on the
TIME / TEMP dial to illuminate both the LED backlit
screen and the oven.
9. The function can be cancelled anytime by pressing and
holding down the START/PAUSE button. The oven alert will
sound for 2 seconds, indicating that the function has been
cancelled.
10. Once the ROAST function has concluded, the oven alert
will sound once, the LED backlit screen will illuminate blue
while the START/PAUSE button backlight will go out.
The ROAST function is perfect for making food perfectly
roasted on the outside while keeping them juicy and tender on
the inside. Ideal for a wide variety of meats and poultry.
Rack Placement Bottom
Cooking Surface Cooking Pan
CONVECTION function Yes
ROTISSERIE function Yes
TIME function 1 min - 2 hr
TEMP function
150-450ºf / 66-232ºc
WARNING:
PLEASE EXERCISE CAUTION BY GIVING YOUR OVEN ABOUT 20 SECONDS
TO COOL DOWN BEFORE OPENING THE OVEN DOOR.
14

60:00
F
150
USING YOUR OVEN
WARM function
1. Place your bake mix on the cooking pan. Should you choose
to use your own oven-ready dish or pot, be sure to place it on
the wire rack at the bottom rack placement.
WARNING: Never place anything directly on the heating
elements.
2. Insert the cooking pan into the oven, in the top rack
placement.
3. Close the oven door and ensure it is fully closed.
4. Turn the SELECT dial until the WARM function is
selected. The default settings for the WARM function is 45
minutes cook time at 150ºF temperature.
5. To adjust the default settings of the WARM function, turn
the TIME / TEMP dial counter-clockwise to decrease the
cook time, or turn it clockwise to increase it. Press on the dial
once to adjust the temperature setting by turning the
TIME / TEMP dial counter-clockwise to decrease the
temperature or turn it clockwise to increase it.
6. Press the START/PAUSE button once to commence the
WARM function. The oven alert will sound once, while the LED
Backlit screen and START/PAUSE button will both illuminate
blue.
7. To pause the function, press the START/PAUSE button once.
The oven alert will sound once, while the LED backlit screen
and START/PAUSE button will both illuminate blue.
8. At any time of the function, press down on the
TIME / TEMP dial to illuminate both the LED backlit
screen and the oven.
9. The function can be cancelled anytime by pressing and
holding down the START/PAUSE button. The oven alert will
sound for 2 seconds, indicating that the function has been
cancelled.
10. Once the WARM function has concluded, the oven alert
will sound once, the LED backlit screen will illuminate blue
while the START/PAUSE button backlight will go out.
The WARM function ensures that any hot food is kept at a
consistent temperature, reducing the chances of bacterial
growth (common at 160ºf / 70ºc or above).
Rack Placement Bottom
Cooking Surface Cooking Pan
CONVECTION function Yes
ROTISSERIE function - Not Available -
TIME function 1 - 60 mins
TEMP function
150-200ºf / 66-93ºc
WARNING:
PLEASE EXERCISE CAUTION BY GIVING YOUR OVEN ABOUT 20 SECONDS
TO COOL DOWN BEFORE OPENING THE OVEN DOOR.
15

16:00
F
200
USING YOUR OVEN
DEFROST function
1. Place your food on the cooking pan. Should your frozen
food come in any packaging, please remove it before putting
it in the oven.
WARNING: Never place anything directly on the heating
elements.
2. Insert the cooking pan into the oven, in the top rack
placement.
3. Close the oven door and ensure it is fully closed.
4. Turn the SELECT dial until the DEFROST function is
selected. The default settings for the DEFROST function is 16
minutes cook time at 200ºF temperature.
5. To adjust the default settings of the DEFROST function, turn
the TIME / TEMP dial counter-clockwise to decrease the
cook time, or turn it clockwise to increase it. Press on the dial
once to adjust the temperature setting by turning the
TIME / TEMP dial counter-clockwise to decrease the
temperature or turn it clockwise to increase it.
6. Press the START/PAUSE button once to commence the
DEFROST function. The oven alert will sound once, while
the LED Backlit screen and START/PAUSE button will both
illuminate blue.
7. To pause the function, press the START/PAUSE button once.
The oven alert will sound once, while the LED backlit screen
and START/PAUSE button will both illuminate blue.
8. At any time of the function, press down on the
TIME / TEMP dial to illuminate both the LED backlit
screen and the oven.
9. The function can be cancelled anytime by pressing and
holding down the START/PAUSE button. The oven alert will
sound for 2 seconds, indicating that the function has been
cancelled.
10. Once the DEFROST function has concluded, the oven alert
will sound once, the LED backlit screen will illuminate blue
while the START/PAUSE button backlight will go out.
The DEFROST function thaws meat at room temperature by
circulating air around the food using the oven’s built-in fan.
To prevent any bacterial growth, always cook your food
immediately after using the DEFROST function. Perfect for
poultry, steaks and sh.
Rack Placement Bottom
Cooking Surface Cooking Pan
CONVECTION function Yes
ROTISSERIE function - Not Available -
TIME function 1 - 60 mins
TEMP function
150-250ºf / 66-121ºc
WARNING:
PLEASE EXERCISE CAUTION BY GIVING YOUR OVEN ABOUT 20 SECONDS
TO COOL DOWN BEFORE OPENING THE OVEN DOOR.
16

15:00
F
325
USING YOUR OVEN
REHEAT function
1. Place your food in the center of the cooking pan.
2. Insert the cooking pan into the oven, in the top rack
placement.
3. Close the oven door and ensure it is fully closed.
4. Turn the SELECT dial until the REHEAT function is
selected. The default settings for the REHEAT function is 15
minutes cook time at 325ºF temperature.
5. To adjust the default settings of the REHEAT function, turn
the TIME / TEMP dial counter-clockwise to decrease the
cook time, or turn it clockwise to increase it. Press on the dial
once to adjust the temperature setting by turning the
TIME / TEMP dial counter-clockwise to decrease the
temperature or turn it clockwise to increase it.
6. Press the START/PAUSE button once to commence the
REHEAT function. The oven alert will sound once, while
the LED Backlit screen and START/PAUSE button will both
illuminate blue.
7. To pause the function, press the START/PAUSE button once.
The oven alert will sound once, while the LED backlit screen
and START/PAUSE button will both illuminate blue.
8. At any time of the function, press down on the
TIME / TEMP dial to illuminate both the LED backlit
screen and the oven.
9. The function can be cancelled anytime by pressing and
holding down the START/PAUSE button. The oven alert will
sound for 2 seconds, indicating that the function has been
cancelled.
10. Once the REHEAT function has concluded, the oven alert
will sound once, the LED backlit screen will illuminate blue
while the START/PAUSE button backlight will go out.
The REHEAT function is ideal for reheating leftovers without
losing its taste, texture or freshness while also avoiding
browning or burns.
Rack Placement Bottom
Cooking Surface Cooking Pan
CONVECTION function Yes
ROTISSERIE function - Not Available -
TIME function 1 - 60 mins
TEMP function
150-450ºf / 66-232ºc
WARNING:
PLEASE EXERCISE CAUTION BY GIVING YOUR OVEN ABOUT 20 SECONDS
TO COOL DOWN BEFORE OPENING THE OVEN DOOR.
17

CLEANING AND STORAGE
CLEANING THE OVEN EXTERIOR
1. Use a soft damp sponge and some non-abrasive liquid detergent or a mild spray solution to clean the oven exterior. Never
apply the cleaning solution directly onto the oven, instead apply it to the sponge before wiping the oven exterior.
2. Never immerse the convection oven in water to clean it. Do not put any accessories into a dishwasher.
3. Use a soft damp sponge or scouring pad and some non-abrasive liquid detergent or a mild spray solution to clean the oven
glass door.
4. Wipe LED screen with a soft damp cloth and cleaning solution. Never apply the cleaning solution directly onto the LED screen,
instead apply it to the sponge before wiping down the screen. Using a dry cloth may scratch the LED screen surface.
5. Avoid using metal-based dish brushes to clean the exterior of the oven as it may tarnish the surface.
CLEANING THE OVEN INTERIOR
1. Wipe the interior surfaces of the oven with a soft damp sponge with a non-abrasive liquid detergent or a mild spray solution.
Never apply the cleaning solution directly onto the oven, instead apply it to the sponge before wiping the oven interior.
2. Never immerse the convection oven in water to clean it. Do not put any accessories into a dishwasher.
3. Never clean or wipe the heating elements. Never place any object including cooking pan directly on the surface of the heating
elements.
4. Avoid using metal-based dish brushes to clean the exterior of the oven as it may tarnish the surface.
CLEANING THE OVEN ACCESSORIES
1. Clean each accessory with a damp soft cloth and detergent or soap solution.
2. Avoid using metal-based dish brushes to clean the accessories as it may tarnish the surface.
CLEANING THE CRUMB TRAY
1. After every use, ensure to clean the crumb tray.
2. Remove the crumb tray from the bottom of the oven and wipe it with a soft damp sponge with non-abrasive liquid detergent.
Never apply the cleaning solution directly onto the oven, instead apply it to the sponge before wiping the crumb tray.
3. Dry the crumb tray thoroughly. Please ensure to always re-insert the crumb tray into the oven after cleaning before using the
oven.
STORAGE
1. Turn the oven off by pressing and holding the START/PAUSE button on the control panel. When the START/PAUSE button no
longer illuminates blue, the oven is powered off fully. Remove the power plug from the power outlet and allow for the oven and
accessories to cool down completely before you proceed to clean them.
2. After cleaning, ensure that the oven and all accessories are dry. Insert the wire rack into the middle rack slot, the cooking pan in
the bottom rack slot and the crumb tray into the oven. Close the oven door.
3. Ensure the oven is stored in an upright position, standing on its support legs. Keep the top of the oven clear of any
obstructions except for the bamboo cutting board.
WARNING:
UNPLUG THE UNIT & ALLOW IT TO COOL DOWN COMPLETELY BEFORE
CLEANING. DO NOT PLACE ANY OBJECT DIRECTLY
ON THE HEATING ELEMENTS.
18

CLEANING AND MAINTENANCE
Problem Reason Solution
Smoke appears while cooking If smoke appears and it starts
to smell during rst use of the
oven, it is a normal occurrence
as there is a layer of protective
lm on the heating elements to
prevent any corrosion during sea
transportation.
No special action required
If smoke appears while baking,
please check to see if the cooking
pan or the interior of the oven
is dirty.
Clean the cooking pan or the
interior of the oven
Ingredients in the oven may have
a high amount of fat.
Remove any extra fat from the
ingredients before cooking to
reduce any smoke.
Reason cannot be identied. Stop the oven immediately and
unplug the oven to prevent the
power cord from catching re.
The rack is jammed and the
oven door will not open.
Rack slots might be faulty from
normal usage.
Pull the rack out of the oven and
clean the rack slot inside the
oven. Please check to see if the
rack is damaged.
Toast shade is either too light or
too dark and producing smoke
Toast settings might not be ideal. Adjust the toast setting and check
to see if the rack is on the correct
rack placement.
19

WARNING: Before using the electrical
appliance, the following basic precautions
should always be followed:
1. Read all instructions.
2. Before using, check that the voltage of
the wall outlet corresponds to rated voltage
marked on the rating plate.
3. This appliance has been incorporated with a
grounded plug. Please ensure the wall outlet in
your house is well earthed.
4. To protect against re, electric shock and
injury to persons, do not immerse cord & plug
in water or other liquid.
5. Remove plug from wall outlet before
cleaning and when not in use. Allow appliance
to cool down completely before taking off,
attaching components or before cleaning.
6. Do not operate any appliance with
a damaged cord or plug or after the
appliance malfunctions, or was dropped or
damaged in any manner. Please contact us
at [email protected] to arrange for
examination, repair or electrical or mechanical
adjustment.
7. Make sure to remove all paper, cardboard or
electrical matter from within the oven before
using your oven.
8. Do not store any materials, including paper,
cardboard or plastic materials, in this oven
when it is not in use.
9. This oven is not intended to be operated by
means of an external timer or separate remote-
control system.
10. The use of accessory attachments not
recommended by the appliance manufacturer
may result in re, electric shock or injury to
persons.
1. Place appliance on at surface or table, do
not hang power cord over the edge of table or
counter.
12. Ensure the power cord does not touch any
hot surface of the appliance.
13. Do not place the convection oven on a hot
surface or beside a re in order to avoid being
damaged.
14. To disconnect, remove plug from wall
outlet. Always hold the plug but never pull the
cord.
15. Do not use appliance for other than its
intended use and place it in a dry environment.
16.Close supervision is necessary when your
applianc is being used near children.
17. Do not touch the hot surface of the oven
(such as oven door and the top of the oven).
Use oven mitts or handles.
18. This appliance is not intended for use
by persons (including children) with reduced
physical, sensory or mental capabilities, or lack
of experience and knowledge, unless they
have been given supervision or instruction
concerning use of the appliances by a person
responsible for their safety.
19. Children should be supervised to ensure
that they do not play with the appliance.
20. This oven is intended to be used in
household and similar applications such as:
- Staff kitchen areas in shop ofces and other
working environments
- farm houses
- cilents in hotels, motels and other residential
type environments
- bed and breakfast type environments
IMPORTANT SAFEGUARDS
20
/