Remington PG6060 Owner's manual
- Category
- Hair trimmers & clippers
- Type
- Owner's manual

PG6060
LITHIUM POWERED GROOMING KIT
PG6060-INT-T22- SS2013 amended.indd 1 11/21/2012 2:08:59 PM
Page is loading ...

3
ENGLISH
Thank you for buying your new Remington® product.
Before use, please read these instructions carefully and keep them safe. Remove all
packaging before use.
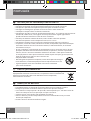
A CAUTION
• Use this appliance only for its intended use as described in this manual.
• Do not use the appliance if it is damaged or malfunctions.
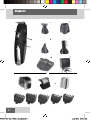
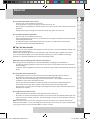
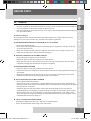
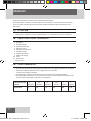
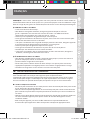
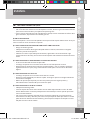
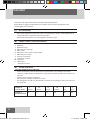
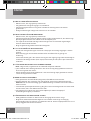
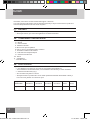
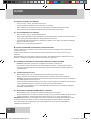
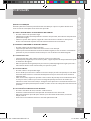
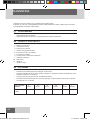
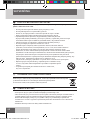
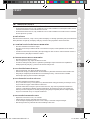
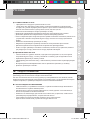
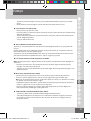
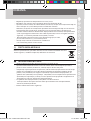
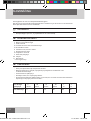
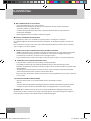
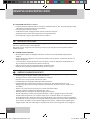
C KEY FEATURES
1 On/o switch
2 Groomer
3 Wide trimmer
4 Detail trimmer
5 Miniscreen shaver
6 Nose, ear, eyebrow trimmer
7 Body hair trimmer
8 8 attachment guide combs
9 Charging Indicator
10 Stand
11 Adapto r
•3yearsguarantee
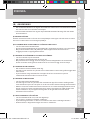
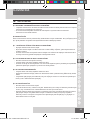
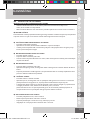
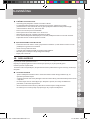
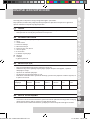
C GETTING STARTED
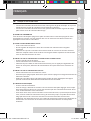
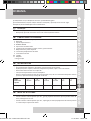
,Charging your groomer
•Beforeusingyourgroomerforthersttime,chargefor14-16hours.
•Placeyourgroomerintothestand,connecttheadaptortotheproductandthentothe
mains
•Thechargingindicatorwilllightup.
•Allow 3.5 hours for a complete charge.
•Topreservebatterylife,letthemrunoutevery6monthsthenrechargefor14-16hours.
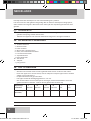
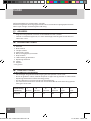
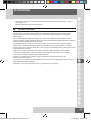
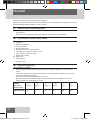
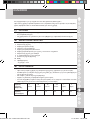
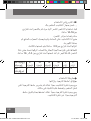
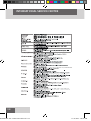
Quick
charge
time
5
minutes
10
minutes
15
minutes
30
minutes
1
hour
2
hours
Run time 4 8 12 20 45 90
PG6060-INT-T22- SS2013 amended.indd 3 11/21/2012 2:09:02 PM

4
ENGLISH
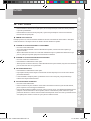
C HOW TO USE
, Attaching and removing guide combs
•Withthetrimmerbladefacingawayfromyou,slidetheguidecomboverthebackof
the trimmer blade and click into position.
•Withthetrimmerbladefacingawayfromyou,carefullypushtheguidecombaway
from the wide head trimmer.
, Before you begin
Combfacialhairwithanecombbeforeyoustarttrimming.Hairsshouldbedryandwithout
any waxes or lotions before using the groomer.
, To thin and taper beards or moustaches
• Attachthewidetrimmerblade.
• Placethehairlengthattachmentonthetrimmerblade,selectthedesiredlengthand
switch on.
• Starttrimmingunderthechin,followingthejawboneline.Worktowardtheearand
upper beard line using an upward motion.
, To Trim edge of beards or moustaches
• Attachthedetailtrimmerblade.
• Holdgroomerwithcuttingbladefacingyou.
• Startwithedgeofbeard/moustacheline,andwiththecuttingbladesrestinglightly
against your skin, use slow movements to create a beard/moustache line.
, To trim sideburns
• Holdgroomerwithcuttingbladefacingyou.
• Useasmallcombtoliftthehairs.Holdthecombatthedesiredbeardormoustache
length.
• Movethegroomeralongthecombtocutthehairs.Uselightpressureand
well-controlledmovementstotrimhair.
, Trimming the nape of your neck
• Attachthewidetrimmerblade.
• Useyourngerstoliftthehairatthebaseofyourheadupotheneck.Yourindex
ngershouldbecoveringtherootsofthehairsyouareliftingtopreventaccidental
removal by groomer.
• Usingyourotherhand,holdthegroomertothebaseofyourneckwiththecuttingunit
facing up, and move the groomer up the length of the neck until the unit touches your
ngercoveringthehairrootsatthebaseofyourhead.Movetheunitslowlywhen
performing this operation and to keep the hair roots at the base of your head out of the
way of the groomer.
PG6060-INT-T22- SS2013 amended.indd 4 11/21/2012 2:09:02 PM

5
ENGLISH
, To remove hair from nose and ear
• Attachnose,ear&eyebrowattachment.
• Insertgroomer’scuttingunitgentlyintothenostrilorear.
• Gentlymovethegroomerinandoutofthenostrilorearandatthesametimerotatethe
groomer.
• Avoidinsertingthecuttingunitmorethan6mmintoyournostrilorear.
, To remove hair from eyebrows
• Attachnose,ear,eyebrowattachment.
• Gentlyguidecuttingunittostray,unwantedhairsalongtheeyebrowlineorprotruding
from the eyebrow itself.
• Toremovethehairscompletelylowerontotheskinandmoveoverdesiredarea.
• Useslowandwell-controlledmovements.
E Tips for best results
Comb your hair in the direction that it grows so that the hairs are at their maximum height and
facing in the same direction.
Aftertrimming,lightlygooverthetrimmedareaswiththefoiltogetasmoothcleannish.
Since all hairs do not grow in the same direction, you may want to try dierent trimming
positions (i.e. upwards, downwards or across) for better results.
,Attaching and removing the trimmer attachments
Note: Always ensure the groomer is switched o before changing any attachments.
• Toremove,holdthegroomerwithonehandandturnthetrimmerheadanti-clockwise
with the other.
• Toattach,holdthegroomerwithonhandandturnthetrimmerheadclockwisewiththe
other.
, Using the detail attachement
• Holdgroomerwiththesurface(backside)ofthebladeguidesagainsttheskin.
• Usemotionssimilartousingawetbladetoprovidetheclosesttrim.
Note: The Trim Shave Technology attachment provides a dual purpose solution for
stubble or close results without irritation.
• Attachthecombtothedetailtrimmermakingsuretokeeptheadjustableguard
orientated to the large cutting teeth, while covering the small cutting teeth.
• Onceguardisinplace,youcanadjusttheheightofcutbyusingthethumbadjustment
button on the comb.
, Using the miniscreen shaver
• HoldthegroomersotheMiniScreengentlytouchesyourface.
• Useshort,andwell-controlledmovementstoshavearoundyourbeard/moustache.Use
your free hand to stretch your skin. This encourages the hair to stand upright, making it
easier to shave .
Note: The MiniScreen shaver was designed to shave the detail areas around your beard/
moustache/sideburns. It was not designed to shave your entire face. For a close comfortable
shave,guaranteed,useoneofRemington’selectricshavers.
PG6060-INT-T22- SS2013 amended.indd 5 11/21/2012 2:09:02 PM

6
ENGLISH
, Trimming body hair
•AttachBodyHairtrimmerattachmenthead.
•Toachievethedesiredhairlength,changetheguidecombbyeasilyslidingitontoone
of the three slots on the attachment head. The dierent slots represent 2.8mm, 5.6mm
&9.6mmhairlengths
•Placetheattopofthetrimmercombagainsttheskin.
S lowly slide the trimmer through the hair, in the direction of hair growth.
•Useslowandwell-controlledmovements.
•Ifhairbuildsupintheguidecombduringthetrimmingprocess,switchtheunito,pull
o the guide comb. Brush trimmer / rinse comb.
, Removing body hair
To remove the hairs completely,
•Trimthehairdownto1.2mmwithoutattachingtheguidecombandthenchangetothe
Mini Screen attachment head.
•Holdtheshavingheadtoyourskin.
•Stretchyourskinwithyourfreehandsohairsstandupright.
•Onlyapplylightpressureontheshavingheadwhilstshaving.
•Shaveagainsthairgrowth.
C CARE FOR YOUR GROOMER
Care for your product to ensure a long lasting performance. We recommend that you clean your
groomer after each use.
The easiest and the most hygienic way to clean the groomer is by rinsing the product head after
use with warm water.
E After each use
• Rinsetheaccumulatedhairfromthecuttersandshakeoexcesswater.Alternatively,
use a brush.
• Gentlytaponaatsurfacetoremovehairparticles,andbrushtheremaininghairsaway.
• Placeoneortwodropsofcutteroilorsewingmachineoilontheblades.Turntheclipper
on to distribute the oil evenly, wipe o any excess oil.
• Wipethemainunitwithadampclothanddryimmediately.
Note: Ensure that the groomer is turned o when applying the oil or rinsing under the
tap.
PG6060-INT-T22- SS2013 amended.indd 6 11/21/2012 2:09:02 PM

7
ENGLISH
F IMPORTANT SAFETY INSTRUCTIONS
Warning – To reduce the risks of burns , electrocution , re, or injury to persons:
• Donotleavetheapplianceunattendedwhilepluggedin.
• Onlysettheappliancedownonaheat-proofsurface.
• Makesurethepowerplugandcorddonotgetwet.
• Donotplugorunplugtheappliancewithwethands.
• Donotusetheapplianceifitisdamagedormalfunctions.
If the cable is damaged, it must be replaced by the manufacturer, its service agent, or
someonesimilarlyqualied,inordertoavoidhazard.
• Donottwistorkinkthecable,anddon’twrapitaroundtheappliance.
• Storetheproductatatemperaturebetween15°Cand35°C.
• Donotuseaccessoriesorattachmentsotherthanthosewesupply.
• Theappliance,includingitscord,mustnotbeused,playedwith,cleanedormaintained
by persons under eight years old and should at all times be kept out of their reach.
Use, cleaning or maintenance of the appliance by children over eight or by anyone with
a lack of knowledge, experience or with reduced physical, sensory or mental capabilities
should only be undertaken after receiving appropriate instruction and under the
adequate supervision of a responsible adult to ensure that they do so safely and that
thehazardsinvolvedareunderstoodandavoided.
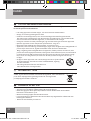
• Don’tputtheapplianceinliquid,don’tuseitnearwaterinabath-tub,
basinoranyothervessel,anddon’tuseitoutdoors.
• Alwaysremembertoturnonthegroomerbeforeyouinsertitinto
yournoseoreartoavoidinjury.
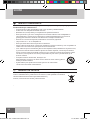
H ENVIRONMENTAL PROTECTION
Toavoidenvironmentalandhealthproblemsduetohazardoussubstancesinelectricaland
electronic goods, appliances marked with this symbol must not be
disposed of with unsorted municipal waste, but recovered, reused or recycled
PG6060-INT-T22- SS2013 amended.indd 7 11/21/2012 2:09:02 PM

8
ENGLISH
F BATTERY REMOVAL
•Thebatterymustberemovedfromtheappliancebeforeitisscrapped.
• Theappliancemustbedisconnectedfromthesupplymainswhenremovingthebattery.
• Unpluggroomerfromtheoutlettoavoidriskofelectricalshock.
• Prytheupperhousingfromtheproductwithaatheadscrewdriver.Thiswillexposethe
batteries.
• Withwirecutters,clipthewiresleadingtothebatteries.
• Removethebatteriesfromtheproduct.Contactyourlocalauthoritiesforproper
disposal.
• Thebatteryistobedisposedofsafely.
E SERVICE AND GUARANTEE
This product has been checked and is free of defects.
We guarantee this product against any defects that are due to faulty material or workmanship
for the guarantee period from the original date of consumer purchase.
If the product should become defective within the guarantee period, we will repair any such
defect or elect to replace the product or any part of it without charge, provided there is proof
of purchase.
This does not mean an extension of the guarantee period.
In the case of a guarantee simply call the Service Centre in your region.
This guarantee is oered over and above your normal statutory rights.
The guarantee shall apply in all countries in which our product was sold via an authorised
dealer.
This guarantee does not include damage to the product by accident or misuse, abuse,
alteration to the product or use inconsistent with the technical and/or safety instructions
required.
This guarantee shall not apply if the product has been dismantled or repaired by a person not
authorised by us.
IfyoucalltheServiceCentre,pleasehavetheModelNo.tohand,aswewon’tbeabletohelp
you without it.
It’sontheratingplatewhichcanbefoundontheappliance.
PG6060-INT-T22- SS2013 amended.indd 8 11/21/2012 2:09:02 PM
Page is loading ...
Page is loading ...
Page is loading ...
Page is loading ...
Page is loading ...
Page is loading ...
Page is loading ...
Page is loading ...
Page is loading ...
Page is loading ...
Page is loading ...
Page is loading ...
Page is loading ...
Page is loading ...
Page is loading ...
Page is loading ...
Page is loading ...
Page is loading ...
Page is loading ...
Page is loading ...
Page is loading ...
Page is loading ...
Page is loading ...
Page is loading ...
Page is loading ...
Page is loading ...
Page is loading ...
Page is loading ...
Page is loading ...
Page is loading ...
Page is loading ...
Page is loading ...
Page is loading ...
Page is loading ...
Page is loading ...
Page is loading ...
Page is loading ...
Page is loading ...
Page is loading ...
Page is loading ...
Page is loading ...
Page is loading ...
Page is loading ...
Page is loading ...
Page is loading ...
Page is loading ...
Page is loading ...
Page is loading ...
Page is loading ...
Page is loading ...
Page is loading ...
Page is loading ...
Page is loading ...
Page is loading ...
Page is loading ...
Page is loading ...
Page is loading ...
Page is loading ...
Page is loading ...
Page is loading ...
Page is loading ...
Page is loading ...
Page is loading ...
Page is loading ...
Page is loading ...
Page is loading ...
Page is loading ...
Page is loading ...
Page is loading ...
Page is loading ...
Page is loading ...
Page is loading ...
Page is loading ...
Page is loading ...
Page is loading ...
Page is loading ...
Page is loading ...
Page is loading ...
Page is loading ...
Page is loading ...
Page is loading ...
Page is loading ...
Page is loading ...
Page is loading ...
Page is loading ...
Page is loading ...
Page is loading ...
Page is loading ...
Page is loading ...
Page is loading ...
Page is loading ...
Page is loading ...
Page is loading ...
Page is loading ...
Page is loading ...
Page is loading ...
Page is loading ...
Page is loading ...
Page is loading ...
Page is loading ...
Page is loading ...
Page is loading ...
Page is loading ...
Page is loading ...
Page is loading ...
Page is loading ...
Page is loading ...
Page is loading ...
Page is loading ...
Page is loading ...
Page is loading ...
Page is loading ...
Page is loading ...
Page is loading ...
Page is loading ...
Page is loading ...
Page is loading ...
Page is loading ...
Page is loading ...
Page is loading ...
Page is loading ...
Page is loading ...
Page is loading ...
Page is loading ...
Page is loading ...
Page is loading ...
Page is loading ...
Page is loading ...
Page is loading ...

138
INTERNATIONAL SERVICE CENTRE
1920r. 7a, 02-366 Warszawa
Тел.
PG6060-INT-T22- SS2013 amended.indd 138 11/21/2012 2:09:13 PM

139
PG6060-INT-T22- SS2013 amended.indd 139 11/21/2012 2:09:13 PM

140
Model No. PG6060
5BǵNBWFOBLMJZFTSBTOEBEJLLBUFEJMFDFLIVTVTMBS
̓̓̓̓̓̓̓̓ÃSàOàEàǵàSNFZJOJ[
̓̓̓̓̓̓̓̓%BSCFMFSFNBSV[LBMNBNBTOTBǘMBZO[
̓̓̓̓̓̓̓̓$JIB[OBLMJZFTSBTOEBPSJKJOBMBNCBMBKOEBUBǵZO[
#BLBOMLÎBUFTQJUWFJMBOFEJMFOLVMMBONÚNSàZMES
5Ã3,ƞ:&ƞUIBMBUÎ'JSNB#JMHJTJ
7"35"1JMMFSJ5JD-UEƵUJ
ƞ450±"EB4POV,V[FZ1MB[B,BU%.BINVUCFZƞ45
Tel: 0212 659 50 60
Ã3&5ƞ$ƞ'ƞ3."#ƞ-(ƞ4ƞ7"35"$POTVNFS#BUUFSJFT(NC)$P,(B""MGSFE,SVQQ4US
73479 Ellwangen, Germany.
ʅʦʤʞʝʘʤʚʞʨʛʡʲ4QFDUSVN#SBOET4IFO[IFO-UEʇʥʛʠʨʦʩʢɷʦʳʣʚʧ
ʎʛʣʲʭʜʛʣʲ
ʁʨʚʀʞʨʖʟʚʡʵ7BSUB$POTVNFS#BUUFSJFT(NC)$P,(B"ɶʡʲʪʦʛʚ
ʀʦʩʥʥʎʨʦʖʧʧʛʓʡʡʲʘʖʣʙʛʣɹʛʦʢʖʣʞʵ
ɾʝʚʛʡʞʛʞʧʥʤʡʲʝʤʘʖʨʲʥʤʣʖʝʣʖʭʛʣʞʴʘʧʤʤʨʘʛʨʧʨʘʞʞʧʞʣʧʨʦʩʠʬʞʛʟʥʤ
ʳʠʧʥʡʩʖʨʖʬʞʞ
*/51(57FSTJPO
Remington® is a Registered Trade Mark of Spectrum Brands,Inc.,
or one of its subsidiaries
7"35"$POTVNFS#BUUFSJFT(NC)$P,(B""MGSFE,SVQQ4US&MMXBOHFO
Germany
XXXSFNJOHUPOFVSPQFDPN
© 2012SBI
PG6060-INT-T22- SS2013 amended.indd 140 11/21/2012 2:09:13 PM
44-6060-208000
-
 1
1
-
 2
2
-
 3
3
-
 4
4
-
 5
5
-
 6
6
-
 7
7
-
 8
8
-
 9
9
-
 10
10
-
 11
11
-
 12
12
-
 13
13
-
 14
14
-
 15
15
-
 16
16
-
 17
17
-
 18
18
-
 19
19
-
 20
20
-
 21
21
-
 22
22
-
 23
23
-
 24
24
-
 25
25
-
 26
26
-
 27
27
-
 28
28
-
 29
29
-
 30
30
-
 31
31
-
 32
32
-
 33
33
-
 34
34
-
 35
35
-
 36
36
-
 37
37
-
 38
38
-
 39
39
-
 40
40
-
 41
41
-
 42
42
-
 43
43
-
 44
44
-
 45
45
-
 46
46
-
 47
47
-
 48
48
-
 49
49
-
 50
50
-
 51
51
-
 52
52
-
 53
53
-
 54
54
-
 55
55
-
 56
56
-
 57
57
-
 58
58
-
 59
59
-
 60
60
-
 61
61
-
 62
62
-
 63
63
-
 64
64
-
 65
65
-
 66
66
-
 67
67
-
 68
68
-
 69
69
-
 70
70
-
 71
71
-
 72
72
-
 73
73
-
 74
74
-
 75
75
-
 76
76
-
 77
77
-
 78
78
-
 79
79
-
 80
80
-
 81
81
-
 82
82
-
 83
83
-
 84
84
-
 85
85
-
 86
86
-
 87
87
-
 88
88
-
 89
89
-
 90
90
-
 91
91
-
 92
92
-
 93
93
-
 94
94
-
 95
95
-
 96
96
-
 97
97
-
 98
98
-
 99
99
-
 100
100
-
 101
101
-
 102
102
-
 103
103
-
 104
104
-
 105
105
-
 106
106
-
 107
107
-
 108
108
-
 109
109
-
 110
110
-
 111
111
-
 112
112
-
 113
113
-
 114
114
-
 115
115
-
 116
116
-
 117
117
-
 118
118
-
 119
119
-
 120
120
-
 121
121
-
 122
122
-
 123
123
-
 124
124
-
 125
125
-
 126
126
-
 127
127
-
 128
128
-
 129
129
-
 130
130
-
 131
131
-
 132
132
-
 133
133
-
 134
134
-
 135
135
-
 136
136
-
 137
137
-
 138
138
-
 139
139
-
 140
140


Remington PG6060 Owner's manual
- Category
- Hair trimmers & clippers
- Type
- Owner's manual
Ask a question and I''ll find the answer in the document
Finding information in a document is now easier with AI
in other languages
- italiano: Remington PG6060 Manuale del proprietario
- français: Remington PG6060 Le manuel du propriétaire
- español: Remington PG6060 El manual del propietario
- Deutsch: Remington PG6060 Bedienungsanleitung
- русский: Remington PG6060 Инструкция по применению
- Nederlands: Remington PG6060 de handleiding
- português: Remington PG6060 Manual do proprietário
- slovenčina: Remington PG6060 Návod na obsluhu
- dansk: Remington PG6060 Brugervejledning
- polski: Remington PG6060 Instrukcja obsługi
- čeština: Remington PG6060 Návod k obsluze
- Türkçe: Remington PG6060 El kitabı
- svenska: Remington PG6060 Bruksanvisning
- suomi: Remington PG6060 Omistajan opas
- română: Remington PG6060 Manualul proprietarului
Related papers
-
Remington PG6050 User manual
-
Remington NE 3550 Owner's manual
-
-
Remington PG6045 Owner's manual
-
Remington AS300 User manual
-
-
Remington MB4040 User manual
-
-
-
Remington BHT6250 Owner's manual
Other documents
-
BaByliss MT728E 10 en 1 Carbon Steel Owner's manual
-
-
-
-
Philips QT4020/30 User manual
-
Philips G380/60 User manual
-
Norelco QG3360/42 User manual
-
Sytech SYHC26 Owner's manual
-
ECG ZS 1420 User manual
-
Rowenta WET & DRY PRECISION Owner's manual