Ferm CDM1086 Owner's manual
- Category
- Cordless combi drills
- Type
- Owner's manual

EN
DE
NL
FR
ES
PT
IT
SV
FI
NO
DA
Cordless drill
18V -1,5Ah
CDM1086
www.ferm.com
Original instructions 05
Übersetzung der Originalbetriebsanleitung 09
Vertaling van de oorspronkelijke gebruiksaanwijzing
14
Traduction de la notice originale 19
Traducción del manual original 24
Tradução do manual original 29
Traduzione delle istruzioni originali 34
Översättning av bruksanvisning i original 39
Alkuperäisten ohjeiden käännös 44
Oversatt fra orginal veiledning 48
Oversættelse af den originale brugsanvisning 53
Page is loading ...
Page is loading ...
Page is loading ...

GB
5
Ferm
CORDLESS DRILL
Thank you for buying this Ferm product.
By doing so you now have an excellent product,
delivered by one of Europe’s leading suppliers. All
products delivered to you by Ferm are
manufactured according to the highest standards
of performance and safety. As part of our
philosophy we also provide an excellent customer
service, backed by our comprehensive Warranty.
We hope you will enjoy using this product for many
years to come.
The numbers in the text refer to the diagrams
on pages 2 - 4.
Read the operating instructions carefully
before using this device. Familiarise
yourself with its functions and basic
operation. Service the device as per the
instructions to ensure that it always
functions properly. The operating
instructions and the accompanying
documentation must be kept in the
vicinity of the device.
Contents
1. Machine information
2. Safety instructions
3. Mounting accessories
4. Operation
5. Service & maintenance
1. MACHINE INFORMATION
Technical specifications
Voltage 18 V
Charger voltage 230-240 V~
Charger frequency 50 Hz
Battery output 1.5 Ah
Charge time 70 minutes
Chuck capacity 1.0 - 10 mm
Drill speeds 2
Max. torque (low speed) 20 Nm
No-load speed
Position I 0 - 350/min
Position II 0 - 1250/min
Weight (incl. battery) 1.5 kg
Lpa (acoustic pressure) 75 dB(A), K=3
Lwa (acoustic power) 86 dB(A), K=3
Vibration 1.68 m/s
2
, K=1.5
Vibration level
The vibration emission level stated in this
instruction manual has been measured in
accordance with a standardised test given in EN
60745; it may be used to compare one tool with
another and as a preliminary assessment of
exposure to vibration when using the tool for the
applications mentioned
• using the tool for different applications, or with
different or poorly maintainted accessories,
may significantly increase the exposure level
• the times when the tool is switched off or when
it is running but not actually doing the job, may
signifi cantly reduce the exposure level
Protect yourself against the effects of
vibration by maintaining the tool and its
accessories, keeping your hands warm, and
organizing your work patterns
Contents of packing
1 Cordless drill
1 Battery
1 Charger
2 Double-sides bits
1 Operating instructions
1 Safety instructions
1 Warranty card
Check the appliance, any loose parts and
accessories for damage caused during transport.
Product information
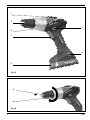
Fig. A
1. Direction switch
2. Battery release button
3. Battery
4. On/Off switch
5. Torque setting ring
6. Chuck
7. Speed selection switch
2. SAFETY INSTRUCTIONS
Explanation of the symbols
Denotes risk of personal injury, loss of
life or damage to the tool in case of non-
observance of the instructions in this
manual.

GB
6
Ferm
Indicates electrical shock hazard.
The number of revolutions of the
machine can be electronically set.
Do not use in rain.
Indoor use only.
Do not dispose of in household waste.
In case of failure, the transformer is not
dangerous
Max. temperature 40
o
Do not throw the battery into fire
Do not throw the battery in the water
Important safety notes on charger and battery
block
If you come in contact with acid from the
battery block, rinse it off with water
immediately. If acid gets into your eyes,
rinse out your eyes at once with water
and contact a doctor immediately!
1. Read and note the operating instructions and
safety notes for the charger and battery block
before use!
2. NB! Only use the charger and battery block
that were supplied by the manufacturer -
otherwise you will risk an accident.
3. Protect the charger, battery block and power
tool from moisture, e.g. rain or snow.
4. Always check that all cables are connected
correctly before using the charger.
5. If you discover that a cable is damaged, you
should not use the charger again. Have the
damaged cable replaced immediately.
6. When the charger is not in use, it should be
removed from the power socket. Do not pull
out the charger by grasping the cable.
7. If the charger has been dropped or has
otherwise been exposed to high mechanical
stresses, you should have it checked for
damage by an authorised dealer before using
it again. Damaged parts should be repaired.
8. Exercise caution when handling the battery
block and do not drop it or expose it to impacts.
9. Never attempt to repair the charger or battery
block yourself. Repairs must always be carried
out by an authorised dealer - otherwise you
risk an accident.
10. Before cleaning or servicing the charger or
battery block, always pull the plug from the
charger socket.
11. Never charge the battery block when the
ambient temperature is below 5 °C or above
40 °C.
12. The battery block must not be short-circuited.
A short-circuit will cause a high current
to flow. This may result in overheating,
the danger of fire or explosion of the
battery block. This may damage the
battery block or the user may risk an
accident.
Therefore:
• Do not connect any cables to the poles of
the battery block.
• Take care that there are no metal objects
(nails, paper clips, coins, etc.) on the
contact surface of the battery block.
• Do not expose the battery block to water or
rain.
• Only use the battery block supplied in
combination with this cordless drill/
screwdriver so as to avoid faults and/or
risks to persons.
13. A damaged battery block or one that can no
longer be charged must be disposed of as
special waste. Do not discard it with
household waste.
14. Never throw the battery block onto a fire or
into water. This will risk explosion!

GB
7
Ferm
Electrical safety
Always check that the voltage on the
battery block corresponds to the voltage
on the rating plate. Also check that your
mains voltage corresponds to the input
voltage of the battery charger.
Class II machine – Double insulation –
You don’t need any earthed plug.
Replacing cables or plugs
Immediately throw away old cables or plugs when
they have been replaced by new ones.
• Remove the battery block when the power tool
is not being used and prior to maintenance.
• The tool is suitable for use as a screwdriver
and drill. Any other application is specifically
excluded.
3. MOUNTING ACCESSORIES
Prior to mounting an accessory always
remove the battery.
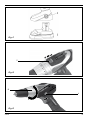
Fitting and removing drill cutters
Fig. B
In addition to screwdriver bits with a hexagonal
shaft, this tool can also accommodate drill bits with
a hexagonal shaft.
• Loosen the drill chuck (6) by rotating the hand-
grip (8).
• Insert the shaft of the drill cutter into the chuck.
• Tighten the drill chuck so that the drill cutter is
firmly clamped.
• Rotate the drill chuck in the opposite direction
when you wish to change the cutter.
Connecting and removing the battery
Fig. C
Ensure that the exterior of the battery
block or tool is clean and dry before
connecting the charger.
• Ensure that the direction reversing switch (1,
Fig. A) is in the central position in order to
prevent the appliance from being switched on
unexpectedly.
• Insert the battery (3) into the base of the
appliance, as shown on the illustration. Push
the battery until it latches in.
• Press the locking buttons (2) on both sides
before removing the battery, and disengage
the battery from the base of the appliance.
4. OPERATION
Always follow the safety notes and the
relevant safety code.
Hold the appliance firmly and press the drill
steadily onto the workpiece. Do not overload the
appliance. Only use drills with no visible wear.
Worn drills will have a bad effect on the functioning
of the appliance.
Adjusting the speed
Fig. D
The appliance has two drill speeds.
• For slow drilling or for driving or removing
screws, set the speed selection switch (7) to ‘1’.
• For fast drilling set the speed selection switch
(7) to ‘2’.
Never switch over when the motor is
running!
Adjusting the torque
Fig. E
The appliance has 21 different torque settings with
which to set the power for driving and removing
screws.
• Set the torque adjustment ring (5) to the
desired position. The available torque settings
are indicated on the adjustment ring by the
numbers 1 to 21 and by dots between the
figures to define intermediate settings.
• You should preferably choose a setting as low
as possible when using the screwdriver.
Select a higher setting if the motor slips.
Driving and removing screws
Fig. A
• Set the direction reversing switch (1) to
position ‘’ in order to drive screws.
• Set the direction reversing switch (1) to

GB
8
Ferm
position ‘±’ in order to remove screws.
Drilling
• Rotate the torque adjustment ring (5) to the
drilling position.
Ensure that the direction reversing
switch (1) is always set to ‘’ during
drilling.
Switching the device on and off
Fig. A
• Depress the on/off switch (4). It regulates the
speed of the appliance by transmitting power
to the switch.
• Release the on/off switch (4) to halt the drill
chuck immediately, it will no longer run on.
• Move the direction reversing switch (1) to the
centre in order to lock the appliance in its
disabled state.
Only lay down the appliance when it has stopped
running completely. Do not place it on a dusty
surface as particles of dust could get into the
mechanism.
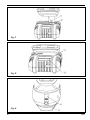
Spirit level
Fig. H
The drill is equipped with a dual reading horizontal/
vertical level to assist in keeping the drill “level”
while drilling horizontal and vertical holes. The
horizontal level (13) is located in the top of the drill
housing. The vertical level (14) is located on the
rear of the drill housing.
To maintain a level drilling position, hold the drill
where the level bubble is centred in the level
indicator circle.
Charging the battery
• The included battery is delivered in partly
charged condition.
• Only use the battery charger in a temperature
range between + 5 °C to + 40 ºC.
• Only use the battery charger in dry, ventilated
rooms.
Charging
Fig. F
One advantage of using Lithium-Ion batteries is
that, until the battery is almost empty, hardly any
power fading is noticeable. The machine can be
used until you start noticing that the power of the
drill is elapsed. The battery is discharged now and
needs to be charged.
Charging the battery
Fig. F
• Place the battery stem (9) into the matching
cavity on top of the charger (10).
• Make sure the battery stem is pressed fully
into the charger as far as it will go.
• Plug the charger into the electrical outlet.
LED indicators
Fig. G
When the battery charger is plugged in and the
battery inserted, the battery charger will begin
charging the battery. The red LED (11) and the
green LED (12) on top of the charger will indicate
the charging status.
• When the charger is plugged in without a
battery inserted, the green LED (12) will be lit
up.
• When a battery is inserted, the red LED (11)
will start blinking, indicating charging has
started.
• When the battery is full, charging will stop and
the green LED (12) will start blinking.
• If the battery is left in the charger, the charger
will go on standby after 2 hours. The green
LED (12) will stop blinking and light up.
When an error occurs the red LED (11)
will be lit up.
If the temperature of the battery is too
high to get charged safely, both the
green LED (12) and red LED (11) will be
lit, indicating charging process is on
hold. Charging will start when the
battery has cooled down.
Lithium-Ion cells can be stored for a
long period without losing much of their
charge. When the machine is not being
used over a longer period of time, it is
best to store the battery in charged
condition.

D
9
Ferm
5. SERVICE & MAINTENANCE
Make sure that the machine is not live
when carrying out maintenance work on
the motor.
These machines have been designed to operate
over a long period of time with a minimum of
maintenance. Continuous satisfactory operation
depends upon proper machine care and regular
cleaning.
Cleaning
Keep the ventilation slots of the machine clean to
prevent overheating of the engine. Regularly clean
the machine housing with a soft cloth, preferably
after each use. Keep the ventilation slots free from
dust and dirt. If the dirt does not come off use a
soft cloth moistened with soapy water. Never use
solvents such as petrol, alcohol, ammonia water,
etc. These solvents may damage the plastic parts.
Lubrication
The machine requires no additional lubrication.
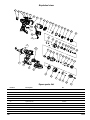
Faults
Should a fault occur, e.g. after wear of a part,
please contact the service address on the
warranty card. In the back of this manual you find
an exploded view showing the parts that can be
ordered.
Environment
To prevent damage during transport, the appliance
is delivered in a solid packaging which consists
largely of reusable material. Therefore please
make use of options for recycling the packaging.
Faulty and/or discarded electrical or
electronic apparatus have to be
collected at the appropriate recycling
locations.
Warranty
The warranty conditions can be found on the
separately enclosed warranty card.
AKKU-BOHRSCHRAUBER
Vielen Dank, dass Sie dieses Ferm Produkt
gekauft haben.
Dadurch besitzen Sie nun ein ausgezeichnetes
Produkt von einem der führenden Lieferanten in
Europa. Alle Produkte, die Ihnen von Ferm
geliefert werden, werden im Einklang mit den
höchsten Standards für Leistung und Sicherheit
gefertigt. Als Teil unserer Philosophie bieten wir
auch einen ausgezeichneten Kundenservice,
unterstützt von unserer umfangreichen Garantie.
Wir hoffen, dass Sie viele Jahre Freude an diesem
Produkt haben werden.
Die Ziffern im nachstehenden Text verweisen
auf die Abbildungen auf Seite 2 - 4.
Lesen Sie diese Bedienungsanleitung
aufmerksam, bevor Sie die Maschine in
Betrieb nehmen. Machen Sie sich mit
der Funktionsweise und der Bedienung
vertraut. Warten Sie die Maschine
entsprechend der Anweisungen, damit
sie immer einwandfrei funktioniert. Die
Betriebsanleitung und die dazugehörige
Dokumentation müssen in der Nähe der
Maschine aufbewahrt werden.
Inhalt
1. Technische Daten
2. Sicherheitsvorschriften
3. Montage des zubehörs
4. Bedienung
5. Wartung und Pflege
1. TECHNISCHE DATEN
Gerätedaten
Spannung 18 V
Spannung Akkuladegerät 230-240 V~
Frequenz Akkuladegerät 50 Hz
Akkuleistung 1,5 Ah
Ladezeit 70 Minuten
Anzahl der Bohrgeschw. 2
Max. Drehmoment
(Geschwindigkeit niedrig) 20 Nm
Drehzahl, ohne Last
Position I 0 - 350/min
Position II 0 - 1250/min
Bohrfutteraufnahme 1,0 - 10 mm
Page is loading ...
Page is loading ...
Page is loading ...
Page is loading ...
Page is loading ...
Page is loading ...
Page is loading ...
Page is loading ...
Page is loading ...
Page is loading ...
Page is loading ...
Page is loading ...
Page is loading ...
Page is loading ...
Page is loading ...
Page is loading ...
Page is loading ...
Page is loading ...
Page is loading ...
Page is loading ...
Page is loading ...
Page is loading ...
Page is loading ...
Page is loading ...
Page is loading ...
Page is loading ...
Page is loading ...
Page is loading ...
Page is loading ...
Page is loading ...
Page is loading ...
Page is loading ...
Page is loading ...
Page is loading ...
Page is loading ...
Page is loading ...
Page is loading ...
Page is loading ...
Page is loading ...
Page is loading ...
Page is loading ...
Page is loading ...
Page is loading ...
Page is loading ...
Page is loading ...
Page is loading ...
Page is loading ...
Page is loading ...

20
45
43
46
42
41
31
30
44
18
33
40
39
38
37
36
35
34
32
21
19
22
17
16
15
14
13
12
8
7
11
10
9
6
5
47
48
49
50
51
52
53
4
3
2
1
54
55
56
57
29
28
27
26
25
24
23
Ferm
58
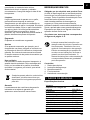
Spare parts list
Position Description No
4 Battery CDA1070
5till19 + 12till41 Gearbox complete 409870
10 Chuck 409871
11 Chuck screw 409283
43 +54 + 55 Motor + switch 409872
45 Speed elector 409873
50 Spirit level 409874
53 L/R Switch 409875
56 Battery lock assy 490012
- Charger 409876
Exploded view
Page is loading ...

www.ferm.com
1204-23
-
 1
1
-
 2
2
-
 3
3
-
 4
4
-
 5
5
-
 6
6
-
 7
7
-
 8
8
-
 9
9
-
 10
10
-
 11
11
-
 12
12
-
 13
13
-
 14
14
-
 15
15
-
 16
16
-
 17
17
-
 18
18
-
 19
19
-
 20
20
-
 21
21
-
 22
22
-
 23
23
-
 24
24
-
 25
25
-
 26
26
-
 27
27
-
 28
28
-
 29
29
-
 30
30
-
 31
31
-
 32
32
-
 33
33
-
 34
34
-
 35
35
-
 36
36
-
 37
37
-
 38
38
-
 39
39
-
 40
40
-
 41
41
-
 42
42
-
 43
43
-
 44
44
-
 45
45
-
 46
46
-
 47
47
-
 48
48
-
 49
49
-
 50
50
-
 51
51
-
 52
52
-
 53
53
-
 54
54
-
 55
55
-
 56
56
-
 57
57
-
 58
58
-
 59
59
-
 60
60


Ferm CDM1086 Owner's manual
- Category
- Cordless combi drills
- Type
- Owner's manual
Ask a question and I''ll find the answer in the document
Finding information in a document is now easier with AI
in other languages
- italiano: Ferm CDM1086 Manuale del proprietario
- français: Ferm CDM1086 Le manuel du propriétaire
- español: Ferm CDM1086 El manual del propietario
- Deutsch: Ferm CDM1086 Bedienungsanleitung
- Nederlands: Ferm CDM1086 de handleiding
- português: Ferm CDM1086 Manual do proprietário
- dansk: Ferm CDM1086 Brugervejledning
- svenska: Ferm CDM1086 Bruksanvisning
- suomi: Ferm CDM1086 Omistajan opas
Related papers
Other documents
-
Texas IFX2000 Owner's manual
-
Einhell Blue BT-CD 14,4 2B Operating instructions
-
Makita BDF450 User manual
-
Makita BDF442 User manual
-
Defort DCD-14N-7-BDK User manual
-
Defort DCD-12N-7-B Owner's manual
-
-
Maktec MT001 Owner's manual
-
-