TCHELICON HARMONY SINGER Owner's manual
- Category
- Musical Instrument Amplifier
- Type
- Owner's manual

(EN) Introduction
This is the singing guitarist’s backup vocal group, reverb unit and pro engineer in one pedal!
Whether you’re singing solo with an acoustic guitar, rocking with your band or practicing at home, Harmony
Singer will fill out your sound and maybe even inspire your next song. Despite its small size, it features the same
quality of effects as its TC-Helicon big brothers VoiceLive 2 and VoiceLive Touch, yet with only the most essential
controls.
Features
• Adds one to two voices of realistic vocal harmony guided by your guitar
• Superb reverb effect with three styles sweetens your vocal presentation
• Adaptive Tone automatically brightens, compresses and removes mud for pro vocal tone overall
• Harmony arrangement knob selects harmony voices above or below, close or far and combinations
• Easy inline connection between standard mic and mixer
• Clean Thru connection to guitar amp/PA
• Phantom power always on
• USB connection to free VoiceSupport application offering updates, product-specific news, and more
• Mic Control (patent pending) allows remote on/off switching using an optional TC-Helicon MP-75 or
Sennheiser e835FX mic.
(DE) Einleitung
Der Harmony Singer ist Chor, Reverb und Toningenieur – und all das im kompakten Pedalformat!
Ob Sie als Solist mit einer akustischen Gitarre auftreten, mit einer Band spielen oder einfach zu Hause üben: Der Harmony
Singer sorgt für einen überzeugenden Sound und wird Sie vielleicht sogar zu Ihrem nächsten Song inspirieren. Trotz seiner
kompakten Maße bietet er dieselbe Effektqualität wie seine großen Brüder; die TC-Helicon-Effektprozessoren VoiceLive 2
und VoiceLive Touch. Lediglich die Bedienelemente wurden auf das unbedingt Erforderliche reduziert.
Features
• Erzeugt – gesteuert von Ihrer Gitarre – zu Ihrer Gesangsstimme ein oder zwei realistisch klingende Harmoniestim-
men.
• Herausragend klingender Reverbeffekt mit drei verschiedenen Stilen bringt Ihre Vocals noch besser zur Geltung.
• Adaptive Tone-Modul sorgt mit Höhenanhebung, Komprimierung und Reduzierung problematischer Frequenzen
automatisch für einen professionellen Vocal-Sound.
• Arrangieren der Harmoniestimmen per Drehregler (obere oder untere Lage, nah oder weit sowie entsprechende
Kombinationen)
• Kann problemlos zwischen ein normales Mikrofon und ein Mischpult geschaltet werden (Inline-Betrieb)
• Unverfälschte Signaldurchleitung (Thru) an Gitarrenverstärker/PA.
• Permanent aktive Phantomspeisung
• Per USB-Verbindung Zugriff auf VoiceSupport-Software für Produktinformationen, Updates und vieles mehr
• Funktion Mic Control (zum Patent angemeldet) zum Steuern des Gerätes direkt von einem Mikrofon Modell TC-He-
licon MP-75 oder Sennheiser e835FX (separat erhältlich)
Phantom power
There is no switch to enable phantom power on Harmony Singer. Phantom power is available when the product is
powered up. Microphones that don’t require phantom power will operate properly.
First setup and use
1. Turn down your PA’s master volume.
2. Connect your mic and PA as shown in the diagram, then plug in the AC adaptor. For live performance, a USB
connection to a computer is not required.
3. Sing into your mic while adjusting the MIC GAIN control so that the input level LED flashes green. Brief
flashes of red on the LED on your loudest singing are OK.
4. Ensure the Tone button is lit.
5. Set the Harmony knob to its fully counter-clockwise (left) detent position.
6. Set the Level knob to the center notch.
7. Set the Reverb knob to any level you wish!
8. Sing while turning up your PA volume to a comfortable level.
9. Activate the harmony effect with the footswitch. The center LED will light up.
10. Strum some chords while you sing to hear your new backup singers following your music.
Phantomspeisung
An diesem Gerät gibt es keinen Schalter zum Aktivieren der Phantomspeisung. Die Phantomspeisung steht sofort
zur Verfügung, wenn das Gerät angeschaltet wird. Mikrofone, für die keine Phantomspeisung erforderlich ist,
können problemlos verwendet werden.
Konfiguration und Inbetriebnahme
1. Senken Sie den Pegel an Ihrem Verstärker oder der PA ab.
2. Schließen Sie das Gerät zunächst entsprechend der Abbildung an Ihr Mikrofon und Ihre PA an und stecken
Sie dann das Netzteil in eine Steckdose. Eine USB-Verbindung zu einem Computer ist beim Live-Einsatz nicht
erforderlich.
3. Singen Sie in Ihr Mikrofon und passen Sie mit dem Regler MIC GAIN die Eingangsempfindlichkeit so an, dass
die Eingangspegel-Leuchtdiode grün leuchtet. An lauten Stellen darf die LED auch kurzfristig rot leuchten.
4. Achten Sie darauf, dass die Leuchtdiode der Tone-Taste leuchtet.
5. Drehen Sie den Harmony-Regler gegen den Uhrzeigersinn bis an den linken Anschlag.
6. Stellen Sie den Level-Regler auf die Mittelposition.
7. Stellen Sie den Reverb-Regler auf eine beliebige Position.
8. Singen Sie, während Sie den Pegel an Ihrer Verstärkeranlage erhöhen, bis der gewünschte Pegel erreicht ist.
9. Aktivieren Sie die Harmoniestimmenerzeugung durch Antippen des Fußtasters. Die mittlere LED leuchtet auf.
10. Spielen Sie auf Ihrer Gitarre und singen Sie. Sie sollten dann Harmoniestimmen hören, die Ihrem Gesang
passend zu den Songakkorden folgen.
USER’S MANUAL
BEDIENUNGSANLEITUNG
MANUAL DE INSTRUCCIONES
MANUALE D’USO
MODE D’EMPLOI
Harmony Singer
Important Safety Instructions
1. Read these instructions.
2. Keep these instructions.
3. Heed all warnings.
4. Follow all instructions.
5. Do not use this apparatus near water.
6. Clean only with dry cloth.
7. Do not block any ventilation openings. Install in accordance
with the manufacturer’s instructions.
8. Do not install near heat sources such as radiators, heat
registers, stoves, or other apparatus (including amplifiers)
that produce heat.
9. Only use attachments/accessories specified by the
manufacturer.
10. Refer all servicing to qualified service personnel. Servicing is
required when the apparatus has been damaged in any way,
such as power-supply cord or plug is damaged, liquid has
been spilled or objects have fallen into the apparatus, the
apparatus has been exposed to rain or moisture, does
not operate normally, or has been dropped.
Warning!
• To reduce the risk of fire or electrical shock, do not expose
this equipment to dripping or splashing and ensure that no
objects filled with liquids, such as vases, are placed on the
equipment.
• Do not install in a confined space.
Service
All service must be performed by qualified personnel.
Caution:
You are cautioned that any change or modifications not
expressly approved in this manual could void your authority to
operate this equipment.
EMC/EMI
This equipment has been tested and found to comply with the
limits for a Class B Digital device, pursuant to part 15 of the
FCC rules.
These limits are designed to provide reasonable protection
against harmful interference in residential installations. This
equipment generates, uses and can radiate radio frequency
energy and – if not installed and used in accordance with the
instructions – may cause harmful interference to radio com-
munications. However, there is no guarantee that interference
will not occur in a particular installation. If this equipment does
cause harmful interference to radio or television reception –
which can be determined by turning the equipment off and on
–, the user is encouraged to try correcting the interference by
one or more of the following measures:
• Reorient or relocate the receiving antenna.
• Increase the separation between the equipment and the
receiver.
• Connect the equipment to an outlet on a circuit different
from the one to which the receiver is connected.
• Consult the dealer or an experienced radio/TV technician
for help.
For the customers in Canada:
This Class B digital apparatus complies with Canadian ICES-003.
Cet appareil numérique de la classe B est conforme à la norme
NMB-003 du Canada.
Achtung!
• Um die Gefahr eines Feuers oder eines elektrischen Schla-
ges zu vermeiden, dürfen Sie dieses Gerät keinem tropfen-
dem Wasser oder Spritzwasser aussetzen. Stellen Sie keine
mit Flüssigkeiten gefüllten Behältnisse – wie beispielsweise
Vasen – auf diesem Gerät ab.
• Montieren Sie das Gerät nicht in einem vollständig geschlos-
senen Behälter oder Gehäuse.
Wartung
• Alle Wartungsarbeiten müssen von einem hierfür qualifizier-
ten Servicetechniker durchgeführt werden.
Achtung:
Änderungen an diesem Gerät, die im Rahmen dieser Anleitung
nicht ausdrücklich zugelassen wurden, können das Erlöschen
der Betriebserlaubnis für dieses Gerät zur Folge haben.
Folgen Sie beim Auswechseln der Batterie den Anweisungen zur
Handhabung von Batterien in dieser Bedienungsanleitung.
¡Precaución!
• Para reducir el riesgo de incendios o descargas eléctricas,
no permita que este aparato quede expuesto a salpicadu-
ras y asegúrese de no colocar sobre él ningún objeto que
contenga líquidos, como un jarrón, para evitar que se pueda
derramar.
• No instale este aparato dentro de un espacio confinado,
como encastrado en una librería.
Reparaciones
• Cualquier reparación debe ser realizada únicamente por
personal de un servicio técnico oficial.
Atención:
Le advertimos que cualquier cambio o modificación que no
aparezca aprobada expresamente en este manual puede anular
su autorización a utilizar este aparato.
A la hora de sustituir la pila, siga cuidadosamente las instruccio-
nes sobre manejo de la misma que aparecen en este manual.
Attention Danger!
• Pour éviter tout risque d’électrocution ou d’incendie, ne pas
exposer cet appareil à quelque source liquide (goûtes d’eau,
projections liquides,etc.) et veillez à ne poser aucun objet
contenant un liquide sur l’appareil.
• Ne pas installer dans un espace confiné.
Service
• Confiez toutes les opérations de maintenance à un person-
nel qualifié.
Attention:
Toute modification apportée à l’appareil et qui n’est pas
expressément préconisée dans ce manuel invalide votre droit à
utiliser cet appareil.
Lors du remplacement de la pile, suivez attentivement les
instructions spécifiées dans ce manuel.
Attenzione!
• Per ridurre il rischio di incendio o scossa elettrica, non
esporre questo dispositivo allo sgocciolamento o agli schizzi
di alcun liquido. Non posizionare sul dispositivo oggetti
contenenti liquidi, come vasi o bicchieri.
• Non installare in uno spazio ristretto.
Assistenza
• Ogni intervento tecnico deve essere effettuato solo da
personale qualificato.
Cautela:
Si avverte che qualsiasi cambiamento e modifica non espres-
samente approvata in questo manuale può annullare la vostra
autorità di utilizzo del dispositivo.
Per sostituire la batteria, seguire attentamente le procedure
fornite all’interno di questo manuale.
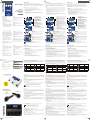
1. Harmony On/Off Footswitch
2. INST THRU to amp or PA
3. INST Ground Lift (in = lifted)
4. MIC GAIN Input Level Control
5. Harmony Arrangement Selector
6. Harmony Level Control
7. MIC: Balanced XLR Mic Input
8. OUT: Balanced XLR Mono Output
9. Power In
10. USB connector to computer
11. Input Level LED
(green = Signal, red = Clip)
12. Reverb Selector and Reverb Mix Control
13. MIC CONTROL via optional MP-75 Mic
(in = on)
14. INST IN Guitar Input Jack
15. Adaptive Tone On/Off Button
16. Harmony Active LED Indicator.
Cycle footswitch to confirm unit is powered.
1. Fußtaster zum Ein- und Ausschalten der Harmonie-
stimmen
2. INST THRU-Buchse zur Durchleitung des Instrumen-
tensignals an einen Verstärker oder an die PA
3. INST Ground-Lift-Taste (gedrückt = Ground Lift
aktiv)
4. MIC GAIN – Mikrofon-Eingangspegelregler
5. HARMONY – Harmoniestimmen-Arrange-
ment-Wähler
6. LEVEL – Harmoniestimmen-Pegelregler
7. MIC-Buchse: Mikrofoneingang (symmetrisch/XLR)
8. Out-Buchse: Audioausgang (mono/symmetrisch/XLR)
9. Power-Buchse (Netzeingang)
10. USB-Anschluss zur Verbindung mit einem Computer
11. Eingangspegel-LED (grün = Signal liegt an, rot =
übersteuert)
12. REVERB – Kombinierter Reverbtyp-Wähler und
Reverb-Effektanteilregler
13. MIC CONTROL – Steuerung über separat erhältli-
ches Mikrofon MP-75 (gedrückt: aktiv).
14. INST IN – Gitarreneingang
15. Adaptive-Tone-Schalter (ein/aus)
16. Aktivitätsanzeige-Leuchtdiode für Harmoniestim-
men. Um zu prüfen, ob das Gerät mit Spannung ver-
sorgt wird, drücken Sie ggf. mehrfach den Fußtaster.
9 910 10
11 11
12 12
13 13
14 14
16 16
8 87 7
6 6
5 5
4 4
3 3
2 2
1 1
15 15
PA
PA
Connecting
MIC jack – Connect your mic here using a balanced XLR cable.
Phantom power is always on for condenser mics.
OUT jack – Connect to your PA mixer or powered speaker.
Power in – Connect the supplied 12VDC power supply.
Optional:
USB – Connect to a computer running the TC-Helicon VoiceSup-
port application for registration, latest version and tips. Download
VoiceSupport at www.tc-helicon.com.
INST IN – Chords played on your guitar will guide harmony.
INST THRU – Connect to a PA or guitar amp to hear your guitar.
Anschlüsse vornehmen
MIC: Schließen Sie an diese Buchse mit Hilfe eines symmetrischen XLR-Ka-
bels Ihr Mikrofon an. Die Phantomspeisung für Kondensatormikrofone am
Mikrofoneingang ist permanent aktiv.
OUT: Verbinden Sie das Gerät über diese Buchse mit Ihrem PA-Mischer oder
einem Aktivmonitor.
Netzeingang: Schließen Sie hier das Originalnetzteil (12 V) an.
Mögliche, aber nicht erforderliche Verbindungen:
USB: Verbinden Sie das Gerät über ein USB-Kabel mit einem Computer, auf
dem die Software VoiceSupport von TC-Helicon läuft, um das Produkt zu re-
gistrieren, die neueste Software und wichtige Tipps zu erhalten. Sie können die
Software VoiceSupport von der Website www.tc-helicon.com herunterladen.
INST IN: Wenn Sie an diese Buchse eine Gitarre anschließen und darauf
Akkorde spielen, werden diese Akkorde zum korrekten Arrangieren der
Harmoniestimmen verwendet.
INST THRU-Buchse: Verbinden Sie diese Buchse mit Ihrem Verstärker oder
der PA, um die an die Buchse INST IN angeschlossene Gitarre zu hören.
• Turn down your PA when making all connections.
• The latest version of VoiceSupport is available free from www.tc-helicon.com/voicesupport.
• The USB connection does not provide power to the unit.
• If you hear hum from your PA or amp, push the GRND LIFT in. Otherwise, it should remain out.
• Wenn Sie die Verbindungen zu diesem Gerät herstellen (Audio, USB, Stromversorgung), sollte der entsprechende Eingang Ihres
Verstärkers oder Ihre PA heruntergeregelt sein.
• Sie können die neueste Version der Software VoiceSupport kostenlos von www.tc-helicon.com/voicesupport herunterladen.
• Das Gerät wird über die USB-Verbindung nicht mit Strom versorgt.
• Wenn Sie aus Ihrem Verstärker oder der PA ein Netzbrummen hören, drücken Sie die Ground-Lift-Taste. Ansonsten sollte diese
Taste nicht gedrückt sein.
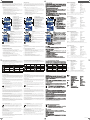
Choosing intervals with the Harmony control
This control selects a single harmony voice or combination of voices higher or lower in pitch than your voice.
The chart below shows name and pitch intervals for each Harmony option when you sing the root note of the
current chord (e.g. sung note = E, guitar chord = E major). The actual intervals will vary slightly depending on
moment-by-moment melody and chord movements.
Icon Name Interval Icon Name Interval
High 3rd above
Lower 6th below
Higher 5th above Low and Lower
4th below
6th below
High and Higher
3rd above
5th above
Higher and Lower
5th above
6th below
Low 4th below High and Low
3rd above
4th below
Intervalle mit dem Harmoniestimmen-Arrangement-Wähler festlegen
Mit diesem Regler legen Sie fest, ob das Gerät eine einzelne oder zwei Harmoniestimmen erzeugen soll, und ob
diese über und unter der Hauptstimme arrangiert werden sollen. Die folgende Tabelle zeigt für jede Einstellung
des Harmoniestimmen-Arrangement-Wählers die Namen und Intervalle der Harmoniestimmen, die erzeugt
werden, wenn Sie den Grundton des gerade aktiven Akkordes singen (z.B.: gesungene Note = E, zuletzt gespielter/
erkannter Gitarrenakkord = E-Dur). Die tatsächlich verwendeten/erzeugten Intervall können je nach der Richtung
des Melodieverlaufs und der Akkordfolgen leicht variieren.
Icon Name Intervall Icon Name Intervall
Hoch Terz oberhalb
Tiefer Sexte unterhalb
Höher Quinte oberhalb Tief und tiefer
Quarte unterhalb
Sexte unterhalb
Hoch und höher
Terz oberhalb
Quinte oberhalb
Höher und tiefer
Quinte oberhalb
Sexte unterhalb
Tief Quarte unterhalb Hoch und tief
Terz oberhalb
Quarte unterhalb
Using the footswitch
Tap and release the footswitch when you want to turn the Harmony voices on or off. The Reverb and Tone effects
will stay as they are. When you want to talk to your audience without the Reverb effect, press and hold the foot-
switch to enter Talk mode. In Talk mode, Reverb is muted, but Tone is left active so your voice doesn’t suddenly
become muddy. The Harmony LED will flash indicating Talk mode. Tap again to exit Talk mode and continue singing
with Reverb on.
Using Reverb
The Reverb control offers three styles: Room, Club and Hall. The same control also allows you to vary the
amount of each style’s level. Set fully left, Reverb is muted. From there, each one third of the knob travel allows
you to choose a little or a lot of each type of reverb.
Using guitar effect pedals
Connect any guitar pedals between Harmony Singer’s instrument Thru and your amp. Connecting and activating
typical guitar pedals before the instrument input jack will adversely affect vocal harmony production.
• Strumming chords works better than single note playing for harmony control.
• When changing chords, ensure that the root and the third of each new chord
are played cleanly.
• To harmonize correctly from the first chord of a song, briefly play the first chord
before singing.
Verwenden des Fußtasters
Um die Harmoniestimmenerzeugung an- oder abzuschalten, drücken Sie den Fußtaster des Pedals. Dies hat keinen
Einfluss auf den Reverb-Effekt oder das Tone-Modul. Wenn Sie zwischen zwei Songs zum Publikum sprechen
wollen und dabei kein Reverb-Effekt zu hören sein soll, drücken und halten Sie den Fußtaster, um den Talk-Modus
zu aktivieren. Im Talk-Modus ist das Reverb abgeschaltet. Das Tone-Modul bleibt jedoch weiter aktiv, damit Ihre
Stimme nicht plötzlich dumpf klingt. Im Talk-Modus blinkt die Harmony-Leuchtdiode. Um den Talk-Modus zu
beenden und den Reverb-Effekt wieder zu aktivieren, tippen Sie noch einmal auf den Fußtaster.
Das Reverb
Der Reverb-Effekt umfasst drei verschiedene Stile: „Room“, „Club“ und „Hall“. Sie können denselben Regler auch verwen-
den, um den Pegel des ausgewählten Effekts einzustellen. Wenn Sie den Regler bis an den linken Anschlag drehen, ist der
Reverb-Effekt stummgeschaltet. Von dort können Sie den Regler nach rechts drehen, um einen der drei Stile auszuwählen
und den Effektanteil zu erhöhen.
Mit Gitarren-Effektgeräten arbeiten
Zwischen der Buchse INST THRU des Harmony Singer und Ihrem Verstärker können Sie beliebige Gitarreneffektgeräte
betreiben. Wenn Sie hingegen typische Gitarreneffekte vor den Instrumenteneingang des Harmony Singer schalten, wird
dies die Qualität der Harmoniestimmenerzeugung beeinträchtigen.
• Durchgeschlagene, definierte Akkorde sind zur Steuerung von Harmoniestimmen besser geeignet als einzelne Melo-
dietöne.
• Bei Akkordwechseln sollten Sie darauf achten, dass Sie den Grundton und die Terz des neuen Akkordes deutlich
spielen.
• Wenn Sie direkt ab dem ersten Akkord eines Songs mit Harmoniestimmen arbeiten wollen, spielen Sie vorher kurz
den ersten Song-Akkord.
Avoiding hum
Hum or buzzing can occur in either your amp or PA as a result of different grounds. Fortunately, Harmony Singer
has a ground lift button that can remove or minimize this problem. If you experience hum, first turn down your
PA channel from Harmony Singer, then push the ground lift button. If hum persists, try plugging both your amp and
PA into the same AC outlet and/or changing your guitar cable.
Alternate momentary footswitch action
If you wish, you can change the default action of the footswitch so that it activates harmony only while you hold
it. This is good for very fast insertion of harmony lines into your songs. However, when you enable this mode,
you will lose the ability to go into Talk mode. To activate this alternate footswitch mode, power up the unit while
holding the Tone button until the Harmony LED flashes twice. The unit will remain in this alternate mode during
subsequent power-ups until the procedure is repeated.
Using the Mic Control feature
Mic Control allows you to turn the harmony effect on and off from the optional TC-Helicon MP-75 or Sennheiser
e835FX mic. Harmony Singer has a switch labelled MIC CONTROL that can be pushed in, allowing you to active
or deactivate the device from the mic. When Mic Control is not desired, make sure the switch is out.
Störgeräusche vermeiden
Aufgrund unterschiedlicher Erdung Ihres Verstärkers oder der PA können Brumm- oder Summgeräusche auftreten.
Glücklicherweise hat der Harmony Singer eine Ground-Lift-Taste, mit der dieses Problem beseitigt oder zumindest redu-
ziert werden kann. Wenn Brummen zu hören ist, drehen Sie zunächst den Pegel des PA-Kanals herunter, an den Sie den
Harmony Singer angeschlossen haben, und drücken Sie dann die Ground-Lift-Taste. Wenn das Brummen dann noch immer
zu hören ist, schließen Sie Ihren Verstärker und/oder die PA an dieselbe Steckdose an. Sie können auch versuchsweise ein
anders Gitarrenkabel verwenden.
Fußtaster-Arbeitsweise ändern
Wenn Sie möchten, können Sie die Funktionsweise des Fußtasters ändern, so dass er nur dann Harmoniestimmen erzeugt,
wenn Sie ihn drücken und halten. Auf diese Weise können Harmonien sehr schnell und „punktgenau“ platziert werden.
Wenn Sie diese Betriebsart verwenden, können Sie aber nicht mehr den Talk-Modus verwenden, um ohne Reverb-Effekt
zum Publikum zu sprechen. Um die alternative Arbeitsweise für den Fußtaster zu aktivieren, halten Sie beim Einschalten
des Gerätes die Tone-Taste gedrückt, bis die Harmony LED blinkt zweimal. Das Gerät bleibt auch nach dem erneuten Ein-
und Ausschalten in dieser alternativen Betriebsart, bis die hier beschriebene Prozedur wiederholt wird.
Wie Sie die Funktion Mic Control verwenden
Die Funktion Mic Control ermöglicht es Ihnen, den Harmoniestimmen-Effekt mit einem Schalter am (separat erhältlichen)
Mikrofon MP-75 von TC-Helicon oder am Sennheiser e835FX an- und abzuschalten. Der Harmony Singer ist mit einer
MIC CONTROL-Taste ausgestattet. Wenn Sie diese Taste drücken, können Sie das Pedal mit dem Mikrofon an- und aus-
schalten. Wenn Sie die Funktion Mic Control nicht verwenden wollen, achten Sie darauf, dass der MIC CONTROL-Schalter
nicht gedrückt ist.
Wie Sie Rückkopplungen vermeiden
• Achten Sie darauf, dass Ihr Monitor und/oder die Lautsprecher Ihrer PA nicht direkt auf die Vorderseite Ihres Mikro-
fons abstrahlen.
Tips for avoiding feedback
• Ensure your monitor and/or PA speakers don’t aim directly at the front of your mic.
• Sing really close to the mic, even touching the grill with your lips.
• Try a super-cardioid dynamic mic such as TC-Helicon’s MP-75 or MP-70.
• Set your PA channel EQ and graphic EQ flat.
• Turn down the monitors and have your band play quieter on stage!
FAQ
Will harmonies still work if I use alternate tunings on my guitar?
Generally, alternate tunings and drop tuning will work fine as long as you are in tune to a reference of A=440Hz.
Why am I hearing distortion?
Likely the MIC GAIN knob is set too high. Ensure that the Input LED is green most of the time with only brief
and rare peaks of red.
Will I need a DI box to connect to a mixer?
No.
Why is the product turning the effect on and off by itself?
This can happen when you have the MIC CONTROL knob pushed in and you are connected to a mixer with
“pseudo balanced” outputs. Unless you are using only the TC-Helicon MP-75 mic with the Mic Control feature,
the MIC CONTROL knob should be out.
• Singen Sie so nah wie möglich an Ihrem Mikrofon. Ihre Lippen können dabei durchaus das Metallgitter des Mikrofon-
korbs berühren.
• Verwenden Sie ein dynamisches Mikrofon mit Supernierencharakteristik wie zum Beispiel ein MP-75 oder MP-70 von
TC-Helicon.
• Stellen Sie an Ihrem Mischpult den Equalizer des Mikrofon-Kanalzugs (oder den grafischen Equalizer Ihrer PA) auf
eine flache Kennlinie ein.
• Wenn keine andere Maßnahme hilft, muss die Band leiser spielen beziehungsweise ihre Bühnenmonitore leiser stellen.
Häufige Fragen und Antworten
Können auch dann Harmoniestimmen erzeugt werden, wenn ich für meine Gitarre eine alternative Stim-
mungen (Skordatur) verwende?
Grundsätzlich können Sie für Ihre Gitarre alternative Stimmungen verwenden, so lange das Instrument auf A = 440 Hz
gestimmt ist.
Warum kommt es zu Verzerrungen?
Wahrscheinlich ist der Regler MIC GAIN auf einen zu hohen Wert eingestellt. Stellen Sie die Eingangsempfindlichkeit so
ein, dass die Input-Leuchtdiode meist grün und nur selten/kurz rot leuchtet.
Benötige ich eine DI-Box, um dieses Gerät an einem Mischpult zu betreiben?
Nein.
Warum schaltet das Gerät den Effekt selbsttätig ein und aus?
Dies kann geschehen, wenn Sie den Schalter MIC CONTROL aktiviert haben und das Gerät mit einem Mischpult verbun-
den haben, das mit „pseudosymmetrischen“ Ausgängen ausgestattet ist. Sie sollten den Taster MIC CONTROL nur aktivie-
ren, wenn Sie ein Mikrofon wie das MP-75 von TC-Helicon verwenden, welches die Funktion Mic Control unterstützt.
www.tc-helicon.com - Prod. No: E60521012
Take Control of
your Vocal Sound!
MP-75
Modern Performance Microphone
with Mic Control
MP-70
Modern Performance Microphone
VoiceLive Play GTX
Vocal FX, Guitar FX and Looper in one
VoiceLive 2
The Evolution of Tried and True
(EN) Introducción
¡Aquí tiene el coro de acompañamiento, reverb y técnico de sonido profesional para el guitarrista-cantante todo
reunido en un único pedal!
Tanto si es un cantautor que canta solo con una guitarra acústica, o si está dándolo todo con su grupo o
ensayando en casa, el Harmony Singer hará que su sonido sea más perfecto aún e incluso es posible que le sirva
de inspiración para su próximo éxito. No se deje engañar por su pequeño tamaño, ya que le ofrece efectos de
la misma calidad que sus hermanos mayores, los TC-Helicon VoiceLive 2 y VoiceLive Touch, pero solo con los
controles más fundamentales.
Características
• Añada una o dos voces de auténticas armonías vocales guiadas por su guitarra
• Increíble efecto reverb con tres estilos distintos para dulcificar su interpretación vocal
• El efecto Adaptive Tone da brillo, comprime y elimina murmullos automáticamente para una voz profesional
• El mando Harmony Arrangement elige voces de armonía por encima o debajo, cerca o lejos y combinaciones
• Sencilla conexión en línea entre un micro standard y una mesa de mezclas
• Conexión Clean Thru a amplificador de guitarra/PA
• La alimentación fantasma siempre está activa
• Conexión USB para el acceso al programa gratuito VoiceSupport que le ofrece actualizaciones, noticias y
novedades de cada producto y mucho más
• La función Mic Control (pendiente de patente) le permite la conmutación on/off remota desde el micro
opcional TC-Helicon MP-75 o Sennheiser e835FX.
Alimentación fantasma
En el Harmony Singer no hay ningún interruptor para activar la alimentación fantasma; siempre está disponible
en cuanto el producto esté encendido. Los micrófonos que no necesiten esta alimentación fantasma seguirán
funcionando correctamente.
Configuración inicial y manejo
1. Reduzca al mínimo el volumen máster de su sistema PA.
2. Conecte su micro y equipo PA tal como le mostramos arriba y conecte después el adaptador de corriente
del VoiceTone. Para actuaciones en directo no es necesaria la conexión USB a un ordenador.
3. Cante en su micro mientras ajusta el control MIC GAIN de forma que el piloto de nivel de entrada parpadee
en verde. Un breve parpadeo en rojo de este piloto durante las partes más potentes de su canción también
es admisible.
4. Asegúrese de que el botón Tone esté activo (iluminado).
5. Ajuste el mando Harmony a su tope izquierdo (posición con muesca).
6. Ajuste el mando Level a su posición de muesca central.
7. Ajuste el mando Reverb para conseguir el nivel de reverb que quiera!
8. Cante mientras sube el volumen de su equipo PA hasta llegar a un nivel adecuado.
9. Active el efecto de armonía con el pedal. El piloto central se iluminará.
10. Rasguee algunos acordes en su guitarra mientras canta para observar cómo su nuevo coro vocal sigue la
música que toca.
1. Pedal On/Off Harmony
2. Toma INST THRU a amplificador o PA
3. GRND LIFT de instrumento: pulsado=toma
de tierra anulada
4. Control de nivel de entrada MIC GAIN
5. Selector Harmony Arrangement
6. Control Harmony Level
7. MIC: Entrada de micro balanceada en XLR
8. OUT: Salida mono balanceada en XLR
9. Entrada de fuente de alimentación
10. Conector USB al ordenador
11. Piloto de nivel de entrada
(verde=señal, rojo=saturación)
12. Selector Reverb y control Reverb Mix
13. MIC CONTROL a través del micro opcional
MP-75 (pulsado = función activa)
14. Toma de entrada de guitarra INST IN
15. Botón On/Off Adaptive Tone
16. Piloto de activación de armonía. Pulse el
pedal para confirmar que la unidad está
activa.
9 10
11
12
13
14
16
87
6
5
4
3
2
1
15
PA
Conexión
Toma MIC – Conecte aquí su micro usando un cable con XLR
balanceado. La alimentación fantasma siempre está activa para los
micros condensadores.
Toma OUT – Conéctela a su mesa PA o altavoz autoamplificado.
Entrada Power – Conecte aquí el adaptador 12VDC incluido.
Opcional:
USB – Conéctelo a un ordenador que ejecute el programa TC-
Helicon VoiceSupport para acceder al registro, últimas versiones y
consejos. Descárguese la última versión del VoiceSupport en la web
www.tc-helicon.com.
INST IN – Los acordes que toque en su guitarra controlarán la
armonía.
INST THRU – Conéctelo a un PA o amplificador de guitarra para
escuchar el sonido de su guitarra.
• Apague su sistema PA cuando esté realizando las conexiones
• Descárguese gratis la última versión del VoiceSupport desde la web www.tc-helicon.com\voicesupport
• La conexión USB no actúa como fuente de alimentación para esta unidad
• Si escucha zumbidos en su PA o amplificador, pulse el interruptor GRND LIFT. En caso contrario, déjelo tal como está.
Selección de intervalos con el control Harmony
Este control elige una única voz de armonía o una combinación de ellas por encima o por debajo del tono de su
voz. La tabla siguiente le muestra los nombres e intervalos de tono para cada opción de este Harmony cuando
cante la nota base del acorde activo (p.e. nota cantada = E, acorde de guitarra = E mayor). Los intervalos reales
variarán ligeramente dependiendo de la evolución de la melodía y los movimientos de los acordes.
Icono Nombre Intervalo Icono Nombre Intervalo
High 3ª superior
Lower 6ª inferior
Higher 5ª superior Low and Lower
4ª inferior
6ª inferior
High and Higher
3ª superior
5ª superior
Higher and Lower
5ª superior
6ª inferior
Low 4ª inferior High and Low
3ª superior
4º inferior
Uso del pedal
Pulse y suelte el pedal cuando quiera activar o desactivar las voces de armonía. Los efectos de reverb y tono
seguirán sin cambios. Cuando quiera hablarle al público sin ningún efecto, mantenga pulsado el pedal para activar
el modo Talk. La reverb será anulada, pero el efecto Tone seguirá para que su voz no se emborrone bruscamente.
El piloto Harmony parpadeará para indicarle este modo Talk. Pulse el pedal de nuevo para salir del modo Talk y
seguir cantando con el efecto Reverb activo.
Uso de la Reverb
El control Reverb le ofrece tres estilos: Room, Club y Hall. Este mismo control también le permite modificar la
cantidad de nivel de cada estilo. Si lo ajusta a su tope izquierdo, la reverb quedará anulada. A partir de ahí, cada
tercio de giro le permitirá elegir un poco (o un mucho) de cada estilo de reverb en sucesión.
Uso de pedales de efecto de guitarra
Conecte cualquier pedal de guitarra entre la toma Thru de instrumento del Harmony Singer y su amplificador.
La conexión y activación de los típicos pedales de guitarra antes de la toma de entrada de instrumento afectarán
negativamente a la producción de armonías vocales.
• Para el control de armonías, el rasgueo de acordes funciona mejor que el tocar notas sueltas.
• Cuando cambie de acordes, asegúrese de tocar claramente la nota raíz o base y la tercera de cada,
nuevo acorde.
• Para conseguir una armonía perfecta desde el primer acorde de la canción, toque brevemente el
primer acorde antes de cantar.
Cómo evitar zumbidos
Se pueden producir zumbidos en su amplificador o PA como resultado de diversas derivaciones a tierra.
Afortunadamente, el Harmony Singer dispone de un botón de anulación de toma de tierra que puede eliminar
o reducir este problema. Si detecta algún zumbido, primero baje el canal del Harmony Singer en su PA y pulse
después el botón de anulación de toma de tierra. Si el zumbido continúa, pruebe a conectar su PA o amplificador
a la misma salida de corriente que el resto del equipo y/o a cambiar su cable de guitarra.
Acción alternativa del pedal momentáneo
Si quiere, puede cambiar la actuación por defecto del pedal de forma que active la armonía solo mientras lo
mantenga pulsado. Esto resulta muy útil para una inserción muy rápida de líneas de armonía en sus canciones.
No obstante, cuando active este modo perderá la capacidad de activar el modo Talk. Para activar este modo
alternativo, encienda la unidad mientras mantiene pulsado el botón Tone hasta que el piloto Harmony parpadee
dos veces. La unidad seguirá en este modo hasta que vuelva a repetir este proceso de activación.
Uso de la función Mic Control
El Mic Control le permite activar o desactivar el efecto de armonía desde el micro opcional TC-Helicon MP-75
Sennheiser e835FX. El Harmony Singer dispone de un interruptor marcado como MIC CONTROL que puede
pulsar si quiere controlar de forma remota el on/off de dicho pedal desde el micro. Cuando no vaya a usar esta
función Mic Control, asegúrese de que el interruptor no esté pulsado.
Consejos para evitar la realimentación
• Asegúrese de que su monitor y/o altavoces de PA no apunten directamente hacia su micro
• Cante cerca del micro, incluso tocando la parrilla con sus labios
• Pruebe con un micro dinámico super-cardioide como el MP-75 y MP-70 de TC Helicon
• Ajuste el EQ del canal del PA y el EQ gráfico a una respuesta plana
• Reduzca el volumen de los monitores y haga que los músicos no toquen a tope en el escenario!
Preguntas frecuentes (FAQ)
¿Seguirán funcionando las armonías si uso una afinación alternativa en mi guitarra?
Por lo general, las afinaciones alternativas y drop darán buenos resultados siempre y cuando su referencia de
afinación sea A=440Hz.
¿Por qué se escucha distorsión?
Es probable que haya ajustado el mando MIC GAIN demasiado alto. Asegúrese de que el piloto de entrada se
ilumine en verde la mayoría del tiempo y solo en rojo puntualmente durante los picos.
¿Necesito una caja directa o DI box para conectar esta unidad a un mezclador?
No.
¿Por qué este producto se conecta y desconecta a su aire?
Esto puede ocurrir si ha pulsado el interruptor MIC CONTROL y ha conectado la unidad a un mezclador con
salidas “pseudo-balanceadas”. Salvo que esté usando el micro TC-Helicon MP-75 con esta función Mic Control,
deje el interruptor MIC CONTROL desactivado.
TC-Helicon Harmony Singer Manual 1 MASTER CS6.indd 1 08.01.2013 23:50
Page is loading ...
-
 1
1
-
 2
2


TCHELICON HARMONY SINGER Owner's manual
- Category
- Musical Instrument Amplifier
- Type
- Owner's manual
Ask a question and I''ll find the answer in the document
Finding information in a document is now easier with AI
in other languages
Related papers
-
TCHELICON VOICETONE H1 Owner's manual
-
TCHELICON VOICETONE X1 Owner's manual
-
TCHELICON VOICELIVE User manual
-
-
TCHELICON VOICELIVE 3 Owner's manual
-
-
TCHELICON VOICELIVE 2 Owner's manual
-
-
-
TCHELICON PLAY ELECTRIC User manual
Other documents
-
TC-Helicon HARMONY SINGER 2 User manual
-
Falcon TP Pull Template
-
TC-Helicon CRITICAL MASS User manual
-
TC HELICON VOICELIVE 3 Quick start guide
-
TC-Helicon Voice Tone R1 Vocalprozessor Pedal Owner's manual
-
TC-Helicon VOICELIVE 3 EXTREME Owner's manual
-
-
TC-Helicon VOICETONE D1 User manual
-
-