Page is loading ...

VG811BL/VG811BR/VG811C
Wing Backed Height Adjustable Chair
Fixing and Maintenance Instructions

Fixing and Maintenance Instructions 2
VG811 Range of Wing Backed Height Adjustable Chairs in Split
Down Format for Easy Transportation
VG811BL Blue
VG811BR Brown
VG811C Cream
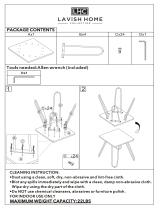
Maximum User Weight 140 kg (22 st.)
DO NOT EXCEED THE WEIGHT LIMIT- Doing so could put the user at risk.
N.B. It is recommended that this equipment is installed by a competent person and a risk assessment is
undertaken as to the suitability for the user. Do not use on uneven surfaces.
BEFORE USE
After assembly, carefully check the chair for any damage. Make sure the chair sits steady on the oor
and does not wobble. If you suspect any damage, do not use the chair, and contact your dealer.
PARTS LIST
Ensure all parts are present before assembly. Contact your supplier if any parts are missing.
A: Padded Seat
B: Padded Back Rest
C: Seat Frame
D: Rear Seat Frame
E: Chair Sides
F: Bolt
G: Bolt
H: Washer
I: Curved Washer
J: Bolt Cover Cap
K: Nut
L: Plastic Spacer
M: Thumb Wheels
N: Spanner
O: Allen Key
A x 1 B x 1
C x 1
D x 1
E x 2
F x 4
G x 4
H x 12
J x 4
K x 4
L x 4
M x 4
N x 1
O x 1
I x 4

Fixing and Maintenance Instructions
3
g. 2
2) Use an allen key (O) to attach rear seat frame (D) to chair sides (E), ensuring rear seat frame brackets
(g. 2) are on the inside, using bolt (G), 3 washers (H) and 1 nut (K). (g. 3)
Repeat this step to ensure there are 2 bolts (G) fastened on both sides.
Ensure bolts (G) are tightened for use, then cover end of bolt using bolt cover caps (J). (g. 4)
Use spanner (N) to put on nut (K).
g. 4
g. 3
ASSEMBLY:
Requires at least 2 people for assembly.
Assemble the chair as per the assembly instructions below.
DIRECTIONS:
1) Attach seat frame (C) to chair sides (E), using bolt (F), a plastic spacer (L) and 1 curved washer (I).
Ensure seat brackets are facing up, and grey bungs are facing forward/ensure Aidapt label is at the
back. (g. 1)
Foam handles facing forwards.
Label at back.
Brackets facing up.
g. 1

Fixing and Maintenance Instructions
4
REISSUE
If you reissue or are about to reissue this product then please check all components for safety and in
particular tighten all the nuts and bolts, that the chair is steady, no rips or splits in the upholstery, and
that the ‘E’ clips are tted correctly.
CLEANING
A useful guide to decontamination is MHRA leaet DB2003(06).
Do not use abrasive cleaners as this could damage the surface of the equipment. For cleaning, wipe with
a clean cloth soaked in detergent solution and wring out. Depending on the detergent manufacturer’s
instructions, the solution may be heated.
• Wipe all surfaces of the equipment and the cloth should be re-immersed periodically and the
detergent changed frequently. The detergent should be rinsed or wiped off using a clean cloth
immersed in clean water and wrung out.
• To disinfect, make sure the equipment has been cleaned and dried and then wipe over with a clean
cloth and a compatible liquid disinfectant. After disinfecting, clean with clean water and dry.
• When using detergent or disinfectants, please refer to manufacturers’ instructions, and if unsure,
please consult your local Infection Control Specialist for advice.
• This product is not suitable for cleaning with moist heat or autoclaving.
ADJUSTING SEAT & BACK POSITION
The back and seat can be adjusted to suit the user’s requirements. Simply unscrew the 2x thumb wheels
(M) (g. 5 or g. 6), reposition the back of seat as required, then tighten both thumb wheels.
3) Attach padded seat (A) to seat frame (C) using 2x thumb wheels (M), ensuring they are attached
tightly. (g. 5)
Please Note: Padded seat can be moved forward or backward.
g. 5
4) Attach padded back rest (B) to rear seat frame (D), using 2x thumb wheels (M), ensuring they are
attached tightly. (g. 6)
Please Note: Padded back can be moved upwards or downwards.
g. 6

Fixing and Maintenance Instructions
5
HEIGHT ADJUSTMENT
Remove the ‘E’ clip from the extension leg and extend all legs evenly to the desired height, ensuring you
do not exceed the last punched hole of the extension leg. (g. 7)
Once you have achieved the desired height, reinstall the ‘E’ clip, ensuring that it has passed through the
extension leg and is tting neatly and snug around the outside leg. (g. 8 and g. 9)
Make sure same holes are used on each leg. If the legs are tted unevenly or slanted, then this could
compromise the safety of the user.
DIMENSIONS
Height to top of backrest 1050 to 1285mm
Footprint of Chair 540x620mm
Width of seat to inside of arm rest 460mm
Width of seat to outside of arm rest 570mm
Height to top of seat cushion 440mm
Net weight 15.4kg
Aidapt Bathrooms Ltd, Lancots Lane, Sutton Oak, St Helens, WA9 3EX
Telephone: +44 (0) 1744 745 020 • Fax: +44 (0) 1744 745 001 • Web: www.aidapt.co.uk
g. 7
g. 9
g. 8
/