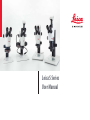
Leica Microsystems S9 E User manual
- Category
- Microscopes
- Type
- User manual

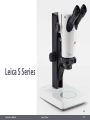
Leica S Series
User Manual

S Series User Manual 2
General Instructions
Safety concept
Before using your stereo microscope for the first
time, please read the "Safety Concept" booklet
included with your instrument. It contains
additional information about handling and
care.
About cleaning
O Do not use any unsuitable cleaning agents,
chemicals or techniques for cleaning.
O Never use chemicals to clean colored
surfaces or accessories with rubberized
parts. This could damage the surfaces,
and specimens could be contaminated by
abraded particles.
Servicing
O Repairs may only be carried out by Leica
Microsystems-trained service technicians.
Only original Leica Microsystems spare
parts may be used.
Responsibilities of person in charge of
instrument
O Ensure that the Leica stereo microscope
is operated, maintained and repaired by
authorized and trained personnel only.

S Series User Manual 3
Important Safety Notes
User manual
User manuals and updates are available for
you to download and print from our website
www.leica-microsystems.com. Keep it in a safe
place, and readily accessible to the user.
This user manual describes the special
functions of the Leica stereo microscopes
(S series) and contains important instructions
for their operational safety, maintenance, and
accessories.
The "Safety Concept" booklet contains
additional safety information regarding the
service work, requirements and the handling
of the stereo microscope, accessories and
electrical accessories as well as general safety
instructions.
You can combine individual system articles
with articles from external suppliers (e.g. cold
light sources, etc.). Please read the user manual
and the safety requirements of the supplier.
Before installing, operating or using the
instruments, read the user manuals listed
above. In particular, please observe all safety
instructions.
To maintain the unit in its original condition
and to ensure safe operation, the user must
follow the instructions and warnings contained
in these user manuals.

S Series User Manual 4
Symbols Used
Warning of a danger
This symbol indicates especially
important information that is mandatory
to read and observe.
Failure to comply can cause the following:
O Hazards to personnel
O Functional disturbances or damaged
instruments
Warning of hazardous electrical voltage
This symbol indicates especially
important information that is
mandatory to read and observe.
Failure to comply can cause the following:
O Hazards to personnel
O Functional disturbances or damaged
instruments
Danger due to hot surface
This symbol warns against touching hot
surfaces, e.g. those of light bulbs.
Important information
This symbol indicates additional
information or explanations that intend
to provide clarity.
Explanatory notes
O This symbol within the text stands for
additional information and explanations.
Figures
(1) Numbers in parentheses within the
descriptions relate to the figures and the
items within those figures.

S Series User Manual 5
Safety Instructions
Description
The individual modules fulfill the highest
requirements for observation and
documentation of Leica stereo microscopes of
the S series.
Intended use
O Refer to "Safety Concept" booklet
Non-intended use
O Refer to "Safety Concept" booklet
Never use S series microscopes or their
components for surgical procedures (e.g. on
the eye) unless they are specifically intended
for that purpose.
The devices and accessories described in this
User Manual have been tested with regard to
potential hazards. The responsible Leica affiliate
must be consulted whenever the instrument is
altered, modified or used in conjunction with
non-Leica components that are outside of the
scope of this manual!
Unauthorized alterations to the instrument or
noncompliant use shall void all rights to any
warranty claims!
Place of use
O Refer to "Safety Concept" booklet
O Electrical components must be placed at
least 10 cm away from the wall and from
flammable substances.
O Avoid large temperature fluctuations,
direct sunlight and vibrations. These
conditions can distort measurements * and
micrographic images.
O In warm and warm-damp climatic zones,
the individual components require special
care in order to prevent the build-up of
fungus.
* Measurement results depend on used
objective, zoom and microscope settings.
Responsibilities of person in charge of
instrument
O Refer to "Safety Concept" booklet
Ensure that:
O The S series stereo microscopes and
accessories are operated, maintained
and repaired by authorized and trained
personnel only.
O All operators have read, understood and
observe this User Manual, and particularly
the safety instructions.

S Series User Manual 6
Safety Instructions (Continued)
Repairs, service work
O Refer to "Safety Concept" booklet
O Only original Leica Microsystems spare
parts may be used.
O Before opening the instruments, switch off
the power and unplug the power cable.
Touching the live circuit can cause
injury.
Transport
O Use the original packaging for shipping
or transporting the individual modules
of the Leica S stereo microscopes and the
accessory components.
O In order to prevent damage from
vibrations, all moving parts that (according
to the user manual) can be assembled and
disassembled by the customer should be
disassembled and packed separately.
Integration in third-party products
O Refer to "Safety Concept" booklet
Disposal
O Refer to "Safety Concept" booklet
Legal regulations
O Refer to "Safety Concept" booklet
EC Declaration of Conformity
O Refer to "Safety Concept" booklet

S Series User Manual 7
Safety Instructions (Continued)
Health risks
•
Workplaces with stereo microscopes
facilitate and improve the viewing task,
but they also impose high demands on the eyes
and holding muscles of the user. Depending on
the duration of uninterrupted work, asthenopia
and musculoskeletal problems may occur. For
this reason, appropriate measures for reduction
of the workload must be taken:
O Optimal arrangement of workplace, work
assignments and work flow (changing tasks
frequently).
O Thorough training of the personnel,
giving consideration to ergonomic and
organizational aspects.
O The ergonomic optical design and
construction of the Leica S stereo
microscopes are intended to reduce the
exertion of the user to a minimum.
•
Direct contact with eyepieces is a
potential transmission method for
bacterial and viral infections of the eye.
The risk can be kept to a minimum by using
personal eyepieces for each individual or
detachable eyecups.

S Series User Manual 8
General Instructions 2
Important Safety Notes 3
Symbols Used 4
Safety Instructions 5
Contents 8
Leica S Series
Congratulations! 11
The Modular Design: Everything is Possible 12
What Your Stereo Microscope has to Offer you 13
Microscopes of the S Series 14
On We Go 15
Assembly
Installing the Basic Equipment (Overview) 17
Focusing Column 18
Sub-base for Transmitted Light and Cold Light Source 19
Optics Carrier and Additional Objective 20
Available Graticules 21
Inserting Graticules 22
Eyepieces 23
Leica LED Illumination 24
Camera Design (Leica S9 D and S APO) 25
Quick Start Guide
An Overview of a S Series Stereo Microscope 27
Using the Eyepieces 28
The Correct Interpupillary Distance 29
Focusing 30
Changing Magnification (Zooming) 31
Limiting Zoom Range 32
Regulating the Resistance of the Focusing Drive 34
Changing the Position of the Optics Carrier 35
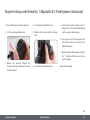
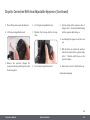
Diopter Settings and Parfocality: 1 Adjustable & 1 Fixed Eyepiece 36
Dioptric Correction With two Adjustable Eyepieces 39
Connectivity of the S9 i Stereo Microscope With Integrated Camera 42
The S9 i With Integrated Camera 43
S9 i: Overview 44
Get Set!
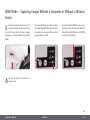
USB Mode – Capturing and Adjusting Images Using a Computer 46
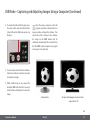
HDMI Mode – Capturing Images Without a Computer or Without a Wireless
Device 48
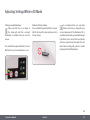
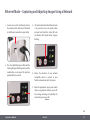
Adjusting Settings While in SD Mode 50
Ethernet Mode – Capturing and Adjusting Images Using a Network 51
Contents

S Series User Manual 9
Extend!
How to Install the Coded Zoom 53
Installation of the Coded Zoom in LAS X 55
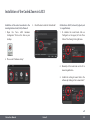
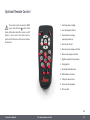
The Camera Remote Control
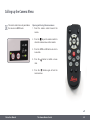
Optional Remote Control 58
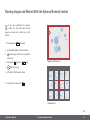
Viewing Images and Movies With the Optional Remote Control 59
Calling up the Camera Menu 60
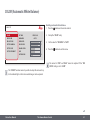
COLOR (Automatic White Balance) 61
COLOR (Manual White Balance) 62
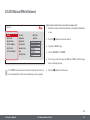
EXPOSURE 63
RESOLUTION 64
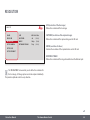
SETUP CAMERA (Camera Settings) 65
SETUP USER 66
SETUP ETHERNET 67
Pairing Cameras With Remotes 69
Photography & Video
Photography & Video 71
Photography With the Leica S9 D and S APO 72
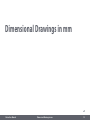
Dimensional Drawings in mm
Leica S9 E With Incident Light and Transmitted Light Illumination 74
Leica S9 D With Incident Light and Transmitted Light Illumination 75
Leica S9 i With Incident Light and Transmitted Light Illumination 76
Leica S APO With Incident Light and Transmitted Light Illumination 77
Technical Data
Technical Data 79
Appendix
Calculating the Total Magnification/Field of View Diameter 81
Troubleshooting 82
Care, Maintenance, Contact Persons 83
Contents

S Series User Manual Leica S Series 10
Leica S Series

S Series User Manual Leica S Series 11
Congratulations!
Congratulations on obtaining your new Leica stereo microscope from
the S series. We are convinced it will exceed your expectations, as
this instrument embodies all the qualities you associate with Leica
Microsystems: excellent objectives, high-quality engineering, and
reliability. Furthermore, the modular design ensures that the Leica stereo
microscope adapts perfectly to your needs – no matter which accessories
you require for your tasks.
Thanks to the parfocal system with simultaneously large working distances
and object fields, you can always view your microscopic specimens
accurately – from the complete image to the finest detail.
Though the reliability and robustness of Leica stereo microscopes is
world-renowned, like any high-tech product, the Leica S series requires
a certain degree of care and attention. Therefore, we recommend that
you read this manual. It contains all the information you need regarding
operation, safety and maintenance. Simply observing a few guidelines will
ensure that even after years of intensive use, your stereo microscope will
continue to work as smoothly and reliably as on the very first day.
We wish you the best of success in your work! after all, you are now
equipped with the best tool!

S Series User Manual Leica S Series 12
Have a special request? Let us know!
Leica Microsystems enjoys an exceptional
reputation when it comes to devising customer-
specific solutions. If you have a special request
that cannot be met with standard parts, contact
your Leica consultant. They have a solution for
every application.
The Modular Design: Everything is Possible
The Leica S series provides a high degree of
flexibility in choosing equipment, thanks
primarily to the modular configuration and
the compatibility that Leica has painstakingly
maintained for decades. The optics carriers,
eyepieces, stands, and more can be combined
in any way you choose, allowing you to create
the stereo microscope that best suits your
needs.
Despite this, you will notice that the controls
and individual components do not differ
significantly. Whichever configuration you
choose, you will quickly feel right at home with
your new stereo microscope.

S Series User Manual Leica S Series 13
What Your Stereo Microscope has to Offer you
The optical system of the S series stereo
microscopes consists of two beam paths
converging at 10°. The objective pairs of each
optical path are positioned close together, so
the stereo microscopes can be of very "slender"
design, especially towards the base of the
instrument. The advantage: The advantages
of this design are that it has a small space
requirement for use on bonders and in machine
applications, unobstructed access to specimens,
plenty of space for tools and a completely clear
view of the object field.
The Greenough system enables cost-effective
correction of aberrations such as chromasia,
image field curvature, and distortion with
minimal effort. In all S series microscopes the
optimum corrected center of the objective
ensures high image quality. This provides
superior optical performance with large, level
and undistorted fields of view and chromatically
optimized, high-contrast images.
Patented FusionOptics Technology
The S9 E, S9 D, S9 i feature the Leica patented
FusionOptics technology and deliver you
finest details in 3D. While the right channel
delivers you a high-resolution image at the
largest possible numerical aperture, the left
channel presents an image with high depth of
field. This results in an image perception with
outstanding richness of details and exeptional
depth of field at the same time.
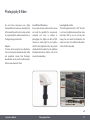
Photography
The S9 D and S APO are equipped with an
integrated video/phototube, which allows
the simple, fast mounting of digital cameras.
The S9 i with integrated camera has an SD card
slot and allows image sharing via Ethernet
connection.
Apochromatic correction
The Leica S Series is a completely
apochromatically corrected Greenough
system. The modern optical technology
of the Leica S Series corrects chromatic
aberration perfectly, removes bothersome
color seams and displays pin-sharp images
of even the finest enlarged detail. Contrast,
brilliance, image sharpness, resolution, color
fidelity and image precision are unsurpassed.
The benefit of apochromatic correction is best
seen in specimens that have a fine, low-contrast
structure such as large animal cells, cilia plants
or metallic microelectronic structures.
The technical features of the individual models
can be found on page 79.

S Series User Manual Leica S Series 14
Microscopes of the S Series
Leica S9 E
Leica S9 D
Leica S9 i
Leica S APO

S Series User Manual Leica S Series 15
On We Go
If your new stereo microscope has already
been assembled and commissioned by your
Leica consultant, click here to skip through the
installation instructions and go directly to the
Quick Start Guide on page 26.
If, on the other hand, you are assembling the
stereo microscope yourself, continue with the
"Assembly" chapter, which begins on page 16.

S Series User Manual Assembly 16
Assembly

S Series User Manual Assembly 17
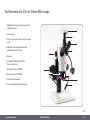
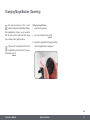
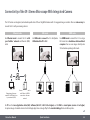
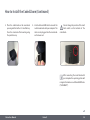
Installing the Basic Equipment (Overview)
1. Sub-base for transmitted light with glass stage plate
2. Incident light base with stage plate
3. Focusing column with microscope carrier
4. Additional objective, optional
5. Optics carrier
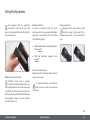
6. Eyepieces, fixed and/or adjustable
6
5
4
3
2
1

S Series User Manual Assembly 18
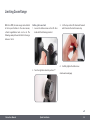
•
Never unscrew the 3 screws on the right
side of the focusing column.
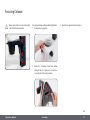
Focusing Column
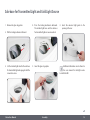
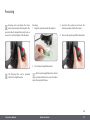
Focusing column on the incident light base
1. Remove the stage plate.
2. Route the 3 hollow screws from below
through the base plate and screw these
securely into the focusing column.
3. Insert the stage plate back into place.

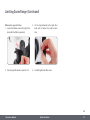
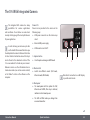
S Series User Manual Assembly 19
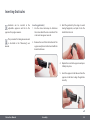
1. Remove the glass stage plate.
2. Pull the locking mechanism forward.
3. Set the incident-light stand to the sub-base
for transmitted light and engage it with the
connection screw.
4. Press the locking mechanism backward.
The incident light base and the sub-base
for transmitted light are now connected.
5. Insert the glass stage plate.
6. Insert the universal light guide in the
opening at the rear.
Additional information can be found in
the user manual for cold-light source
Leica KL300 LED.
Sub-base for Transmitted Light and Cold Light Source

S Series User Manual Assembly 20
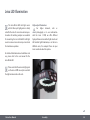
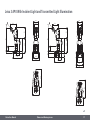
Optics carrier
1. Insert the optics carrier carefully in the
microscope carrier and fasten it in the
desired position with the clamping screw.
Additional objective (optional)
1. Screw the desired objective counter
clockwise into the optics carrier.
Protective objective glass (optional)
1. Screw the objective protective glass
directly onto the objective.
Optics Carrier and Additional Objective
Page is loading ...
Page is loading ...
Page is loading ...
Page is loading ...
Page is loading ...
Page is loading ...
Page is loading ...
Page is loading ...
Page is loading ...
Page is loading ...
Page is loading ...
Page is loading ...
Page is loading ...
Page is loading ...
Page is loading ...
Page is loading ...
Page is loading ...
Page is loading ...
Page is loading ...
Page is loading ...
Page is loading ...
Page is loading ...
Page is loading ...
Page is loading ...
Page is loading ...
Page is loading ...
Page is loading ...
Page is loading ...
Page is loading ...
Page is loading ...
Page is loading ...
Page is loading ...
Page is loading ...
Page is loading ...
Page is loading ...
Page is loading ...
Page is loading ...
Page is loading ...
Page is loading ...
Page is loading ...
Page is loading ...
Page is loading ...
Page is loading ...
Page is loading ...
Page is loading ...
Page is loading ...
Page is loading ...
Page is loading ...
Page is loading ...
Page is loading ...
Page is loading ...
Page is loading ...
Page is loading ...
Page is loading ...
Page is loading ...
Page is loading ...
Page is loading ...
Page is loading ...
Page is loading ...
Page is loading ...
Page is loading ...
Page is loading ...
Page is loading ...
Page is loading ...
Page is loading ...
-
 1
1
-
 2
2
-
 3
3
-
 4
4
-
 5
5
-
 6
6
-
 7
7
-
 8
8
-
 9
9
-
 10
10
-
 11
11
-
 12
12
-
 13
13
-
 14
14
-
 15
15
-
 16
16
-
 17
17
-
 18
18
-
 19
19
-
 20
20
-
 21
21
-
 22
22
-
 23
23
-
 24
24
-
 25
25
-
 26
26
-
 27
27
-
 28
28
-
 29
29
-
 30
30
-
 31
31
-
 32
32
-
 33
33
-
 34
34
-
 35
35
-
 36
36
-
 37
37
-
 38
38
-
 39
39
-
 40
40
-
 41
41
-
 42
42
-
 43
43
-
 44
44
-
 45
45
-
 46
46
-
 47
47
-
 48
48
-
 49
49
-
 50
50
-
 51
51
-
 52
52
-
 53
53
-
 54
54
-
 55
55
-
 56
56
-
 57
57
-
 58
58
-
 59
59
-
 60
60
-
 61
61
-
 62
62
-
 63
63
-
 64
64
-
 65
65
-
 66
66
-
 67
67
-
 68
68
-
 69
69
-
 70
70
-
 71
71
-
 72
72
-
 73
73
-
 74
74
-
 75
75
-
 76
76
-
 77
77
-
 78
78
-
 79
79
-
 80
80
-
 81
81
-
 82
82
-
 83
83
-
 84
84
-
 85
85


Leica Microsystems S9 E User manual
- Category
- Microscopes
- Type
- User manual
Ask a question and I''ll find the answer in the document
Finding information in a document is now easier with AI
Related papers
-
Leica Microsystems M165 C User manual
-
Leica Microsystems M80 User manual
-
-
Leica Microsystems MZ10 F User manual
-
Leica Microsystems EZ4 Educational Stereo (without eyepieces) User manual
-
-
-
Leica Microsystems dm750 User manual
-
-
Leica Microsystems DM500 User manual
Other documents
-
Sitecom SMCN-205 Datasheet
-
Leica M80 User manual
-
-
Carson MM-200 Micro Max LED Lighted Zoom Microscope User manual
-
-
-
-
Bresser 5914170 Owner's manual
-
-