
INSTRUCTION MANUAL
Colour Television
Multi System
CATV Hyper Band
256 Programmes with Automatic Tuning
CA14SE1M
CP14SE1M
CA14SE1K
CP14SE1K
CA14SE1(V)
CP14SE1(V)
CA21CF1(V)
CP21CF1(V)
CA21CF1M
CP21CF1M
CA21SE1M
CP21SE1M
CA21SE1K
CP21SE1K
CA21SE1(V)
CP21SE1(V)
CA21VF1
CP21VF1
CA21VF1K
CP21VF1K
INST. MANUAL -C8WE-D (AUS) 4/10/08 3:27 PM Page 1

W
W
ar
ar
nings and Cautions
nings and Cautions
2
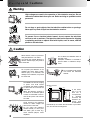
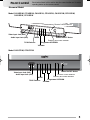
If the televi-
sion is to be
built into a
compartment
or similarly
enclosed, the
minimum dis-
tances must
be maintained.
Heat build-up can reduce the service life of your televi-
sion, and can also be dangerous.
Never stand on, lean on or push sud-
denly the television or its stand.
You should pay special attention to
children. Serious injury may result if
it should fall.
Do not place your television on an
unstable cart, stand, shelf or table.
Serious injury to an individual, and
damage to the television, may result
if it should fall.
High voltages are used in the operation of this television receiver. Do not
remove the cabinet back from your set. Refer servicing to qualified service
personnel.
To prevent fire or electrical shock hazard, do not expose the television
receiver to rain or moisture. The television shall not be exposed to dripping
or splashing and that no objects filled with liquids, such as vases, shall be
placed on the television.
Do not drop or push objects into the television cabinet slots or openings.
Never spill any kind of liquid on the television receiver.
At installation of the unit, the plug
of power cord shall remain
accessible and readily operable
to disconnect the unit from the
wall outlet.
When the television receiver is
not used for an extended period
of time, it is advisable to discon-
nect the AC power cord from the
AC outlet.
Avoid exposing the television
receiver to direct sunlight and
other source of the heat.
Do not stand the television
receiver directly on other prod-
ucts which give off heat. E.g.
video cassette players, audio
amplifiers.
Do not block the ventilation holes in
the back cover.
Adequate ventilation is essential to
prevent failure of electrical compo-
nents.
Do not squash power supply
cord under the television
receiver.
5cm
10cm
10cm
20cm
Minimum distances
Warning
Caution
INST. MANUAL -C8WE-D (AUS) 4/10/08 3:27 PM Page 2

Contents
Contents
3
Warnings and Cautions . . . . . . . . . . . . . . 2
Contents . . . . . . . . . . . . . . . . . . . . . . . . . 3
Plug & Play . . . . . . . . . . . . . . . . . . . . . . . 3
Front Control . . . . . . . . . . . . . . . . . . . . . 4-5
Remote Control Transmitter . . . . . . . . . . 6
Battery Installation of
the Remote Control Transmitter . . . . . . . 6
General Operation
Remote Control Operation . . . . . . . . . 7
OFF TIMER . . . . . . . . . . . . . . . . . . . . 8
ON TIMER . . . . . . . . . . . . . . . . . . . . . 8
Colour and Sound System
Setting of the Colour System . . . . . . . 8
Setting of the Sound system . . . . . . . . 8-9
Picture Adjustment . . . . . . . . . . . . . . . . . 9-10
Audio Adjustment . . . . . . . . . . . . . . . . . . 10
Tuning of the Channels
Automatic Tuning . . . . . . . . . . . . . . . 11
Semi-Auto Tuning and Manual Tuning
.
.11
Channel Copy . . . . . . . . . . . . . . . . . . 12
Channel Swapping . . . . . . . . . . . . . . 12
Skip Channel Set and Cancel . . . . . . . . . . .12-13
Setting of the Private Position . . . . . . . . 13
Setting of the OSD Language . . . . . . . . . 14
Connecting Other Equipment . . . . . . . . . 14
Connecting to the Rear AV1 Input
Jacks . . . . . . . . . . . . . . . . . . . . . . . . . . .14-15
Selecting the Colour System in AV
Mode . . . . . . . . . . . . . . . . . . . . . . . .15
Connecting to a DVD Player with AV1(DVD)
Video Component output terminal . . .15
Connection to the Front AV2 Input
Jacks . . . . . . . . . . . . . . . . . . . . . . . . . . . 16
Connecting to the Monitor Output
Jacks . . . . . . . . . . . . . . . . . . . . . . . . . . . 16
AV Connection to the Aerial Socket . . . . 16
Aerial Connection . . . . . . . . . . . . . . . . . . 17
Care and Cleaning . . . . . . . . . . . . . . . . . . 17
Specifications . . . . . . . . . . . . . . . . . . . . . 18
Helpful
Hints-Problems/Solutions . . . . . . . . . . . 19
I AM SEARCHING.
AUTO SET-UP
COMPLETED.
HAPPY VIEWING !
1
ALL PROGRAMMES.
PLEASE WAIT.
This TV set provides a self-automatic tuning and
sorting system function called “Plug & Play”. It
automatically begins searching and storing of all
available channels when switching-on the TV set
for the first time.
2
2
Press any of the control buttons to make the
ending message disappear. Or will
automatically return to normal TV display
after 10 seconds.
After completing this procedure, the programme
position 1 is selected and the ending messages on
the screen.
Note: The Plug & Play can be cancelled at any
time by pressing the MENU button.
✐ This procedure only appears at the first
switch-on time.
1
1
Connect power cord of the TV set to a wall
outlet, and turn on the TV set by pressing the
Mains ON/OFF button. Self-automatic tuning
system will be started as follows;
Let’s start !
NO STATION.
PLEASE CONNECT
ANTENNA PLUG.
■ If no TV stations are found, the display shown
below will appear. Please check if the antenna
is connected properly.
If it isn’t connected properly, connect antenna and
Automatic Tuning will be reset.
Automatic setting up channels
Plug & Play
Plug & Play
INST. MANUAL -C8WE-D (AUS) 4/10/08 3:27 PM Page 3

Fr
Fr
ont Contr
ont Contr
ol
ol
4
Each button listed in this section has the same function as it’s corre-
sponding button on the remote control.
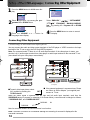
Model CA14SE1(V), CP14SE1(V), CA21SE1(V), CP21SE1(V), CA21VF1, CP21VF1,
CA21VF1K, CP21VF1K
Stand-by and Power Indicator
VOLUME
TV/AV Selector
Audio Input Jack-Right (AV2)
MEN
U
T
V/A
V
POW
ER
C
H
-
+
L-AU
D
I
O-R
VI
D
EO
Remote Control Detector
Mains ON/OFF Button
Programme UP/DOWN
Video Input Jack (AV2)
Audio Input Jack-Left (AV2)
MENU
Model CA21CF1(V), CP21CF1(V)
Stand-by and Power Indicator
VOLUME
TV/AV Selector
Audio Input Jack-Right (AV2)
Remote Control Detector
Mains ON/OFF Button
Programme UP/DOWN
Video Input Jack (AV2)
Audio Input Jack-Left (AV2)
MENU
INST. MANUAL -C8WE-D (AUS) 4/10/08 3:27 PM Page 4

Fr
Fr
ont Contr
ont Contr
ol
ol
5
Each button listed in this section has the same function as it’s corre-
sponding button on the remote control.
Monaural Model
Model CA14SE1M, CP14SE1M, CA14SE1K, CP14SE1K, CA21SE1M, CP21SE1M,
CA21SE1K, CP21SE1K
Stand-by and Power Indicator
VOLUME
TV/AV Selector
MEN
U
T
V/
AV
POW
ER
C
H
-
+
AU
D
I
O
VI
D
EO
Remote Control Detector
Mains ON/OFF Button
Programme UP/DOWN
Video Input Jack (AV2)
Audio Input Jack (AV2)
MENU
Model CA21CF1M, CP21CF1M
Stand-by and Power Indicator
VOLUME
TV/AV Selector
Remote Control Detector
Mains ON/OFF Button
Programme UP/DOWN
Video Input Jack (AV2)
Audio Input Jack (AV2)
MENU
INST. MANUAL -C8WE-D (AUS) 4/10/08 3:28 PM Page 5

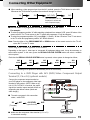
Remote Contr
Remote Contr
ol T
ol T
ransmitter
ransmitter
6
1. Open the battery cover.
2. Install two “AA” 1.5 volt batteries so that the “+” and “-” marks on the batteries match the “+” and
“ - ” marks inside the unit.
3. Close the battery cover.
Note: Replace the batteries when the TV set is showing the following symptoms:
Operation is unsteady or erratic, sometimes the TV set does not work with transmitter.
Discharged batteries may leak and damage the unit. The normal life of batteries should be from
nine to ten months.
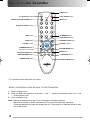
-/- -
-/- -
P
P
BASS
SOUND
S. SYS
SURROUND
A•B
PICTURE
SWAP
CH SCAN
TIMER
JXPSC
TV / AV
MENU
CH
CH
Power ON/OFF button
ALTERNATE button
VOLUME + button
TIMER button
MUTE button
CHANNEL SCAN button
* SURROUND button
PICTURE MODE button
Programme UP button
RECALL/COLOUR SYSTEM button
MENU button
TV / AV Selector button
Programme Selector button
SWAP button
VOLUME - button
STEREO/MONO button
(This button is not used)
Programme DOWN button
* BASS EXPANDER button
* SOUND MODE button
SOUND SYSTEM button
DIGIT button
Battery Installation of the Remote Control Transmitter
* For monaural models this button is not used.
INST. MANUAL -C8WE-D (AUS) 4/10/08 3:28 PM Page 6

General Operation
General Operation
7
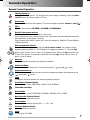
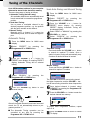
Remote Control Operation
-/- -
-/- - -/- - -/- -
-/- -
-/- -
-/- -
Standby/Power-on
To switch the TV on and off. For shutting off a power supply completely, Press the Mains
ON/OFF button on the front control of TV set.
-/- -
-/- - -/- - -/- -
-/- -
-/- -
-/- -
Sound mute
To switch the sound from the speakers. The sound changes as follows; normal -> mute ().
-/- -
-/- - -/- - -/- -
-/- -
-/- -
TIMER
-/- -
Timer
To Adjust Timer function OFF-TIMER -> ON TIMER -> ON PROGRAM
-/- -
-/- - -/- - -/- -
-/- -
-/- -
-/- -
Recall/Colour system selector
To display the programme information on the screen.
It also operates as Colour system selector if the clear picture cannot be obtained even when
the broadcasting or AV signal is received.
Colour System and Sound System (SIF) could be changed in SEMI-AUTO and MANUAL
TUNING operation.
-/- -
-/- - -/- - -/- -
-/- -
-/- --/- -
-/- -
-/- -
-/- - -/- - -/- -
-/- -
-/- -
-/- -
-/- -
-/- - -/- - -/- -
-/- -
-/- -
-/- -
Direct programme selector
For direct access to programmes using the (0-9) numeric button. For selection of ana-
logue programme position 10 - 255, Example: for programme position 17,
Press
the Digit
button, press
“1” button. Press “7” button. For programme position 125
Press the Digit button twice. Press
“2” button. Press “5” button.
For programme position 225
Press the Digit button 3 times. Press “2”
button. Press “5” button.
-/- -
-/- - -/- - -/- -
-/- -
-/- -
P
P
-/- -
Alternate
To select the previous position and the present position.
-/- -
-/- - -/- - -/- -
-/- -
-/- -
-/- -
-/- -
-/- - -/- - -/- -
-/- -
-/- -
-/- -
Volume Up/Down
To adjust the sound volume level . Also operates as left ( ) and right ( ) cursor.
-/- -
-/- - -/- - -/- -
-/- -
-/- -
-/- -
CH
-/- -
-/- - -/- - -/- -
-/- -
-/- -
-/- -
CH
Pr
ogramme down/up
To select the next programme number or previous programme number. Also operates as up
() and down ( ) cursor.
-/- -
-/- - -/- - -/- -
-/- -
-/- -
-/- -
SWAP
Swap
To swap the channels between two stored programme positions
-/- -
-/- - -/- - -/- -
-/- -
-/- -
SOUND
-/- -
Sound Mode (Optional Model)
To select Sound mode; PERSONAL, MUSIC, TALK, NORMAL.
-/- -
-/- - -/- - -/- -
-/- -
-/- -
-/- -
PICTURE
Pictur
e Mode
To select Picture mode; PERSONAL, DYNAMIC, NATURAL, ECO, GAME.
-/- -
-/- - -/- - -/- -
-/- -
-/- -
BASS
-/- -
Bass Expander (Optional Model)
To activate bass expander function.
-/- -
-/- - -/- - -/- -
-/- -
-/- -
S. SYS
-/- -
Sound System
To select optimum sound system (BG → I → DK → M).
-/- -
-/- - -/- - -/- -
-/- -
-/- -
SURROUND
-/- -
Surround (Optional Model)
To activate Surround function.
-/- -
-/- - -/- - -/- -
-/- -
-/- -
MENU
-/- -
Menu
To Call up the TV MENU.
-/- -
-/- - -/- - -/- -
-/- -
-/- -
-/- -
A•B
This button is not used
INST. MANUAL -C8WE-D (AUS) 4/10/08 3:28 PM Page 7

General Operation /Colour and Sound System
General Operation /Colour and Sound System
■
■ If no operation is performed after the TV has
been switched on by the ON TIMER, such as
if you are not at home, the TV will be auto-
matically switched off after approximately
2 hours
■
■ If the TV is already switched on when the time
set for the ON TIMER has been reached, only
the programme position will be changed to the
set programme position.
■
■ Cancelling ON TIMER. To cancel the ON
TIMER, press the VOLUME ( + or - ) button to
set it to “ON 0:00” while the ON TIMER screen
is shown. Switching off the TV by pressing the
Mains ON/OFF button will also cancel the
ON TIMER settings.
■ The OFF TIMER cancels when the TV set is
turned off or if a power failure occurs.
The OFF TIMER will switch off the TV automatical-
ly after 30 minutes, 1 hour, 1 hour and 30 minutes,
or 2 hours.
1
1
Press the TIMER button.
2
2
Press the VOLUME ( + or - ) button to select
the time period.
■ Just one minute before switching off the TV,
“OFF 0:01” will be display on the screen.
■ To cancel the OFF TIMER, select “OFF 0:00”
by pressing the VOLUME (+ or - ) button.
When the ON TIMER is set. TV will automatically
be switched On to the selected programme posi-
tion when the specified time has elapsed.
2
2
Press the VOLUME ( + or - ) button. The set
time will be increased or decreased by 10
minutes each time the button is pressed ; the
maximum time which can be set is 24 hours.
3
3
Use Direct Programme Selection to insert
programme position for when TV is switched
on by ON TIMER. (see page 7.)
Normally, set the colour system to “AUTO”, if the
clear picture cannot be obtained even when the
broadcasting or AV signal is received, press the
RECALL/COLOUR SYSTEM button repeatedly
until the optimum image can be produced.
(Refer to Broadcast Transmission System List
indicated by the last of this page in a setup of
Colour System.)
Each time the RECALL/COLOUR SYSTEM but-
ton is pressed, colour system changes as follows;
To set the sound system, make it during Semi-Auto
Tuning or Manual Tuning mode.
When the sound is not clear or no sound is pro-
duced on a programme number position, select
sound system repeatedly until the optimum sound
is obtained.
(Refer to Broadcast Transmission System List
indicated by the last of this page in a setup of
Sound System.)
To select sound system:
■ Press the SOUND SYSTEM button to select
the sound system directly. The sound system
will be memorized automatically.
OFF TIMER
ON TIMER
Colour and Sound System
Colour and Sound System
Setting of the Colour System
Setting of the Sound System
Note:Colour system is displayed according as
Colour system option.
8
OFF 0:00
1
1
Press the TIMER button twice.
(ON TIMER setting
mode)
ON 0:00 2
Programme position for when TV is
switched ON by ON TIMER.
6
AUTO
6
PAL
6
NTSC
6
NTSC4.43
6
SECAM
INST. MANUAL -C8WE-D (AUS) 4/10/08 3:28 PM Page 8

Colour and Sound System /
Colour and Sound System /
Pictur
Pictur
e Adjustment
e Adjustment
9
or:
BG
(5.5MHz)
DK
(6.5MHz)
I
(6.0MHz)
M
(4.5MHz)
2) To enter a sound system selection into the
memory, select “MEMORY” and press the
VOLUME + or
-
button.
(Semi-Auto or Manual Tuning mode )
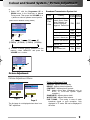
Broadcast Transmission System List
Area
Country
Sound
System
Colour
System
Middle
East
Asia
Oceania
PAL
B/G
Australia,
New Zealand, etc.
Union of Arab Emirates,
Kuwait, Oman, Qatar,
Yemen,
Bahrain,
etc.
Indonesia, Malaysia,
Singapore, Thailand,
etc.
PAL
B/G
China,
etc.
PAL
D/K
Hong kong
PAL
I
Saudi Arabia,
Iraq, Iran, Lebanon,etc.
B/G
SECAM
Russian Federation,etc.
D/K
SECAM
Myanmar, etc.
M
NTSC
1) Select “SIF” with the Programme UP or
DOWN button in the Semi-auto or Manual
Tuning mode. Then press the VOLUME (+ or
-
) button to select a optimum sound system.
Picture Adjustment Item
COLOUR : Adjusts colour intensity.
BRIGHT : Adjusts picture brightness.
CONTRAST : Adjusts picture contrast.
TINT : Adjust colour tints. (Displayed only on
NTSC or NTSC4.43 system signal
reception.)
SHARPNESS : Adjusts picture detail.
WHITE TONE : Adjusts white balance.
FINE TUNING : Fine tuning in case of weak
broadcast signal or poor reception. Only
displayed in TV mode. Will not be displayed in
AV mode.
The 2nd page is not displayed when there is no
TINT adjustment.
Pictur
Pictur
e Adjustment
e Adjustment
Picture Adjustment Menu
SEARCH
SYSTEM
MODE
POSITION
SEMI
START
2
AUTO
SKIP
MEMORY
OFF
--
SIF
BG
SELECT
ADJUST
BACK
EXIT
SEARCH
SYSTEM
MODE
POSITION
SEMI
START
2
AUTO
SKIP
OFF
SIF
BG
SELECT
ADJUST
BACK
EXIT
MEMORY
OK
BRIGHTNESS
TINT
CONTRAST
SHARPNESS
SELECT
40
ADJUST
BACK
EXIT
COLOUR
Page 1
Page 2
FINE TUNING 471.25MHZ
SELECT
37
ADJUST
BACK
EXIT
WHITE TONE
INST. MANUAL -C8WE-D (AUS) 4/10/08 3:28 PM Page 9

Pictur
Pictur
e Adjustment / Audio Adjustment
e Adjustment / Audio Adjustment
1
1
Press the MENU button for MAIN menu
display.
2
2
When “PICTURE” is not selected, select
“PICTURE” with the Programme UP or
DOWN button.
4
4
Select desired control by pressing the
Programme UP or DOWN button.
3
3
Press the VOLUME + or
-
button to display
Picture Adjustment menu.
5
5
Press the VOLUME + or
-
button to alter
settings.
■ To return to Main menu, press the
ALTERNATE button.
■ To return to the normal TV mode, press the
MENU button. ( Or will automatically return to
the normal TV mode after 20 seconds.)
1
1
Press the MENU button for MAIN menu dis-
play.
Audio Adjustment Item
BASS : Bass Adjustment
TREBLE :Treble Adjustment
BALANCE : Left/right speaker volume balance
adjustment
BASS EXPANDER : Operates BASS EXPANDER
on and off
SURROUND :Operates SURROUND on and off.
Note: If SURROUND “on”, BALANCE has no function.
Note: When the stereo signal is inputted from the
right and left audio input terminals in the AV mode,
surround mode is changed as follows;
“SURROUND” ON and “SURROUND OFF”.
2
2
Select “AUDIO “ by pressing the Programme
UP or DOWN button.
3
3
Press the VOLUME + or
-
button for Audio
Adjustment menu display.
■
■ To return to Main menu, press the ALTERNATE
button.
■
■ To return to normal TV mode, press the MENU
button. (Or will automatically return to normal
TV mode after 20 seconds.)
Basic Picture Adjustment Operation
Audio Adjustment
Audio Adjustment
Audio Adjustment Menu
Audio Adjustment Operation
(MAIN MENU)
The Monaural Models not equipped with Audio
Adjustment Menu
Audio Adjustment
Menu is not
equipped in
monaural models.
AUDIO
LANGUAGE
PRESET
SELECT
ENTER
EXIT
PICTURE
AUDIO
LANGUAGE
PRESET
PICTURE
BRIGHTNESS
SHARPNESS
CONTRAST
WHITE TONE
FINE TUNING 567.25MHZ
25
COLOUR
SHARPNESS
CONTRAST
WHITE TONE
FINE TUNING 567.25MHZ
30
COLOUR
BRIGHTNESS
TREBLE
BASS EXPANDER
BALANCE
SURROUND
OFF
OFF
SELECT
27
ADJUST
BACK
EXIT
BASS
LANGUAGE
PRESET
PICTURE
AUDIO
TREBLE
BASS EXPANDER
BALANCE
SURROUND
OFF
OFF
27
BASS
10
INST. MANUAL -C8WE-D (AUS) 4/10/08 3:28 PM Page 10

T
T
uning of the Channels
uning of the Channels
11
Up to 256 broadcast stations in your reception
area can be stored in the electronic memory.
There are three ways of tuning as follows;
1. Automatic Tuning (the basic way):
All receivable channels are automatically tuned
in and memorized in consecutive programme
position.
2. Semi-Auto Tuning:
Use to preset a receivable channel in any
desired programme position, e.g. the position
with the same number as the channel.
3. Manual Tuning:
Manually tune a channel if it cannot be
automatically tuned, such as when the signal is
poor.
1
1
Press the MENU button for MAIN menu
display.
2
2
Select “PRESET” by pressing the
Programme UP or DOWN button.
3
3
Press the VOLUME + or
-
button for
PRESET menu display. On entering PRESET
display, Automatic Tuning will be selected
initially.
■
■ The Automatic Tuning operation can be
cancelled at any time by pressing the
Programme UP or DOWN button.
4
4
Select “SEARCH” by pressing the
Programme UP or DOWN button.
After all receivable channels have been found and
stored, the TV set automatically returns to pro-
gramme position “1”.
-/- -
-/- - -/- - -/- -
-/- -
-/- -
-/- -
MENU
CH
CH
1
5
5
Press the VOLUME (+) button to start
channel tuning.
1
1
Press the MENU button for MAIN menu
display.
2
2
Select “PRESET” by pressing the
Programme UP or DOWN button.
3
3
Press the VOLUME + or
-
button for
PRESET menu display. On entering
PRESET display, Automatic Tuning will
be selected initially.
4
4
Select “SEMI” or “MANUAL” by pressing the
VOLUME + or
-
button.
8
8
Press the MENU button to return to normal
TV display.
6
6
Once desired channel is located, select
“MEMORY” by pressing the Programme UP
or DOWN button.
The VOLUME + button will move tuning toward
the higher frequencies, and the VOLUME
-
but-
ton will move tuning toward the lower frequencies.
5
5
Select “SEARCH” by pressing the
Programme UP or DOWN button.
Semi-Auto Tuning:
Press and release the VOLUME + or
-
button
to search for required TV station. Once a
station is located, tuning will automatically stop.
Continue till desired channel is located.
Manual Tuning :
Press and hold the VOLUME + or
-
button to
search for required TV station.
7
7
Press the VOLUME + or
-
button to enter the
desired channel into memory.
To preset other Programme Positions, repeat
steps 5
-
8.
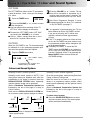
Automatic Tuning
Semi-Auto Tuning and Manual Tuning
AUDIO
LANGUAGE
PICTURE
PRESET
SYSTEM
POSITION
1
AUTO
SIF
BG
MODE
AUTO
SEARCH
START
SEARCH
SYSTEM
POSITION
START
1
AUTO
SIF
BG
MODE
AUTO
SYSTEM
POSITION
6
AUTO
MODE
SEMI
SEARCH
START
SYSTEM
POSITION
6
AUTO
MODE
SEMI
SEARCH
SYSTEM
POSITION
6
AUTO
MODE
MANUAL
SEARCH
SKIP
OFF
SELECT
ADJUST
BACK
EXIT
MEMORY
OK
INST. MANUAL -C8WE-D (AUS) 4/10/08 3:28 PM Page 11

T
T
uning of the Channels
uning of the Channels
12
2
2
Enter to SEMI-AUTO or MANUAL tuning
mode. (Refer to page 11.)
3
3
Select “POSITION” with the Programme UP
or DOWN button.
This function can be utilized after Automatic
Tuning.
For example, to copy a TV channel on pro-
gramme position “2” onto programme position
“6”;
1
1
Select programme position “2” .
2
4
4
Select position “6” with the VOLUME + or
-
button.
5
5
Select “MEMORY” by pressing the
Programme UP or DOWN button.
7
7
Press the MENU button to return to normal
TV display.
6
6
Press the VOLUME + or
-
button to
memorize.
The two TV channels will now have changed
places.
Use this channel swapping feature to swap the
channels between two stored programme position.
This feature is particularly useful after automatic
tuning.
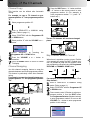
1
1
Select programme position “6”.
2
2
Press the SWAP button.
For example, to swap the channel between pro-
gramme position “6” and programme position
“12”.
6
12
6
3
3
Press the DIGIT button, “ 1 “ button and then
“ 2 ” button on the remote control to enter
programme number 12. (For example, to
enter programme number “ 3 “, press “ 3 ”
button only. )
6
12
1
1
Enter to SEMI-AUTO or MANUAL tuning
mode. (Refer to page 11.)
2
2
Select “POSITION” with the Programme UP
or DOWN button.
When there is a position you do not use, Position
4 for example, by setting the SKIP Channel func-
tion it is possible to jump over this position, when
you are selecting a channel using the Programme
UP/DOWN or CHANNEL SCAN button.
3
4
5
Skip
For example, to set programme position “4” as
Skip channel ;
3
3
Press remote control “4” button to select pro-
gramme position 4. Use the DIGIT button
and Programme Selector (Number buttons)
to enter programme number. Do not use the
VOLUME + or
-
button to enter programme
position in this settings.
Channel Copy
Channel Swapping
Skip Channel Set and Cancel
SWAP 6 AND
-
SWAP 6 AND 12
SEARCH
SYSTEM
MODE
SEMI
START
AUTO
SIF
BG
POSITION
6
SEARCH
SYSTEM
MODE
SEMI
START
AUTO
SKIP
MEMORY
OFF
--
SIF
BG
POSITION
4
6
SWAPPING
INST. MANUAL -C8WE-D (AUS) 4/10/08 3:28 PM Page 12

T
T
uning of the Channels /
uning of the Channels / Setting of the Private Position
6
6
Press the MENU button to return to normal
TV display.
4
4
Select “SKIP” by pressing the Programme
UP or DOWN button,then press the
VOLUME + or
-
button to set SKIP to ON.
To cancel Skip Channel function, set to OFF.
5
5
Select “MEMORY” by pressing the
Programme UP or DOWN button, then press
the VOLUME + or
-
button for memory.
Any number of channels maybe set as Skip
Channels.
For example, to set the programme position
“15” as the private position.
1
1
Select programme position “15”.
2
2
Press and hold the RECALL/COLOUR SYS
TEM button for more than 2 seconds.
The programme number “15” will shift to centre of
the screen.
The picture will disappear, and “ 15” will be dis-
play on the screen.
The private position setting is now completed.
3
3
Press the MENU button.
Private position is used to restrict of pro-
gramme positions that you do not want others
to watch. Any position can be set as the Private
position.
1
1
Select private position (In this case position “15”).
2
2
Press and hold the RECALL/COLOUR
SYSTEM button for more than 2 seconds.
3
3
Press the RECALL/COLOUR SYSTEM
button for watching a TV programme.
Note: The position “15” is still in the private position.
The private position is now cancelled.
1
1
Select private position (position “15”).
2
2
Press and hold the RECALL/COLOUR
SYSTEM button for more than 2 seconds.
3
3
Press the MENU button.
Setting of the Private Position
Setting of the Private Position
How To Set the Private Position
To View a Programme on Private Position
Cancelling of the Private Position
SEARCH
SYSTEM
MODE
SEMI
START
AUTO
MEMORY
--
SIF
BG
SELECT
ADJUST
BACK
EXIT
POSITION
4
SKIP
ON
SEARCH
SYSTEM
MODE
POSITION
SEMI
START
4
AUTO
SKIP
ON
SIF
BG
MEMORY
OK
15
15
15
AUTO
BG
BG
15
15
15
AUTO
BG
15
AUTO
BG
15
15
AUTO
15
13
INST. MANUAL -C8WE-D (AUS) 4/10/08 3:28 PM Page 13

Setting of the OSD Language / Connecting Other Equipment
Setting of the OSD Language / Connecting Other Equipment
2
2
Select “LANGUAGE “ by pressing the pro-
gramme UP or DOWN button.
3
3
Press the VOLUME + or
-
button for
Language menu display.
4
4
Press the MENU button to return to normal
TV display.
You may connect the audio and video output terminals of the DVD player or VIDEO recorder to the input
terminals of the TV set to enjoy the DVD and VIDEO programs.
When the stereo signal is inputted from the right and left audio input terminals, each time the
SURROUND button is pressed (or selection of On-screen Menu), surround mode is changed as follows;
“ SURROUND ON”, and “SURROUND OFF”.
Note: The effect of surround is not obtained although the switching of surround is displayed in this
monaural connection.
■
■ To watch video input picture, select
AV1 position by pressing the
TV/AV Selector.
AV1
Select “ENGLISH”, “ ”, “VIETNAMESE”,
“ ”, “FRANÇAIS”, “BAHASA INDONE-
SIA” by pressing the
Progamme
UP or DOWN
button.
P
C
NN
y
C
Connecting Other Equipment
Connecting Other Equipment
Connecting To the Rear AV1 Input Jacks
Y
MONITOR OUT
AV1/DVD
C
R
C
B
R
L
(MONO)
VIDEO
R
L
INPUT
V
D
E
O
I
To Audio Input-R (AV1)
To Audio Input-L (AV1)
To Video Input (AV1)
Video/DVD Player
FRANCAIS
VIETNAMESE
BAHASA INDONESIA
ENGLISH
PCC
y
NN
1
1
Press the MENU button for MAIN menu dis-
play.
Note: For monaural model TV there is no L/R audio input terminals. If the video player is stereo, con-
nect the Left (L) audio output terminal from video player to audio input terminal on the monaural TV set
(more details see your video player manual book).
Note for monaural models: the surround button is no function.
AUDIO
LANGUAGE
PRESET
PICTURE
AUDIO
PRESET
PICTURE
LANGUAGE
SURROUND OFF
SURROUND ON
14
Y
MONITOR OUT
AV1/DVD
C
R
C
B
R
L
(MONO)
VIDEO
R
L
INPUT
V
D
E
O
I
To Audio Input-R (AV1)
To Audio Input-L (AV1)
To Video Input (AV1)
To Audio output
Mono to Stereo Adapter
(not supplied)
To Video output
Monaural Equipment
■
■ If the external equipment is a monaural one, Please
use “Mono to Stereo Adapter” (not supplied) and
connect to TV set.
INST. MANUAL -C8WE-D (AUS) 4/10/08 3:28 PM Page 14

Connecting Other Equipment
Connecting Other Equipment
15
■
■ When watching a video program input from the AV1 terminal, press the TV/AV button to select AV1.
Whenever the TV/AV button is pressed, the mode will change as follows:
Colour system setting for AV position is automatically stored in the memory.
Each time the RECALL/COLOUR SYSTEM button is pressed, colour system is changed as follow;
Depending on the type of video tape or connected AV equipment being used, it may be necessary to
select colour system. In this case, press the RECALL/COLOUR SYSTEM button and select a suitable
colour system.
■
■ You can select a TV programme while watching a playback from a VCR
For example:
● To select programme position “9” while watching a playback from external VCR, press “9” button of the
remote control. The TV set returns to the TV mode and programme “9” will be selected.
● To select the programme position “26”, press Digit (--/-) button, “2” then “6” button. Then TV set returns
to the TV mode and programme position “26” will be selected.
Note: Pressing either of the PROGRAMME UP or DOWN buttons of the remote control or the TV will
return the TV to the TV mode.
TV mode
AV1
AV1(DVD)
28
AV2
(This AV1(DVD) will be
displayed for model with
DVD Component input.)
Selecting the Colour System in AV Mode
Connect the component output terminal on
your DVD player to the component video input
terminal of this product. (NOTE: When a sig-
nal of Y,Cb,Cr/Y,Pb,Pr is received, the output
signal from monitor output terminal will be cor-
responding but without colour (black and
white image).)
■
■ To watch a program in this connection
status, select DVD.
Y
MONITOR OUT
AV1/DVD
C
R
C
B
R
L
(MONO)
VIDEO
R
L
INPUT
V
D
E
O
I
Video/DVD Player
To Audio Input-R (AV1)
To Audio Input-L (AV1)
To Input Terminal C
R
To Input Terminal CB
To Input Terminal Y
Connecting to a DVD Player with AV1 (DVD) Video Component Output
Terminal (Y, Cb or Cr) (optional models)
28
AV1 AV1(DVD)
(TV mode)
AV2
(Optional model)
■
■ Make sure the component video terminal (Y, Cb or Cr)
is connected correctly.
AV1
AUTO
AV1
PAL
AV1
SECAM
AV1
NTSC
AV1
NTSC 4.43
INST. MANUAL -C8WE-D (AUS) 4/10/08 3:28 PM Page 15

To Audio Input-R (AV2)
To Audio Input-L (AV2)
To Video Input (AV2)
Video/DVD Player
■
■ To watch the Front AV2 video
input picture, select AV2
position by pressing the TV/AV
Selector.
Connecting Other Equipment
Connecting Other Equipment
16
Aerial Socket
The AV apparatus can also be connected to the aerial socket of your TV receiver.
Presetting to watch the video input
1. Playback the VCR .
2. Tune a VCR playback in programme position
that you want. (See Semi-Auto Tuning and
Manual Tuning on pages 11.)
For further details concerning this connection and adjustment, refer to the operating instructions
for the AV equipment.
VCR for
playback
PLAYBACK
■
■ To record TV programme, select TV mode by
pressing the TV/AV Selector and record the
desired programme.
15
The picture signal being displayed on the TV screen is
output through the Monitor Output Jacks. Use these
terminals to record TV broadcasts and for video dub-
bing from AV1 or AV2 input terminals.
TV mode
Connecting to the Front AV2 Input Jacks
Connecting to the Monitor Output Jacks
Y
MONITOR OUT
AV1/DVD
C
R
C
B
R
L
(MONO)
VIDEO
R
L
INPUT
V
D
E
O
I
To Audio Output-R
To Audio Output-L
To Video Output
VCR for Recording
To video and
audio inputs
AV Connection To the Aerial Socket
It is convenient to use the AV input jack on the front panel for equipment
that is often connected and disconnected.
AV2
Note: For monaural model TV there is no L/R audio input terminals. If the
video player is stereo, connect the Left (L) audio output terminal from
video player to audio input terminal on the monaural TV set (more details
see your video player manual book).
■ To dub video from the AV1 terminal input, select
AV1 position and by pressing the TV/AV Selector.
AV1
INST. MANUAL -C8WE-D (AUS) 4/10/08 3:28 PM Page 16

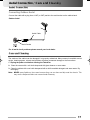
Aerial Connection / Car
Aerial Connection / Car
e and Cleaning
e and Cleaning
17
The surface of the cabinet can be damaged if not properly maintained. Many common household aerosol
sprays, cleaning agents, solvents and polishes will cause permanent damage to the fine surface.
1. Unplug the power cord before cleaning the Television.
2. Clean the screen with a soft cloth dampened with glass cleaner or warm water.
3. Clean the cabinet with a soft cloth dampened with a mild household detergent and warm water. Dry
thoroughly.
Note: NEVER spray liquids on the screen because they can run down and drip onto the chassis. This
may cause component failure not covered under Warranty.
Connect the cable with a plug from a UHF (or VHF) aerial to the aerial socket on the cabinet back.
Aerial Cable
Aerial Socket
For all aerial circuit problems please consult your local dealer.
Outdoor Aerial
Connecting Outdoor Aerial
Car
Car
e and Cleaning
e and Cleaning
Aerial Connection
Aerial Connection
INST. MANUAL -C8WE-D (AUS) 4/10/08 3:28 PM Page 17

Specifications
Specifications
18
Power Source AC127-240 Volts, 50/60Hz
Colour System PAL/SECAM/NTSC4.43/NTSC/PAL-60Hz
Sound System B/G, I, D/KK’, M/M
Channel Coverage
VHF: E2-E12, R1-R12, K1-K9, J1-J12, A2-A13 // 0-11, 5A (AUS), 1-11 (NZ)
UHF: 21-69, A14-A69, J13-J62 // 28-69 (AUS)
CATV: S1
-
S41, X, Y, Z, Z+1, Z+2
Audio output (RMS) Model: CA14SE1(V), CP14SE1(V), CA21SE1(V), CP21SE1(V)
CA21VF1, CP21VF1, CA21VF1K, CP21VF1K, CA21CF1(V),
CP21CF1(V): 5W + 5W
Model: CA14SE1M, CP14SE1M, CA14SE1K, CP14SE1K, CA21SE1M,
CP21SE1M, CA21CF1M , CP21CF1M, CA21SE1K, CP21SE1K
: 2.5W + 2.5W
Speakers : 5 cmx 9 cm x 2 pcs (All models)
Ext. terminals
DVD Video Component: Composite/Component Y, CB,CR input
(Optional models)
Video Inputs: Phone Jack x 2 (1.0Vp-p, impedance 75 Ω)
Audio Inputs: Phone Jack (L/R) x 2 (436mVrms, impedance more than 40KΩ)
Video monitor outputs: Phone Jack x 1 (1.0Vp-p, impedance 75 Ω)
Audio monitor outputs: Phone Jack (L/R) x 1 (436mVrms, impedance less than 600Ω)
Monaural model Ext. terminals
Video inputs: Phone Jack x 2 (1.0Vp-p, impedance 75 ohm)
Audio inputs: Phone Jack x 2 (436mVrms, impedance more than 40K ohm)
Video monitor outputs: Phone Jack x 1 (1.0Vp-p, impedance 75 ohm)
Audio monitor outputs: Phone Jack x 1 (436mVrms, impedance less than 600 ohm)
Dimension: Model
CA14SE1M, CP14SE1M, CA14SE1K, CP14SE1K, CA14SE1(V),
CP14SE1(V): 433(W) x 336(H) x 359(D) mm
Model
CA21SE1(V), CP21SE1(V), CA21SE1M, CP21SE1M, CA21SE1K,
CP21SE1K : 580(W) x 460(H) x 457(D) mm
Model
CA21CF1M, CP21CF1M, CA21CF1(V), CP21CF1(V) : 580(W) x 460(H) x 465(D) mm
Model
CA21VF1, CP21VF1, CA21VF1K, CP21VF1K : 580(W) x 460(H) x 468(D) mm
Weight: Model
CA14SE1(V), CP14SE1(V), CA14SE1K, CP14SE1K, CA14SE1M,
CP14SE1M
: approx. 8.7 Kg
Model
CA21SE1(V), CP21SE1(V), CA21SE1M, CP21SE1M, CA21SE1K,
CP21SE1K
: approx. 19.1 Kg
Model
CA21CF1M, CP21CF1M, CA21CF1(V), CP21CF1(V)
: approx. 20.6 Kg
Model
CA21VF1, CP21VF1, CA21VF1K, CP21VF1K
: approx. 20.5 Kg
Specifications subject to change without notice.
INST. MANUAL -C8WE-D (AUS) 4/10/08 3:28 PM Page 18

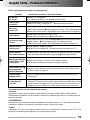
Helpful Hints - Pr
Helpful Hints - Pr
oblems/Solutions
oblems/Solutions
19
Before requesting service check the following chart.
“GHOSTS”
Reflections of signals from mountains or high buildings will cause multiple images, called “Ghosts”.
These abnormal conditions can be reduced to minimum by repositioning aerial or by installing new one
suited for your area.
“INTERFERENCE”
Interference may be caused by electrical appliances, car ignition systems, etc. This should normally be
a temporary condition, but should this interference persist, contact your dealer.
The following faults are not caused by the receiver:
● Check aerial connection on back of TV set.
● Check aerial for broken wires. ● Re-orient aerial.
Problem: Check these Conditions / Try these solutions:
● Check if TV is plugged in.
● Try a different channel, if OK, probably station trouble.
No picture,
no sound
● Adjust Brightness or Contrast control.
● Adjust Fine Tuning. (See page 9.) ● Check aerial connection.
Poor picture,
sound OK
No colour,
Picture OK
● Adjust Colour or Tint control. ● Adjust Fine Tuning. (See page 9.)
●
Check aerial connection.
●
Is the programme in colour ? Try a different channel.
● Select other colour system. (See Setting of the Colour System on page 8.)
Weak picture
No sound or poor
sound.
●
Sound Mute may be on. Press the
SOUND MUTE
button on the remote control.
● Adjust Volume. ●
May be station trouble. Try a different channel.
● Select other sound system. (See Setting of the Sound System on page 8-9.)
Remote Control
will not work.
● Check batteries. Replace batteries.
● Check if TV set is plugged in. Aim remote control towards front of TV.
Cannot select or
scan some channels.
● Channel may be removed from memory. Add channel to memory manually.
(See “Skip Channel Set and Cancel” on page 12-13.)
● Check aerial connection.
● This is a normal condition during warm-up and cool down of the plastic
cabinet parts.
Blue screen with AV1
or AV1(DVD) or AV2
is displayed.
● Check AV connection. Press the TV/AV Selection button.
● Check external equipment. Switch on external equipment.
● Check to see if channel is set as the Private Position. See “Setting of the
Private Position” on page 13.
Black screen with
and programme
position displayed.
Cabinet makes
popping sound.
Colour Spot On
The CRT
● Keep away your TV set from magnetic source, then turn-off your TV set and
disconnect TV's power cord from AC outlet, keep this condition about 30-60
minutes and turn-on again your TV set if time is reach. If colour spot is not
disappear after this solution have done, please contact your local dealer.
“SLANT”
If the picture of TV set is not properly horizontal (slant), try to change face direction of your TV set. This
case may be caused by geo-magnetic on your place where you live.
INST. MANUAL -C8WE-D (AUS) 4/10/08 3:28 PM Page 19

SANYO ELECTRIC Co., Ltd.
Part No. 1AA6P1P5434-D C8WE-D (AC7-A)
INST. MANUAL -C8WE-D (AUS) 4/10/08 3:28 PM Page 20
-
 1
1
-
 2
2
-
 3
3
-
 4
4
-
 5
5
-
 6
6
-
 7
7
-
 8
8
-
 9
9
-
 10
10
-
 11
11
-
 12
12
-
 13
13
-
 14
14
-
 15
15
-
 16
16
-
 17
17
-
 18
18
-
 19
19
-
 20
20


Ask a question and I''ll find the answer in the document
Finding information in a document is now easier with AI
Related papers
Other documents
-
Sharp 20BM2-GMK2 Operating instructions
-
Panasonic TX51P15H Operating instructions
-
-
-
-
-
-
-
-