JOHAN LEWIS White Marble Wall Lt User manual
- Type
- User manual
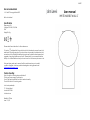
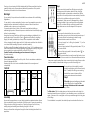
JOHAN LEWIS White Marble Wall Lt is a stylish and functional lighting fixture designed for indoor use, particularly well-suited for bathrooms due to its IP44 rating. It features a sleek white marble finish and requires a single 5-watt G9 energy-efficient LED bulb (not included). With a maximum power of 5W and voltage compatibility of 220~240V, 50/60Hz, this wall light provides ample illumination for various spaces. For safety, it should be installed in accordance with local Building Regulations and connected to a lighting supply protected by a 5 amp fuse or equivalent circuit breaker.
JOHAN LEWIS White Marble Wall Lt is a stylish and functional lighting fixture designed for indoor use, particularly well-suited for bathrooms due to its IP44 rating. It features a sleek white marble finish and requires a single 5-watt G9 energy-efficient LED bulb (not included). With a maximum power of 5W and voltage compatibility of 220~240V, 50/60Hz, this wall light provides ample illumination for various spaces. For safety, it should be installed in accordance with local Building Regulations and connected to a lighting supply protected by a 5 amp fuse or equivalent circuit breaker.


-
 1
1
-
 2
2


JOHAN LEWIS White Marble Wall Lt User manual
- Type
- User manual
JOHAN LEWIS White Marble Wall Lt is a stylish and functional lighting fixture designed for indoor use, particularly well-suited for bathrooms due to its IP44 rating. It features a sleek white marble finish and requires a single 5-watt G9 energy-efficient LED bulb (not included). With a maximum power of 5W and voltage compatibility of 220~240V, 50/60Hz, this wall light provides ample illumination for various spaces. For safety, it should be installed in accordance with local Building Regulations and connected to a lighting supply protected by a 5 amp fuse or equivalent circuit breaker.
Ask a question and I''ll find the answer in the document
Finding information in a document is now easier with AI
Related papers
Other documents
-
John Lewis 701 33074 User guide
-
 John Lewis Partners Ashbourne Floor Lamp User guide
-
John Lewis 239783159 User guide
-
Habitat 1233759 Chrome Opal Ceiling Light User manual
-
Argos Home Manhattan Ceiling Fan User manual
-
John Lewis JLBIHD904 User manual
-
-
-
-
