Page is loading ...

Instruction Manual
ETX-90AT Astro Telescope
ETX-105AT Astro Telescope
ETX-125AT Astro Telescope


Quick-Start Guide .......................................................... 4
Telescope Features ...................................................... 6
Autostar Features .......................................................... 9
Getting Started ..............................................................12
Parts Listing ..............................................................12
How to Assemble Your Telescope & Tripod..............12
Attaching and Using the Viewfinder..........................13
Focusing and Aligning the Viewfinder ......................14
Choosing an Eyepiece..............................................15
Observing ......................................................................16
Observing by Moving the Telescope Manually ........16
Terrestrial Observing ................................................16
Observing Using Autostar's Arrow Keys ..................16
Slew Speeds ............................................................17
Astronomical Observing, Observe the Moon ............17
To Track an Object Automatically..............................17
Moving Through Autostar’s Menus......................17
Initializing Autostar ..............................................18
Easy (Two-Star) Align..........................................18
Observe a Star Using Automatic Tracking ..........20
Go To Saturn ............................................................20
Using the Guided Tour ..............................................21
Basic Autostar Operation................................................22
Autostar Navigation Exercise....................................22
Entering Data, Navigating Autostar ..........................23
Autostar Menus ............................................................24
Menu Tree ................................................................24
Objects Menu............................................................25
Event Menu, Glossary Menu ....................................26
Utilities Menu ............................................................27
Setup Menu ..............................................................28
Advanced Autostar Features ..........................................31
Adding Observing Sites ............................................31
Finding Objects Not in the Database........................32
Observing Satellites ..................................................32
Create Your Own Guided Tour..................................33
Landmarks ................................................................36
Identify ......................................................................37
Advanced Alt/Az Alignment Methods ........................38
Browse ......................................................................39
Photography ..................................................................40
Photography with Autostar Suite ..............................42
Optional Accessories......................................................43
Maintenance ..................................................................45
Troubleshooting ......................................................46
Specifications ................................................................48
Appendix A: Equatorial (Polar) Alignment ......................51
Equatorial Alignment, Celestial Coordinates ............51
Polar Mounting with #884 Deluxe Field Tripod ........51
Equatorial Mounting Procedure ................................52
To Track a Star When Polar Mounted ......................52
Autostar Polar Alignment Modes ..............................53
Locating the Celestial Pole ......................................53
Setting Circles ..........................................................54
Appendix B: Latitude Chart ............................................55
Appendix C: Training the Drive ......................................56
Appendix D: Basic Astronomy........................................57
CONTENTS
WARNING!
Never use a Meade
®
ETX
®
Astro Telescope
to look at the Sun!
Looking at or near the
Sun will cause instant and irreversible
damage to your eye. Eye damage is often
painless, so there is no warning to the
observer that damage has occurred until it is
too late. Do not point the telescope or its
viewfinder at or near the Sun. Do not look
through the telescope or its viewfinder as it is
moving.
Children should always have adult
supervision while observing.
Caution: Use care to install batteries in the
orientation indicated by illustration in the
battery slots of the battery compartment.
Follow battery manufacturer's precautions.
Do not install batteries backwards or mix
new and used batteries. Do not mix battery
types. If these precautions are not followed,
batteries may explode, catch fire or leak.
Improperly installed batteries void your
Meade warranty.
If you are anxious to use your telescope
for the first time,
read the QUICK-START
GUIDE on pages 4 and 5.
® The name "Meade," “ETX,” “Autostar” and the Meade logo
are trademarks registered with the U.S. Patent Office and in
principal countries throughout the world.
Patents:
US 6,304,376
US 6,392,799
US 6,563,636
D 422,610
Patent Pending
© 2004 Meade Instruments Corporation.

QUICK-START GUIDE
2
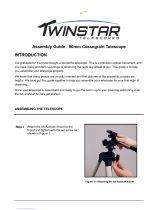
Make sure that the computer control panel power switch
(
F) is in the OFF position. Remove the Autostar
®
handbox
and the coiled cord from the packing materials. Plug one
end of the cord into the HBX port (
G).
Tighten (to a "firm feel" only, do not overtighten) the vertical lock
(
I) and the horizontal lock (J).
See page 7 and 8 for more infor-
mation.
...and the other end of the coiled cord into the coiled cord
port at the bottom of Autostar handbox (
H), as shown above.
Place the 26mm eyepiece (C) into the eyepiece holder on
the telescope and tighten the attachment thumbscrew (D) to
a "firm feel" only. See page 7, for more information.
Remove the dust cover (E) from the end of the telescope
tube.
C
D
H
I
J
F
E
B
A
F
G
C
B
D
Remove the ETX
®
telescope from its packaging and place
it on a sturdy surface. Place the ETX on its side and
remove the battery compartment cover (
A) from the under-
side of the drive base. Insert eight (user-supplied) AA-size
batteries into the battery compartment (
B) oriented as
shown in the battery compartment. Replace the cover and
return the telescope to an upright position (if you wish to
attach the telescope to the deluxe field tripod, see page
12).
Flip the Power Switch (F) on the computer control panel to
the ON position. A copyright message lights on Autostar’s
LCD display, followed by a warning not to look at the Sun.
Press the Autostar key prompted by the message when you
are done reading.
A “Getting Started” message displays. Press ENTER to skip
this message.
See pages 9 to 11 for more information about Autostar’s
keys.
This Quick Start Guide demonstrates how to install the batteries and eyepiece, and how to observe using the Autostar Arrow keys.
If you wish to try out Autostar’s “Go To” capabilities, check out the list of page references at the bottom of the following page.
4

5
Keep pressing the ENTER key until "Country/State" appears
on the display. (Ignore the prompts requesting "Date" and
"Time" for now – these functions will be explained later).
When “Country/States” displays, press either one of the
SCROLL KEYS to cycle through the choices on the list. When
your state or country appears on the list, press ENTER.
“Cities” displays. Using the SCROLL KEYS, cycle through the
list of cities and press ENTER when the city closest to you
displays.
Finally “Telescope Models” displays. Using the SCROLL KEYS,
cycle through the list of telescope models and press ENTER
when your model displays.
The display now displays "Setup: Align." See page 19 for more
information.
If Autostar does not requests the Country/State, City and
Telescope Model information, use the "Telescope Model"
and "Site" options in the Setup menu to change this
information. See pages 28, 29 and 31 for more information.
Sight along the side of the telescope’s main tube to locate an
object. If you wish to learn how to attach and align the
telescope’s viewfinder, see pages 13 to 14.
Use the telescope’s focus knob (L) to bring the object into
focus.
If you wish to observe using Autostar’s databases,
see
:
Page 19 to learn how to perform an Easy Alignment
Page 20 to “Go To” Saturn”
Page 21 to learn about Guided Tours
Pages 22 to 39 to
learn more about Autostar’s menus
K
L
You can now use the ARROW KEYS to slew (move) the
telescope up, down, right or left. Practice using the ARROW
KEYS to center objects in the eyepiece.
To change the speed at which the telescope moves (known
as the “slew” speed) press a NUMBER KEY from 1 through 9.
1 is the slowest speed and 9 is the fastest.
Make sure that the flip mirror control (K) is in the “Up” position,
as shown the diagram above.
Enter
Key
Number
Keys
Arrow
Keys
Arrow
Keys
Scroll Up
Key
Scroll
Down
Key
L

TELESCOPE FEATURES
6
1 2
9
5
11
10
6
(on left
fork arm)
16
4
19
13
15
7
3
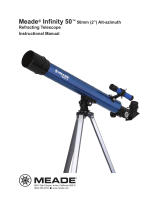
Features of the ETX-90AT, ETX-105AT,
and ETX-125AT are identical, with the
exception of the size of optical tube
and the type of viewfinder.
Fig. 2 (Inset): Computer Control Panel. (A) On/Off switch; (B)
Auxiliary ports; (C) Handbox port; (D) 12v connector; (E)
Power indicator light.
E
A
B
B C D
8
12
14
18
17
1 Eyepiece
2
Viewfinder
3 Holder Thumbscrew
4 90° Eyepiece Holder
5 Optical Tube
6 Vertical Lock
7 Fork Arms
8 Focus Knob
9 Horizontal Lock
10 Computer Control Panel
A. ON/OFF Switch
B. Auxiliary Ports (2)
C. Handbox Port
D. 12v
E. LED
11 Base Housing
12 Battery Compartment
(bottom of base)
13 Right Ascension (R.A.)/
Horizontal Setting Circle
14 Flip-Mirror Control Knobs
15 Photo Port
16 Declination (Dec.)/Vertical
Setting Circle
17 Viewfinder Alignment Screws
18 Viewfinder Alignment Bracket
19 Dust Cap
Fig. 1: The ETX-90AT Telescope.

MEADE ETX: YOUR PERSONAL
WINDOW TO THE UNIVERSE
The Meade ETX-90AT, ETX-105AT and the ETX-125AT are extremely versatile, high-
resolution telescopes. With pushbutton controls, automatic tracking of celestial
objects and diffraction-limited imaging, an ETX telescope may be all the telescope
ever required by many terrestrial and astronomical observers.
Your ETX telescope reveals nature in an ever-expanding level of detail. Observe the
feather structure of an eagle from 50 yards or study the rings of the planet Saturn from
a distance of 800 million miles. Focus beyond the Solar System and observe
majestic nebulae, ancient star clusters, remote galaxies and even stars recently
discovered to have planets orbiting about them. Meade ETX telescopes are
instruments fully capable of growing with your interest and are ideal for both the
casual observer and serious astronomer alike.
Telescope Controls
Become acquainted with all of these controls before attempting observations through
the telescope.
B Eyepiece: Place the supplied 26mm eyepiece into the 90° Eyepiece Holder (4,
Fig. 1
) and tighten in place with thumbscrew (3, Fig.1).
C
Viewfinder
ETX-90AT
:
8 x 21mm Viewfinder: Slide the eyepiece end of the viewfinder
through the
front of the viewfinder bracket (Fig. 18).
ETX-105AT, ETX-125AT
:
8 x 25mm Right-Angle Viewfinder: Slide the front cell
end of the viewfinder through the rear of the viewfinder bracket (Fig. 19).
D Eyepiece Holder Thumbscrew: Tightens the eyepiece in place. Tighten to a firm
feel only.
e 90° Eyepiece Holder: Holds the eyepiece upright for easy viewing.
F Optical Tube: The main optical component that gathers the light from distant
objects and brings this light to a focus for examination with the eyepiece.
G Vertical Lock: Controls the manual vertical movement of the telescope. Turning
the vertical lock counterclockwise unlocks the telescope enabling it to be freely
rotated by hand about the vertical axis. Turning the vertical lock clockwise (to a
firm feel only) prevents the telescope from being moved manually, but engages
the vertical motor drive clutch for Autostar operation. When polar aligned, the
vertical lock serves as the Declination or Dec. lock.
Note: The vertical lock knob is a knurled knob located on the fork arm to
the right of the focus knob (8, Fig. 1). Mounted beneath the knob is a cir-
cular scale without numbers. Do not confuse this scale with the Dec.
setting circle (
16, Fig. 1) on the opposite fork arm which has a numbered
scale used to locate astronomical objects.
H Fork Arms: Hold the optical tube in place.
Note: The telescope base and fork mount are designed with internal
“rotational limit stops.” The horizontal limit stop prevents the telescope
from rotating more than 630° to avoid damage to the internal wiring. The
vertical limit stop prevents the viewfinder from striking the fork mount
when the telescope is pointed upward just past 90° and prevents the
optical tube from striking the base if pointed downward more than 30°. Do
not force the telescope to move beyond these stops or damage to the
telescope will result.
i Focus Knob: Moves the telescope’s primary mirror in a finely-controlled motion
to achieve precise image focus. The ETX telescopes can be focused on objects
from a distance of about 11.5 ft (ETX-90AT) or 15 ft (ETX-105AT or
ETX-125AT) to infinity. Rotate the focus knob clockwise to focus on distant
objects and counterclockwise to focus on nearby objects.
Caution:
Using products other than
standard Meade accessories
may cause damage to the
telescope’s internal
electronics and may void the
Meade warranty.
7
B Want to learn more
about the eyepieces
available for your ETX
telescope?
See OPTIONAL
ACCESSORIES
, pages
43 to 44.
c Want to learn how to
attach the viewfinder to
your ETX telescope?
See VIEWFINDER,
pages 13 and 14.
G Want to learn more
about the Right
Ascension and
Declination setting
circles? See page 54.
Caution:
When loosening the Dec.
lock, be sure to support
the optical tube (5 Fig. 1).
The weight of the tube
could cause the tube to
swing through the fork
arms suddenly.

8
j Horizontal Lock: Controls the manual horizontal rotation of the telescope. Loosen
the horizontal lock counterclockwise to unlock the telescope, enabling it to be freely
rotated by hand about the horizontal axis. Tightening the horizontal lock clockwise
prevents the telescope from being rotated manually, but engages the horizontal
motor drive clutch for Autostar operation. When polar aligned, the horizontal lock
serves as the Right Ascension or R.A. lock.
1) Computer Control Panel (see Fig. 2)
A. ON/OFF Switch
: Turns the Computer Control Panel and Autostar
handbox ON or OFF.
Note: Always remove the batteries if they are not to be used for a long
period of time.
B. Auxiliary (AUX) Ports (2): Provide connection for current and future
Meade accessories. See
OPTIONAL ACCESSORIES
, page 43.
C. Handbox (HBX) Port: Plug the Autostar handbox into this port.
D. 12v: The 12v connector is designed to accept an external power
supply such as the optional #541 AC Adapter or the #607 Power Cord
(see OPTIONAL ACCESSORIES, page 43). When one of the external
power supply options is used, the internal batteries are disconnected
from the power circuit.
E. LED: The red power indicator light illuminates when power is supplied
to the connected handbox and to the telescope’s motor drive.
1! Base Housing: Supports the telescope for placement on a flat, level surface,
such as a tabletop or tripod.
1@ Battery Compartment (not shown, underneath base): Install eight
user-supplied AA batteries in this compartment. See page 12 for more
information.
1# Right Ascension (R.A.) Setting Circle: See page 54 for detailed information.
1$ Flip-Mirror and Flip-Mirror Control Knobs: ETX telescopes include an internal
mirror. With the flip-mirror control in the “up” position, as shown in
Fig. 3a, light is
diverted to the eyepiece. With the flip-mirror control in the “down” position, as
shown in Fig. 3b, light proceeds straight out the photo port for photography. See
PHOTOGRAPHY, page 40.
Note: The flip-mirror control is in the “up” position when the control is
vertical (perpendicular to the telescope tube).To place the flip-mirror in the
“down” position, turn the control until it is horizontal.
1% Photo Port: Attach any 35mm camera with a removable lens to this port using an
optional #64ST T-Adapter or attach the #932 Erecting Prism for correctly
oriented images through the eyepiece. See
OPTIONAL ACCESSORIES, page 43.
1^ Declination (Dec.) Setting Circle (on left fork arm): See page 54 for detailed
information.
1& Viewfinder Alignment Screws: Adjust these screws to align the viewfinder. See
pages 13 and 14 for more information.
1* Viewfinder Alignment Bracket: Attach the viewfinder to this bracket. See pages
13 and 14 for more information.
1( Dust Cap: Unthread the dust cap counterclockwise from the front lens of the
telescope.
1* Want to learn more about
attaching and aligning
the viewfinder?
See pages 13 and 14.
Definitions
Throughout this manual,
you will notice the terms
"Alt/Az," "Right
Ascension," and
"
Declination." Alt/Az or
more properly, altazimuth,
is frequently used to refer to
altitude or Declination (the
up-and-down vertical
movement of the telescope)
and
azimuth or Right
Ascension (the side-to-side
horizontal movement of the
telescope). Right Ascension
is abbreviated as "
R.A."
and Declination as "Dec."
Fig. 3a: Flip mirror control in
the “up” position.
Fig. 3b: Flip mirror control in
the “down” position.
1( Note: The dust cap
should be replaced
after each observing
session and the
power turned off to
the telescope. Verify
that any dew that
might have collected
during the observing
session has
evaporated prior to
replacing the dust
cap. Do not
overtighten.

9
Fig. 4: The Autostar Handbox.
AUTOSTAR FEATURES
1
2
4
7
9
J
8
3
5
6
L
K
Want to learn more about
downloading the latest
updates of Autostar
software from the
Meade website? See
pages 29 and 43.
Tour the Cosmos with Just the Push of a Button
Control of ETX Telescopes is through the operation of the standard-equipment #497
Autostar. Nearly all functions of the telescope are accomplished with just a few
pushes of Autostar’s buttons. Some of the major features of Autostar are:
• Automatically move the telescope to any of the 30,000 objects stored in the
database or manually enter the astronomical coordinates of any celestial object.
• Take a guided tour of the best celestial objects to view on any given night of the
year.
• Download the latest satellite data, guided tours and software revisions directly
from the Meade website (
www.meade.com) and share software with other
Autostar enthusiasts. (Requires optional #505 AstroFinder™ Cable Connector
Kit. See
OPTIONAL ACCESSORIES, page 43.)
• Access a glossary of astronomical terms.
• Calculate which eyepiece to use for optimum viewing of a celestial object.
Autostar provides control of virtually every telescope function. The Autostar handbox
has soft-touch keys designed to have a positive feel. The LCD (Liquid Crystal Display)
is backlit with red LEDs (Light Emitting Diodes) for easy viewing in the dark. The back-
lit display, key arrangement and sequential menu structure make Autostar extremely
user friendly.
1 LCD Display
2 ENTER Key
3 MODE Key
4 GO TO Key
5 Arrow Keys
6 Number Keys
7 Scroll Keys
8 Speed/? Key
9 Coil Cord
10 RS232 Port
11 Light key
12 Utility Light

10
B 2-Line LCD Display: This screen displays Autostar's menus and information
about the telescope.
•
Top line: Lists the primary menu.
• Bottom line: Displays other menus that may be chosen, menu
options, telescope status or information about a function that is being
performed.
c ENTER Key: Press to go to the next menu level or to choose an option in a
menu. The ENTER key is similar to the RETURN or ENTER key on a computer.
See
MOVING THROUGH AUTOSTAR’S MENUS, page 17 and AUTOSTAR MENUS,
page 24.
d MODE Key: Press to return to the previous menu or data level. The top menu
level is “Select Item." The MODE key is similar to the ESCAPE key on a com-
puter.
Note: Pressing MODE repeatedly while in the “Select Item” level moves
Autostar to the topmost screen: “Select Item: Object.”
Note: If MODE is pressed and held for two seconds or more, information
about the telescope's status displays. When the status displays, press
one of the Scroll keys (7, Fig. 2) to display the following information:
• Right Ascension and Declination (astronomical) coordinates
• Altitude (vertical) and Azimuth (horizontal) coordinates
• Local Time and Local Sidereal Time (LST)
• Timer and Alarm Status
• Date
• Site coordinates
• Battery status
Press MODE again to return to the previous menu.
e GO TO Key: After the telescope is aligned, press to slew (move) the telescope to
the coordinates of the currently selected object. While the telescope is
slewing, the operation may be aborted at any time by pressing any key except
GO TO. Pressing GO TO again resumes the slew to the object. Also, press
during the alignment or GO TO procedures to activate a "spiral search."
f Arrow Keys: The Arrow keys have several functions. Press an Arrow key to slew
the telescope in a specific direction (up, down, left and right), at any one of nine dif-
ferent speeds. See
SLEW SPEEDS, page 17. Use the Up and Down Arrow keys to
move the telescope vertically up and down. The Left Arrow key rotates the
telescope horizontally counterclockwise, while the Right Arrow key rotates it clock-
wise.
Also, use the Arrow keys to scroll through numbers 0 through 9 and the alpha-
bet. The Down Arrow key begins with the letter "A;" the Up Arrow key begins with
digit "9."
Additionally, use the Arrow keys to to move the cursor across the display: Use the
Right or Left Arrow key to move the cursor from one number to the next in the
display.
g Number Keys: Press to input digits 0 to 9. To change the speed at which the
telescope moves (known as the “slew” speed) press a NUMBER KEY from 1
through 9. 1 is the slowest speed and 9 is the fastest.
h Scroll Keys: Press to access options within a selected menu. The menu is
displayed on the first line of the screen. Options in the menu are displayed, one
at a time, on the second line. Press the Scroll keys to move through the options.
Press and hold a Scroll key to move quickly through the options.
The Scroll keys also control the speed of text scrolling on the Autostar display.
When text is scrolling, press and hold the Up Scroll key for a faster display speed
and the Down Scroll key for a slower display speed.
e Want to learn more
about using the GO TO
function
? See page 20.
Want to learn how to
perform a spiral
search? See page 20.
g Want to learn more
about changing slew
speeds? See page 17.

11
i ? Key: Press to access the "Help" file. "Help" provides on-screen information on
how to accomplish whatever task is currently active.
Press the ? key and then follow the prompts on the display to access details of
Autostar functions in the Help feature. The Help system is essentially an
on-screen instruction manual.
If you have a question about an Autostar operation,
e.g., INITIALIZATION, ALIGN-
MENT, etc., press the ? key and follow the directions that scroll on the
second line. When satisfied with the Help provided, press MODE to return to the
original screen and continue with the chosen procedure.
j RS232 Port: Plug in optional cable to download the latest satellite data and
software revisions directly from the Meade website (
www.meade.com). You can
also share software with other Autostar enthusiasts or control your telescope
remotely from your PC. (Requires optional #505 AstroFinder™ Software and
Cable Connector Kit. See
OPTIONAL ACCESSORIES, page 43.)
1) Coil Cord Port/Coil Cord: Plug one end of the supplied Autostar coil cord into
this port located at the bottom of the handbox and the other end into the HBX port
of the Computer Control Panel.
1! Light/0 Key: Press to turn on Utility light (12, Fig. 4).
1@ Utility Light: Use this built-in red light to illuminate star charts and accessories
without disturbing your eye's adaptation to darkness. Press "0" to turn the light on
and off.
ETX TIPS
Join an Astronomy Club, Attend a Star Party
One of the best ways to increase your knowledge of astronomy is to join an astronomy
club. Check your local newspaper, school, library or telescope dealer/store to find out if
there’s a club in your area.
At club meetings, you will meet other astronomy enthusiasts with whom you will be able
to share your discoveries. Clubs are an excellent way to learn more about observing the
sky, to find out where the best observing sites are and to compare notes about
telescopes, eyepieces, filters, tripods and so forth.
Often, club members are excellent astrophotographers. Not only will you be able to see
examples of their art, but you may even be able to pick up some “tricks of the trade” to
try out with your
ETX telescope. See page 40 for more information about photography
with the
ETX.
Many groups also hold regularly scheduled Star Parties at which you can check out and
observe with many different telescopes and other pieces of astronomical equipment.
Magazines such as Sky & Telescope and Astronomy print schedules for many popular
Star Parties around the United States and Canada.

12
GETTING STARTED
Fig. 5: Battery installation.
Fig. 6: Spread tripod legs.
Fig. 7: Slide spreader on rod.
Parts Listing
Getting the telescope ready for first observations requires only a few minutes. When
first opening the packing box, note carefully the following parts:
• The ETX Astro Telescope with fork mount system.
• #497 Autostar handbox with coil cord.
• One or more eyepieces, packed in plastic storage containers.
• Hex-wrench, packed with the instruction manual. See
MAINTENANCE,
page 45.
• #884 Deluxe Field Tripod; two attachment knobs; spreader tray with sepa-
rate spring, washers (2) and tension knob; leg extension lock knobs.
How to Assemble Your Telescope and Tripod
Assembly of the ETX telescope requires eight AA-size (user-supplied) batteries.
1. Remove the ETX telescope from its packaging and place it on a sturdy surface.
Place the ETX on its side and remove the battery compartment cover from the
underside of the drive base. Insert eight (user-supplied) AA-size batteries into the
battery compartment oriented as shown in the battery compartment. Replace the
cover and return the telescope to an upright position.
Caution: Use care to install batteries as indicated by the diagrams in the
battery compartment. Follow battery manufacturer's precautions. Do not
install batteries backwards or mix new and used batteries. Do not mix
battery types. If these precautions are not followed, batteries may
explode, catch fire or leak. Improperly installed batteries void your Meade
warranty. Always remove the batteries if they are not to be used for a long
period of time.
Note: Autostar does not require batteries; the telescope’s batteries
supply power to Autostar.
2. Assemble the #884 Deluxe Field Tripod:
Step a: Spread the tripod (1, Fig. 6) legs apart to a fully open position.
Step b: Slide the spreader tray (2, Fig. 7) onto the central threaded rod.
Step c: Slide a washer, followed by the spring, another washer and the
tension knob (3, Fig. 8) onto the threaded rod. Tighten the tension knob
to a firm feel.
Step d: Adjust the height of the tripod by loosening the leg lock knobs (4, Fig. 9)
and adjusting the height of the inner leg extensions. Then retighten the lock
knobs.
3. Mount your telescope in the altazimuth (alt/az) mode. If you wish to mount your
telescope in the equatorial mode, see EQUATORIAL ALIGNMENT, page 51.
Note: Throughout this manual, you will notice the term "Alt/Az," or more
properly, altazimuth.This term is frequently used to refer to altitude or the
up-and-down vertical movement of the telescope). Azimuth refers to the
side-to-side horizontal movement of the telescope.
Step e: Loosen the latitude control latch (6, Fig. 10) and lift up the tilt-plate (5, Fig.
10) so that you can easily access the underside of the plate. Relock the
latitude control latch, so the assembly doesn't slip while you are attaching
the telescope.
Step f: Line up the mounting hole (7, Fig. 11) on the base of the telescope
marked "High Latitude Leg" with the attachment knob (
8, Fig. 11) that is
closest to the latitude control bar (
9, Fig. 11). Line up the other
mounting hole with the attachment knob at the bottom of the tilt-plate.
Thread both attachment knobs into the base of the telescope. Tighten to
a firm feel only. (
See Fig. 12.)
Step g: Unlock the latitude control latch (10, Fig. 13) and lower the tilt-plate until
it is level (push the tilt-plate down until it stops; this is the level
position). Lock the latitude control latch.
Batteries
Cover
1
2
2
4
Fig. 8: Tension knob assembly.
Fig. 9: Adjust tripod height.
3

13
4. Place the 26mm eyepiece (12, Fig. 15) into the eyepiece holder on the
telescope and tighten the attachment thumbscrew (
13, Fig. 15) to a "firm feel" only.
Make sure that the flip-mirror control (
14, Fig. 15) is in the “up” position, as shown
in the above photo. See page 8, for more information. Remove the dust cover (
15,
Fig. 15
) from the end of the telescope tube.
5. Make sure that the computer control panel power switch (A, Fig. 2) is in the OFF
position. Remove the Autostar handbox and the coiled cord from the packing
materials. Plug one end of the cord into the HBX port (
C, Fig. 2)and the other end
of the coiled cord into the coiled cord port at the bottom of Autostar handbox, as
shown above.
6. Tighten (to a "firm feel" only, do not overtighten) the vertical lock (Fig. 6) and the hor-
izontal lock (
Fig. 9)
.
Attaching the Viewfinder
ETX-90AT: 8 x 21mm Viewfinder: Slide the eyepiece end of the viewfinder
through the front of the viewfinder bracket (16, Fig. 18).
ETX-105AT or ETX-125AT: 8 x 25mm Right-Angle Viewfinder: Slide the front
cell end of the right-angle viewfinder through the rear of the viewfinder bracket
(17, Fig. 19).
Unthread the six alignment screws slightly to fit the viewfinder through the
bracket. With the viewfinder in place, tighten the six alignment screws to a firm feel
only against the viewfinder tube.
Using The Viewfinder
As with most astronomical telescopes, the ETX model telescopes present a fairly
narrow field of view to the observer. As a result it is sometimes difficult to locate and
center objects in the telescope’s field of view. The viewfinder, by contrast, is a low-
power, wide-field sighting scope with crosshairs that let you easily center objects in
the eyepiece of the main telescope’s field of view. The telescope viewfinder is a great
help in locating faint astronomical objects before you begin observing through the
telescope eyepiece.
ETX-90AT 8 x 21mm Erect-Image Viewfinder:
Standard equipment with the ETX-90AT, the 8 x 21mm Erect-Image Viewfinder has
8-power magnification and an aperture of 21mm. This viewfinder presents a
correctly oriented image both up-and-down and left-to-right.
ETX-105AT or ETX-125AT 8 x 25mm Right-Angle Viewfinder:
Standard equipment with the ETX-105AT and ETX-125AT, the 8 x 25mm Right-Angle
Viewfinder has 8-power magnification and an aperture of 25mm. This viewfinder
presents a correctly oriented image up-and-down, but is reversed left-for-right.
Fig. 12: Attach telescope to
tripod.
Fig. 11: High latitude leg
mounting hole and
corresponding attachment
knob.
Fig. 10: Loosen control latch .
Fig. 15: Insert eyepiece.
Fig. 16: Tighten vertical
lock.
Fig. 17: Tighten horizontal
lock.
Fig. 13: Level tilt-plate.
Fig. 14: Handbox HBX port.
Fig. 18: ETX-90 Viewfinder Installation.
Fig. 19: ETX-105/-125 Viewfinder
5
6
7
8
8
J
L
L
M
N
O
P
Q
9

14
Focusing the Viewfinder
The ETX model viewfinders are pre-focused at the factory. Individual eye variations
may require that the viewfinder be re-focused. To check the focus, point the
viewfinder at a distant terrestrial (land) object such as a telephone pole or light pole
and look through the viewfinder. If the viewfinder image is not in sharp focus, follow
the procedure below that applies to your telescope model.
ETX-90AT
1. Remove the viewfinder by slightly unthreading the six alignment screws (4, Fig.
20a) and slipping it out of the bracket.
2. Loosen the knurled lock-ring (2, Fig. 20a) located near the viewfinder’s front lens
cell (1, Fig. 20). Unthread this ring (counterclockwise, as seen from the eyepiece-
end of the viewfinder) by several turns.
3. Look through the viewfinder and focus on a distant object. Slowly rotate the front
lens cell in one direction or the other, until the object appears sharp. One or two
rotations of the lens may have a significant effect on image focus.
4. Lock the focus in place by threading the knurled lock-ring
clockwise up against the
viewfinder’s lens cell.
5. Replace the viewfinder into the viewfinder bracket. Gently tighten the six alignment
screws. Proceed with
Aligning the Viewfinder.
ETX-105AT or ETX-125AT
Turn the focus ring (6, Fig. 20b) at the base of the viewfinder eyepiece (7, Fig. 20b)
in either direction until a sharp focus is reached.
Aligning the Viewfinder
In order for the viewfinder to be useful, it must first be aligned with the main telescope,
so that both the viewfinder and the main telescope are pointing at precisely the same
location. To align the viewfinder:
1. Turn the three
rear alignment screws of the viewfinder bracket (4, Fig. 20a) so that
the viewfinder tube is roughly centered within the viewfinder bracket.
Tip: Do not overtighten the alignment screws. When tightening one screw it may
be necessary to loosen one or both of the two other alignment screws.
2. Point the main telescope at some tall, well-defined land object, such as the top of
a telephone pole. Center the object, as precisely as possible, in the SP 26mm
eyepiece's field of view. Tighten the vertical and horizontal locks (6 and 9, Fig. 1)
so that the tube cannot move and the object remains centered (1, Fig. 21).
3. While looking through the viewfinder, turn one or more of the three
front
viewfinder alignment screws (4, Fig. 20a), until the crosshairs of the view-finder
point at precisely the
same position as the
view through the
eyepiece of the main
telescope (
2, Fig. 21).
Check that the viewfinder’s
crosshairs and the main
telescope are now pointing
at precisely the same
object. The viewfinder is
now aligned to the main
telescope. Unless the
alignment screws are
disturbed or the viewfinder
jarred, the viewfinder
should remain aligned
indefinitely.
Fig. 20a: ETX-90 Viewfinder:
(1) Front lens cell;
(2) Knurled lock-ring;
(3) Viewfinder eyepiece;
(4) Alignment screws;
(5) Viewfinder bracket;
Fig. 20b: ETX-105/-125
Viewfinder:
(6) Focus ring;
(7) Viewfinder eyepiece
Fig. 21: Aligning the Viewfinder.
1
2
(before
alignment)
(after
alignment)
View through the
telescope eyepiece
View through the
viewfinder
1
7
6
2
3
4
5

15
Fig. 23a & 23b: Jupiter: Examples
of the right amount of
magnification and too much
magnification.
Fig. 22: Meade Super
Plössl eyepieces.
Too Much Power?
Can you ever have too much power? If the type of power you’re referring to is
eyepiece magnification, yes, you can! The most common mistake of the
beginning observer is to “overpower” a telescope by using high magnifications
which the telescope and atmospheric conditions cannot reasonably support.
Keep in mind that a smaller, but bright and well-resolved image is far superior to
one that is larger, but dim and poorly resolved (see Figs. 23a and 23b). Powers
above 300X should be employed only under the steadiest atmospheric
conditions.
Autostar can calculate the best eyepiece for you to use. Try out the “Eyepiece
Calc” feature in the Utilities menu.
Most observers should have three or four additional eyepieces to achieve the full
range of reasonable magnifications possible with the ETX telescopes. See
OPTIONAL ACCESSORIES, page 43.
ETX TIPS
Choosing an Eyepiece
The magnification or power, at which a telescope is operating is determined by two
factors: the focal length of the telescope and the focal length of the eyepiece.
Telescope Focal Length is the distance that light travels inside the telescope before
reaching a focus. In the mirror-lens design of the ETX models, the focal length is
compressed by the telescope’s secondary mirror, so that a long focal length is housed
in the short ETX optical tube. For example, the ETX-90AT’s focal length is 1250mm
or about 49”. This means that if the ETX–90AT were a classical refracting-type of
telescope, the optical tube would be more than four feet long instead of the
ETX–90AT's compact 11” tube length.
Eyepiece Focal Length is the distance light travels inside the eyepiece before
reaching focus. Focal length is usually printed on the side of the eyepiece, for example,
26mm. Low-power eyepieces are typically available in 26mm, 32mm and 40mm sizes
(see OPTIONAL ACCESSORIES, page 43). The low-power eyepiece provided with your
ETX is designed to provide a wide, comfortable field of view with high image resolution.
Calculating Magnification: On a telescope, such as the ETX, different eyepiece
focal lengths are used to achieve different magnifications, from low to high. A 26mm
eyepiece yields 48X (“48-power”) on the ETX-90AT, 57X on the ETX-105AT and 73X
on the ETX-125AT. A variety of powers may be obtained with the addition of optional
eyepieces as well as the #126 2X Barlow Lens which doubles the power of an eye-
piece (see
OPTIONAL ACCESSORIES, page 43). To calculate magnification, divide the
focal length of the telescope’s optical tube by the focal length of the eyepiece. For
example:
Telescope Focal Length divided by Eyepiece Focal Length = Power
1250mm divided by 26mm = 73X
With Barlow: 73 x 2 = 146X
The eyepiece power or magnification is therefore 73X and 146X with the Barlow.
Most observers should have 3 or 4 eyepieces plus the #126 2X Barlow to achieve the
full range of reasonable magnifications possible with ETX models.
Tip: If you plan on
viewing using higher
magnification eyepieces,
first locate, center and
focus the object using a
low-power eyepiece
(e.g., 26mm eyepiece).
Then remove the low-
power eyepiece and
replace it with a higher-
power eyepiece; the
object should still be
centered in the field of
view. Objects are much
easier to locate and
center at lower powers;
higher powers are
employed simply by
changing eyepieces.

16
OBSERVING
Observing by Moving the Telescope Manually
If you wish to observe a distant land object, such as a mountain top or a bird, you can
observe by merely pointing the telescope and looking through the eyepiece.
1. Loosen the telescope’s horizontal lock (
9, Fig. 1) and vertical lock (6, Fig. 1).
2. Move your telescope to observe distant street signs, mountains, trees and other
structures. Use your viewfinder to help sight-in on an object.
3. Center the object in the viewfinder’s crosshairs and then in the telescope
eyepiece. When the object is centered in your eyepiece, remember to re-tighten
the horizontal and vertical locks.
4. Practice focusing objects using the focus knob (
8, Fig. 1).
5. Once you get a feel for how your telescope moves and focuses, try to view
something more challenging, like a bird or a distant moving train.
You can also observe stars and objects in the night sky using this method, but note
that objects begin to slowly drift across the eyepiece field. This motion is caused by
the rotation of the Earth. As you become familiar with the Autostar handbox operation,
you can counteract the drift using the automatic tracking feature (see
TO TRACK AN
OBJECT AUTOMATICALLY, page 17) or by using Autostar's GO TO capabilities (see
GO TO SATURN, page 20).
Terrestrial Observing
ETX telescopes are excellent high-resolution terrestrial (land) telescopes. Viewing
terrestrial objects requires looking along the Earth's surface through heat waves.
These heat waves often cause degradation of image quality. Lower power eyepieces,
like the 26mm, magnify these heat waves less than higher power eyepieces (such as
a 9mm eyepiece). Therefore, lower power eyepieces provide a steadier, higher qual-
ity image. If the image is fuzzy or ill-defined, reduce to a lower power eyepiece, where
the heat waves do not have such an effect on image quality. Observing in early morn-
ing hours, before the ground has built up internal heat, produces better viewing
conditions than during late afternoon hours.
Observing Using Autostar Arrow Keys
You may observe land and astronomical objects using Autostar's Arrow keys to move
the telescope.
1. Tighten the horizontal and vertical locks (
9 and 6, Fig. 1).
2. Make sure that Autostar’s coiled cord is connected to the computer control
panel’s HBX port (
C, Fig. 2).
3. Flip the Power Switch (
A, Fig. 2) on the computer control panel to the ON
position. A copyright message lights on Autostar’s LCD display, followed by a
warning not to look at the Sun. Press the Autostar key prompted by the message
when you are done reading. See page 9 to 11 for more information about
Autostar’s keys.
4. A “Getting Started” message displays. Press ENTER to skip this message.
5. Keep pressing the ENTER key until "Country/State" displays. (Ignore the
prompts requesting "Date" and "Time" for now—these functions will be explained
later).
6. When “Country/States” displays, press either one of the SCROLL KEYS to cycle
through the choices on the list. When your state or country appears on the list, press
ENTER.
7. “Cities” displays. Using the SCROLL KEYS, cycle through the list of cities and press
ENTER when your city or the city closest to your observing site displays.
8. Finally “Telescope Models” displays. Using the SCROLL KEYS, cycle through the
list of telescope models and press ENTER when your model displays.
9. The display now displays "Setup: Align." .
You can now use the ARROW KEYS to slew (move) the telescope up, down, right or
left. Practice using the ARROW KEYS to center objects in the eyepiece.
To change the speed at which the telescope moves (known as the “slew” speed),
press a NUMBER KEY from 1 through 9. 1 is the slowest speed and 9 is the fastest.
See
SLEW SPEEDS on the following page.
NEVER point
the telescope
directly at or
near the Sun at
any time! Observing the
Sun, even for the smallest
fraction of a second, will
result in instant and
irreversible eye damage,
as well as physical
damage to the telescope
itself.
Do not look through the
telescope's eyepiece or
viewfinder while it is rap-
idly moving. Children
should always have adult
supervision while
observing.
Note:
Viewing conditions vary
widely from night-to-night
and site-to-site. Turbulence
in the air, even on an
apparently clear night, can
distort images. Low-power
eyepieces, such as the
26mm supplied with your
telescope, are better suited
to resolving images in poor
viewing conditions.
Important Note:
Autostar requests the
Country/State, City and
Telescope Model
information only the first
time
Autostar is activated.
Subsequently, Autostar
uses the location and
model number you have
chosen.
If you wish to change this
information, use the
"Telescope Model" and
"Site" options in the Setup
menu. See pages 28, 29
and 31 for more
information.

17
Slew Speeds
Autostar has nine slew speeds that move the optical tube at rates that are directly
proportional to the sidereal rate and have been calculated to accomplish specific
functions. Press the Number key to change the slew speed.
The nine available speeds are:
Number Key 1 = 1x = 1 x sidereal (0.25 arc-min/sec or 0.004°/sec)
Number Key 2 = 2x = 2 x sidereal (0.5 arc-min/sec or 0.008°/sec)
Number Key 3 = 8x = 8 x sidereal (2 arc-min/sec or 0.033°/sec)
Number Key 4 = 16x = 16 x sidereal (4 arc-min/sec or 0.067°/sec)
Number Key 5 = 64x = 64 x sidereal (16 arc-min/sec or 0.27°/sec)
Number Key 6 = 128x = 30 arc-min/sec or 0.5°/sec
Number Key 7 = 1.0° = 60 arc-min/sec or 1.0°/sec
Number Key 8 = 1.5° = 90 arc-min/sec or 1.5°/sec
Number Key 9 = Max = approx. 4.5°/sec
Speeds 1, 2 or 3: Best used for fine centering of an object in the field of view of a
higher power eyepiece, such as a 9mm eyepiece.
Speeds 4, 5 or 6: Enable centering of an object in the field of a low-to-moderate
power eyepiece, such as a 26mm.
Speeds 7 or 8: Best used for rough centering of an object in the viewfinder.
Speed 9: Moves the telescope quickly from one point in the sky to another.
Astronomical Observing
Used as an astronomical instrument, your telescope has many optical and electro-
mechanical capabilities. It is in astronomical applications where the high level of
optical performance is readily visible. The range of observable astronomical objects
is limited only by the observer’s motivation.
Observe the Moon
Point your telescope at the Moon (note that the Moon is not visible every night) and
practice using the Arrow keys and the slew speeds to view different features. The
Moon contains many interesting features, including craters, mountain ranges and fault
lines. The best time to view the Moon is during its crescent or half phase. Sunlight
strikes the Moon at an angle during these periods and adds a depth to the view. No
shadows are seen during a full Moon, making the overly bright surface appear flat and
rather uninteresting. Try using a neutral density Moon filter when observing the Moon
(see
OPTIONAL ACCESSORIES, page 43). Not only does it cut down the Moon's bright
glare, but it also enhances contrast, providing a more dramatic image.
To Track an Object Automatically
As the Earth rotates beneath the night sky, the stars appear to move from East to
West. The speed at which the stars move is called the sidereal rate. You can setup
your telescope to move at the sidereal rate so that it automatically tracks (follows) the
stars and other objects in the night sky. If the telescope is not tracking an
astronomical object, the object will drift out of the eyepiece field of view. The tracking
function automatically keeps an object centered in the telescope’s eyepiece.
To automatically track objects, you need to learn how the Autostar keypad operates
in order to move through its menus. You'll need to initialize and align your telescope.
Moving Through Autostar’s Menus
The Autostar database is organized in levels for quick and easy navigation.
• Press ENTER to go deeper into Autostar's menu levels.
• Press MODE to move back toward the top menu level.
• Press the Scroll keys to move up and down through the options
available for each level.
• Press the Arrow keys to enter characters and digits. The Arrow keys
are also used to move the telescope.

18
Definition:
Initialization is a
procedure that makes sure
that Autostar operates
correctly. When you first
use Autostar, it doesn't yet
know where the observa-
tion location site is or the
time or date of the
observation session.
During the
alignment
procedure, you will enter
time, date and observing
location
Autostar Uses this
information to precisely
calculate the location of
celestial objects (such as
stars and planets) and to
move your telescope
correctly for various
operations.
Tip:
When multiple choices are
available within an Autostar
Menu option, the current
option is usually displayed
first and highlighted by a
right pointing arrow (>).
Initializing Autostar
This section describes how to initialize Autostar. Perform this procedure the first time
you use Autostar or after performing a Reset (see
RESET, page 30). Autostar will ask
you to enter the current time and date and to choose your observing location and your
telescope’s model number from the list it displays.
1. Tighten the vertical and horizontal locks (
6 and 9, Fig. 1) if necessary.
2. Make sure that Autostar is connected to the HBX port (
C, Fig. 2) of the
telescope’s computer control panel.
3. Flip the telescope power switch (
A, Fig. 2) to the ON position.
The Autostar screen displays a copyright message, followed by a short beep.
Then Autostar takes a few moments to start up the system.
4. A message displays that warns not to look at the Sun. At the end of this message,
press the key prompted by Autostar to signify that the message has been read
and understood.
5. The Getting Started menu displays a scrolling message. Press ENTER (
2, Fig.
4
) to bypass the Help tutorial and continue with initialization.
6. Autostar then requests the current date. Use the Number keys (
6, Fig. 4) to enter
the digits for the date. Use the Arrow keys (
5, Fig. 4) to move back and forth from
one number to the next in the day display. Next, use the Right Arrow key to move
to the month position. Use the Scroll keys (
7, Fig. 4) to cycle through the list of
months.
When the
current month is displayed, use the Right Arrow to move to the year
position. Use the Number keys to enter all four digits of the current year. Press
ENTER when the entire date has been entered.
7. Autostar then requests the current time. Use the Number keys to enter the time.
(Use a "0" for the first digit if it is less than 10.
) Use the Arrow keys to move from
one number to the next. Press one of the Arrow keys to scroll to "AM" or "PM." If
you select the "blank" choice that follows "AM" and "PM," the clock displays time
in a 24-hour (military time) format. Press ENTER to start the clock.
8. Autostar then requests the status of Daylight Savings Time. Press a Scroll key to
toggle between the YES/NO settings. Select the desired setting by pressing
ENTER when the correct setting displays.
Note: Daylight Savings Time may be referred to by a different name in
various areas of the world.
9. Autostar then requests the country or state (listed alphabetically) of the
observing site. Use the Scroll keys to cycle through the database of countries,
states and provinces. Press ENTER when the correct location displays.
10. Autostar then requests the city (listed alphabetically) closest to the observing
site. Use the Scroll keys to cycle through the database of cities. Press ENTER
when the closest city displays.
11. Autostar then requests the telescope model number. Use the Scroll keys to cycle
through the database of models. Press ENTER when your model number dis-
plays.
12. System initialization is complete and the screen reads "Setup: Align."
Easy (Two-Star) Align
The fastest and easiest way to locate celestial objects is to use the alt/az Easy Align.
Autostar is in the alt/az mode when you first power it on, so you do not need to select
this mode, unless you have changed this setting in the Telescope/Mount menu. If you
wish to align your telescope in the equatorial (polar) mode, see
EQUATORIAL
ALIGNMENT, page 51.
Autostar automatically picks two stars from its database for the Easy Align procedure.
During this procedure, Autostar moves the telescope to a first alignment star and the
user is asked to center the star in the eyepiece. The process is then repeated with a
second star to complete the alignment.
Important Note:
Autostar requests the
Country/State, City and
Telescope Model
information
only the first
time Autostar is activated.
Subsequently, Autostar
uses the location and
model number you have
chosen.
If you wish to change this
information, use the
"Telescope Model" and
"Site" options in the Setup
menu. See pages 28, 29
and 31 for more informa-
tion.

19
Which One’s the Alignment Star?
If you’re not familiar with objects in the night sky, how can you be sure if the star
in your eyepiece is really the alignment star?
The rule of thumb is that an alignment star is usually the brightest star in that
area of the sky. If you perform a GO TO to an alignment star and you're not sure
if you have located the alignment star or it isn't in the eyepiece, look through your
viewfinder. When you view an alignment star in the viewfinder, it stands out
dramatically from the rest of the stars in that portion of the sky. The viewfinder
will help you locate a star more quickly than the eyepiece, because it has a much
wider field of view than the eyepiece. Using Autostar, set the slew speed to 6
(push Number key 6) or higher and use the Arrow keys to center the alignment
star in the viewfinder. If your viewfinder has been aligned with the telescope, the
alignment star should now be in the eyepiece. Set the slew speed to 4 or less
and center the star in the eyepiece. Also see the
SPIRAL SEARCH tip, page 20.
ETX TIPS
Important Note: Before aligning the telescope, you MUST first initialize
Autostar, as described in
INITIALIZING AUTOSTAR, page 18. See MOVING
THROUGH AUTOSTAR’S MENUS, page 17, for a description of how
Autostar’s keys operate.
How to perform the Easy Align Procedure
If you have just performed the initialization procedure, go to step 6.
1. Sun Warning: Press the key prompted by Autostar to accept.
2.
Getting Started: Press ENTER to continue.
3. Enter Date: Enter the current date, then press ENTER.
4. Enter Time: Enter the current time. Select "AM," "PM," or 24-hour clock (blank).
Then press ENTER.
5.
Daylight Savings: Select “Yes” or “No,” then press ENTER.
6. Alignment Option Screen: “Setup: Align” displays. Press ENTER.
7. Select Alignment: “Align: Easy” displays. Press ENTER.
8. Set Home Position: Autostar then prompts you to set the telescope in the Alt/Az
Alignment home position (if necessary). To set your telescope in the "Alt/Az"
home position:
• Loosen the telescope’s vertical lock (
6, Fig. 1).
• Level the tripod head. See Step #3g, page 12. Level the optical tube by
lining up 0° on the Dec setting circle (
16, Fig. 1) with the Dec pointer
(the small molded triangle under the setting circle).
• Retighten the vertical lock (6, Fig. 1) to a firm feel only.
• Unlock the horizontal lock (9, Fig. 1).
• Grasp the telescope by a fork arm and rotate the telescope counterclockwise
until it stops.
• Turn the telescope clockwise until a fork arm is directly over the computer
control panel.
• Re-lock the R.A. lock (
9, Fig. 1).
• Lift and rotate the telescope and tripod until they point North. Press ENTER.
See LOCATING THE CELESTIAL POLE, page 53 for more information.
9 . Star Alignment: Autostar chooses two stars to align upon. When the telescope
slews to the first star for alignment, it may not appear in the field of view in the
eyepiece. Try to locate the star using the viewfinder (
2, Fig. 1). The alignment star
should be easily recognized and be the brightest star in the area of the sky where
the telescope is pointing. Look through the viewfinder and use the Arrow keys to
move the telescope until the star is visible. Then center the star in the eyepiece.
Press ENTER. Repeat the procedure for the second alignment star.
Important Note:
The first time you use
your telescope or if you
are experiencing any
problems with pointing
accuracy, follow the
procedure described in
APPENDIX C: TRAINING
THE DRIVE
, page 56, to
insure accurate pointing
and tracking.
Tip:
The GO TO key also
allows you to perform a
"
spiral search." A spiral
search is useful when the
telescope slews to an
object, but that object is
not visible in the eyepiece
after the telescope
finishes its search. (This
sometimes occurs during
an alignment procedure.)
Press GO TO when the
telescope stops slewing.
The telescope begins to
move in a spiral pattern at
a very slow speed around
the search area. Look
through the
eyepiece and when the
object does become
visible, press MODE to
stop the spiral search.
Then use the Arrow keys
to center the object.

20
Important Note:
While performing the
automatic tracking
procedure, only use the
Arrow keys to move the
telescope. Once the
telescope has been
aligned, do not loosen
the telescope’s vertical or
horizontal locks (
6 and 9,
Fig. 1) or move the base
manually or alignment
will be lost.
When the procedure is performed correctly, "Alignment Successful" displays. If
Autostar does not display this message, perform this procedure again.
NOTE: Autostar locates alignment stars based on the date, time and loca-
tion entered. The alignment stars may change from night to night. All that
is required is for the observer to center the selected stars in the eyepiece
when prompted.
Observe a Star using the Automatic Tracking Feature
In this example, the Autostar Arrow keys are used to find a star and then Autostar's
tracking feature automatically keeps the star centered in your
telescope's eyepiece. Make sure you have initialized and aligned your telescope
before you try out this feature (see pages 18 and 19).
1. Once you’re telescope has been aligned, “Align Successful” and then “Select Item:
Object” display. Push the Scroll Up key once and “Select Item: Setup” displays
2. Press ENTER. “Setup: Align” displays.
3. Press the Scroll Down key repeatedly until "Setup: Targets" displays. Press
ENTER.
4. "Targets: Terrestrial" displays. Press one of the Scroll keys once. "Targets:
Astronomical" now displays.
5. Use the Arrow keys (
5, Fig. 2) to locate a bright star in the night sky. Use the
viewfinder (
2, Fig. 1) to help line up on the star. You may choose any unob-
structed, bright star for the purposes of this example. Use Autostar's Arrow keys
to center the star in the eyepiece. Once the star is centered, press ENTER to
select "Astronomical." The telescope's tracking motors then engage. It may take
the tracking motors several seconds to begin tracking. When they do, it may be
necessary to once again center the star in the eyepiece. The tracking motors will
then keep the star you have chosen in the center of the eyepiece.
6. Press and hold the ENTER key for a few seconds and then release to stop track-
ing. You may repeat the procedure to locate another star or object using the
Arrow keys. Then press ENTER to re-engage the tracking motors.
Go To Saturn
After performing the Easy Align procedure, the motor drive begins operating and the
telescope is aligned for a night of viewing. Objects in the eyepiece will maintain their
position even though the Earth is rotating beneath the stars.
This exercise demonstrates how to select a celestial object, the planet Saturn, for
viewing from Autostar’s database.
NOTE: Saturn is not visible the entire year and you may need to choose
another object from Autostar's database; however, the procedure, as
described below, remains the same. If Saturn (or any other object) is not
currently visible in the sky, Autostar displays “Below Horizon.”
1. After the telescope is aligned, “Select Item: Object” displays. If “Select Item:
Object” is not displayed on your handbox, keep pressing MODE until it does dis-
play. Press ENTER.
2. “Object: Solar System” displays. Press ENTER.
3. “Solar System: Mercury” displays. Keep pressing the Scroll Down key until “Solar
System: Saturn” displays (or you may choose another object from the Solar
System list if Saturn is not visible).
4. Press ENTER. “Calculating” displays. Then “Saturn” and a set of coordinates
displays. Note that Saturn’s (and other planets’) coordinates change throughout
the year.
5. Press GO TO. “Saturn: Slewing...” displays and the telescope slews until it finds
Saturn. You may need to use the Arrow keys to center Saturn precisely in the
eyepiece. Autostar then automatically moves the telescope so that it "tracks"
Saturn (or whatever other object you may have chosen); i.e., Saturn remains
centered in the eyepiece.
/